Curtain tiebacks are an interior detail that adds zest to a room. Clips are used to create a unique design. They sell different types of curtain tiebacks. You can buy them in stores or make them yourself; the main thing is to know how to properly make curtain clips with your own hands so that they are beautiful and presentable. With this accessory, especially if you make it yourself, the room will look unusual, individual and interesting.
Types of tiebacks, clips and hairpins
Clamps are distinguished by their functions, material, and shape. Different curtains have their own curtain fasteners. You can often see tiebacks made from laces with tassels or other decorations at the end. Instead of a cord, chains of beads and ribbon are used. Smooth long curtains are decorated with neat ribbons without patterns, matching the shade with the fabric. Curtains with patterns require tiebacks similar to the curtain material.
Hairpins made of fabric, which on one side are the same color as the curtains, and on the other a shade that matches them or is harmonious but contrasting, look impressive. Tight tiebacks beautifully complement the lace fastenings, with loops and other decorative light details.
Clips in the form of large hairpins are additionally decorated with beads, seed beads, wicker elements, and flowers. Sometimes they choose tiebacks in the form of rings, which are attached to different sides of the window. These fasteners position the curtains beautifully, framing the window. There is also an option in the form of tape, which is used to cover the fabric and secure it to hooks in the wall.
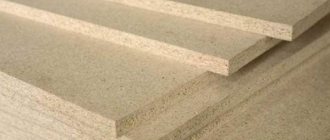
Advice! Dense material or oilcloth is sewn to the inside of the scaffold so that it holds its shape well.
Curtains decorate the room, but you can also fold them beautifully and smooth out the folds on them. The clamps will do this. Such devices are made from fabrics, ribbons, and plastic.
Benefits of using curtain clips:
- By securing the curtains with tiebacks, they allow sunlight into the room and create beautiful, even folds.
- Clips automate the process of closing and opening curtains, eliminating multiple steps.
- The fabric is secured with tiebacks so that the room is well lit, or vice versa, so that the room remains twilight.
- To create new interior details and points to attract attention to the decor. Tiebacks are made from various materials and in any shape, so they find their own accessories for a specific style.
How to make a curtain tieback with your own hands, step-by-step instructions with photos and videos
Below we will describe several master classes on how to make decorations for curtains with your own hands. Some descriptions were compiled for experienced craftswomen, while others can be handled even by novice craftsmen. Design ideas depend only on your imagination.
Magnetic products
The convenience of magnetic curtain clips is that you do not need to drill additional holes in the wall. You can adjust the height and location of the grab bars as you wish.
To make magnetic pickups with your own hands, you will need:
- thin rope made of cotton, jute, silk;
- small magnet – 4 pcs.;
- decor of your choice. These can be rhinestones, sequins, beads, ribbons;
- glue gun
Please pay attention before choosing magnets. The lighter the curtains and the thinner the material connecting them, the smaller the magnets can be.
Work stages and description:
- Take a thin rope or ribbon. The length depends on the density of the fabric. The larger your curtains, the longer the potholder is needed. As a base that will connect the magnets, you can take the material left over after making the curtains.
- Assemble the magnets in pairs so that they connect rather than repel each other.
- Use a glue gun to attach the fabric to the magnets.
- The base of the holder is ready. You can use it as is or decorate it with decorative elements. Glue or sew buttons, bows, rhinestones.
From beads
The bead grabber is easy to make. To make it you will need beads that will match the material and texture of the curtains. You can buy ready-made sets at a fabric store or make jewelry.
Pickup materials:
- thin rope The material must be combined with the curtains;
- strong thread;
- transparent fishing line;
- beads.
Step-by-step master class:
- Secure the line at the beginning of the rope. Then small beads are strung on it. Wrap the fishing line around the entire rope. You can leave the scoop as is or continue decorating further.
- Cut 48-52 cm of thread. A bead is strung on it, which will be located at the base of the structure. Fold the thread in half. Tie or wrap the loose edges under the bead. One more bead is put on both parts. Twist the thread underneath. Repeat the process until you reach the desired length. Tie the remaining ends in a loop.
- Pass the rope through the loop. One pendant is ready. To make one pick-up, you need 4-6 such products.
There is an easier way. The hook can be a string of beads, both ends of which are attached to a wall hook. Before using jewelry, make sure that it is strong enough and will not tear under the weight of the curtain.
Made from macrame cord
You can not only decorate ropes, but also weave patterns from them. Knitting a curtain tieback is a common way to decorate a room.
To knit tiebacks using cord macrame technique, you need the following materials:
- rope made of jute or cotton, flax;
- to pick up you will need 16 ropes of 2.4-2.6 meters each. The pattern can be monochromatic or of matching shades;
- foam pad.
Stages of work:
- Knitted curtain tiebacks are made using flat weave. Fold the ropes in half and attach to the foam. Make 5 knots of 5 ropes to the left. Unfold the pillow and continue weaving in the opposite direction.
- Fold the knots to form a loop. If you use different shades of ropes, then the threads that you have already used should be hidden in the center of the composition. The free edges of cords of unused color are used to form fixing knots. You will need six ropes.
- All ropes are divided into 3 groups. Flat knots are woven from each group. Two of them consist of 6 ropes, and one of 4. After that, they are combined and secured with two knots. This is how the links of the chain are formed.
- Weave until you reach the desired size. To secure it at the end, you need 2 flat knots, and a brush is formed from the free edge. A detailed knitting pattern is given below.
When using this technique, you can take any number of cuts. The volume of the curtain clip will depend on this. Maintain proportions when weaving. A knitted tieback will be a successful accessory for curtains in a classic design.
From hard drive
A CD you don't need can become part of your interior design. The discs are used to make clips or rings for securing curtains.
You need materials such as:
- 3-4 discs. Take a few extra to stuff your hand when cutting;
- rope. Material at your discretion: leather, linen, satin;
- strong glue.
Manufacturing stages:
- You need to cut the disk in such a way that only the outer part of the circle, 1.5-2.0 cm thick, remains. Using a heated knife this will be faster and more accurate.
- Wrap the circle with the chosen material. Secure the edges with glue. You can use decorations that match the style of the curtains. The clip-back is attached to the curtain using a pin, which should be designed in the same way as the main part. Or thread the curtain through the tieback.
From fabric
The discreet classic will be successfully complemented by a fabric grip. Their shape may be different. The curtain will be gathered in even folds.
Grip Materials:
- cardboard;
- pick-up material;
- threads;
- adhesive woven pad. For example, doublerin;
- thin ribbons.
The finished product is fixed on a wall hook.
How to sew tiebacks from fabric:
- To calculate the length of the fabric for gripping, you need to divide the width of one curtain in half.
- The sections from which the curtain holders will be sewn must be folded in half. Each product requires a front part, a back part and a duplerin base.
- A pattern of the required size is cut out of cardboard.
- Cut out blanks from the material. Take into account allowances of 10-15 mm. Dublerin is cut 1:1 according to the pattern.
- The doublerin is connected to the front part. Allowances are ironed using an iron. After this, sew on the part that will be inside the scoop.
- A folded ribbon is sewn along the edges of the grip. The length should be a few centimeters longer than the grip. Tie the remaining edges around the wall hook.
Kanzashi technique
The delicate floral technique was used to make hairpins and headbands. Now you can find elements of such creativity in the interior.
To decorate curtains with voluminous flowers, you will need:
- satin ribbons;
- pieces of chiffon or lace;
- beads.
Manufacturing steps: For the grip you will need a base. It can be made of textile, plastic, wood or metal chain.
Flowers are made as follows:
- textiles are cut into squares. For example, the size can be 4*4 cm, 6*6 cm;
- In order for the material to retain its original appearance, the edges must be burned;
- fold the squares according to the pattern and secure with thread;
- make a flower from satin ribbons using threads or glue. The core can be decorated with beads.
Fairy Tiebacks
Children's rooms also need beautiful accessories. These can be dolls, bears, cats, fairy-tale characters. Fairy tiebacks are suitable for decorating a girl’s room. This is also a magnetic curtain holder.
You will need:
- cardboard for patterns;
- thin textiles of light color. Beige or ivory will do;
- silk, lace, chiffon;
- silk ribbons;
- cotton or padding polyester filler;
- embroidery threads;
- beads, buttons;
- fixing magnets.
How to sew a fairy with your own hands master class:
Trace the pattern onto the fabric, taking into account 3-4 mm for the seams. All parts are cut out in quantities multiplied by two.
The blanks are sewn together with a fine seam “over the edge”. Turn right side out and stuff with filling. To join filled pieces, use a blind stitch.
Use embroidery thread to shape the facial features and hair.
Make a dress for the doll from silk and lace. Chiffon is used to make wings. Use a thin ribbon to form the shoes.
Magnets need to be glued to the doll's hands. This way the fairy will hug and hold the curtains. If the fabric is voluminous, then you will need 2 dolls on one side of the curtains.
In the photo you can see the pickup that we describe in the master class.
You can also make tiebacks using the amigurumi technique for a children's room. The main tool for making is a hook. A bear, a sheep, a bunny, a cat and other characters are suitable for a boy’s and a girl’s room.
How to make a fabric clip pattern
You can make fabric curtain clips yourself; it’s not difficult and you don’t have to use store-bought products. For this, a pattern is prepared. To ensure everything works out right the first time, you need to follow the instructions:
- Cut a piece of material so that it is 25-30 cm wide. The resulting piece is folded in half lengthwise.
- Measure the width of the product from the fold line and mark the area with a piece of soap or chalk. Exactly half of this length is allocated.
- A segment is marked from the edge, which is 2-3 cm less than the width. A section of fabric equal to 27-28 cm is laid at the bottom of the product. This pattern is cut out and then unfolded. To strengthen the product, they hem oilcloth or other dense material, which is cut according to the same pattern.
Types of curtain tiebacks
When decorating windows with curtains, you can avoid grabbing the fabric and leave it flowing. There is another, more creative option - to use hand-sewn curtain tiebacks. The peculiarity of this accessory is that it can be changed at least every week, creating new combinations with the same curtains. Fastening for the curtain composition is carried out using hooks that are mounted near the window.
Fabric
The easiest option is to sew tiebacks with your own hands using the same fabric from which the curtains are made. In this option, lining materials are used, because they hold their shape better. Sometimes a metal frame is sewn between the layers. The ideal shape is considered to be a crescent. Contrasting tones add originality to plain curtains. They are often decorated with sequins, flowers or in the form of bows, which is suitable for children's rooms.
- DIY bottle decoupage
- Chair covers
- 25 ways to organize your kitchen space correctly
Magnetic
The next most popular are devices equipped with holders in the form of magnets. They match lighter curtains. Magnets can be open or sewn into the fabric itself. In any case, they are placed at the ends of the garters. The holders themselves can be anything: decorative cables, ribbons, braid or twisted cords. An important detail is the decoration of the magnets. They are disguised with rhinestones, beads, brooches and other elements.
Hard
Like soft pickups, hard ones have several varieties:
- Metal staples that simply hook the curtain up. Do-it-yourself forged clamps are especially valued.
- Any solid product of suitable shape, covered with fabric.
- Fasteners or clips for curtains. These can be magnets, buckles that are attached to tapes or Velcro.
Cords with tassels
When framing thicker curtains made from fabrics such as velvet, satin, brocade or jacquard, hangers in the form of twisted cords with knots and tassels are used. An alternative to them are regular beads. They allow you to make deep vertical folds from heavy material. Such hangers are necessary to emphasize the richness and at the same time dilute the monotony of rich curtain fabrics.
Hairpins in the form of rings
One of the original ideas for curtain tiebacks is hairpins. Their main part looks like a ring. The second one resembles a large hairpin. The peculiarity of such clamps is in the material. They are made of wood, metal or plastic. The “clip” can be classic and not stand out against the general background of the curtains, or, on the contrary, attract attention with the help of an additional accessory.
- Fallopian tube laparoscopy
- Anti-tick bracelet for humans - mechanism of action, review of the best products with descriptions of characteristics and prices
- Eyebrow shading
Where to attach hairpins and tiebacks
The main rule when attaching clamps and clamps is to arrange them symmetrically. To avoid mistakes, apply tape to the intended location and see if the look suits you. Take into account the length of the curtains, drapes, window height and distance from the floor to the window sill. Even furniture and fabric patterns, wallpaper colors and other decorative elements influence the position of the clamps. The hairpins are attached at a distance of 2/3 from the ceiling. On a curtain that reaches the floor, tiebacks are placed approximately a meter from the bottom. This length is changed depending on the pattern on the curtains or other parts of the decor that they want to leave more visible.
Types of curtain clips
Curtain clamps are divided into:
- Metal ones are the most popular. Among the positive characteristics are the duration of operation (at least ten years), affordability and the ability to combine with various types of curtains. The main disadvantage is the appearance of traces of rust on the fabric, which is almost impossible to get rid of.
- Magnetic - a modern replacement for metal ones. They look much more attractive, and are similar in reliability to the first type. A large assortment allows you to choose the most suitable clip for a specific type of curtain.
- Plastic ones are the most affordable. A large selection of shades and low cost contributed to the growth of their popularity. However, low practicality has reduced functionality, allowing the use of such clips only for light fabrics: plastic simply cannot withstand heavy curtains.
- Decorative - to add uniqueness to the interior. For this purpose, you can make exquisite curtain clips with your own hands. You just need to choose them correctly: for example, to prevent bright curtains from looking flashy and tasteless, you need to choose an accessory of a neutral color.
At the same time, clothespins that perform a certain semantic function will look simple and original. Elements of flora and fauna will highlight the interior of any room. For the nursery you can choose plastic clips with fairy-tale characters and funny animals. “Fruit” and “vegetable” clips will look perfect in the kitchen. The sophistication of the room's decoration is emphasized by hairpins decorated with various stones.
You may also be interested in: How to sew curtains with your own hands
Curtain ties for the kitchen
The kitchen often lacks coziness. To make the room more comfortable, curtains and barrettes help. These clips are made by hand from textile fabric. Cut a rectangle 20 cm long and 15 cm wide. This cut will be used for the loop. Then visually mark the middle of the fabric and fold it in two parts inward. Then fold the piece so that the edges are on the inside. The product is stitched along the edge. There are enough loops to make enough for hooks. Afterwards, half a meter of textile 40-50 cm wide is cut off. It is folded and stitched in the same way.
The edges are folded inward, and a loop folded in half is inserted into one end. The second loop is also inserted into the other edge. Then the ends of the product are stitched and decorated. For decoration, use buttons, flowers, and beads. Secure the grab onto a hook screwed into the wall.
Master class on making curtain clips from beads
If you use thick and heavy curtains, you can make a beautiful bead tieback with your own hands. To do this you need to take:
- beautiful large beads made of glass or plastic of different sizes, shapes and colors;
- strong fishing line;
- needle and thread;
- twisted decorative cord.
The fishing line can be completely replaced with metal wire, the diameter of which should be 0.1-0.2 cm. Usually a length of 250 cm is required.
To decorate curtains, various accessories are used, including hairpins, tiebacks, and ribbons.
The clamp manufacturing process is not complicated:
- The beads are carefully and firmly attached to the wire so that they move freely. The edges of the wire must be rewound so that the beads do not slip off.
- Several such bead cords can be made; they will be used for each side of the curtain.
- The twisted cord is carefully wrapped around, the ends are reinforced with strong thread. The cord itself can be folded in half.
- To decorate the tie, you need to use large beads; 2-3 pieces are enough for each cord.
- A metal ring is screwed to the wall near the window through which the cord with beads will be threaded. This must be done in such a way that the length of the free ends is sufficient to tie the curtain.
If the curtain clip will be used in a children's room, then instead of beads you can take plastic figurines of animals, cartoon characters, fairy tales, and flowers. Mother-of-pearl beads made in the form of geometric three-dimensional figures are suitable.
Clamps for other rooms
Depending on the purpose of the room, the following options can be distinguished:
- Clips for children's room. Cute naive tiebacks are created for curtains in a child’s room. You can buy them in stores or make them yourself. Curtain clips made from toys look funny. You can make an unusual clamp yourself using any standard clamp. Together with the child, he is decorated with toy figures and fabric cutouts. In craft stores they take beautiful butterflies and sew them onto tiebacks.
- Tiebacks for the bedroom. For light, neat curtains, clips with magnets are used. You can buy the base in a store or make it yourself from wide tape. It is folded in half lengthwise and the edges are sewn. Magnets are glued inside, a curtain is wrapped with a clamp and the edges are fastened. You can decorate magnets with halves of beads. You can also glue a magnet to the wall to secure the clamp in one position.
- Tiebacks for the living room. To decorate the living room, use all your imagination, because different styles are suitable for this room. This increases the choice of curtain tiebacks. Clips are made independently from laces, fabric, leather belts and even metal. They are decorated with beads, crafts made of fabric, and plastic. Fabric tiebacks are made in one color or with an ornament. Choose from both simple and complex hairpin designs. The main thing is that the clips are in harmony with the interior of the room.
On a note! On New Year's holidays, you can attach Christmas tree balls, tinsel, figurines of Santa Claus, Snowmen, and any other light holiday paraphernalia to the clips.
What are curtain clips
Clothes pins for curtains are special fasteners that perform not only a decorative function, they have practical significance. As a decorative element, they bring uniqueness and unusualness to the interior, adding a touch of novelty even to old curtains.
Such elements add personality to the room, creating a beautiful, harmonious composition.
Using clips, you can change the length and width of curtains, give them the desired shape, and fix them in a certain position. They are made from various materials and can serve as both hangers for curtains and fastenings to the cornice. The choice of fittings depends on the characteristics of the curtains, the type of fabric and the style of the room.
The variety of holders will allow you to choose the best option for any interior.
Additional Information! Using curtain clips, you can adjust the lighting in the room and hide some of the imperfections of the window: visually enlarge a small opening, straighten out an asymmetrical arrangement, hide minor defects.
Unusual clips and pins for curtains
Stores sell pins and curtain ties in large quantities, but they are not anything special. To attach an original tieback to the curtains, make it yourself.
- Tie grab. This unusual product is suitable for an office, study room or a schoolchild's room. To create this holder, you need a tie and double-sided adhesive tape. The tie is tied with a Windsor knot and a ribbon is glued to the back. Another piece of tape is attached to the wall, and then the curtain is pulled into the tie and glued to both sides of the tape. It is acceptable to use an old belt instead of a tie. It is sewn in the right places, the excess parts are cut off and a curtain is threaded into it.
- Clip made from utensils. This tieback looks stylish in a rustic kitchen, dining room or patio. The cup is better for clamping because it is easy to work with. Bring a tile drill for the job. The bottom of the cup is removed with a drill. To do this, draw a circle with a marker and seal it with tape. Before starting, check the cup to make sure there are no cracks. After pulling the bottom into the cup, pull the curtain through and hang it by the handle on a hook attached to the wall.
- Toy grip. This idea is implemented in children's rooms. For the first option, take two identical toys and sew them together with paws. A curtain is inserted into the opening between them and attached to the wall at the back. For the second option, choose a toy with long legs. The legs are sewn together and the curtain is threaded using the same principle.
- Necklace clip. A necklace holder is an elegant decor for a living room or bedroom. To do this you will need wire of different thicknesses, beads, seed beads or other decorations. Thick wire is wound into a ring. You can wrap it with a beautiful ribbon, or you can leave it just like that. Beads and seed beads are strung on a thin wire and then attached to a thick frame. They do this for several rows, and then thread the curtain into the ring and attach it to the hook at the back.
- Rope-rope. For heavy massive curtains, a large tie made of thick rope or rope is suitable. You can use it to wrap a curtain or make a ring by sewing the ends together. The main thing is to secure the bracket to the wall so that it does not slide down.
- Door handle. To do this, use a handle of an interesting design that matches the curtains. It is screwed to the wall so that the fabric can be tucked behind it. This is suitable for vintage or palace style interiors.
- Flower pick-up. In the store they buy any clamp to which flowers are sewn. They are bought in stores for decoration or handicrafts. But they also make them themselves. These clips add sophistication, sophistication and grace to the room.
DIY curtain clip options
Before you start making a curtain clip, you need to decide on the style, select the right materials and tools. The simplest option can be made with your own hands from satin ribbons.
Satin ribbon clip
Depending on the interior and color scheme of the room, the shade of textiles and decor for it is selected. There is nothing complicated in making clamps; even a schoolchild can cope with this task. In addition to ribbons and braid, the process may need: glue, magnets, lining fabric, decorative elements.
The first thing you need to do is stick a satin ribbon on the magnet, and the selected decorative element on top. Then, glue the other end of the tape to the second magnet. Backing fabric is used to hide the magnetic surface. Thus, it is necessary to make two identical clamps.
Clip made of beads and beads
To work, you will need glass beads, thin wire, and decorative cord. The first step is to cut the wire fifty centimeters. Then put the largest bead on it and stretch it to the middle and fix it firmly. Next, you should string several smaller beads on both sides of the wire, perhaps in a chaotic manner.
You will need a cord to tie the curtains. A ready-made decorative element made of glass beads and beads should be attached to it. If the curtains are made of light fabric, then it is better to use a satin ribbon instead of a cord.
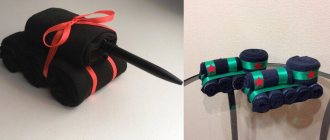
Men's tie clip
One of the simplest and at the same time original options for decorating curtains. If among your things there is a tie that is no longer worn, then it can be used as a clip. Here you will need to prepare additional adhesive tape.
The tie is tied with a classic knot, and one piece of adhesive tape is glued to the back. Next, the curtain is threaded through a tied tie and attached to the wall, onto which the second part of the Velcro is glued at the required height. Making such a clip with your own hands is as easy as shelling pears, and if you choose the right color combinations, the interior will turn out stylish and original.
You can make other, no less original lifts, for example, as in the photo.
Porcelain cup clamp
Oddly enough, dishes can also serve as a good decorative element for curtains. In addition, its manufacture does not require much effort and skill. If there are remnants of an old set in the kitchen, in the amount of a couple of cups, then you can wisely use them without taking up more space on the shelves. Here you will need a drill to work with tiles.
There are also requirements for porcelain or ceramic mugs: they must be intact, without chips or other defects, with a molded handle and not a glued one, otherwise the clamp may break under the weight of the curtains.
The bottom of the cup is outlined with a marker, sealed with tape to reduce the likelihood of defects in the process, and then cut out with a drill. It is better to carry out work in special protective glasses and gloves. You need to insert a curtain into the finished product and hang it by the handle on a hook or nail attached to the wall at the desired level. A cup-shaped clip will be an ideal option for decorating your kitchen interior.
You can use not only dishes, but also cutlery, such as forks and spoons, as a catch. It’s easy to make such a clamp with your own hands without spending a lot of time and effort. Simply bend the device in half and attach it to the wall.
Soft toy clip
This option would look perfect in a children's room. A small bear, a hare or any other animal that will hold the curtains with its paws is suitable for the role of a clamp. You don’t have to sew the toys yourself; you can purchase a finished product in a store and attach an elastic band or ribbon to it yourself to encircle the curtains.
There are other original types of clips, for example: from a door handle, rope, hairpin and even a trouser belt. The choice depends on the style of the room and your own preferences.
To make your interior bright and original, you don’t have to buy expensive decor in stores; it’s quite possible to make it yourself. There is nothing complicated about this, because most things are stored for years in drawers of closets and chests of drawers, and are no longer used for their intended purpose. With some interesting ideas, you can get a truly stylish and beautiful curtain clip that will add a unique touch to any room.
How to make clamps from disks
Disc clips look good on curtains and are easy to make yourself. To work you will need:
- unused computer CD;
- wide ribbons matching the color of the curtains;
- fabric roses, buy them or make them yourself;
- a pair of scissors;
- threads
To make a pick-up do the following:
- The middle of the disk is removed, leaving a ring 3-4 cm wide.
- The disk is wrapped with tape.
- The remaining edges of the tape are sewn together so that the junction remains invisible.
- Fabric flowers are sewn to the ring and the seams are masked with them.
- To clamp the fabric, use an unnecessary knitting needle. It is separated, wrapped with tape and attached to the disk.
Attention! These clips are used only for thin curtain fabrics; they will look out of place on thick curtains.
DIY making
You can find a beautiful curtain clip in specialized stores. If you have free time, a great desire and limitless imagination, then you can create curtain clips with your own hands. Such decorations will add sophistication and uniqueness to the room.
Before you start creating, you need to decide on a style, prepare all the necessary materials and tools for the work. To create your own clamp you may need:
- various flowers (made of fabric, beads, plastic, etc.);
- multi-colored ribbons;
- decorative stones, beads, rhinestones;
- scissors, fabric, needle and thread, glue.
Having laid out all the materials on the table, you can safely turn your idea of decorating curtains into reality.
Magnetic clamp
You can make curtain clips using magnets. To make them you will need: satin ribbon (the color is selected depending on the design of the room), glue, magnets, lining material, decorations (braid, figurines, etc.).
Magnets are glued along the edges of the tape from below, and decor is placed on top. The magnetic surface is hidden using lining material. The tape can be replaced with a leather strip or foil.
Bead clip
To make it you will need: a cord for tying a curtain, beads, beads, glass beads to create decor, thin wire as a base.
Beads are strung on a thin wire in the required order. The finished decor is fixed on a cord that is tied around the curtain. The cord can be replaced with a satin ribbon if the curtains are made of light fabric.
Festive curtain clip
Before making such an accessory, you need to cut out a through circle from thick cardboard. A long chiffon strip is wrapped around the entire circumference of the workpiece. Having wrapped it, the remaining fabric is cut off and the tip is tucked in. All that remains is to decorate the resulting ring with decorative elements: chiffon roses, ribbon leaves, beads or beads. The hairpin on the curtain is fixed with a stick, the role of which can be played by an ordinary pencil.
You may also be interested in: Self-installation of curtain rods
Polymorphus “Orchid” clip
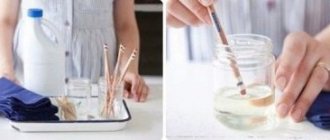
The curtain clip is made from a new material that hardens. This material is called polymorphus. It is easy to work with, so the process will be fun. You can use this material to make a clip-on orchid. To do this, boil water and pour it into a container. Then polymorphus granules are poured there. They quickly become transparent, like plastic. A flower is sculpted from this plastic. First the core is made, and then the petals. Roll it out in your palms. This material is similar to plasticine; they work with it in the same way. The made flower quickly hardens, and after that it is painted with acrylic. The base of the orchid is glued to the holder and the decoration is covered with transparent nail polish.
You can make clothespins for curtains with your own hands even without drawing or sewing skills. If you can’t make a clamp yourself, find different master classes on the Internet and follow the step-by-step descriptions. Several unsuccessful attempts are not a reason to abandon the idea. They make grabs from different materials. The choice of fabric depends on the curtains, the pattern on them, and density. You can select a suitable clip for any curtains and make it in accordance with detailed instructions.
Choice of style and design
The variety of clamp design options offered on the market is great and allows you to choose a product that fully matches the interior of the room and the chosen style. Ideas for curtain clips are not limited to standard products; with a creative approach, it is quite possible to create a curtain clip with your own hands, taking into account the smallest nuances of room design.
Accessories can complement the decor of curtains, set it off, or play the role of independent decorative elements. The following combinations look original and harmonious:
- Bright curtains with a variegated pattern look good with plain clips, while at the same time, you can refresh a plain, dull fabric with accessories made of polished metal or sparkling stones.
- Brooches, hairpins and magnets imitating precious stones will complement the luxurious Baroque style.
- The nursery will be decorated with clips of soft toys hugging the curtain. A bear cub or a monkey with its paws wrapped around the fabric looks original.
- The kanzashi clip will organically fit into the oriental interior.
- Cylindrical holders in the shape of cups or earthenware jugs would be appropriate in a kitchen decorated in a country style. You can also use clips in the shape of butterflies, dragonflies or bouquets.
- Transparent plastic and glass, matte or polished metal will suit the high-tech style.
Don’t be afraid to experiment with different types of clips; when choosing, they focus not only on the design of the curtains, but also link them to other furnishings - lamps, wall decorations or furniture fittings.
Where to attach the tiebacks and pins?
All pins, tiebacks and ribbons must be placed neatly and symmetrically on the curtain so that the visual effect is maximum. Before attaching, it is best to apply the tape and evaluate the appearance of the curtain. The length of the curtain, the height and type of window sill, and individual interior details are taken into account. It is best to fix tiebacks and ribbons at a height of 2/3 from the top; all hooks should be attached 10-15 cm from the edge. If the curtains reach the floor, then it is customary to place the pins 1 m from it. If necessary, you can place them a little higher or lower. It all depends on the type of fabric, the presence of a pattern on it, and other details.
For light curtains, it is best to take small pins, narrow ribbons, and cords can be used instead. Such tiebacks should not be placed low, but you should not select the fabric too high either. After fixing, enough light should enter the room, but if the goal is only drapery, then the ribbons can be placed below 1 m, then they will lie neatly, beautifully highlighting the overall interior.
How to choose the size of the tape?
To make a pattern for a curtain tieback, you must first correctly determine the dimensions of the future tape. The length of the tape should be enough to secure the curtain and create beautiful folds. The tape should not squeeze the curtain, but it should not hang carelessly either. In addition to the length, attention must also be paid to the width of the tape. It should not be too narrow for long curtains or too wide for short ones. Usually the width of the tapes is 10-15 cm, but when drawing up a pattern you need to take a double value, i.e. the width of the workpiece will be 20-30 cm plus an addition for seam allowances.
The length of the tape will depend on the number of fabrics used for the curtains:
- number of canvases – 1 pc., length for tape – 45 cm;
- number of canvases – 2 pcs., approximate length for tape – 61 cm;
- number of canvases – 3 pcs., approximate length for tape – 76 cm;
- number of canvases - 3.5 pcs., approximate length for tape - 84 cm.