X
Slime can also be made from soap...liquid. From a slimer's point of view, this component has at least two advantages.
Liquid soap is used in almost every home, and the price of inexpensive brands is less than 50 rubles.
The advantages of soap include the presence of fragrance and safety - even a child can work with it.
Helpful information:
- How to make transparent slime
- How to make slime without sodium tetraborate: 14 recipes
- How to make slime from water
- How to make slime from soda
- How to make mountain slime
- How to make original slime
Slime with added soap:
- has a soft and at the same time crispy texture;
- does not “lose weight” as actively over time – unlike foam textures;
- moderately sticky;
- may leave marks on furniture or wallpaper.
The main requirements for soap are a hard sulfate composition (cheap brands have no problems with this) and a thick consistency.
The soap in the slime performs two functions - it slightly thickens the mass and improves the crunchy properties.
What kind of soap can be used to make slime?
It’s easier to say which products are not suitable for slime:
- bar laundry or toilet soap - solid soap (like liquid soap) contains surfactants, but it has little moisture and no gel base (thickener);
- soap labeled as “100% eco” - especially if this claim is supported by a sulfate-free composition). This soap is hypoallergenic and safe - it is best to use it for its intended purpose.
Also, slime from natural-based liquid laundry soap may not work out – this is especially true for glue-free recipes.
You should not make slime from soap with a repulsive or irritating odor. When mixed, the smell will not disappear and may be exacerbated by other ingredients. As a result, the impression of the process and result of the experiment will be spoiled.
It makes sense to test all other types of soap with a thick gel-like texture, especially since it is easy to do at home.
Slime made from soap and salt
A famous recipe that requires only two ingredients:
- detergent (soap, shampoo or shower gel);
- salt.
The composition is ambiguous, but the preparation algorithm, on the contrary, is very simple:
Pour liquid soap into a container - in the experiment it was very thick and in its pure form already resembles jelly.
You can and even need to add dye to such slimes. However, this soap itself is a beautiful greenish color, so no dye is needed.
Add salt - literally 1-2 pinches. Here, “more” does not mean “better.”
Mix the contents. If you work quickly with a spoon, you may notice that the mixture changes color (becomes opaque) and slightly clumps into a “lump.”
Place the container in the refrigerator and wait 30 minutes. The green slime in the photo stood in the cold for a day - during this time all the bubbles came out of it.
Try to knead the mass in your hands - it does not stick, but it spreads and melts a little. It turned out, rather, to be mucus or finger lick.
Of course, this cannot be called a full-fledged slime, but a child will be happy to play with it in a jar or on the table. And after 10 minutes you can put it back in the refrigerator.
An obvious advantage of the toy is that if your hands get dirty in it, you can simply wash off the detergent with water. A great way to teach your child to wash their hands with soap.
If the mass does not want to turn into mucus or becomes thinner, the problem may be:
- excess salt - you need to add more soap;
- inappropriate composition of soap or shampoo - you need to take the thickest jelly-like product possible.
How to make slime from shaving foam
Summarizing
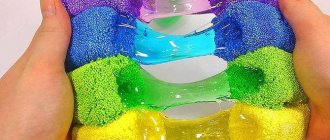
The children's toy "slime", which appeared in stores in the early nineties, was once a desired and adored item for all schoolchildren. Various colors in a translucent jelly-like liquid and a pleasant gel-like non-adhesive texture forced kids to save on school lunches, collect pocket money in small change and buy a toy similar to a cartoon character about ghosts.
Children have grown up and are raising their children, and the toy continues to exist, showing new and new interpretations of its species. It’s such a blessing that modern adults perfectly understand the desire of the younger generation not only to purchase 1-2 types for their collection, but also to make slime with their own hands at home from scrap materials. The process of creating a toy is so exciting that the whole family can do it for at least half a day. Add paint, beads, materials according to the recipe to the slime, or experiment by coming up with a new texture.
In the end, we’ll give you a friendly idea for creating original floffy slimes: if you paint it in a soft blue color, add decorative snow, anti-stress transparent beads and a little glitter, you can get a stunningly beautiful “snowy” panorama. When the slime is stretched, the contents shimmer and flow down the material, like a moving picture of winter nature.
At the same pace, it’s easy to create space or a green rhapsody (as an example: light green and pink and blue sparkles and petals).
By adding starch and shaving foam to the slime, you get butter slimes that spread well over the table surface and also easily assemble into a velvety piece. If you color this slime pale yellow, you can get an inedible, but pleasant-looking mock-up of a real piece of butter, which you can use to occupy your free time.
How to make slime from PVA glue and liquid soap
The basic recipe involves the use of two ingredients; you can add coloring if desired. Instead of soap, you can take thick shampoo or shower gel. Any glue (PVA or transparent) from among the working brands (“Luch”, “Moment”) is suitable.
The experiment involved Eltitans Super glue. This is a high-quality glue, but not 100% safe. It is necessary to work with it in a ventilated area and in the presence of adults.
Preparing a slime from liquid soap and glue will take literally 10 minutes:
Pour glue into a bowl - it is very thick, but it was decided not to add water to the test slime.
Add liquid soap - in the photo there is about 3 times less of it than glue.
Gently stir the contents until smooth. You can see from the color of the mass in the photo that the mixture has begun to curdle.
Add more soap - it is optimal for the portion to be similar to the first. However, more soap is added here to speed up the thickening.
Continue stirring - the slime will curl more actively.
Add more soap, literally pour it over the glue, and knead further. The mass immediately forms a whitish lump.
Knead the slime with your hands directly in the bowl until the lumps disappear.
The slime turned out, but it doesn't stretch very well. Perhaps the glue should have been diluted with water in the first step.
The recipe can be modified as follows:
Mix regular PVA glue with shaving foam in equal proportions - 10 tbsp each. spoons
Add shampoo and liquid soap - 8 and 4 tbsp. spoons respectively.
Add 100 g of light plasticine and knead with your hands, dipping the plasticine into the contents of the bowl. Gradually, the plasticine turns into a soft, elastic, but very sticky mass.
Add a solution of soda in water and wet your hands with it during the final kneading and that’s it - you’ve got slime.
The result is worth the cost of ingredients and time - the slime is large, fluffy, soft, moderately glossy.
You can make a smaller size slime from glue and soap by taking 5 spoons of glue and foam, 4 spoons of shampoo, 1 spoon of soap and 50 g of plasticine - these will be the same proven proportions.
Recipe No. 3
- Shampoo;
- Toilet paper;
- Salt
A somewhat unusual recipe, but still working. Apparently, not all shampoos are suitable in this case. At least, according to experts, the best mixer for lime is Pantin Pro V. If you have the opportunity to try to create toys with it, then this is very good.
According to the recipe, you need to finely tear flaky soft toilet paper into a bowl. The same can be done with multi-layered napkins or paper towels.
The next step is to pour a large amount of shampoo onto the entire paper and mix thoroughly so that absolutely all the pieces are saturated with the gel. It is important to know that you only need to use shampoo here. Experiments with shower gel did not lead to positive results.
Leave the bowl with shampoo and paper on the table for a few minutes. This is necessary so that all the paper gets wet and begins to dissolve in the shampoo.
Mix the entire contents of the cup thoroughly and carefully. You should end up with a homogeneous mass that looks like spoiled marshmallows melted in the microwave.
When this path is behind you, add a little salt to the bowl. After you mix everything, have a good eye to see if you need to add a little more salt.
As a result, the slime turns out to be light, airy and stretches and smacks well. You can also add coloring to this recipe.
Without glue with starch
A slime recipe made from two ingredients - liquid soap and thickener. Such compositions usually “work” as follows:
- soap (shampoo, shower gel) – serves as a base and gives gloss;
- starch thickens.
Some slimers recommend adding water to the starch, and then adding soap. Starch and water must be mixed to a glue-like mass. Water should make the slime softer and more elastic.
Here's a practical test of the anhydrous recipe:
Pour 3 tbsp into a bowl. spoons of liquid soap.
Add a thickener - starch. For starters, 2 tbsp is enough. spoons - this portion needs to be stirred until smooth.
Add thickener until the mixture stops sticking to the walls. At 3 tbsp. spoons of soap required 4 tbsp. spoons of starch.
Knead the mass in your hands and the handgam is ready.
This slime can be made only from starch and liquid soap, without glue and without sodium tetraborate. Of course, “starchy” slime cannot boast of super elasticity or stretch into a transparent film, but it is soft and pleasant to the touch.
Like all hand chewing gums with food thickeners, this one will “live” no more than 3 days – if stored in the refrigerator.
How to choose ingredients for slime?
Most often, slimes are made on the basis of liquid cream soap. It has a pleasant consistency and a fresh smell. In addition, the product is easily measured with a dispenser and easily mixed with other components. Older children can also use hard soap. To do this, you need to grind them on a grater and heat them in the microwave.
Slime shampoo should be thick and fresh (not expired). The subtle smell and pearlescent shine are a pleasant, but optional addition.
Please note that even inexpensive products are suitable for children's creativity. Therefore, to make various slimes, you can buy a separate tube and experiment with the components without regret.
Slimers explain that it is impossible to make high-quality handgum from two components (shampoo and soap). To give the toy elasticity, softness, the ability to stretch and spring, you need to use other substances (glue, starch, salt, sodium tetraborate). And dyes, sparkles, multi-colored balls decorate the slime, making it unique and original.
How to make slime from flour and soap
Given the success of the previous recipe with starch, it is logical to assume that you can make slime with liquid soap from flour.
Like all “flour” compositions, this one is simple and reliable. Any thick soap, shampoo or shower gel will do.
You need to proceed similarly to the previous recipe:
Pour liquid soap into a bowl - about 3 tbsp. spoons
Start thickening the mass - add 2 tbsp. spoons of flour and stir.
Add flour in portions until the contents thicken and stop sticking to the dishes.
Tint the slime - pink acrylic paint is used here.
How to make slime from PVA-M glue
It’s easier to color the slime at the first stage. However, the paint was well distributed in the thick handgam.
That's it, the slime is ready, it stretches a little.
The slime is very soft, it is pleasant to crush it in your hands.
When smeared, it even looks a little like butter slime.
During final kneading, you can smear your hands with vegetable oil - this will remove residual stickiness and add gloss to the slime.
A flour toy quickly deteriorates, but in just 5 minutes you can make a new slime from liquid soap and flour.
You can make such a slime not only from liquid soap or shampoo, but also from hair balm or any cream - the preparation algorithm is the same. The slime will inherit a texture that is pleasant to the hands from the cream, but you shouldn’t expect it to be sticky.
How to make slime from toothpaste and soap
When you decide to make slime from soap and toothpaste, you need to prepare for a specific smell. But in general, the recipe works, and the available ingredients are involved in the preparation:
- liquid soap;
- toothpaste;
- dye (optional);
- thickener – sodium tetraborate, Naphthyzin.
Some bloggers claim that this slime can be thickened with soda (without boric acid). However, experience shows that baking soda does not work with any soap or toothpaste. Therefore, it is worth preparing a more serious activator.
Now all you have to do is take the container and follow a few simple steps:
Squeeze about 1 teaspoon of paste into a bowl. This is enough for a small slime; if you need a voluminous handgam, it is better to take 1 tbsp. spoon.
Pour liquid soap over the paste - there should be 5 times more detergent than paste.
Mix the contents until smooth.
Enter the activator, here it is unusual - this is Aquamaster nasal spray based on sodium chloride. It works more gently - a few teaspoons of spray were needed.
The mass began to thicken; all that was left was to knead it by hand.
The paste did its job - the slime is soft and stretches into a thin film.
Thanks to the soap, the slime is elastic, glossy and makes a great click.
You can make something like fluffy slime from liquid soap and toothpaste by complicating this recipe:
- Whisk the mixture of paste and soap with a whisk.
- Add glue - PVA or silicate.
- Thicken the mixture with tetraborate.
It will take more time, but the result is worth it - the slime is soft, fluffy and “clicking”.
Cooking precautions
To prepare slimes, components are often used that provoke allergic reactions upon contact with the mucous membranes of the mouth or eyes. Toxic components include:
- sodium tetraborate;
- boric acid;
- sealants;
- silicone glue.
If soap, glue or other synthetic components get into your eyes, rinse the mucous membrane with running water. In case of eye irritation, consult an ophthalmologist.
To prevent negative consequences, you need to:
- stop using toxic components;
- avoid rubbing your eyes while playing with slime;
- wash your hands with soap after playing.
Some slime recipes use liquid glass as the main component. This is a mineral compound that causes an alkaline reaction, which is dangerous due to burns. Therefore, it is strictly not recommended to use it for making children's toys.
How to make butter slime from soap
This is almost a classic slime made from liquid soap, sodium tetraborate and glue. The general list of ingredients looks like this:
- liquid soap;
- PVA glue;
- water;
- dye;
- sodium tetraborate.
Mixing the ingredients will not take much time:
Pour liquid soap into the container - about 5 “sprays” from the dispenser.
Tint the future slime - here we use acrylic paint from a tube.
Pour in 2-3 tbsp. add water and mix the contents.
Pour PVA glue into the container - its volume should be slightly less than the purple mixture - and stir until smooth.
Add a thickener – sodium tetraborate. At this stage, the recipe is not similar to the others - the mixture does not need to be brought to full curdling. It should just start to thicken. In this form, it should be left on the table for 3 hours.
“Taste” the slime to the touch – the stickiness has disappeared.
The glossy base for the oil slime is ready - you just need to knead it in your hands for 2-3 minutes.
Now you just need to add plasticine or Soft Clay Daiso clay to it - and the butter slime is ready. However, here it was decided to limit ourselves to decorations. First the “hearts”:
And then glitter - it turned out to be a chameleon slime.
Obviously, making slime from soap with the addition of glue and tetraborate is 100% possible (unlike previous glue-free recipes). It can be used as a base for butter or fluffy, or left as is.
Slime made from liquid soap with glue can be thickened with soda and boric acid - the result will be similar.
How to make slime from soap and sugar
Slime made from soap and sugar - it’s hard to believe that the recipe works. Checking will take time, but all the ingredients are available:
- shampoo and liquid soap - with a thick consistency;
- sugar;
- water;
- soda.
How to make crunchy slime
Next you need to take a bowl and follow the plan:
Measure out 3 teaspoons of shampoo. Pantene “participated” in the audit.
Add 1 teaspoon of liquid soap and stir the contents.
Dilute the base with 1 teaspoon of water.
Add sugar. The exact proportions are not indicated in the recipe, but it is assumed that you need to add a lot of sugar, not forgetting to mix the contents. 3 teaspoons were added as the first portion.
Add sugar until the mixture reaches the desired consistency - you can see in the photo that it has thickened (and become larger) but is not sticky or curdled. The number of spoons of sugar clearly exceeded ten.
Place the bowl in the freezer for 20 minutes.
Take out the container and try to stir the mixture with a spoon - it has thickened and rolled off the walls, but continues to stick.
Add 2-3 pinches of baking soda and mix with a spoon. This is not easy and soon you will have to pick up the slime.
Kneading turned out to be a difficult task - even after baking soda, the slime really stuck to your hands. However, the slime from liquid soap and sugar still turned out - soft, snow-white and viscous.
Conclusion: the recipe works, but requires patience and... a lot of sugar.
Touch up
The most popular dyes are gouache, brilliant green (zelenka), and food coloring. However, it is best to use vegetables and berries. We will also take a grater, a frying pan and a sieve.
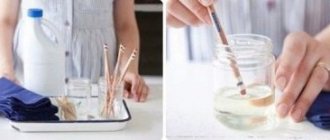
- Red . Grate the beets on a fine grater and pour into a heated frying pan. Add water and simmer for 15 minutes with a tablespoon of lemon juice. We express what happened through a strainer.
- Yellow . We do everything the same, but instead of lemon juice add a piece of butter.
- Violet . Beat in blueberries.
- Blue . Add a teaspoon of soda to the blueberry juice and wait 45 minutes until the dye brightens.
- Brown . Take 10 tablespoons of sugar and a few tablespoons of water. Place 10 tablespoons of sugar and 3 tablespoons of water in a frying pan. Leave on low heat, stirring constantly, until a brown mass forms.
What to do if nothing works out
From the given recipes it is clear: soap is an excellent auxiliary component, but it cannot replace the base 100%. You can make a full-fledged slime from liquid soap only by adding glue and a reliable activator.
If the composition and ingredients are working, but the slime does not work out, first of all you need to determine the problem:
- there is no stickiness - you should remove excess water (to do this, you can knead the mass in a plastic bag) and add a sticky component (glue, shaving foam);
- excessive stickiness, the slime cannot be kneaded - you need to add a little thickener, and when kneading, dip your hands in a soda solution or (for flour or starch compositions) in vegetable oil;
- the toy is slimy or soapy - leave the slime in the air for 1-3 hours. Also, the slippery texture can be corrected by adding glycerin;
- the mass is too soft and watery - you need to add a little salt to the container with the slime, close the lid and put it in the refrigerator for 12 hours;
- hard and inelastic texture - you can add toothpaste (start with a pea). If the slime hardens over time, you can pour water into the container and put it in the refrigerator;
- small volume of mass - depending on the composition, it is treated with water, glue or shaving foam. Then the slime will have to be “thickened”.
If the slime has decreased in size over time, it should be kept in water for 3 hours. If after the “water procedure” the slime becomes crumbly, you need to add salt and hand cream or body lotion.
The smell of freshly made slime may not be very pleasant - this can be easily corrected by adding food flavoring, essential oil or vanillin. If an unpleasant odor appears on a toy that is older than 3 days, it is better to throw it away.
Adding Flavor
Flavorings are divided into cosmetic and food. Cosmetics are also called “fragrances”. They consist exclusively of synthetic artificial components. Please note that this number also includes strong-smelling fragrances used for automotive products and household chemicals. Of course, they are more caustic and aggressive.
An elastic toy should not be created using caustic or artificial fragrances.
In contact with the skin, a person experiences unpleasant itching and allergic reactions. The body, which cannot tolerate artificial flavors and synthetic substances, becomes covered with itching and red rashes that spoil the aesthetic appearance.
Even if a person is allergic to just one component in the composition, it is still not suitable. The toy can cause harm to those who make it and those who use it. The health issue here is very serious. The cosmetic alternative is less harmful to use and more popular in the market. Any scent you like!
The safest flavorings are food grade. Choose a liquid form rather than a gel or dry form. In online stores selling elastic toys, there is an assortment of food flavorings for every taste:
- peanut butter;
- wavy toffee;
- cake cream;
- cappuccino;
- caramel candy;
- cheesecake;
- cinnamon roll;
- coconut;
- strawberry;
- apple;
- boiled condensed milk.
Taste is a serious argument for quickly moving from words to action!