Causes of defects
Despite its many advantages, the polymer has one serious drawback - a low level of resistance to mechanical and chemical stress. For example, if you wash the surfaces of an acrylic bathtub with an acid-alkaline agent for a long time, the surface will become deformed.
Another negative factor is contact with abrasives. Long-term use of a hard brush when cleaning an acrylic bathtub is enough to cause defects of varying severity.
How to remove a scratch on an acrylic bathtub is the most frequently asked question. Of course, if irreparable damage has been caused to the acrylic bathtub, it is better to seek the help of specialists. Minor damage can be easily removed with your own hands at home.
Types of damage to the bathtub
Everyone knows that the bathtub is used quite often. Each family member needs to visit her at least twice a day. We need to wash ourselves daily. It is logical that with such frequent use and a careless attitude, visible damage may form on the bathtub, spoiling its appearance. What are they?
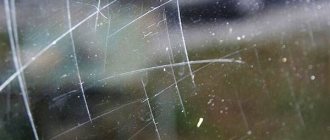
- Scratches. Quite a common occurrence in bathtubs. They appear on an enamel surface when you use abrasive detergents and clean the surface with a hard brush. Or you can scratch the surface with a metal object. As a result, if no action is taken, chips may appear.
- Chips. They form on the bathtub due to the mechanical impact of a heavy object on the surface. For example, an object of considerable mass falling from a height can cause a large chip on the bathtub.
- Cracks. A network of small cracks appears on the enamel. They arise due to frequent and sudden temperature changes. In addition, mechanical loads have the same effect on the bath.
- Yellowness. The white finish of the bathtub may turn yellow if your tap water is of poor quality. If it contains a large amount of metals and salts, then do not be surprised that over time the bath will change its color. It will be quite difficult to wash it all off.
- Rye stains. Most often they form near the metal elements of the bathtub, such as the upper and lower drain. Orange stains spoil the appearance of the bathroom.
Advice!
If you experience any of the damage listed above, you need to take immediate action to restore it. Don't think it's not scary. If you don't act, you will only make things worse. So, let's find out how to deal with most of these defects.
Eliminating minor scratches on a bathtub
The work is not difficult, you can do everything yourself. All you need to do is polish the surface. Everything is done according to the following plan:
- To begin, thoroughly wash the surface of the bathtub and then wait until it dries. If the room is warm, it will dry faster.
- Now take the finest grit sandpaper and thoroughly sand the damaged area. Work carefully so as not to multiply scratches.
- Work until the surface is smooth and matte and the scratches have disappeared. Then polish everything with a fine abrasive polish. Rub the surface with felt until the area on the bathtub is smooth.
- Next you need to apply a wax polish without an abrasive. Rub the area again with the microfiber cloth until a shine appears.
- After all manipulations, rinse the bathtub with liquid detergent and wipe with a soft cloth.
That's all, now you know how to remove a scratch on a bathtub.
Note! You can purchase a repair kit for an acrylic bathtub specially designed for this purpose. It contains two types of polish, wipes and waterproof sandpaper.
We eliminate chips and deep scratches on the bathtub
It is clear that sanding with sandpaper is not quite suitable here. There are special kits for acrylic bathtubs that can be used to remove defects. This kit includes:
- sandpaper;
- polish;
- napkin;
- applicator for acrylic.
The cost of such a set is from 500 rubles. This is much cheaper than hiring specialists. So, your task is to repair the chip with acrylic and polish the bathtub area.
Now everything is in order:
- If you are removing a deep scratch, widen it a little. You will need to place an acrylic mixture inside. For expansion, you can use a mounting knife.
- Next, sand the area around the damage with fine-grain sandpaper. The sanded area should be about 1 cm wide on all sides.
- Degrease the bathtub with alcohol or solvent.
- Take a special mastic for acrylic, which you use to cover a chip or large crack with an applicator. Level everything so that there are no holes or protrusions. The surface of the bath should be smooth, without changes.
- After the composition has polymerized, sand the surface of the bathroom with fine-grained sandpaper. And for finishing, polish everything as described above.
That's all, your bath is ready and looks like new. Minimum effort required. It's important to take it and do it.
Removing cracks in the bathtub
It also happens that the bathtub is simply cracked and begins to leak. What to do in this case? Is there a solution? Yes! To do this, you will need the same repair kit that was used in the previous methods. In general, we can say that the work is carried out according to the same scheme as with scratches and chips. The process is similar, but there are some subtleties.
So, the elimination technology is as follows:
- As in the previous case, before you start treating the crack in the bathtub, you need to make it larger. Pry it apart and sand it 1 cm around the center.
- Now you will need a screwdriver and a drill. Drill holes on both sides of the crack. Their diameter should be no more than 1 mm. This way the crack will not spread further.
- Wash the area on the bathtub and degrease it with known means.
- Now everything needs to be done in exactly the same way as with the chip. The space is filled with mastic, leveled with the surface of the bath, and after drying, everything is carefully sanded.
You should know that such cracks must be repaired immediately as soon as they appear. Then everything will get worse, and elimination will require more money and effort. The crack will spread, becoming even larger. It is important to note that this method is suitable for small cracks. When they are launched, reinforcement will have to be done. The photo below shows how this work is done.
Minor scratches
Before removing scratches, you must properly prepare the product. Repair actions are carried out only after thorough cleaning and drying of the surface using mild agents.
The porous structure of the material dries completely no less than 6 – 7 hours after wet processing.
- A scratch on an acrylic bathtub is rubbed with fine-grained sandpaper. For acrylic surfaces, it is recommended to use ultra-fine sandpaper marked according to GOST M5N 00 and a grain size of P2500 units.
- After grouting, run your hand over the treated area to identify any remaining roughness. If the surface is smooth, apply a special abrasive polish.
- Using a felt cloth, rub the polish over the entire area and leave for 2 – 3 hours.
- After the composition has been absorbed, acrylic bath wax is applied without abrasive.
- After an hour, rinse the surface with a liquid product.
Repairing deep scratches and burns
A special repair composition eliminates scratches up to 2 mm deep. The substance is an acrylic putty based on a polymer resin. Deep scratches and burns cannot be sanded, since the entire polymer layer will have to be ground off.
The classic version of the surface puttying technique is used. The only difference from standard putty is that after drying the mixture is identical to an acrylic sheet.
Repairing scratches is carried out after preparing the bath, the algorithm of work is:
- Cover the perimeter of the defect with masking tape. Grind the defect area with sandpaper No. 1200. This is done to obtain a rough surface that better adheres to the putty composition;
- The defect area is removed from dust using a dry method (vacuum cleaner, special brush). Wipe with a cloth containing alcohol to degrease.
- Mix the repair composition according to the manufacturer's instructions. Repair composition for restoring polymer baths is sold in stores.
- Apply the putty with a rubber spatula. Align. After 30-40 minutes, remove the tape, a day later sand it with sandpaper No. 2500 and polish it.
After treatment, do not use the bath for at least 3-4 days. The exact drying time for the composition is indicated on the packaging. Cramer polish is not suitable for bathtubs with a dirt-repellent layer.
Chips
Of course, it will not be possible to remove the chip with sandpaper. More serious measures are needed here.
Before you begin the process, you need to purchase an acrylic bathtub repair kit. The kit includes everything you need to remove a scratch:
- instructions,
- sandpaper,
- polishes,
- reducing agent,
- disposable napkins,
- gloves,
- applicator.
Inside the chip, the wet grinding method is considered more effective. For this purpose, the paper should be slightly moistened.
The process itself is simple, but requires strict adherence to the instructions:
- A deep chip is sequentially processed on all sides by three types of sandpaper - from the coarsest (No. 600) to fine-grained.
- Next, the cleaned part is rinsed, dried with a construction or household hairdryer and degreased with alcohol.
- Puttying stage. Apply the reducing agent evenly using the applicator. Level the layer to the level of the factory coating.
- After the polymerization process is complete, sand the repaired area.
The hardening time of liquid acrylic is at least 4 - 5 hours.
Repairing chips, how can you fix them at home?
What to do and how to repair a chip? repair kit will help deal with deeper damage . There is a large assortment of different brands on the market, but if you suddenly don’t have such sets in your city, it doesn’t matter, you can assemble it yourself. You will need:
- molar tape;
- sandpaper of different grits (from 240 to 3000);
- alcohol wipe;
- liquid acrylic;
- hardener;
- polishing compound;
- fleece napkin.
STEP 1. First you need to protect the entire surface around the chip so that it is not damaged during the restoration process. Molar tape is best suited for this. Cover the surface around the chip with it, stepping back 1-1.5 cm from its borders.
STEP 2. Now you can begin the repair - you need to take sandpaper with a grit of 800-1200 (a ready-made repair kit, as a rule, has paper of the required grit) and sand the chip in a circular motion, trying not to go beyond the boundaries of the molar tape. It is required to achieve a slight roughness , which will later help the acrylic to adhere to the surface.
Through holes
Actions in this case depend on the nature and location of the gap. A hole with a diameter of more than 5 cm cannot be repaired. Smaller holes can be repaired yourself.
Before removing scratches from an acrylic bathtub, both the inside and the corresponding area on the outside are cleaned and degreased.
- Fiberglass is attached to the back of the bathtub with epoxy glue. In this case, the size of the patch is 5–6 cm larger than the diameter of the hole.
- An overlay is cut 5 cm larger than the first. After 1.5 hours, another patch is glued with a second layer.
- The third imposed section of reinforcement should exceed the second by 5 cm.
- Degrease and sand the inside.
- The hole is filled with putty and leveled.
- After drying, carefully sand again.
The pattern of the reinforced mesh is carried out in advance according to the markings applied from the inside.
Sealing cracks
Through cracks are repaired immediately after detection. Otherwise, under the slightest load, the defect will spread across the entire plane.
- after preparatory work, the defect area is sanded;
- drill two holes so that the center of each is on the opposite side of the crack - this is necessary to create a zone of uniform pressure;
- the depth of the holes is identical to the depth of the crack, that is, they may not be through;
- the crack is expanded to the depth of the defect;
- degrease the defect with a cloth containing alcohol;
- dilute the repair compound according to the instructions and seal the crack;
- After a day, the mixture is ground and polished.
Cracks take longer to dry than scratches. An additional 5-7 hours are added to the time period provided by the manufacturer.
Special means
Before carrying out repairs, you should select a repair kit. The choice of resuscitative agents is based on the nature and extent of the injury. As a rule, the kit includes everything necessary for further actions. The only thing that remains is to make sure that the components declared by the manufacturer are present.
Experience shows that Stakryl, an innovative product designed specifically for the restoration of old bathtubs, completely restores the color and texture. The technology is based on the full-fill method.
BEP 52-97 is no less effective. A Russian-made two-component epoxy suspension is also successfully used for restoration activities.
Damaged areas can be restored by applying touch correctors. According to user reviews, correctional drugs from Cramer from Germany are the leaders in this category. The manufacturer's product line includes 20 items of restorers and kits for partial or complete repair of plumbing fixtures.
Cracks
A crack is much more dangerous than a scratch, since it is a through defect. Firstly, the consequences are much more serious - leaks on the bathroom floor, flooding of the lower apartment. Secondly, they tend to spread further under the influence of loads from the user’s weight and water. Therefore, the restoration technology is somewhat different from repairing scratched areas:
- after sanding the surface, it is necessary to create zones of uniform pressure along the edges of the crack;
- To do this, two holes are drilled with the center of each of them at opposite edges of the crack;
Drilling holes along the edges of the crack. The holes should not be through, they should not be deeper than the crack itself;
Making a through hole.
Breakage Prevention
To avoid repairing a damaged bathtub, you should pay close attention to signs of possible problems.
- If sagging occurs in the acrylic bathtub, you can place blocks or other stable objects under its base. This solution will help those whose plumbing is covered with a screen. This method will significantly reduce the pressure on the inside of the bathtub and prevent cracks from forming.
- Creaks when using the bathtub indicate that the plumbing fixtures were installed incorrectly. This may also be caused by the walls and bottom of the product being too thin. But this problem is also being solved.
- You should carefully look at the purchased bathtub in sunlight. The product should not be transparent. If gaps are noticeable, you can use latex paint, which is applied in bulk to the surface of the bathtub. This will help increase the strength of the plumbing and prevent many defects from occurring.
Many people are interested in how long restored plumbing fixtures will last?
In any case, equipment repair will increase their service life by 2 years or more. But taking into account the low monetary costs, repairing acrylic bathtubs with your own hands is considered an economical solution.
Having found out the reasons and methods for repairing an acrylic bathtub, you can independently eliminate various damage to the plumbing. Repairing products of low complexity can be carried out without assistance, but in the event of a serious breakdown, you should trust the specialists. You can update your bathtub with acrylic, which will be an excellent way to restore it. It should be remembered that polymer baths can be restored in case of any damage. Therefore, it is better not to throw away your old acrylic bathtub, because repairs will allow it to last for a few more years.