What a pleasure it is to eat a handful of a healthy treat - dried pumpkin seeds! They are rich in antioxidants, vitamins, and minerals. Helps improve sleep, normalize digestion, and have a beneficial effect on the cardiovascular system. Not only raw seeds, but also dried ones are endowed with such characteristics.
Today we will show you how to dry pumpkin seeds and always have a storehouse of vitamins on hand. Let's figure out under what conditions pumpkin seeds are best stored and when they should be discarded.
What are the benefits of pumpkin seeds?
Pumpkin seed is a true natural healer. This is a treasury of zinc (Zincum) and iron (Fe), phosphorus (P), magnesium (Mg) and other minerals important for the body.
Thus, Zincum strengthens and increases bone density. Fe supports the functioning of the thyroid gland, ensures tissue respiration, and phosphorus takes part in the formation and maintenance of the health of the brain and cardiovascular system.
Table. Vitamin content per 100 g of seeds
| Vitamins | Content | Percent Daily Value (%) |
| Ascorbic acid (vitamin C) | 1.76 mg | 3 |
| Thiamine (vitamin B1) | 0.27 mg | 6 |
| Nicotinic acid (vitamin B3) | 4.99 mg | 28 |
| Pyridoxine (vitamin B6) | 0.10 mg | 7 |
| Folic Acid (Vitamin B9) | 56.44 mcg | 14 |
| Phylloquinone (Vitamin K) | 4.59 mcg | 6 |
| Tocopherol (Vitamin E) | 2.18 mg | 3 |
Doctors recommend consuming pumpkin seeds for people suffering from arthritis. During pregnancy, a small amount of seeds helps overcome morning sickness and toxicosis.
Also pumpkin seeds:
- strengthen bone mass;
- promote prostate health;
- lower cholesterol levels;
- strengthen the immune system;
- enhance the wound healing effect;
- get rid of helminths.
By including a small amount of seeds in the diet, we will ensure regular bowel movements and lightness in the body.
How to dry pumpkin seeds at home
Pumpkin is a vegetable that people have been eating since ancient times, and they know how great its benefits are.
Not only the pulp, but also flowers and stems were used for food. Once upon a time it replaced potatoes, which were brought into the country by Peter I from Holland. Gradually, it strengthened its position and became almost the main dish on the table, and people forgot about pumpkin and its beneficial properties. Currently, due to frequent health problems, this miracle vegetable is increasingly found on menus. The benefits of pumpkin seeds are also well known, the use of which will help get rid of many diseases and increase immunity. The use of this product helps to normalize the functioning of the entire body. This is simply a pantry of health, which includes a huge amount (about 50) of macro- and microelements, amino acids, pectin, mineral salts, dietary fiber, saturated and unsaturated fatty acids, vitamins. Insufficient content of these substances in the body is expressed in headaches, weakness, decreased muscle tone, pathologies of the musculoskeletal system, dysfunction of the urinary and cardiovascular organs.
The peel of the seeds is also used, its properties affect the protection and strengthening of blood vessels and the heart. The ground peel along with the seeds is a scrub for the digestive system. True, if there are disorders or diseases in this area of the body, then you should not abuse it.
Medicines that have anti-inflammatory, wound-healing and choleretic effects are made on the basis of pumpkin seeds.
The use of pumpkin is recommended for everyone without exception. You should not use it only if you have an individual intolerance.
The raw product contains the maximum amount of elements, but it does not last long. To saturate your body with the beneficial substances found in pumpkin seeds, they are harvested in the fall. So that they are stored for a long time, do not become damp and do not sprout, they are dried. Of course, you can buy them in the store, but if you prepare them yourself, the use of these seeds will be more beneficial, because The drying process will take place under your own control. Before you start drying the seeds, you need to prepare them.
How to select and prepare seeds for drying
Before we figure out how to properly dry pumpkin seeds, let's find out how to choose an orange melon beauty, extract the seeds from it and prepare them for drying. Note that the most delicious seeds come from hard-bark pumpkin (Cucurbita pero), the same one that mainly grows in our gardens.
When choosing a melon vegetable, make sure that it is completely ripe - with a dry stalk, hard peel and a clear characteristic pattern. There should be no dents or signs of rot.
Preparing the seeds for further drying:
- Carefully cut the pumpkin.
- Separate the seed from the pulp. It should be white and dense. Otherwise, the seeds may be unripe.
- Rinse the seeds under running cold water until they lose their viscosity.
- Place the seeds on a towel (preferably paper) for 3 hours to dry. In this case, most of the moisture will evaporate.
- The process of preparing raw seed for drying is complete.
Next, we will consider the basic rules of drying, how to choose the appropriate device and how to dry pumpkin seeds, depending on the desired result.
Important Features
First of all, it is worth clarifying that the seeds are located in the pumpkin pulp. To carry out the correct drying procedure, they must be removed. You can easily separate the pulp from the seeds, the main thing is not to damage their structure
Otherwise, the product will not be suitable for drying, regardless of the method chosen. Pay attention to how you cut the fruit. Choose a sharp knife with a thin blade to avoid accidentally damaging most of the seeds. When sorting through seeds, pay attention to their color and structure.
Fruits ready for drying are denser and whitish in color. Another option involves using unripe seeds. Before cutting into a pumpkin, inspect the fruit from all sides. There should be no foreign inclusions on the surface, similar to ulcers or damage by insects.
how to make pumpkin juice at home
Basic drying rules
Regardless of how you decide to dry pumpkin seeds - in the oven, in the fresh air, in the microwave, in an air fryer or in a frying pan - we adhere to the following rules:
- We take only fully ripened seeds.
- During preparation, we try not to deform or damage the pumpkin seeds.
- If we dry it naturally, we bring the product into the room at night so that morning moisture does not settle on it.
- During the drying process, stir the seeds several times to dry them evenly.
Important! We must dry the planting material naturally, since the seeds may not sprout. We select dense and large grains.
Culinary and consumer information
Pumpkin seeds are tasty and healthy. They are used as a raw material for the production of pumpkin oil, in “beauty recipes”, in cooking - in salads, baked goods, and vegetarian dishes.
Pumpkin seeds are rich in minerals, microelements, natural protein compounds, and natural carbohydrates. Of particular value is the high content of tocopherol - vitamin E. This group of substances has a positive effect on the human reproductive system. Maybe that’s why Ukrainian girls, having decided to refuse a potential groom, gave the matchmakers a pumpkin during matchmaking? As they say, we looked at the root!
Important!
Pumpkin seeds are high in calories. 100 grams of dry product contains about 550 kcal. If you supplement the delicacy with salt, oil and spices, then - beware, figure!
You should not eat pumpkin in the following cases:
- individual intolerance;
- some diseases of the stomach and intestines, liver;
Pregnancy and lactation, childhood are not contraindications.
Pumpkin seeds are not used raw, as they are difficult to peel. Although the maximum useful substances are contained in the raw product! In addition, they contain a large amount of moisture, quickly deteriorate and mold. Therefore, before storing or using for culinary purposes, the seeds should be dried.
We recommend: How and with what can you quickly wash off depilatory wax from the surface of the skin?
How to choose the right device
Choosing the right kitchen gadget. We can use:
- oven;
- frying pan;
- microwave;
- air fryer;
- electric dryer.
We take into account the desired end result and how much time we are willing to allocate. A frying pan—steel, cast iron, or ceramic-coated—is perfect if you want to enjoy pumpkin seeds with a crispy crust. By adding a little salt or a pinch of spices, we get a more pronounced and pleasant taste.
When using an air fryer, drying will take about half an hour, and an electric dryer - up to 1 hour. Drying can also be done outdoors. This is the most budget-friendly and simplest option.
Methods for drying pumpkin seeds
Drying methods directly affect the usefulness of the product. The more gentle the method we choose, the less damage we cause to its vitamin and mineral composition.
How to dry naturally
Place the prepared seed on a tray (tray, dish, baking sheet), previously lined with clean paper. You should not use old newspapers for this purpose, since printing ink is toxic.
We cover the containers with raw materials with a piece of gauze to protect against the penetration of insects and dust. We take them to a ventilated and warm place. Periodically stir the mass for uniform and complete drying. On average, natural drying lasts several days. Under direct sunlight it is much faster - 5 hours, but some vitamins are lost.
Important! High air humidity can cause mold or rotting of the product.
People often ask on forums how to properly dry pumpkin seeds without heating in the winter. The most accessible way is to place containers with seeds, sprinkled in a thin layer, near heating devices.
How to oven dry
There are two options here: fast and slow. We will tell you how to dry pumpkin seeds in the oven, using both the first and second methods.
Fast. This method will help out those who are looking for how to dry pumpkin seeds with minimal waste of time and prefer the seeds to be lightly toasted. Preheat the oven to 180°C. Place the trays with the prepared product on the middle level for 10-20 minutes, remembering to stir.
Drying time largely depends on the technical features of the oven. Therefore, we carefully monitor the readiness of the seeds and prevent them from burning. Pour the seeds off the baking sheet after they have cooled completely.
Slow. Heat the oven to 60-80°C and place a baking sheet with seeds (arranged in a thin ball). If the seeds are large, increase the temperature to 90-100°C. Every 20-30 minutes, stir the seed in the oven so that it does not burn. Leave the oven door slightly open to allow air circulation. Slow drying lasts 1-1.5 hours.
How to dry in a frying pan
Dry with the lid open over medium heat. We do not leave the seeds unattended for even a minute—stir constantly. The process takes 15 minutes.
How to dry in the microwave
It will take 15-20 minutes to dehydrate the semen (at maximum power setting). This is the classic way.
Since the cooking speed of microwaves is different (depending on the power), we will tell you about another way to dry pumpkin seeds in the microwave so that the result will please you. It is most often used by experienced housewives.
So, cover a flat plate with a paper napkin and lay out a small portion of pumpkin seeds. Place in the microwave for 2 minutes at maximum power. If this is not enough, set it for another 1-2 minutes, but at medium power. Such manipulations will have to be done as many times as necessary to achieve the desired result.
How to dry in an electric dryer
Set the temperature to 60-70°C, place the raw seed on trays. During the cooking process, periodically stir the contents of the trays, and swap the trays themselves (at least once an hour) so that the product does not burn.
How to dry in an air fryer
We set the heating temperature to maximum - 70-80°C. For free air circulation, leave the lid slightly open. The light brownish tint of the seed skin will indicate their readiness. Drying time will take from 20 to 30 minutes.
When figuring out how to dry pumpkin seeds in a convection oven at home, we take into account that the device is equipped with a fan. Its operation enhances the heat treatment power of grains. Therefore, we constantly monitor the drying process.
How to prepare grape leaves for dolma for the winter
Grape leaves have long been popular in oriental cuisine, due to their specific pleasant taste and beneficial properties. It has been proven that the consumption of such an ingredient relieves pain from varicose veins, relieves swelling, stimulates blood circulation, and enriches the body with valuable vitamins and microelements.
It is important that during long-term storage the product retains the maximum amount of useful substances in its composition, therefore, of the existing methods, many housewives prefer freezing.
Interesting: How to store dried dill for the winter
For these purposes, it is better to choose young specimens of medium size with small veins. It is better to choose the 5th–7th leaf from the top of the vine.
The following foliage is considered unsuitable for cooking:
- from wild (maiden and ornamental) grapes;
- affected by sunburn, mold, fungi and pests;
- with a suspicious yellowish, whitish or cream color;
- old (dangerous due to components harmful to human health);
- growing on a vine near busy roads and industrial production.
Did you know? Dolma has become the source of international controversy: the Azerbaijan National Culinary Center has accused Armenia of “appropriating” the dish, and recently the UNESCO Intergovernmental Committee recognized the traditions of its preparation in Azerbaijan as one of the elements of the intangible cultural heritage of humanity.
Before freezing, it is advisable to prepare the necessary containers. Remember that thin polyethylene and cling film are subject to crumbling under prolonged conditions of low temperatures. In this regard, dense bags are preferred.
Preparing the leaves
To properly freeze grape leaves, you need:
- cut off the ponytails completely;
- thoroughly rinse the workpiece on both sides;
- dry.
Packaging
Dry leaves are stacked on top of each other in 10 pieces and rolled into a roll. In this form, it is packed into bags and sent to the freezer. It is important that there is as little air as possible inside the package. This will protect the product from foreign odors, allow it to cool faster and be better preserved.
Did you know? Dolma was a dish of the court cuisine of the Ottoman Empire.
For proper harvesting, you need to know when to collect and where best to get grape leaves. For dolma, it is preferable to use white grape varieties. Their plate does not have such a jagged edge as the red varieties, and therefore it is easier to wrap minced meat in it. The foliage is collected when the bush is flowering, in late spring or early summer.
Tender leaf blades five through seven are best, if you start counting from the top of the vine. The average size roughly corresponds to the size of the palm: this will be the most convenient way to wrap the filling.
Leaves are cut off before spraying grapes with chemicals. During the summer, you can also carry out pruning, making sure that after treating the plant with fungicides and insecticides, the period specified in the instructions for the drug passes.
Important! Do not eat products from bushes located along highways!
As with any preparation, the quality of the raw materials plays a crucial role, so it is important to understand which leaves can be used for cooking. They should be a uniform green color, without yellowing, spots or signs of pest damage.
There are several ways to prepare food for the winter, the simplest of which is freezing. But the pickled shell has an additional original flavor. Let's consider all possible ways of harvesting grape leaves.
Freezing
Prepared leaves for freezing must be completely dry. Then they do this:
- Place 10–15 leaves and roll them into a tight roll.
- The roll is wrapped in cling film.
- The rolls are placed in a plastic box, since the product will be fragile after freezing.
To prepare dolma, the pieces will need to be defrosted at room temperature or doused with boiling water.
Important! The number of leaves in one roll should correspond to the amount of dolma that is usually prepared at a time.
Bottled storage
This is an original way to keep leaves fresh for a long time. For it you need to prepare empty plastic bottles. The further procedure is as follows:
- Pour a teaspoon of salt and soda into each bottle, add a little water and shake thoroughly so that the mixture covers the entire inner surface. Then the bottle is rinsed with clean water and dried.
- Small stacks of leaves (3–5 pieces) are rolled into tubes and placed very tightly in the bottle, carefully tamping them down with a stick. The bottle must be completely filled. Sometimes a little salt is added at this stage.
- The bottle is pressed down to release all the air and securely closed with a lid.
This container is stored in a dark, cool place for up to 2 years. To prepare, you need to cut the bottle, remove the leaves and fill with cold water. Sometimes a yellowish coating may appear on the surface, which is not a sign of spoilage.
Did you know? In some regions, fig and quince leaves are used to prepare dolma.
Canning
For preservation, it is necessary to properly prepare glass jars and lids. Sterilization of dishes can be done in a pan of boiling water, in a double boiler or slow cooker, in a microwave or oven. Each jar should be treated with hot steam for 20–25 minutes. With this method, the cuttings do not need to be cut; it will be convenient to use them to pull the workpiece out of the jar. Proceed with the prepared leaves as follows:
- The leaves are rolled into a tube and placed tightly in jars, which are then filled with boiling water for 10 minutes. Afterwards, drain the water and fill the jar with boiling water again.
- Add 1 tbsp per liter of water. l. salt and sugar. Bring the mixture to a boil, stirring to dissolve the salt and sugar.
- The water from the cans is drained and filled with a boiling solution.
- The jar is rolled up and gradually cooled.
Interesting: How to store milk in the refrigerator
This product should be stored in a cool and dark place.
Pickling
Containers for pickling are processed in the same way as for canning. Then do this:
- Place 4-5 peppercorns, 1-2 buds of dried cloves, 1-2 bay leaves at the bottom of the jar.
- Rolled leaves are placed tightly on top of the spices and filled with the same solution as for preservation, with the addition of 2 tbsp. l. 9% vinegar.
- The jar is closed and stored in a cool place for up to three months, and dolma can be prepared from such a preparation in just a few days.
Pickling
Salting consists of placing the product in a solution of table salt. To pickle grape leaves, do this:
- The rolled rolls are placed tightly in a clean container and poured with boiling water. After 10 minutes, the water is drained.
- The saline solution is prepared based on the proportion: 20 g of salt per 1 liter of water. Add the required amount of salt to the drained water, bring the solution to a boil and pour it into the jar.
- Cover the container tightly, cool and store in the refrigerator.
Dry storage
For this method, brine filling is not used, but the container must be sterilized beforehand. The sequence of further preparation of the workpiece is as follows:
- Place 10–12 leaves at the bottom of the jar, press down and lightly sprinkle with salt.
- The next layer is compacted tightly and salted again.
- The filled jar is sterilized for 10–15 minutes in the oven or steamed, and then closed with a lid using a special key.
Grape leaves are an integral part of dolma. And although this oriental dish is in many ways reminiscent of cabbage rolls, traditional for Slavic cuisine, they cannot be replaced with white cabbage. In order to enjoy the spicy taste of the dish all year round, you should prepare the future “wrapper” for the rice and meat filling in advance for the winter. Is it possible to freeze it, and how to do it correctly, find out further from the article.
Grape leaves have long been popular in oriental cuisine, due to their specific pleasant taste and beneficial properties. It has been proven that the consumption of such an ingredient relieves pain from varicose veins, relieves swelling, stimulates blood circulation, and enriches the body with valuable vitamins and microelements.
For these purposes, it is better to choose young specimens of medium size with small veins. It is better to choose the 5th–7th leaf from the top of the vine. This wrapper is easy to work with, which is not the case with wrappers that are too small or too large. Leaves should be picked between late spring and mid-June, when they reach their peak growth. Healthy, well-developed specimens of regular shape without damage or signs of disease are preferred.
Oriental dishes have long been part of our lives. For example, dolma, beloved by many. It is very similar to our cabbage rolls. Only for its preparation they use grape leaves instead of cabbage leaves. Fans of this unusual dish for our area may be interested in how to store grape leaves for dolma so that it can be prepared even in winter.
Let's take a closer look at each of them.
The easiest way to store grape leaves for dolma is to sterilize them and roll them into jars.
- In order for them to retain their qualities for a long time, they are collected in 10-15 pieces and rolled into a tight roll.
- Then, the leaves folded in this way are placed in a glass jar and sterilized for 20 - 25 minutes, having previously closed the lid tightly.
- After the jars have cooled, they are rolled up and placed in a dark and dry place.
- The optimal period for collecting grape leaves is the time when the vine begins to flower.
- It is recommended to use leaves of white grape varieties for preservation, since they differ favorably from others in their sweet and sour taste, which will positively affect the taste properties of dolma, giving the dish a wonderful piquancy. If you decide to use red grape leaves for harvesting for the winter, remember that their disadvantage is their uneven surface and hardness.
- Only young leaves are suitable for dolma, and it is important to cut them from the vine, which is located as far as possible from the roadway.
- Never use damaged or torn grape leaves for preservation. Take only smooth, whole leaves, preferably the same size.
- Cooking time: approximately 35-50 minutes.
- Number of blanks: 3 blanks of 20 leaves.
Interesting: How long can the mixture be stored in diluted form at room temperature?
How to determine readiness
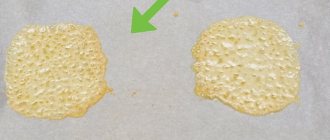
You will be notified when the process is complete:
- Appearance of pumpkin seeds. They become dry and hard, acquiring a yellowish or slightly brownish tint. The clear film slides off easily.
- Core color. It becomes dark green in color with whitish streaks.
- Taste. Pleasant, without any unpleasantness, with nutty notes. The grassy taste, sweetness and milkiness that are inherent in fresh pumpkin seeds go away.
Also, the readiness of the seeds will be signaled by a characteristic crunch when breaking a seed.