Which blade is best for an EDC knife - smooth, serrated or combined?
One of the characteristics to look for when choosing the best knife for your EDC is the type of cutting edge.
It's most often recommended to go with a smooth blade (for reasons we'll get to later), but you may also find two other types of edge: serrated (serrated blade) and combo (combination blade). Unlike the solid edge of a smooth blade, these types of cutting edges add "toothiness" to the knife. Perhaps you haven't had the need for a serrated blade before, or perhaps you didn't know enough about these knives to add to your kit. Our goal is to compare different types of blade edges in terms of how they perform in everyday tasks and find out how serrated sharpening differs from regular sharpening to help you make the right choice.
About angles
Holding a knife at the desired angle while sharpening is not as easy as it might seem at first glance. And what is this corner like? For the vast majority of the inexpensive knives mentioned above, the sharpening angle is 20-30 degrees. There are many ways to “calculate with your hands” the desired tilt of the blade; The simplest one is to fold a sheet of thick paper into a triangle, one fold is 45 degrees, the second is half as much, 22.5. We place the resulting pyramid on the block, carefully press the blade against it and remember the tilt and position of the hands.
20-25 degrees is a good angle for a well-worn carbon OpinelFor the same purposes, you can use special wooden corners or several coins glued with superglue. Or simply buy a special clip for the blade, which will prevent the edge from being too “collapsed”.
True, if the steel is completely “plasticine”, they try to increase the angle as much as thirty-five degrees - cutting such a product will be quite lousy, but it will take a long time. Here you can also play with a sheet of paper, but you will have to fold it not in four, but in three - as a result you will get a corner with a working side close to 33 degrees.
For soft steels there is another trick: the angle is maintained around 30 degrees, but one side of the cutting edge is smoothed almost “into a mirror”, and the other is sharpened on a rough, coarse-grained whetstone. This method is popularly called “gypsy”; at the industrial level, it degenerated into the notorious “laser-sharpened knives” (although, of course, there was no smell of laser there).
Small teeth on one side, a smooth surface on the other, and even the top layer of steel is carburized to increase hardness - it cuts well until it gets dull. For cheap domestic stainless steels such as 40X13, 65X13 or the favorite of Chinese manufacturers 420J2, this method works well - try it yourself.
What is a serrated knife, serrated knife sharpening
Serrator is a file-type sharpening of a knife blade, characterized by a wave-like shape. The main difference from a standard saw is that the serrated teeth are located in the same plane. This type of knife can easily be confused with a small file, which is usually located on the butt. And to prevent this from happening, it is worth knowing the characteristic differences of the serrator:
- the shape of the teeth is rounded;
- the location of the teeth is in the same plane;
- there is no setting on the teeth;
- The sharpening in relation to the blade is not symmetrical.
What is it for on a knife?
A serrator on a knife is needed in many cases, so its scope is very wide.
A blade with this sharpening can cut any fibrous products without any effort. The knife seems to “bite” into the product and saws it, so it is often used for cutting stringy pieces of meat and soft bread.
In addition, the serrator is optimal for cleaning fish from scales.
There are also special serrated survival knives on sale. They are of a tactical type and were developed for active use in extreme conditions.
Pros and cons of the blade
Serrated sharpening gives the tool a number of positive qualities that are absent in conventional blades. These include:
- High efficiency cutting blade. The cutting process is performed at various angles. The result is increased efficiency when working with layered or fibrous materials. For example, a serrated knife easily cuts ropes, cables, and thick nets.
- This knife has a longer cutting edge. Its total area is larger due to the fact that the edge forms a curved line running along all the teeth of the blade. A simple calculation shows that the total bending length of the serrator is much longer than the blade itself.
- The blade retains its original sharpness for a long time. Even if the serrated sharpening is slightly dull, the blade still cuts well. Thanks to this, knives can be used by tourists on long journeys, where there is no possibility of sharpening them.
- Low cutting force. The teeth of the serrated blade easily cut the material, and the cutting efficiency is much higher than that of an ordinary blade.
- The serrated knife can be used for defensive actions. He is capable of delivering a powerful ripping blow.
- Can be used for kitchen knives. Since the serrator cuts simultaneously at different angles, it easily cuts through hard products. The teeth help quickly remove scales from fish.
Unfortunately, the serrator also has a number of negative qualities:
- It is very difficult to sharpen a very dull blade. It is almost impossible to return the original sharpness. The operation can only be performed by an experienced craftsman using special needle files.
- Sharpening cannot be called universal. It is not suitable for delicate work. The edges of the material being cut will always have irregularities.
- The blade requires careful care. After use, it must be cleaned well, as viscous material remains in the teeth.
- The serrator is very inconvenient to use with the left hand; when pressed, the blade moves in the other direction.
Some companies have begun to produce serrated knives for people who work with their left hand.
7-step instructions for sharpening and finishing a kitchen knife
So, in sharpening a knife, one goal is to remove enough metal from the blade so that the cutting edge becomes sharp again. You need to start work with a coarse-grained abrasive and finish with a fine-grained one.
It is important to remember the following principles of sharpening knives:
- The most important thing is to choose the optimal sharpening angle and maintain it along the entire cutting edge while sliding along the block.
- Movements should be smooth, without pressure.
- All bars must be moistened with water, or better yet, with a soap solution: before sharpening (so that the blade glides better and metal dust does not clog the pores), during the process (to remove the resulting suspension) and at the end, to clean the bar.
And one more important tip - the first time it’s better to practice on a knife that you don’t mind ruining. Especially if your main knife is too good and expensive. Well, let's start practicing.
Step 1. Rinse the stone with water, and then run over it, say, with a sponge with a drop of dishwashing liquid.
Step 2. Next, sit down at the table and place the stone on a wooden board, for example, a cutting board. You can place a towel under the stone. For some it is more convenient to place the block perpendicular to themselves, and for others at an angle of approximately 45 degrees. Over time, you will understand how it is more convenient for you to work.
Step 3. Now you need to decide on the sharpening angle and fix the position of the knife. What should the angle be? The general principle is that the smaller it is, the sharper the blade, and the larger it is, the longer the blade retains its sharpness.
- Regular kitchen knives are sharpened to an angle of 40-45 degrees. If you are sharpening a fillet knife (designed for cutting thin pieces of fish, poultry and meat), then you should sharpen it sharper - at an angle of 30-40 degrees. The selected value must be divided by 2, and then we will get the angle that should be between the blade and the surface of the block. That is, to sharpen a blade at 45 degrees, you need to sharpen each side at 22.5 degrees to the sharpening surface.
A simple technique shown in the photo below will help you fix the knife at an angle of 22.5 degrees.
- Remember, you should try to stick to the chosen angle throughout the entire work.
Step 4. Place the knife across the block so that the upper edge of the handle is above the lower edge of the stone. Holding the handle with one hand and the blade with the other, we begin to slide along the block away from ourselves along the trajectory shown in the picture below.
Watch a short and clear video:
- The point is that the cutting edge sliding along the stone should always be perpendicular to the direction of movement.
- At the bend of the blade, the knife handle needs to be slightly raised to maintain the selected angle.
- Remember also that you can’t put pressure on the blade, but you shouldn’t give it any slack either.
Thus, you need to pass the blade along the stone about 40-50 times, namely until a “burr” (burr, microsaw) appears along the entire length of the cutting edge. Its appearance will tell you that the excess metal has worn out and there is no point in grinding further. Then you need to turn the blade over and repeat the same steps. Clearly in the video:
- A burr is a small roughness that is difficult to see, but can be felt by carefully running your finger along the edge of the blade (but not along the edge, so as not to cut yourself).
During operation, a suspension will appear on the blade - metal dust, which must be periodically washed off with water.
Read also: What is a peeling machine used for?
Step 5. So, the burrs have appeared, now we proceed to finishing. To do this, we repeat the same manipulations on a stone with half the grain size. An alternative finishing method is using musat.
- Musat is a steel rod of oval or round cross-section with longitudinal notches. It is only suitable for editing and maintaining sharpness, but not for sharpening a knife. It is recommended to edit the knife with musat every time before and after work.
How to sharpen a kitchen knife with musat can be seen in the following video master class from the respected knifemaker Gennady Prokopenkov, who, by the way, specializes in making kitchen knives.
Step 6. If desired, you can bring your knife to a razor sharpness. To do this, take any leather or leather belt, treat it with GOI, Dialux or any other abrasive paste, and then do the same steps, but only in the direction from the cutting edge.
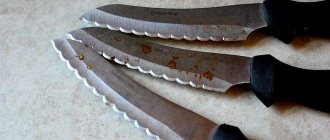
Step 7. Finally, we check the quality of sharpening. This is done very simply. It is enough to cut a tomato or cut paper. If you wanted to achieve razor sharpness, then you should try to shave the hair on your arm. The sharpest knives can even cut hair, as shown in the photo below, but in the kitchen such sharpness is not required for the most ordinary knife.
Features of the technology
Of course, any sharpening technique can have its pros and cons, so it is important to properly weigh the pros and cons before making a purchase. In the case of serrated knives, there are much more strengths than weaknesses, so the desire to purchase such an invention is completely justified. In addition, a significant part of industrial blades developed for the food industry have this type of cutting edge.
Understanding the main features of serrated blade knives, it should be mentioned that there are two types of models available on the market:
- For use in enterprises.
- For household use.
The first option is much more expensive than the second, since it is developed for professional purposes. Models for household use are more in demand due to their low cost and availability. These include serrated knives and sling cutters for cutting fibrous materials.
And if after several weeks of use the product has become seriously dull, you will have to inquire about the features of re-sharpening. In fact, it is not difficult to implement such an action, because you can sharpen almost any cutting edge profile.
As an example, we can take the most primitive design of knives - bread knives. They are intended for cutting baked goods, sweets and other food products with a soft and crumbly structure. Such a blade is sharpened both along the front part, repeating the initial profile, and along the back part. In the first case, the number of sharpenings is limited only by the individual approach of the specialist. The main thing is not to overdo it, because too many teeth will significantly reduce the service life of the product.
There are other serrated sharpening methods that are intended for more serious models of serrated knives. For example, folding and hunting knives with a Sliderco serrated require the use of this sharpening technology - narrow grooves alternate with wide ones. Such products are sharpened in two ways, but in order to achieve better aesthetics, it is advisable to give preference to the “tooth” method.
Sharpening the serrated blade
You can sharpen a serrated knife yourself at home only if you have special sharpening equipment. And a set of abrasives of various shapes, up to a needle file . It is preferable to use diamond sharpening stones.
Tabletop sharpening machines are sold in stores, but their cost is not comparable to the price of knives. If the procedure should be carried out once, it is easier to take the product to a workshop.
Let’s imagine that you decide to sharpen the serrator yourself. The use of abrasives will depend on the shape, size and spacing of the teeth:
- Each recess is sharpened in the direction of the thickening of the blade . The angle is kept at 15 degrees on average. If it is less, the sharpness of the product will increase, but under heavy loads the chances of the chips chipping are high.
- By going between all the teeth and using a larger abrasive, nicks will appear on the edge . If they exist, the process is proceeding correctly. We change the abrasive to a finer one and again go through all the recesses.
- After working with a fine-grained stone, all the burrs may not go away . It is necessary to remove them using a water-based diamond abrasive with a flat surface, the back side of the blade, in a circular motion.
By observing the angle and the use of stones from largest to smallest, difficulties should not arise. The process is labor-intensive and requires patience and experience. Before you start sharpening, think hard about whether it's worth it. The specialist has the tools and experience.
Disadvantages of serrated sharpening
The wavy blade has a number of disadvantages, let’s consider them:
- The semi-serrator leaves an uneven mark. Due to the smooth and serrated blade, the knife will cut the material unevenly.
- Limited action. Some common situations cannot be handled with a serrated knife. For example, a can of canned food will be difficult to open.
- The serrated teeth may become clogged with particles of viscous material.
- The cut is not as smooth as when using a smooth blade. The smooth edge of the blade literally crushes the material, and the serrator tears it apart.
- When cutting, the blade moves to the side. Due to the specific one-sided sharpening of the blade, the knife will behave differently in the hands of a right-handed or left-handed person. The longer the blade and the greater the force on it, the stronger the evasion.
What does a bread knife look like?
A standard bread knife is easy to distinguish from its counterparts for cutting meat, cheese, vegetables or fish. There are several main characteristics that distinguish these irreplaceable kitchen items:
- There is no point - most developers consider the piercing part to be superfluous on this tool due to the specifics of its use; at the initial stage, its role is perfectly fulfilled by numerous teeth that carefully tear the top layers of products.
- Large sizes – when cutting a loaf or large loaf of bread, it is more convenient to use accessories with a long blade.
- The presence of serrated sharpening - instead of a straight blade, a bread knife has a wavy or serrated edge.
Bread knife with wave sharpening
Almost every kitchen bread knife has a sawtooth or wave-shaped edge. This type of blade sharpening is called serrated.
Why a serrated bread knife?
Serrated blades are practical and are used for many purposes. For example, they are effective if you need to quickly cut laminated or fibrous material (belt, rope, cable). The practical serrated bread knife is ideal for cutting prepared foods and vegetables with a soft center but a relatively hard crust.
Let us list the advantages and some disadvantages of this blade sharpening.
- Due to the fact that the edge has a curved line, the cutting line is longer.
- The force applied to the knife is less, because the cutting process occurs at different angles.
- Even a partially dull blade can still easily cut food for a long time.
Disadvantages of a serrated blade:
- To properly edit this blade, you need to have special skills.
- A bread knife is not suitable for work that requires a thin, even cutting line.
- The serrated blade requires regular cleaning and often becomes clogged with food residue and sticky materials.
I don’t want to study, I want it straight away!
Japanese masters said: “Out of a hundred students sent to be sharpeners, only one has the ability, and out of a hundred capable ones, only one will become a decent master.”
Well, they are all to hell with this approach! After all, the meat for shish kebab needs to be cut right now!
So, if you are learning Zen in other ways, or you don’t have enough time/patience, or, finally, you suffer from an acute form of upper limb aphedronality, don’t despair. Especially for such cases, there are a lot of simple but effective devices that help keep the cutting tool in very good condition. Twenty years ago, the pioneer and main manufacturer of such devices was the American company Lansky; its Lansky Sharpening System (LSS) set was a kind of standard on the market. Today, our dear Chinese comrades offer exact copies of the “system” at half or three times the price. The stones, of course, are of a lower grade, but otherwise the thing is quite suitable.
American and Chinese sets - the choice is yours
And here's how they sharpen it:
As you can see, everything is very simple and effective. Anyone can do it. However, more complex sharpening devices are now available, real machines with a bunch of adjustments and replaceable whetstones.
But LSS remains a timeless classic. In our area it was dubbed the “Lansky corner” - and be careful not to confuse it with the “Lansky flyer”. The flyer is also a simple device from the same company and it also helps in maintaining the sharpness of the knife. However, it is not suitable for sharpening, but for editing it is the sweetest thing. “CrockStick” are two pairs of metal-ceramic rods of different grain sizes in a wooden box-stand.
Place a pair of rods at the desired angle, take the knife with your “working hand”, and hold the base of the sharpener with your weak hand. Hold the pre-sharpened blade vertically and move it downwards, as if cutting a piece of sausage - the cermet will quickly bring the edge to a razor sharpness.
The “corner + flyer” pair is an almost ideal option for anyone who doesn’t want to bother with bars. However, there are a lot of “bagels” on the market now, from famous manufacturers to budget Chinese. Choose according to your taste and wallet.
How to sharpen it yourself
Many users of these knives believe that they never need to be sharpened. But this is a wrong opinion; nothing lasts forever. Professionals clearly say that sharpening a serrator is a necessary process, but not a frequent one. And, by the way, there is no clear opinion on how to sharpen it correctly.
Some argue that this should be done on the back of the serrated blade, and some that each serration should be sharpened individually. And there are also people who sharpen at the same time, the first option mixed with the second.
But the most competent specialists still advise working on every tooth. Sharpening a serrator is a rather delicate matter; all procedures must be performed slowly.
For this process, you will need high-quality sharpening stones, always of a conical type. They should have a rounded shape. They are called mussats. The products are quite common in stores, so purchasing them is not difficult. Each edge of the serrator must be ground carefully around 15 degrees until a burr appears.
When it appears, you need to switch to a stone with a finer grain. And continue the sharpening process until the burrs fall off on their own. They can be so small that they may not be noticed with the naked eye. Gently run your fingernail on the back side of the butt and if they are present, then in principle you don’t have to wait for them to fall off.
Sharpening a knife with a serrated blade.
Just take the blade and use the back side of the teeth to remove them using a diamond sharpener in a circular motion. Perform the entire process with slow, non-jerking movements. If burrs do not appear, it means the angle chosen is too small, try increasing it. By choosing a smaller sharpening angle, the blade will be sharper, but the problem will be that when cutting harder material, the teeth will quickly jam.
Complex options
For a beginner in this business, you should practice on cheap knives. We will talk about sharpening the serrator on the butt of the blade.
As a rule, it is characterized by very small teeth; if on the blade, larger ones can be dealt with slowly. In this case, you need diamond needle files, special files, diamond wheels and certain tricks.
Therefore, such sharpening is quite expensive financially and very labor-intensive. It is used in special cases, for example, if the blade is very expensive. And in other options, you will simply end up with unjustified sharpening costs.
A bread slicer for each
Everyone has knives. Regardless of who you are—an experienced nymphomaniac who won’t go out on the street without three blades and a multi-tool, or an inveterate pacifist and non-resistance to violence—you definitely have a knife. If not with you, then at home in the kitchen. Or in the car. Expensive or cheap, warehouse, tourist, hunting, bought from a fashion catalogue, given to a friend “for a penny”, made in the zone or machined at a secret factory from a rocket nozzle - there are countless of them.
Typical “knife in the car just in case”
Three quarters of them are stupid. Sometimes you go with friends to the pampas, you need to cut something, and they’re like: “Oh! I have a knife in my glove compartment!” Something fearful is brought into the light of God, whose wit varies from “dumb as a Siberian felt boot” to “only used to cut up dead mongrels.” And what? They used this to open cans, chop nails on a dare, and pick at bricks. This is how it became. It’s easier for me - I always have a “folding bag” with me, for a quarter of a century now. And it's sharp.
Do you want the same? Learn to sharpen.