Venetian plaster, features
Venetian plaster will make your kitchen look luxurious.
Venetian plaster is a decorative coating for people who can appreciate a classic interior. A variety of color combinations and tints allows you to give the surface the most vibrant appearance. When using this wall decoration idea, there is the opportunity to implement many design ideas, but most people choose a marble effect for the kitchen.
This coating is made on the basis of acrylic or minerals. When used in the kitchen, Venetian plaster not only allows you to admire the noble interior, but also protects the walls from moisture.
There is an opinion that this universal material is overpriced. Venetian plaster is indeed expensive, but its total price drops significantly if a minimum number of layers are used.
Coverage classification
If the appearance of plaster is assessed, the following varieties are distinguished:
- Smooth (universal).
- Embossed.
- Artistic (the rarest).
Depending on the composition of the coating, Venetian plaster is divided into the following types:
- based on pure lime;
- a mixture of acrylate copolymer with lime;
- acrylic as a binder.
To choose the most optimal option, you must first evaluate the main types of Venetian plaster, and then select the most suitable coating from the representatives of the category you like. Typically, Venetian plaster is made from marble dust, the color and suitable consistency of which is selected using a binder.
In most cases, acrylate with lime is used. This plaster is quite easy to work with if you learn how to apply it correctly.
The walls will look elegant, a real highlight
If a lime binder is used, repair work is much more difficult for several reasons:
- It is possible to use only light shades, which is often difficult to fit into the interior of some styles, for example, Rococo or Empire.
- The color upon application is strikingly different from that which appears upon drying. This is due to the strong lightening of the shade; a difference of up to 5 tones is possible.
- It is necessary to apply plaster not only when forming an absolutely even and smooth coating, but also to control the thickness of the layer. In this case, you will have to level the walls 100%, and be careful when working.
When the plaster has transitions in the thickness of the layer, darker spots may appear on it when drying. This phenomenon is called the staining effect.
Decorative plaster in the kitchen interior
Venetian plaster differs from similar wall finishing coatings in many characteristics, among which the presence of wax in the composition is of particular importance. It not only protects the coating. When the work is ready, you will notice an unusual reflection that can be compared to a marble glow. No varnish can give the surface a similar effect. Venetian plaster should not be coated with varnish, as it can create a glossy plastic effect.
Advantages and disadvantages
Venetian plaster is most often used in classic interiors.
Venetian plaster has many advantages, which is confirmed by numerous consumer reviews.
This material is so durable and reliable that manufacturers provide a guarantee of 10 years or more.
The main advantages of Venetian plaster:
- The composition is completely environmentally friendly. During its preparation, application and use, the human body does not receive harmful substances, so this material is the best for most allergy sufferers. All components are tested for safety, since the original mixture is made from safe materials.
- If you want to cover the walls with marble, you can’t do without Venetian plaster. Only this finishing material is able to replace this durable and decorative rock in shade and durability. This plaster has an unusual internal glow, which adds chic to the interior.
- When Venetian plaster is applied to the surface when repairing kitchen walls, cracking of the finish is excluded, so when carrying out repairs you can be sure that it will not only be beautiful, but also guaranteed to be durable.
- This plaster contains wax. When a certain surface is covered with it, it becomes insensitive to the action of water, long periods of general humidity in the room, and also does not respond to temperature changes, which allows you to keep all building materials in their original condition.
- With the help of Venetian plaster, you can decorate not only absolutely smooth walls, but also surfaces with potholes and defects, but commensurate with the consistency of the prepared composition. If you decide to cover the walls with this material, there is no need to worry about small unevenness, since they can be filled to a completely smooth state.
- The Venetian plaster coating can be repaired up to the visual creation of a new repair, and it can also be restored.
This material does not have many disadvantages, but they may influence the decision to purchase Venetian plaster. The following disadvantages stand out:
- High cost of material. Venetian plaster is several times more expensive than other coatings.
- Without the appropriate skills, the coating is difficult to apply. To create a perfectly even base, you will have to practice in advance.
- The need for preliminary surface finishing. The walls may contain slight irregularities, but any cracks, clear depressions and destructive processes must be completely eliminated.
Read about finishing the kitchen with laminate at “https://ilkitchen.ru/remont/pol/pokrytie/laminat/vlagostojkij-vse-o-preimushhestvax-i-nedostatkax.html
Is it possible to wash decorative plaster and how to care for it?
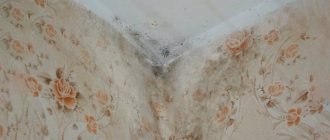
If you've ever cleaned the top of a closet or a tall bookshelf, you'll know that just because things are high off the ground doesn't mean they don't get dirty. Anything that has a horizontal surface sufficient to prevent dust particles or contaminants from falling will form a layer of dirt over time. Decorative plaster is an example of this.
After drying, the plaster becomes soft and brittle. As a result, plaster objects typically include a support system such as metal or wood reinforcement. Hessian or other fibrous materials may be incorporated into the plaster itself or used as a base. Plaster was used to make busts, figures, figurines, sculptor's models, relief panels, and architectural mouldings.
The range of decorative plaster presented here https://vseceni.ua/ct/4253/ is quite large, affordable and in demand among buyers, which means that the issue of cleaning decorative plaster also remains relevant.
The first step in safely cleaning stucco is to determine whether it has been “sealed” or not. If so, you will also need to specify the material used. Plasters can be coated or sealed using a wide variety of materials, including varnishes, waxes, paints and enamels, or a mixture of potassium oleate and alum.
Sealed plaster is easier to clean because it is less porous, but the sealant adds its own potential complications to the cleaning process. The uncovered layer is difficult to clean without causing damage. Sealed plaster tends to have little shine to the surface and is less absorbent than unsealed plaster. If in doubt, consult a specialist.
DIY concrete vibrator. Features of creating a foaming agent for foam concrete. Do-it-yourself prefabricated monolithic ceiling. Read more>>
A clean sealed layer of plaster should be cleaned with a swab moistened with water or white spirit. Test a small hidden area and, if successful, proceed in small steps through the rest of the facility. Problem areas to look out for include peeling plaster and areas with thin coating that may have tears. Sticky marks can be removed by wiping the surface with a clean, slightly damp cloth.
How to make it yourself
You can make Venetian plaster with your own hands, but it will require some skill
Anyone can create and apply Venetian plaster. All you need is to take all the necessary ingredients and equipment. Before carrying out the work, it is necessary to study the step-by-step technology, since only high-quality and measured application of the coating will allow you to admire ideal walls.
First you need to prepare the surface. It must be properly leveled. The basis can be any walls coated with a primer. Even if there is paint on the walls, you must first clean it of any dirt.
It is advisable that the surface under Venetian plaster contains nothing other than initial wall treatment and primer. This is the only way to guarantee the durability of the material.
You can decorate some part of the wall, thereby attracting its attention
Preparing the walls is carried out in the same way as cleaning the walls before pasting. All irregularities are sanded to form a completely smooth surface. Then the wall is completely primed.
It is necessary to choose a deep penetration primer. With its help, you can provide reliable protection of the surface from mold and mildew. Also, a high-quality primer increases the absorbency of the walls, which helps ensure stronger adhesion of the plaster to the wall. Allow the plaster to dry for 24 hours before continuing work.
The final coating with primer is organized at least within 24 hours. It helps make the walls as receptive to plastering as possible. The primer dries quickly, but you should let it sit for about a day, only then work on applying Venetian plaster begins. Do-it-yourself Venetian plaster, video with expert advice:
How to prepare the composition
- Prepare a container for the mixture. Dry powder must be placed in it with water. The proportions are indicated on the packaging. You should use water whose temperature is above 10 degrees.
- To mix the mixture, you must use a construction mixer. An alternative is a drill with an appropriate attachment. The solution should be stirred until it resembles the consistency of sour cream.
- It’s worth letting the composition sit. Then it is thoroughly mixed again. At the same time, its homogeneity is checked.
- The final and most crucial moment is adding dye to the mixture. It is necessary to add it in an amount that is optimal for a particular interior.
Kitchen safety rules, here.
Application technology
Venetian plaster will make even an ordinary kitchen amazing
It is advisable to apply only fresh material, that is, try to prepare as much plaster as the master can use at one time. The solution is prepared from pure ingredients. Purified drinking water and powder with an optimal shelf life are used. You can make your walls beautiful only with the use of high-quality mortar.
Each layer is applied to the kitchen walls according to a specific pattern:
- the work is done with a large spatula;
- the mixture is located on the surface from the top side, usually from the left corner;
- the edges are rounded and ground. Any defects should be excluded, including burrs and scratches;
- a sufficient amount of plaster is taken onto a spatula to subsequently cover a large space with it;
- While working with a spatula, you can make any movements. When working, it is allowed to change the direction of movement to achieve an ideal surface;
- After initial application, sand the surface immediately. A spatula is used for this. It needs to be pressed firmly into the wall, as if smoothing out a layer of plaster. These steps are repeated until the most even and thin layer is achieved;
- After 2-3 movements with the spatula, it is necessary to clean the spatula from the composition using a cloth soaked in water. Next to the already sanded layer, you need to apply the next one. Care should be taken to disguise the transition. These actions are carried out until the entire wall is painted.
When working with Venetian plaster, many novice craftsmen are perplexed about its rapid drying. You will have to come to terms with this property and learn to perform the necessary actions not only efficiently, but also at an accelerated pace.
All about the advantages and disadvantages of Venetian plaster for the kitchen:
Work is only allowed at temperatures above 5 degrees. This parameter must be specified on the packaging of the product. The higher the temperature, the faster the Venetian plaster dries. If you perform work at a room temperature of more than 20 degrees, you can expect the layer to dry completely within an hour. When the temperature is higher, the drying process speeds up.
Each layer of Venetian plaster is placed according to a specific pattern, which involves several actions:
- initial application of material to the surface;
- layer leveling;
- grinding;
- polishing, giving the surface a glossy sheen (for the final layer).
Venetian plaster will be the highlight of your kitchen
All stages of work are carried out in an accelerated mode, since with delay the plaster dries out and becomes more viscous, which makes it impossible to give it an optimal shape and thoroughly level the surface. If the kitchen is large, it is advisable to organize joint work with 2-3 partners. More competent people will be able to give the coating smooth contours, and inexperienced people will be able to carry out the initial application of the material. This method helps to make the coating high quality.
The walls will resemble noble marble
Before applying each subsequent layer, excess protrusions and other protruding defects are removed from the previous one using fine sandpaper. This element should be handled carefully so as not to damage the coating. The final layer is done differently from the previous ones, because it is the face of the decorative finish.
To give the surface a marble pattern, you will have to work separately with a spatula. Usually the medium size of this device is chosen, but some people prefer to work on the design for a long time with a small spatula.
Once the lines resembling marble tints have been applied, the coating should be thoroughly polished. With the help of polishing, experienced craftsmen achieve a variety of effects, which are determined depending on the surrounding interior. Usually a glossy or matte effect is chosen for the kitchen, but some prefer the brightest and most shiny walls.
Everything you need to know about Venetian plaster:
Protective covering
After applying all layers of Venetian plaster, the walls should be protected from negative influences and any construction work with a new coating should be limited for a period of about 5 days. After this time, it is necessary to cover the walls with a protective solution containing wax. To apply it, you can use a cotton napkin, but professionals use a trowel.
The sophistication and elegance of Venetian plaster imparts a certain character to the entire room.
The wax is applied with gentle movements, preferably in a circular direction. An absolutely even layer is achieved, since with a contrast in the thickness of the layer, dark spots may appear in areas more saturated with the product.
Usually there is a need to treat Venetian plaster in two layers. You can wash the walls for the first time after this procedure for 3-5 days. This information is specified on the packaging of a specific product.
How to create a wall with imitation marble in our video:
Relief (texture) decorative plaster
With the help of lime mixtures, which are used to decorate walls, various effects are achieved. Relief plasters are divided into structural and textured.
Structural ones are created using plastic masses. For this, various tools are used: the choice depends on what surface texture you need to obtain. These can be brushes, tampons, stamps, spatulas, stencils, combs, structural rollers, etc. On the surface of the walls, patterns can be created that imitate the skin of reptiles, stonework, flower petals...
In addition to three-dimensional forms, azures, mother-of-pearl pastes and wax are used to create complex designs. Plant fibers, stone dust and other materials can be added to lime. As a result, the wall surface, after finishing with decorative plaster, acquires water-repellent properties (which is important for bathrooms and kitchens), mechanical strength and resistance to temperature changes. The sun's rays will not change the pigmentation, and in case of damage, the surface can be easily restored.
- Roll is a freely modeled surface. Brushes, brushes, spatula knives (spatulas, or generally just spatulas) and relief rollers are used. Application technique and direction of strokes are important.
- Rillen - a surface covered with grooves. The essence of the application method is to level the working mixture with a trowel, as a result of which the filler particles are displaced, forming a grooved texture.
- Edel – rough homogeneous surface. The technology for applying plaster is simple: you should evenly distribute the working mixture over the surface of the wall.
Useful tips
- To make the process of applying Venetian plaster easy and quick, you can practice the technology on a training surface. To do this, prepare a small amount of solution, take a sheet of cardboard or other unnecessary material and apply the coating in an even layer, following all the rules.
- If there is a risk of not having time to use the entire solution, it is necessary to prepare it in small doses. The more economically the composition is used, the more economically the work on finishing the kitchen walls is carried out.
- After Venetian plaster has dried, small irregularities are often noticed. They should be immediately sanded or removed with a spatula.
- To make the marbling effect more realistic, each layer should be mixed with slightly changed color parameters. To do this, the mixture is made either darker or lightened.
Venetian plaster in the interior
the color of the plaster depends on the dye, but light shades are most often chosen
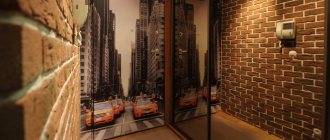
Venetian plaster is appropriate in any classical or laconic style. If you adapt the surrounding interior to it, the design in the Empire, Baroque, and Rococo styles will look harmonious. When plaster with reflective particles is used, you can adapt it to the Art Deco style and similar trends.
This material is universal. If there is a desire and imagination, it can be adapted to any stylish solution, including for a kitchen in a high-tech or loft style, where ergonomics are primarily valued, which is fully ensured by homogeneous or marble Venetian plaster.
The more modern and practical the style, the lighter the plaster is chosen. It is also advisable to use only matte tones of this coating.
How to remove decorative plaster from walls: brief instructions
To efficiently remove the old coating, you should follow some tips and instructions that will determine the progress of the work. First of all, you need to:
- stock up on personal protective equipment (respirator, gloves, goggles);
- cover the floor with plastic film to prevent dirt from spreading;
- clarify what type of plaster was used, the degree of its strength and the approximate thickness of the layer;
- choose convenient tools and tools;
- start with simple methods and move on to more complex ones, combining them if necessary;
- Sharpen your tools while working to get faster results.
Before you begin removing decorative plaster, do not forget to remove all switches or sockets, as well as all lighting fixtures. If all the tools and materials are prepared, you can start working.
Necessary tool for removing plaster
The type and number of tools needed depends on how the old plaster is removed. Since decorative or Venetian plasters are a very broad concept that contains materials of different thickness and structure, the difficulty of removing them will vary. To cover all possible options, we list the most popular devices. It can be:
- chisel, preferably with a long handle;
- hammer;
- spatula/scraper;
- scraper (a tool for removing old textured finishes and other paints and varnishes);
- metal brush;
- perforator;
- machine for removing plaster.
In addition, you will need plastic film, a bucket of water, a damp cloth, and a spray bottle, since during the entire process you will have to wet the walls with water, and at the end, wipe the walls from dust and remnants of decorative plaster.
Sanding decorative coatings and methods for doing it
To effectively remove plaster, it is better to choose a scraper with a length of 130-150 mm. Pressing lightly, it is passed along the wall at the correct angle of application. Using light movements, cycle the finish, starting from a small part of the surface, moving to a large one. At the same time, wipe the wall with a cloth soaked in water. Instead of a scraper, you can use a hammer and spatula. Before starting work, the decorative finish is moistened with hot water to reduce dust and soften the putty. Next, they tap the wall with a hammer, so that poorly adhering parts of the plaster will fall off on their own. Other parts need “help”.
A grinding machine with abrasive discs is an effective method and solution to the problem of how to remove Venetian plaster from walls. For example, Gracelo di Calce, Stucco Veneziano, Marmorino Classico. This tool does not knock down, but rather erases the plaster. To completely remove it, you need to walk over the surface with a wire brush. It also helps remove sand-effect decorative wall paint well.
Other coating removal methods
When the coating to be removed is strongly strengthened on the surface, you can use a grinder with special attachments, which has greater power. This tool works faster than a sander. But here you should work carefully so as not to damage the wall. If a coating, including Venetian plaster, was applied to the paint, an industrial hair dryer, which softens the paint, will help remove it. Next, use a spatula to remove it and the coating.
Wall care
Venetian plaster is unpretentious to environmental factors, so it does not require special actions when caring for it.
- To clean it from dirt, just wipe the surface with a damp cloth;
- if the stain is too strong, you can use detergents that are used for furniture or other similar surfaces;
- the only restriction is the prohibition on the use of abrasive products, as they can destroy the coating.
To apply Venetian plaster, you will have to do difficult work, show care and speed at all its stages. These efforts are justified, since the style and special color of this coating cannot be compared with any similar material. Venetian plaster is easy to maintain and harmless to health, which makes its use in the kitchen not only aesthetically pleasing, but also safe. We also recommend that you read our article which will tell you how to choose washable wallpaper.
Features of care
Most of the decorative plasters that can be found on the market today are classified as moisture-resistant. This means that you can safely wash walls with such a coating. However, we must not forget that this must be done taking into account the type of plaster and in compliance with all the rules for caring for it. Otherwise, you risk getting a lot of unpleasant consequences, including the loss of a presentable appearance of the surface.
Cleaning methods may vary depending on what type of plaster mixture is applied to the walls, but in all cases the wet cleaning procedure does not require any special skills, tools or products. So, how to properly wash walls covered with decorative material?
Thin-layer decorative plaster
This type of wall covering includes plasters with the following effect:
When washing such a coating, you should act as carefully as possible. You can only use a soft cloth soaked in plain water. If the contamination is strong enough, you can use a soft sponge or cloth soaked in a mild soap solution. When caring for thin-layer plaster, it is allowed to use a small amount of dishwashing detergent dissolved in water.
Textured
Among the advantages of this type of decorative mixtures is increased resistance to physical influences. Usually, in the process of forming such a coating, varnish or wax is applied as a finishing layer - these compounds have water-repellent properties, which significantly facilitates the care of textured decorative plaster.
You can use various brushes, cloths and sponges; you can add soap, dishwashing detergent, washing powder or glass cleaner to the water to clean dirt. A surface covered with textured plaster will not lose its decorative properties. This is an indispensable quality in the bathroom or kitchen.
Plaster with quartz filler
Speaking about the advantages of this type of wall coverings, experts note their resistance to mechanical stress and fairly high moisture resistance.
Caring for plaster that contains quartz filler is quite simple:
- if a large amount of dust accumulates, you can use a regular vacuum cleaner;
- if the contamination is significant, you should take a napkin soaked in warm water, to which you can add soap or a small amount of dishwashing detergent.
When caring for this type of surface, you can use a brush with soft bristles.
Venetian
The basis of this type of wall covering is marble flour. That is why at first it is necessary to protect Venetian plaster from moisture. It will take about 30 days for the surface to dry completely, and the wax coating that seals the plaster should be applied no sooner than a week after the last coat is applied.
Only when the wax has completely dried can the Venetian plaster be wiped with a damp rag or sponge. For severe stains, it is permissible to use soapy water. But what should be avoided are brushes, hard sponges, and abrasive powders.
Latex plastic
This type of decorative material allows you to obtain both surfaces with a slight gloss and walls that imitate the texture of marble or polished stone. Among the advantages is increased water resistance and resistance to various cleaning agents, and therefore this plaster can be cleaned with a damp cloth soaked in soap and water or a solution of washing powder.