Techniques for making pompoms from fabric, paper, rain, plastic bags. Photo and video instructions.
Decorating a space is a creative activity that inspires people of all ages. More often than not, decorators are women. They are closer to the theme of transforming the world around them, bringing beauty and harmony into it.
Pompons have taken their rightful place in the theme of decorating spaces for various events. Although initially they were used to decorate gaderob items.
It turns out that making them yourself is quite simple. Yarn, fabric, New Year's tinsel, and paper are used. It is important to follow the correct sequence of actions and arrange the pompoms harmoniously.
What can pompoms be made from?
various pom-poms assembled into products
Classic pom-poms are made from knitting yarn. Other materials for their creation are:
- fur pieces
- paper of different textures and colors
- bags from small to trash
- napkins
- foil
- New Year's rain and tinsel
- fabrics, for example, tulle, felt
In addition to the basic materials, you will need:
- scissors
- blanks for winding thread or fastening other types of materials
- thread, thin wire or decorative tape to secure the middle
How to make a pom-pom from yarn, threads on a fork: step-by-step instructions, design ideas, photos, videos
brief instructions in pictures for creating a pom-pom on a fork.
Needlewomen often decorate their work with pom-poms. They know how to make them in different ways. Let's consider a classic one using round cardboard blanks and a regular fork.
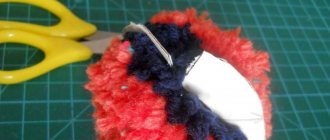
The peculiarity of the first method is that you wind the thread on 2 cardboards with a hole in the middle to the desired thickness. Then carefully cut the threads between them, and thread the thread to fasten the middle of the pompom. Pull it together and remove the blanks. The larger their outer diameter, the larger the pompom will be.
Below are instructions in pictures.
photo of step-by-step making of a pompom from threads using a cardboard template
In the second method, the finished product will be small in size. The reason is the small distance between the 2 teeth. Proceed like this:
- place a short thread in the middle between pairs of teeth so that its ends hang down towards the handle
- wrap the thread around the outer teeth of the fork to the desired thickness
- pull one free end of the cut thread up so as to connect it to the other
- tie them tightly and remove the thread from the fork
- cut all the windings on the opposite side from the knotted place
Below is a visual cue in the photo.
step-by-step photos of creating a pompom from yarn on a fork
How to make a fluffy pompom for a hat?
girl in a hat with a fluffy pompom
The fluffiness of a pompom for a hat directly depends on the diameter of the object around which you wind the yarn. The second important factor is the volume of the ball of yarn. It will correspond to the diameter of the future pompom.
In addition to the classic cardboard round blanks, you will be suitable for:
- own palm
- cardboard rectangle
- mobile phone
- plastic bottle
- glass jar
The main thing is that you can pull the thread around the winding on both sides and tie all the threads tightly.
- Cut the circle to the right and left of the fixed center.
- Align the threads, cut off those that stand out in length.
How to make a pompom from napkins: step-by-step instructions, design ideas, photos, videos
several ready-made pompoms from blue napkins.
The more magnificent you want the pom-pom to be, the more napkins you take to make it. For example, for the middle option, 3 napkins are suitable.
- Trim the edges of each with scissors.
- Stack them and arrange them like an accordion.
- Secure the middle with thin wire.
- Carefully go through each layer, leveling it.
- To make the napkins as fluffy as possible, level the layers only in one direction, leaving the other flat.
- Then you can glue it with another similar napkin.
In addition to processing with curly scissors, you can trim the edges in a semicircle or house. Fold the straightened napkins on top of each other, 10-15 pieces at a time, if your goal is large and delicate pom-poms. Such products are a good solution for decorating children's parties, as well as events involving children.
Pompoms made from napkins are hung from the ceiling or other objects, or glued to thin twigs or clothing.
Pipidastras from plastic bags
In order to make pipidastra from bags, you will need to take quite a large amount of them. The more bags you use, the more magnificent the pompom will be. The most budget-friendly option is to use garbage bags. The most beautiful option is holiday bags for wrapping gifts, or wrapping roll paper.
Step-by-step instructions with photos
Below are different options for making shaggy ones:
- The bags are straightened and stacked. 30 - 35 pieces will be enough.
- In order for the bags to lie flat when cut, without slipping, they are pinned along the center line, or stitched with large stitches.
- Trim 3–4 cm around the perimeter, thus removing unnecessary folds and handles.
- In the area of stitching or chipping, fold in half.
- Make cuts in the direction from the edge to the fold, not reaching 5 cm.
- Carefully unfold the workpiece and remove the pins.
- As a result, we got cuts along the edges, and in the middle there was a smooth, whole area.
- Start rolling this area into a tube, starting from the edge.
- Wrap the resulting tube with tape to create a holder.
- Fluff the resulting fringe along the edges, separating the ribbons from each other.
This is interesting: if the strips are short, you will get a pompom, and if the strips are cut long, you will get a plume.
- Cut off the handles of the bag. The cuts are not made across the entire width, but not a few centimeters from the edge. The free area will become a stick - a holder.
- The untouched area is rolled up into a tube.
- The stick is wrapped with tape and decorated with wrapping paper.
- Separate the fringe strips and fluff them up.
- Plastic bags are stacked on top of each other.
- All unnecessary things are cut off: handles, folds.
- Cut into even strips of the required length. This should be done carefully to prevent them from spreading.
- The strips are carefully stacked parallel to each other and tied in the center with a strong thread.
- A holding stick is attached to the junction.
- Fluff the pompom with your hands, separating the ribbons.
How to make a pompom from corrugated paper: step-by-step instructions, design ideas, photos, videos
multi-colored crepe paper pompoms suspended from the ceiling
- The technique for making a pompom from corrugated paper is similar to that discussed in the previous section.
- The difference is in the preparatory stage. Cut the corrugated sheets into identical rectangles, for example, 20x30 cm in size.
- Be careful when securing the center of the sheet with thread or wire. The paper is thin and may tear from excessive pressure.
- To make pom poms more interesting, fold 2 or more colors of paper into an accordion shape. Alternate them at your discretion.
step-by-step instructions in pictures for creating a pompom from corrugated paper
How to make a pompom from crepe paper: step-by-step instructions, design ideas, photos
Multi-colored crepe paper pompoms hang in the room.
Take a lot of crepe paper to create a pompom. Due to the thinness of its sheets, the required volume is achieved by their quantity.
- Lay out the sheets and cut them to standard A4 size.
- Fold with an accordion 1.5-2 cm wide.
- Secure in the middle with strong thread or thin wire. Leave a long tail if you plan to hang the pom pom from the ceiling.
- Cut the ends of the accordion on both sides with scissors, rounding them or giving them the shape of a triangle.
- Connect the ends of the accordion and begin to level the sheets layer by layer.
- Do this without haste, carefully so as not to tear the paper.
Instructions in pictures for creating a pompom from crepe paper
Creative project "Cheerleader costume"
Description of the presentation by individual slides:
Creative project: “Cheerleader Costume” Designer: Olesya Porshakova 10th grade student Profile: design, modeling. Head: Butylkina G.N. MBOU "Kovylkinskaya Secondary School No. 2
Sequence of project implementation 1. Justification of the problem and need that has arisen. 2. Definition of a specific task and its formulation. 3. Development of ideas and options. 4. Analysis of ideas and selection of the optimal option. 5. Study of history, trends. 6. Selection of fabric, tools, fixtures, equipment. 7. Sequence of product manufacturing. 8. Economic justification. Calculation of product cost. 9. Quality control. Correction. 10. Self-esteem.
1. Justification of the problem and need that has arisen In our republic, much attention is paid to sports; it is no coincidence that our Mordovia is included in the list of participants in the 2021 FIFA World Cup. I myself play sports and am a member of our school cheerleading team, there are 7 people in it, but we don’t have a uniform. I decided to make my small contribution to the development of sports by inventing a uniform for my team. I present to you a sample of a costume that I came up with myself and if the jury likes it, then I will sew it for the whole team.
2. Definition of a specific task and its formulation Making this product will not be difficult for me, since I have been interested in modeling, designing, and sewing for a long time. Considering that our school purchased Overlock, this will make my work much easier. Goals: 1) Show the strong connection between Mordovia and Russia. 2) Improve your skills as a fashion designer. 3) Strengthen your tailoring skills.
3. Development of ideas and options On the Internet, I watched a lot of films where cheerleader costumes were shown.
4. Analysis of ideas and selection of the optimal option All options are good, but I decided to come up with a costume myself. Since the symbol of our republic is the fox, I decided to emphasize it with the main color of the suit - reddish. We will be rooting for Russia, but we are representatives of Mordovia, so I decided to present elements of Russian and Mordovian symbols in my costume.
5. Study of history, trends Cheerleading was formed in 1898 in the USA. The University of Minnesota football team was losing every game this year and something had to be done! Before the game, a meeting was held at which several students were selected to support their team. This is how cheerleading arose, but at first it was widespread among men; only in the 20s of the last century did active participation appear among women. Over time, cheerleading became even more popular, being used to entertain spectators and support their athletes. Today, cheerleading has become an independent international sport. It is actively developing and thriving.
6. Selection of fabric, tools, devices, equipment To complete the work I will need: 1) Sewing machine. 2) Overlock. 3) Centimeter tape. 4) Ruler. 5) Pencil. 6) Chalk. 7) Iron. Graph paper. 9) Threads. 10) Sewing needles. 11) Scissors. I chose knitted fabric because it has all the qualities necessary for a suit: good stretchability (does not restrict movement), has good hygroscopicity and breathability, and also washes well and does not wrinkle.
7. Sequence of making the product I decided to make a wedge skirt from 6 wedges. We sewed it in 6th grade. Up with set-in sleeves, we sewed in 8th grade during labor lessons. 1) I took all the necessary measurements (Sb, St, Di, Dst, Op, Dr, Shp, Ssh, Shs, Shg, SgII) 2) I made a pattern on graph paper. 3) I cut it out taking into account seam allowances. 4) I cut out wedges for the flags. 5) Connected them, getting two semicircles. 6) Prepared for the first fitting. 7) Conducted a fitting, specifying the length and width of the product. Processed after fitting. 9) I joined the shoulder seams and tucked in the sleeves. 10) I inserted details imitating flags into the side seam and sleeve seam. 11) Processed with overlock. 12) I processed the neckline and connected the upper part with the skirt. 13) I folded the sleeves and the bottom of the product. 14) Completed OBE. The suit is ready.
8. Economic justification For finishing, I used leftover fabrics from previous works. No. Name of materials used Price (rub.) Consumption of materials for the product Cost of materials (rub.) 1. Knitted fabric 260 rub. (1m) 1.5 m 390 rub. 2. Sewing threads 10 rub. 2 to 20 rub. Total: 410 rub.
Calculation of electricity Calculation of the total cost 1) Sewing machine 0.38 rub. Because Our machine consumes 85 W in 1 hour, and 1 kW costs 2.91. In total, I worked with the machine for 1.5 hours, that’s 130 W. Then I 0.13 kW x 2.91 = 0.38 rub. 2) Iron 1.7 rub. Because an iron consumes 1200 W in 1 hour, and 1 kW costs 2.91 rubles. In total, I worked with the iron for 30 minutes, that’s 600 W. Then I 0.6 kW x 2.91 = 1.7 rubles. Total: 2.08 rub. Material costs Cost 1) Material consumption 410 rub. 2) Electricity consumption 2.08 rub. Total: 412 rub. 8 kop.
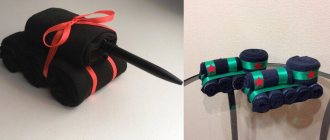
How to make a pom-pom from garbage bags and T-shirts: step-by-step instructions, design ideas, photos, videos
ready-made pom-pom from polyethylene T-shirts on the table
These rustling pom-poms are often used for dances, support groups for sports teams, and decorating festive costumes. Therefore, one side is always a handle, which is convenient to hold the pompom.
- Place the bags with equal sides facing each other. Cut off the handles and cut the sides.
- The remaining glued bottom will be the handle of the future pompom.
- Cut the fabrics of the bags into fringes up to a centimeter wide. Leave 2-5 cm to the edge intact.
- Roll the result into a tube and secure the handle with tape or thread.
- Straighten the fringe. If desired, add a layer of glitter tinsel along the outer edge.
- If the pom pom is made for cheerleading, attach a plastic handle inside it to prevent your hand from slipping while dancing.
step-by-step photos of collecting pompoms from garbage bags
What is cheerleading?
This term refers to an organized support group for teams in different sports. Describing what cheerleading is, it should be said that the term comes from the English language and it combines two words: “cheer” - to support and “lead” - to manage. Today, support groups have moved to a new level, as they take part in the World and European Championships. The fiery performances of girls with bright pom-poms are based on rhythmic dances, acrobatics and other elements.
To further understand what cheerleading is, we offer several interesting facts related to this sport:
History of Cheerleading
People first started talking about cheerleading teams at the end of the 19th century, and cheerleading immediately became popular. The decision to create the first team was made in 1989 at a meeting of the University of Minnesota. In the early stages, cheerleading was closely related to American football and, interestingly, it was initially an activity for men. Cheerleading has been accepted as a sport since 2001, when the World Championships were held.
Cheerleading competition
World competitions in this sport are held annually. The championship is hosted by the winning team. The leading positions in most cases are occupied by teams from America, Japan, Finland and Germany. The cheerleading championship gave a big impetus to the development of this type of sports dance, so more than 50 countries around the world already have their own sports clubs. Another interesting fact is that there is an International Cheerleading Federation, which was founded in 1998.
How to make a pompom from tulle: step-by-step instructions, design ideas, photos
hanging pompoms made of tulle
There are several ways - winding and assembling on a thread.
The procedure in the first case is similar to using yarn, which we discussed in the sections above.
In the second case, you need a needle and a long thread. With their help, you either string the fabric in the middle of the tulle cut or along its edge.
Once you reach the edge, pull it together to form a pompom.
Fix the thread tightly and cut off the excess.
Often tulle pompoms decorate weddings or children's outfits for girls.
step-by-step photos of creating a pompom from tulle
Cheerleading chants
To become a member of a support group, you need not only to have good physical fitness and flexibility, but also to have excellent diction, a well-trained voice and a sense of rhythm. This is due to the fact that cheerleading in sports involves the use of different chants that are uttered during the performance. These are short poems aimed at raising the morale of the team. They traditionally use bright and expressive words. Chants are divided into two groups: cheers - performed only by cheerleaders and chants - chanted along with the audience. Here are some examples:
How to make a rain pompom on a stick: step-by-step instructions, design ideas, photos, videos
several ready-made rain pompoms on sticks
- In addition to rain, you need sushi sticks or pencils, tape, and a glue gun.
- Measure the required length of rain and cut off the excess.
- Cover the middle with a thin strip of tape.
- Repeat the steps as many times as necessary to obtain the desired volume.
- Distribute the resulting bunches evenly around the stick and secure with either tape or a glue gun. To be safe, use both methods at the same time.
- To add beauty to the product, cover the stick with the same rain that was used for the pompom. Wind it in a spiral in 2-3 layers and secure it with glue.
Pyramids cheerleading
In each performance, the team uses several pyramids, which can have different configurations, the main thing is to form it correctly and fix it so that no one falls, and the poses of the top ones are as even as possible. At the base of the pyramid are guys or strong girls, and those who are lighter occupy the top positions. The girls at the bottom are the “base”, the middle level are the “mounters”, and the top level are the “flyers”. The program is structured so that cheerleading includes dancing, acrobatics, and feasting, and the transitions from element to element should be almost imperceptible.
How to make a pompom from tinsel: step-by-step instructions, design ideas, photos
a girl holds pompoms made of tinsel in her hands.
The tinsel is quite voluminous, it is quite difficult to collect it like yarn to create a pompom. Available means will come to the rescue, for example, straws, foam balls, and the figure-eight folding technique.
- In the first two cases, you should attach the tinsel so that there is no free space.
- If you took a foam ball, stick it in rows, starting from the middle.
- To give the pompom extra volume, wrap another row of tinsel on top. It will look especially beautiful in a different color.
- If you plan to hang the pom pom, use a glue gun to attach the string between the strands of tinsel.
How to make a pompom from faux fur: step-by-step instructions, design ideas, photos
rows of ready-made faux fur pompoms
- Take a cardboard blank with a slightly larger diameter than the future pompom.
- Place it on the inside of the fur piece and circle it.
- Cut out the result and sweep the edges of the future pompom from the inside so that the fur does not fall apart.
- Pull back the thread you used to sew. You will get a fur ball.
- Fix the thread so that it holds the edges tightly. If you plan to hang the pompom from something, leave it long, otherwise cut it off.
step-by-step photos of making a fur pompom
How to make a fabric pompom: step-by-step instructions, design ideas, photos
three fabric pompoms on the table
For such a pompom, prepare pieces of fabric 1.5-3 cm wide and 2 cardboard crescents.
- Between the latter, place one piece so that its ends hang freely.
- Wind the fabric in the same way as discussed in the yarn section. Be careful not to over-tighten the winding.
- Secure the remaining end with glue or a stapler.
- Using scissors, cut the strips between the crescents and carefully remove them.
- Pull the thread and tie tightly.
- Trim the fabric in a circle to give the pompom a nice shape.
- Hang it either from the ceiling, or create original bouquets, or attach it to the “wishes” tree.
step-by-step photos of making a fabric pompom
Pom poms for cheerleading
It’s hard to imagine a cheerleading performance without pompoms – balls made from thin strips of different sizes. They can use plastic, polyethylene, vinyl, special paper, cotton, and so on. Accessories for cheerleading should not only be bright and beautiful, but also convenient for performing various elements: spins, throws and others.
Pompoms can have different types of holders, which are recommended to be selected individually to make them convenient. There is a regular handle, made in the form of an elongated holder, a dumbbell handle is located, as if inside a pompom, and the third option is a handle in the form of a double ring. The loop handle is suitable when you don't need to toss pompoms. In addition, there are different diameters of balls, for example, for competitions, voluminous pompoms are used, which reach up to 30 cm in diameter.
Cheerleading clothing
One of the main attributes of the dancers’ impact on the audience is their costumes. In most cases they include short shorts/skirts and tank tops. Clothes should be bright and colorful, so sequins and other decor are often used for decoration. All team members wear the same costumes so as not to stand out from the overall picture. Elastic fabrics are used to sew costumes so as not to hamper the movements of the dancers. If the performance is aimed at supporting a specific team, then the cheerleading costumes will match the color of the club.
How to make a two-color pompom?
a set of materials and tools for creating a two-color pompom.
Depending on the material from which you plan to make a pompom, the process of making it will also be different.
For example, for a yarn product, you do one of the following:
- wrap each color on half a piece of cardboard or a special device
- alternate colors in layers
- wrap both shades at the same time
How to make a pompom for cheerleading?
ready-made pom-poms for cheerleading made from rain
One of the easiest options to make is a pom-pom for cheerleading.
The technique for making it is quite simple:
- take a solid piece of the material from which you plan to make a pom-pom
- on both sides, cut the canvas into strips of equal width, which you set at your discretion
- leave a narrow space in the middle without cutting
- twist the cut fabric with a pipe and pull it in the middle
- If desired, glue a loop here to prevent your hand from slipping while dancing
So, we looked at the technique of making pompoms from different materials. We got inspired by looking at photographs of their placement in space and on the hats.
Use your imagination and pick up scissors, cardboard blanks and thread for attaching the centers. You'll definitely make some interesting pom-poms!
Slide captions:
Creative project using technology CHEERLEADER COSTUME Prepared by 7th grade student “A” of Municipal Educational Institution Secondary School No. 1, Gulkevichi Nechaeva Yulia Supervisor Baklanova E. A.
GOALS AND OBJECTIVES OF THE PROJECT PRODUCT REQUIREMENTS MODELING PROCESSING TECHNOLOGY CONSTRUCTION RATIONALE FOR THE CHOICE OF THE TOPIC SELECTION OF THE MODEL HISTORICAL REFERENCE Star of consideration ADVERTISING CALCULATION OF COST
It is necessary to consider the properties of various materials and choose the best fabric for the suit. Textile materials research
Models proposed by girls 1 2 3 Creation of a bank of models
Neck line Chest line Waist line Bottom line modeling
Safety precautions. • The workplace must be kept in order, each tool must have its place (needle in the needle bar, scissors and threads in the pencil case.) • Do not lean towards the machine. • Do not work without a scarf. • Do not handle the plug of electronic devices with wet hands. • Before work, check that the cord is in good condition; when turning the machine on and off, only grasp the body of the plug. • The needle should always be with thread to make it easier to find. • Do not put the needle into clothing • Keep your hands suspended while sewing, you need to sit straight and not bring the work close to your eyes.
We designed the base of the nightgown and drew shaped lines. We prepared the pattern for cutting and placed the details sparingly on the fabric. Pin and trace the pattern along the contour, set aside seam allowances. Carefully cut out all the details according to the allowances. Manufacturing technology
We swept away the details of the suit and prepared them for fitting. We processed the parts and assemblies of the garment. During the processing, we carried out overcasting and WTO of the product.
1) We made pom-poms for performances from large (25 kg) garbage bags. First, all the soldered seams in the rolled bags were cut off and the bags were folded into stacks of 7 pieces each. The stacks were folded in half lengthwise and thinly cut from cut to fold. 1 2 2) Turn the stacks around so that the cuts are on both sides. 3 3) Rolled stacks of cut bags into a roll and fixed the middle 4) Made a double loop in the shape of 8 from a linen elastic band according to the size of the middle and index fingers to hold the pompom in the hand. 5) Use a hat elastic band to tighten the middle of the roll, attaching a loop at the same time. 4 5 6) Fluff the pompom by sorting out the layers of cut strips. Making pompoms