Why doesn't the light in the hood turn on?
Check if the device is working. This may be difficult if LED lamps are installed in the hood . In addition to the LED, a control driver is also installed in the device. It cannot be checked with a regular tester. To find out whether the LED lamp is working properly, it is inserted into the working socket. However, before you start checking, you should make sure that the rated voltage of the lamp corresponds to 220 V.
If the test reveals that the lamp is working properly, make sure that the connecting wires are not damaged and the operation of the power button is not impaired. A tester is also required for this purpose. The button is pressed and the probe of the device is brought to it. If it is working properly, the resistance between its contacts should be less than 1 ohm under such conditions.
The light bulb burned out after a short circuit
The light bulb may have stopped working due to a short circuit . A visual inspection of the wires will be required. If no external damage is found, test the power lines with a multimeter.
The device will help you find the short circuit area in hidden wiring. After identifying the problem area, repair the wiring.
The life of the light bulb has expired
Any lighting device sooner or later becomes unusable. The duration of its operation depends on a number of factors : the quality of wire switching, voltage stability, etc.
Before taking any action, it is important to make sure that the cause of the breakdown is a failed light bulb . The lighting device is checked with a special device - a multimeter. If the assumption is confirmed, the lamp is replaced with a new one. In this case, it is advisable to use a device with exactly the same performance indicators as the previously installed one. Otherwise, the wiring will be damaged or the light bulb simply will not light.
Dirt or moisture has entered
This could happen during the cooking process. To solve the problem, the lamp must be unscrewed and cleaned . After it is completely dry, install it in place. If after the above steps the light still does not turn on, then the cause of the breakdown lies elsewhere.
Interesting things on the site:
How to clean grease from a kitchen hood
Types of carbon filters for hoods
Types of grease filters for hoods
Wiring problems
Burnt out wiring is another reason why the light in the hood does not turn on . In this case, it is important to understand where exactly the breakdown occurred. First, check the wire that is located in the lamp - the thinnest and most fragile. In 90% of cases it is he who burns out. In order for the light to appear in the hood again, the wire is changed.
If a short circuit occurs, the wire may simply come off. In this case, it is attached back.
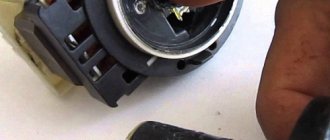
The switch is broken
The switch in the wiring will not work due to burnt out or dirty contacts . If you don't have enough technical knowledge, it is much easier to replace the old switch with a new one. If you have certain skills, clean the switch contacts.
If the hood in the kitchen has been installed for a long time, the power button may break due to natural wear and tear . There is only one way out - replace the button. It’s not that difficult to do, the main thing is to know how to work with a soldering iron.
If the hood contains halogen lighting fixtures that work normally, the cause of the breakdown may be the operation of the transformer. If the device has fluorescent lamps, the cause of the malfunction is sought in the ballast. If a malfunction is detected, it must be replaced.
Operational issues
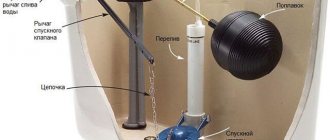
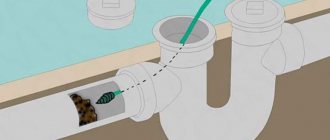
To install a Crohn's hood, it is not necessary to contact specialists. Circulating models just need to be connected to the power supply. Flow-through and mixed-type hoods are connected to the ventilation duct: Internet sources contain many Krohn hood diagrams that describe the installation and commissioning of equipment.
The image shows a standard connection option: this Krona hood diagram is suitable for most models of the manufacturer.
One of the many advantages of the brand is the ability to repair a Krohn hood with your own hands. Before you start repairing your Krohn hood at home, understand the breakdown features:
- if the equipment does not turn on, make sure that the motor for the Krona hood is installed correctly, and also check the connection to the electrical network;
- if the performance of the equipment decreases, check the serviceability of the aluminum and carbon filters, as well as the presence of draft in the air duct;
- the reasons for the loud operation of the exhaust device may be the condition of the engine or an excessively dirty filter system;
- If the backlight begins to burn less brightly or stops turning on, but there are no problems with electricity, replace the built-in lamps with new ones.
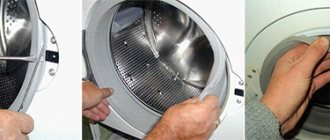
How to change a light bulb in a Krohn hood? Open the hinged panel on the housing, carefully remove the external filter - and, by pressing the holder, remove the lamp socket by turning it counterclockwise.
You can learn how to disassemble a Krohn hood, how to properly care for the surface and how to ensure its proper operation over time from the instructions for the purchased model.
If you are not sure that you can handle the installation and repair of a Krona hood yourself, contact a specialist.
A little about the general
The vast majority of manufacturers equip hoods with lighting systems. This is extremely convenient, as the hob is fully illuminated and cooking comfort is increased. Each brand implements this option differently. Models differ in the type of lamps, their placement, and brightness .
Modern modifications of air purifiers are equipped with adjustable lighting intensity. In this way, the light flux can be diffused throughout the kitchen or directed onto the hob. The function is independent of the fan and can be activated independently of the main operation of the device.
How to replace a light bulb on a hood, refrigerator, oven, or sewing machine
The hood was chosen according to the principle: beautiful - quiet - not very expensive. The Ventolux Bravo kitchen hood with an inclined surface, metallic color, touch buttons, lighting with two light bulbs, and a relatively low price compared to other hoods met these parameters. During the first year of operation, the hood coped with all its tasks: it pulls steam and odors from the hob well, the light is bright, it works quite quietly in the first and second modes, it is very easy to wash it, there are no fingerprints left on the metal surface, drops of grease can be wiped off with a cloth without effort .
In the second year of operation, both light bulbs burned out in the hood. Can it be replaced? We thought so too, until we disassembled the hood and saw that the lamps in it were soldered together with the electrical board. It’s not so easy to unscrew a burnt-out lamp and screw in a new one. After a few months, our hood completely “went crazy.” As soon as you lightly boil a saucepan on the hob and pour steam over the hood, the touch buttons independently begin to turn on and off and switch operating modes. We even jokingly called our hood a poltergeist.
We contacted the technician about this problem. The answer was clear: due to poor-quality insulation of the internal electrical part of the hood, steam from the pans gets inside the board and “switches” the hood, oxidizing the contacts. Repair means replacing all boards. At the same time, the master did not guarantee that the problem would not arise again, because a manufacturing defect cannot be corrected.
Catalog of reviews Kitchen appliances Hoods. Average: 1 1 review. Read all reviews 1. Category: Hoods. Type of equipment: Hood. Published November 16, - Touch buttons that turn on and off themselves. Postgirl does not recommend. All comments. Read all reviews 2. Average: 2. Average: 4 1 review. Stylish, practical, easy to clean, but the performance is extremely poor.
Average: 5 1 review. Great design will decorate your kitchen and bring comfort. Popular categories.
Faulty exhaust equipment
If the hood fan does not work at all, then the following reasons are possible:
- Poor contact in the socket or plug, the power cord is broken or there is no voltage;
- The fuse has blown;
- The connection terminals inside the hood body are loose, or the wires are unsoldered;
- Faulty buttons or switches;
- If the hood has an electronic control interface, there may be damage to the electrical board, relays, sensors, etc.
- The fan motor is faulty.
When starting a hood repair, you need to look for faults, excluding the possible causes mentioned above, going through the points one by one.
Troubleshooting inside the hood
The initial diagnosis of the hood is carried out by turning on the built-in light. But, due to overvoltage, all components of the hood may fail, or, at best, the fuse may blow. Wiring and fuse testing, voltage measurement and socket repair are described in detail in other articles of this resource.
Complete set of hoods
The hood is actually a centrifugal fan, the functionality of which is based on a conventional asynchronous motor. The rotation speed of this single-phase electric motor is continuously controlled by different methods. Exhaust devices operate on the following principle: a fan inside a metal casing passes through filter elements and removes steam, soot and odors during cooking to the outside.
Hood details:
- centrifugal exhaust fan;
- exhaust ventilation grilles;
- switches and switches;
- filters and grease traps;
- air intake grille;
- regulators;
- lighting lamps.
The rotation speed of the hood fan may vary. The exhaust air mass enters the grease filter. If the device operates as a flow type, the air goes outside through a vent or shaft. If the device only filters the air, then it falls on a carbon filter that absorbs odors and is returned back into the room.
Centrifugal fan - the “heart” of the hood
Carbon filters are often installed immediately after the grease trap and secured to metal brackets. They are disposable, they are changed depending on the contamination and intensity of the hood. During cooking, fatty impurities accumulate on metal grease traps made of aluminum, so they are regularly washed and cleaned of grease and dirt. You can wash the hood grate with warm water and baking soda.
The control panel can be push-button, slider or touch. Both mechanical and electronic panels are carried out by one kitchen hood control unit. Exhaust devices are equipped with lighting devices (incandescent, halogen or LED lamps).
Advantages and disadvantages
It is more convenient to use a stove with lighting above it
Advantages of using backlight:
- ease of use of the stove, illuminated from above;
- the possibility of long-term operation of economical products that do not blind the owner’s eyes;
- natural lighting.
The advantages of lighting do not exclude the presence of its negative aspects: the high cost of some types of illuminators and additional costs for electricity.
Replace the light bulbs in the hood
In the presented list of manuals for a specific model of Hoods - Konigin Terra White. You can download the instructions to your computer or view them online on the website for free or print them. If the instructions are not complete or you need additional information on this device, if you need additional files: drivers, additional user manual, manufacturers often make several different technical help documents and manuals for each product, the latest firmware version, then you can administrators or all users site, everyone will try to quickly respond to your request and help as quickly as possible.
Contents: 1. Service manual Replacing lamps 4. Replacing a light bulb in a hood - YouTube 5. Replacing a lamp, Ariston hood. Do not use the hood if the grille is not installed correctly!
About the brand
Once you find out who the manufacturer of Krohn hoods is, you will dispel all doubts regarding the quality of these products. The country of origin of Kron hoods is Germany: it is here that today the best technical solutions are born, useful innovations are introduced and modern designs are designed that will not leave even the most demanding customers indifferent.
The numerous variety of Krona Steel hoods allows each client to find a suitable option both in terms of performance characteristics and cost on the market. This is where the main approach of the company is manifested: to satisfy maximum requests and improve technology to make the process of cleaning the kitchen easier and faster .
Connecting the hood to electricity
This stage is the simplest. It’s very good when initially planning your kitchen, you carefully planned the location of all sockets and electrical points.
You can find out how to avoid making a bunch of basic mistakes and maintain all distances in a separate article.
If you do not have a free socket for the hood, you will have to install it. To do this you will need the following materials:
three-core cable VVGngLs 3*2.5mm2
For home wiring, use a cable of this particular brand (with the index Ls).
regular 16A socket with grounding contacts
The hood itself, unlike other kitchen appliances, is a low-power device. Accordingly, it is not at all necessary to pull separate wiring under it directly from the switchboard.
The same cannot be said about the hob or dishwasher.
It turns out that this unit can be connected from a common socket group from the nearest distribution box.
Pull a groove or cable channel from the distribution box to the location of the future outlet and mount the socket box.
This outlet is located on top, almost under the ceiling, slightly above or to the side of the hood itself. The choice of a specific location will depend on the length of the cord and the requirement for the minimum installation height of the exhaust unit above the stove.
Often you have to cut a hole in the nearest kitchen cabinet for this purpose.
Next, remove the insulation from the cable, mark the cores and connect them together in the junction box.
All that remains is to connect the outlet correctly.
The wiring for the kitchen unit is ready. Let's move on to the air duct.
The hood doesn't work
Such a malfunction can be caused by various reasons, the most common are the following.
- The hood is not connected to the power supply.
- Switch malfunction. To check it you need a multimeter.
- The fuse inside the plug has blown. Some hood models are equipped with plugs with a fuse that could blow due to power surges. You can replace it with your own hands - returning the repaired device to working condition.
- Damage to the wires inside the hood. A multimeter is used to check the internal circuit for the possibility of damage and contact loss. Having tightened the connections with a screwdriver and crimped the connections with pliers, the electrical circuit is checked again with a tester.
- Fan motor failure. Having checked the engine and found the cause in it, they replace it. It is better not to repair the motor yourself, since it is labor-intensive and economically ineffective. It's easier and cheaper to buy a new engine.
Causes of failure
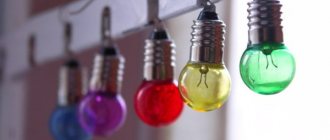
LED lamps are the most economical and durable.
The main reasons for lamp failure include:
- expiration of service life;
- breakage of the switch;
- electrical wiring problems;
- contamination and moisture ingress;
- short circuit in the power supply or break in the connecting contacts.
Each of the listed cases requires a special approach that will help eliminate the malfunction. Sometimes you can do this yourself, but in most situations you will need the intervention of a professional electrician.
How to change a light bulb in a kitchen hood depending on the design
Different types of lamps are installed in different hoods. Replacing each of them has a number of features.
Incandescent lamp
This lighting option is the cheapest . Such lamps are found in budget models of hoods. Light appears due to the passage of current through a tungsten wire. The glow is soft and warm.
You don't have to spend a lot of money to replace the lamp. Economy class hoods are often equipped with samples with an E14 base and a power of 20 or 40 W. The disadvantage of such lamps is that they quickly fail, but they are cheap - 90 rubles.
Substitution rules:
- Unplug the power cord from the outlet.
- Wait until the lamps cool down, if the lighting was working until this point.
- Remove the aluminum filter.
- To remove the lamp, you need to unscrew it using counterclockwise movements.
- Insert a new lamp with the same power.
- Reinstall the filter.
Halogen
They cost a little more, but their service life is longer compared to the previous option . The lamp cylinder contains halogen vapor, due to which the service life of the lighting device is extended by 2-4 thousand hours. The temperature of the coil rises to 300°.
Halogen lighting devices are less energy-consuming . They emit a pleasant light, reminiscent of natural light. The lamps have effective light output. This is the main competitor of LEDs.
Substitution rules:
- Disconnect the hood.
- Wait until the lamps have cooled completely.
- Unscrew the lamp cover. A flathead screwdriver will help make the task easier.
- Remove the old lamp and install a new one in its place. It is important to only touch the lamp with a clean cloth. We must not allow any traces of sweat to remain on it. Otherwise, the device will quickly fail.
Luminescent lamps
Such hoods provide cold and soft light. Essentially, this is a gas-discharge light source, where an electric discharge creates UV radiation in mercury vapor. It is converted into visible light by a phosphor.
Thanks to the high luminous efficiency of 75 lm/W, the hob is illuminated evenly and better than with typical incandescent lamps . This is light of low brightness, without contrasting shadows; the lamps always shine in the cold spectrum. You can count on a long service life - at least 5 years, but the price of the lamps is high. However, it is offset by good work resources.
There is one caveat - a long service life is ensured subject to a limited number of starts - up to 2000 . It’s better not to terrorize such lamps 10 times a day. Plus, there is a risk of chemical hazards - after all, there is mercury inside.
This solution is much less common in air purifiers. Fluorescent lamps are installed on Krona Grace, Faber Titano, Miele DA hoods. The price starts from 260 rubles.
The replacement principle boils down to the following:
- the hood should be disconnected from the network. To do this, remove the power plug from the socket or turn off the fuse on the distribution board;
- The lamp shade is removed, for which you use a flat screwdriver or a special spatula. The lampshade should be lifted in the middle part, bent and removed from the side holders of the housing;
- The fluorescent lamp sockets protrude slightly on one side. It is from this side that the cartridge is retracted all the way and held in this position;
- turn the lamp a quarter turn and remove it from the socket;
- In the same way we insert a new lamp and shade.
A problem when replacing a failed lamp can be the brand’s own design developments. Perhaps the only solution is to contact the service. In addition, from such manufacturers only original spare parts are suitable for replacement, so pay attention to the availability of consumables.
Kitchen hood lighting. Electrical problem.
Address: Sirenevy Boulevard, 39, Moscow, Moscow city. Dmitry M. Alexander Sh. Installation of one interior door. It is required to install a simple interior door to the bathroom on
Address: Sirenevy Boulevard, 39, Moscow, Moscow city. Dmitry M. Alexander Sh. Assemble a wardrobe.
We install LED bulbs in the kitchen hood
Availability: Free like all guides on the site. No registration or SMS. Page: 30 of Die Instruktionen, die in diesem Handbuch, gegeben werden, sind bitte ganz streng einzuhalten.
Category: Homemade lamps. Publishing comments and questions without moderation Subscribing to comments Uploading files and pictures. Toggle navigation. Don't remember Lost Password? Authorization Registration.
Step 7. Understanding additional functions
- Depending on the “sophistication”, you can see models with 1-2 air intake speeds and even 10. In our opinion, there is little point in overpaying for an abundance of speeds; 3-4 modes will be quite enough for most non-professional cooks.
- Also, modern hoods are almost always equipped with a timer or a residual stroke button, which makes it possible to synchronize its operation with the stove.
- When buying a hood, you should make sure that it has protective shutdown sensors and a sensor that reminds you that it is time to replace/clean the grease filter.
- Some manufacturers (for example, Siemens) even build televisions into hoods.
Popular models
Why is embedded technology so in demand? First of all, thanks to its compactness and the possibility of camouflage in any interior .
Reviews of Krona built-in hoods confirm the quality of this equipment. The average cost for them is about 3-6 thousand rubles. The model range includes built-in hoods Krona 60 cm and 50 cm. Compact hoods Krona 50 cm can be mounted in any wall cabinet.
A built-in Krona 60 cm hood with electromechanical control with a capacity of 320 m3/h will cost about 3.6 thousand rubles. A compact model with a glass visor, gaining power up to 450 cubic meters, is estimated at 4-5 thousand.
Maintenance and care – Operating instructions Hansa OSC 511 WH
Information for preliminary review. The official information of the manufacturer is not. Cleaning and care. Turn off the power supply to the hood by unplugging the plug from the power socket or turning off the fuse. This significantly reduces the risk of fire and ensures that the hood functions as efficiently as possible. Never wipe. Ventilate the kitchen frequently.
In my Elikor hood model, at the place where the light bulb is located, there is visually only one hole where you can insert a knife.
Has the light on the instrument panel burned out? No problem!
Here a lot depends on the car model. But the essence remains the same. As for the tools, we will need a flat and figured screwdriver or a set of bits. Often the dashboard is attached using several self-tapping screws. We find and unscrew them. Next, carefully pull the tidy towards you. There is a block in the center; it needs to be disconnected, since without this it will be difficult to replace the required lamp.
With the panel removed, we remove the back cover. It is held in place by simple plastic clips. We try not to break them in the process. Next we see lamp bases, each of which is responsible for illuminating a particular icon. Scroll the lamp base to the left and remove it. Now you need to remove the light bulb from the base. If you cannot remove it, you can try to fix the base with pliers, but be careful not to damage it. Then we install a new lamp and assemble everything in the reverse order. Since changing the light bulbs on the instrument panel is not difficult, this must be done, because you may not find out about some malfunctions just because the lamp does not work.
Security measures
Before carrying out work, turn off the electricity supply to the house. If the electrical wiring is incorrectly routed, a wall switch may open not the phase but the neutral wire, which will lead to an electric shock during removal and installation.
The work site must be convenient and safe. You cannot change the lamp on unstable benches and stools; for this you should use a high-quality factory stepladder. All procedures must be carried out very carefully so as not to damage the ceiling, the lamp itself and its wiring.
Thus, replacing light bulbs in suspended ceilings and spotlights is not as difficult a job as it seems.