Good times everyone! Shouldn't you bake us some pancakes? Yes, so that there is more oil, so that it is golden and bright, reminding of sunny spring days, when the rays of the sun melt the snow after a long winter, and the earth is reborn and gains fruitful strength...
Pancakes are and remain a ritual food at funerals, and it was in this capacity that they were used on Maslenitsa (Maslenitsa week before Lent) and Christmas Eve. Get ready! A fascinating story and a simple recipe for delicious pancakes awaits you.
The pancake is red and hot, like a hot, all-warming sun, the pancake is poured with melted butter - this is a memory of the sacrifices made to powerful stone idols. A round, hot pancake is a symbol of bright sun, red days, good harvests, good happy marriages.
Kuprin A. I.
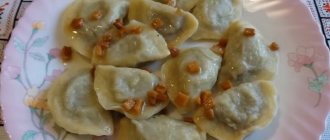
Thin pancakes with milk (in the photo there is an option to serve with red caviar)
In Russian villages, small clay frying pans were found as early as the 9th-10th centuries, which were shaped like jagged edges and a symbol of the sun. They were probably made for baking Pancake week pancakes. And this once again could serve as confirmation that small frying pans with radiant edges were a model of the sun. It turns out that Russian pancakes are at least 1000 years old. Can you imagine?!
Thin pancakes with milk - a simple recipe for delicious pancakes
To prepare pancakes, we need the following ingredients:
- Milk – 1 liter
- Egg – 4 pcs.
- Flour – 400 gr.
- Vegetable oil – 4 tbsp. spoons
- Sugar – 2 tbsp. spoons
- Salt – 1 teaspoon (not heaped)
- Soda – 0.5 teaspoon
- Melted butter 50 gr.
We will cook for 1 liter of milk, and we will show you the whole recipe from preparing the dough to baking the pancakes. It is worth noting that these are not delicate pancakes with holes, but the simplest recipe for thin pancakes. We will cook with holes in one of the following issues. Do not miss…
Interesting
In the English town of Olney in 1445, one woman was so enthusiastically baking pancakes that she did not notice the start of the church service. And when the bells rang, she ran out of the house with a frying pan, tossing and turning the pancake as she ran so that it wouldn’t burn.
Since then, a tradition has emerged in England - every year on Fat Tuesday (Mardi Gras, an analogue of Forgiveness Sunday) “pancake races” are held. Women must run a distance of 400 meters while holding a frying pan with a pancake in their hands. During the race, women must toss and turn over the pancake at least twice. The participant whose pancake turns over the most times wins.
Pancake dough made with milk and eggs. Simple recipe
Remove the eggs and milk from the refrigerator in advance so that the dough turns out as it should, they should be at room temperature. Of course, the milk can be heated on the stove and the eggs can be placed in warm water.
So, let's begin…
Break the eggs into a bowl and add salt and sugar in quantities - 2 tablespoons of sugar and 1 teaspoon of salt. We use 4 eggs per 1 liter of milk.
By the way! The amount of sugar will determine the brownness of the pancakes and their crispiness. If you add too little of it, the pancakes will turn out pale. And if you overdo it, it will be too ruddy and, of course, cloyingly sweet. You can count the amount of sugar in teaspoons, and then you would get 4 spoons. And these actually make delicious golden brown pancakes, as in the photos above and below. But in any case, you can experiment and add 3 teaspoons of sugar if desired. It will turn out delicious too! In simple words, 3-4 teaspoons of sugar is the most optimal combination for 1 liter of milk.
We begin to beat the eggs and at the same time add 4 tablespoons of sunflower oil...
We continue to beat until the mass is homogeneous, and the composition will not be similar to honey. Attached photo:
Next, add flour, and it is advisable to sift it through a sieve so that the flour is saturated with oxygen, thereby making the dough more tender and airy.
There are several recipes for pancake dough. There are custards made with boiling water, which come out with holes if the dough is not thick and the frying pan is hot enough when baking.
There are several secrets in the holes:
- The dough should rest sufficiently. Minimum 40 minutes.
- The dough should not be thick, otherwise holes will not have time to form, as the pancake will bake faster.
- The pan should be sufficiently hot. Thus, the first pancake will not turn out lumpy, and of course, on a hot frying pan, those same holes will appear.
But keep in mind that for pancakes with fillings, holes are not always appropriate. But dipping it into the filling is just the thing...
Also, for holes, many people start the dough in boiling water. It is also called choux pastry for pancakes. In our case, soda 0.5 teaspoon. At the same time, in a heated frying pan, you will get those very delicate pancakes. But we’ll talk about them in the next issue, in more detail! Now, add half a teaspoon of soda...
The important point is that we pour in the flour gradually. This is necessary to make it easier to get rid of lumps. Pour in flour, mix, add more and mix again. The measuring cup is literally 180 grams. At the same time, try to make the pancake dough by eye, because a little more or less flour can result in a slightly different composition, and if you want to get holes in the pancakes, there won’t be any. In our case, we intentionally make the pancake dough without holes.
In the photo below, we’ll take a closer look at how it turned out. I will try to convey this to you through photos!
You can leave a few grams of flour in case you overdo it with milk. Literally 50 grams... Although leave it by eye. It’s hard to make a mistake here, because you will see the finished dough below... You will get exactly the same, and the pancakes will be very tasty! Especially with the right filling))
Fluffy pancakes made with water and yeast
Ingredients:
- Wheat flour - 300 gr
- eggs - 3 pcs
- milk - 300 ml
- water - 200 ml
- dry instant yeast - 7 g
- sugar - 60 gr
- sunflower oil - 100 ml
- salt - 1 tsp.
Cooking method:
In a bowl, combine the eggs with sugar and salt, then beat until bubbles appear.
The amount of sugar in this recipe is selected optimally for a neutral taste, since yeast loves sugar, the dish will not turn out very sweet.
Next, pour in the milk, add the sifted flour and yeast and mix, and so that there are no lumps left and the mass becomes homogeneous, add more boiled water and vegetable oil.
Now we put the dough in a warm place, and to speed up this process, I put it on the stove at 40 degrees and keep it there for 40-50 minutes, until it rises. After I mix it, let it settle a little and put it back on the stove so that the dough rises again, but now we don’t mix it under any circumstances, you need to save all the bubbles that appeared in the dough.
Place the frying pan on the stove, heat it up, grease it with oil and, using a ladle, carefully pour the dough into it so that it spreads evenly over the entire surface.
When one side is browned, turn it over and do the same on the other side. And we do this with every pancake.
Serve the finished dish for tea with any toppings, bon appetit!
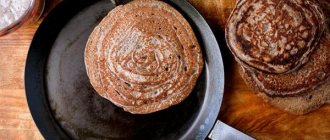
Pancakes for 1 liter of milk - a classic recipe with step-by-step photos:
Next, pour in the milk, little by little, in a thin stream, stirring occasionally. Don't rush to add too much milk, otherwise the dough will be lumpy. Of course, you can just beat it with a mixer, but I always mix the pancake batter by hand, using a whisk!
This is how our grandmother taught us...)) We stick to our grandmother’s pancake recipe. It’s just that all the information on the Internet is pulled from different places, and it’s difficult to find proven recipes. Thanks for reading us!
And whisk, and whisk...
Add a little more milk and finish with a whisk. Here's what happens...
Pour in the remaining handful of flour and continue kneading the dough. I’m trying to show you a step-by-step recipe to make it easier for you...
Next, we stir the dough for 1-3 minutes, and it turns into a homogeneous mass, but there are still a few lumps left. The whisk will have to work a little.
The next shot is at the moment when the dough is actively stirring with a whisk. You can already see how the dough turns out. In fact, it is still a bit thick... A delicate process begins!
Add milk little by little until you get the desired consistency. We also take into account that when the dough rests, it will become a little thicker. This is a very important moment!
How do you like the photo, drops of milk? We tried for you...
This is truly a detailed recipe, and it can be prepared based on photos alone))
With milk it turns out very delicately; you need to refine the dough, because it should turn out a little liquid, but as it sits it will become thicker. This is worth considering. Therefore, we stopped and added milk. And if needed, add a little more. In total, we used about 1 liter of milk. Almost! But this recipe is just for 1 liter.
This is how the homogeneous pancake dough turned out...
Now our dough for thin pancakes is almost ready... It turns out to be such a liquid consistency, somewhat reminiscent of liquid condensed milk. Although the dough is a little thinner... This takes into account the fact that the dough still needs to rest. Let's take a closer look below!
All that remains is to add melted butter. Pour in)
Literally 2 tablespoons of melted butter. Photo above.
Prepare thin pancakes with holes. Step by step recipe:
Baking also has its own little nuances and secrets. We'll talk about them below.
The frying pan plays a big role. It is advisable that it be intended only for this type of baking. Currently, stores sell pancake makers with different coatings, and you can choose the appropriate option for yourself. Of course, if you have a cast-iron frying pan left over from your grandmother, then this will be completely out of competition... The products will turn out beautiful, rosy and thin.
I have an ordinary pancake maker, supposedly with a stone coating. But in fact it is some kind of polymer, albeit a fairly good one. She has never let me down, and not a single product on her has turned out lumpy.
If you cook different foods in your frying pan, then it will require preliminary preparation.
- firstly, it needs to be washed well and degreased;
- secondly, it needs to be heated very well over fire;
Previously, there were no traces of special frying pans, so my grandmother heated coarse salt on its surface.
1. Place the pancake maker on high heat and warm it up well. You can check whether it has warmed up or not by raising your palm to the surface at a distance of about 3 centimeters. It should be warm. And I determine the degree of readiness of the dishes by the characteristic smell.
2. Prepare a silicone brush, dip it in oil and lubricate the heated surface, grabbing the walls. If it is large, then you can dip the brush twice. You should not apply a lot of oil to the surface. Otherwise, the products may start to burn and will be too greasy. In general, the oil on the surface should not be visible.
3. Take a ladle and stir the dough. Scoop it up and pour it into the pan in a thin layer. For containers with a diameter of 24 cm you will need a full ladle. But in any case, with the first product it will be possible to decide how much dough is needed.
You can pour it starting from one of the edges or from the middle. In this case, you need to quickly rotate the pan while holding it by the handle. The dough spreads quickly.
If individual islands remain unfilled, you can add just a little extra to them.
4. When pouring the dough, if the layer turns out to be thin, many holes will immediately appear and the bottom will be visible through the product. This is a good indicator, which is what we were striving for.
You will need to bake the product on one side until it browns for about 40 seconds. Although this indicator will depend on the thickness of the poured layer and the intensity of the fire. My fire is above average.
There are also indirect signs by which one can determine the stateness. There should be no batter remaining on the surface of the poured dough during baking. The ends of the product dry out and move away from the edge of the dish.
It happens that the dough does not come away from the walls well, in this case it can be helped with a sharp thin knife.
5. When ready, insert a wide spatula under the browned product, lift it and turn it over. It turns over without any difficulty, does not tear or stick.
6. Bake the second side for 30 seconds. If the fire is high, then the surface is quickly covered with ruddy dots and our beauty is ready.
Place it on a plate, where we will place all the finished products in a pile.
7. To bake the second and subsequent pancakes, it is advisable to re-grease the frying pan with a brush each time, dipping it once in oil. So there will always be a large number of holes on the surface.
If you are not chasing holes, then lubricating with oil is no longer necessary (this is only necessary for the first product). We have a sufficient amount of it in the dough, and you can completely get by with what you have!
You can experiment and try baking a couple of products with butter and a couple without it. So decide which handsome men you like best in their appearance.
It is also necessary to stir the dough with a ladle before each new pouring of dough. As you noticed, ours is very liquid. And so that the solid residue does not accumulate at the bottom, it must be raised upward so that all the pancakes are of the same thickness.
In general, all proportions are observed in the dough, and it turns out not capricious at all. It's a pleasure to work with and doesn't present any surprises. There will be a video below so you can see everything with your own eyes.
8. Bake all the pancakes in the same way, placing each one on a plate, where a beautiful, fragrant pile will soon gather. It happens that for greater taste, each of them is greased with butter while the product is still hot. It also turns out very tasty, although quite high in calories.
When I fry a large number of portions, for example from a liter of milk, I usually bake in two pans. The cooking process is twice as fast. But you can see for yourself how it will be more convenient for you.
How to cook (cook) pancakes with milk
That's all... Let the dough sit for fifteen minutes and you can start cooking. If you want to get holes, let the dough sit longer. Preferably an hour! And before baking, heat the pan properly.
By the way! The dough can be prepared the night before and left in the refrigerator overnight. And in the morning bake pancakes.
Look what happened, the dough should be not much thinner than 15% sour cream. Although, it’s probably not correct to focus this way, because each manufacturer has its own thickness. To put it simply, it is quite liquid.
The dough has “rested”, and now you can start cooking. Heat up the frying pan.
The coating of modern frying pans allows you to bake pancakes without using additional oil. I remember how, as a child, my grandmother baked pancakes in a cast-iron frying pan, greasing it with a piece of lard... by the way, she still does not change her habits, and now she bakes pancakes for her great-grandchildren.
It is enough to wipe the pan with a napkin and then heat it up so that all the metal around the edges is sufficiently warm. If the frying pan is not warm enough, the first pancake will most likely turn out lumpy.
In any case, the first pancake may turn out to be a trial one. And don’t worry if it turns out lumpy or a little burnt. I admit, it didn’t turn out perfect for us either, but the main thing is that it didn’t tear and the consistency of the dough turned out to be ideal for baking pancakes...
Brush the first pancake with melted butter and continue baking the pancakes. Our dough stood for only 15 minutes, and if you hold it longer, around 1 hour, then it will infuse enough, and in a very hot frying pan, when slowly pouring a thin layer of dough into a heated frying pan, you will get holes. In the photo below, you can tell they are not there, but if you look closely, you will notice that they are starting to form. I intentionally don't preheat the pan because this is a classic no-hole pancake recipe. They turn out thin and are good for filling!
If you bake pancakes in two pans at once, the baking process is 2 times faster. It is very comfortable! First, cook on one side, then turn the pancake over to the other side. It takes literally 3 minutes for 1 pancake. But you will understand the exact time already during the baking process. It depends firstly on the temperature of the stove, and of course the material from which the frying pan is made.
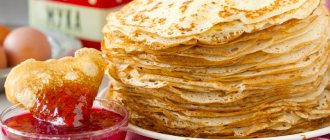
So, after 20 minutes we got this stack of pancakes with 1 liter of milk:
The most interesting process begins, namely preparing the filling, or eating pancakes with sour cream, condensed milk and any other delicacy. For example, raspberry jam!
Try this recipe. Delicious!
Delicious pancakes with mineral water and milk: they just melt in your mouth
Believe me, you can make pancakes with milk in a hole without using soda or yeast. Here you will need something else, namely soda. This recipe has the perfect proportions of ingredients. Your pancakes will not stick to the pan and will not tear. They will be thin, but at the same time elastic. You can wrap any filling in them, be it sweet or salty.
Ingredients:
- eggs - 3 pcs.
- milk - 200 ml
- flour - 1 tbsp. (200 ml)
- salt - 1/2 tsp.
- sugar - 1 tsp.
- vegetable oil - 2-3 tbsp.
- highly carbonated mineral water - 2/3 tbsp.
How to cook:
1. Separate the whites from the yolks. Beat the egg whites with a mixer or whisk until you obtain a fluffy white foam. This will take about 3 minutes. There is no need to beat until stiff peaks form. The photo shows what should happen.
2.In a separate container, mix all other ingredients. This is done in a certain sequence. First, beat the eggs, add salt, sugar, and mash. Pour in milk (temperature does not matter) and stir.
3.Sieve the flour and mix it vigorously to form a smooth dough. Use the same mixer you used to beat the egg whites.
4.Pour vegetable oil into the dough and stir.
5.Now add carbonated mineral water. The dough will begin to foam immediately, mix everything. This water will soften the finished pancakes.
6. At the very end, add the whipped whites and mix gently (not with a mixer, but with a spoon or spatula) with upward movements. Try to keep the foam fluffy.
7.Now leave the dough alone for 20 minutes, let it rest before frying.
8. Heat the frying pan and grease it with oil before the first pancake. Then there is no need to lubricate if the surface is non-stick coated. Stir the dough before each scooping to ensure it remains homogeneous.
9.Bake pancakes on both sides until golden brown. You will see how delicate they will be. And when you try it, you will fall in love with this recipe.
10.If you wish, you can grease the pancake with butter after baking for a richer taste. Cook with pleasure!
Thin pancakes with milk. They turn out very tasty!
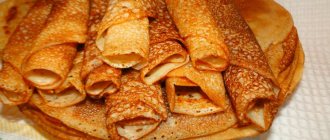
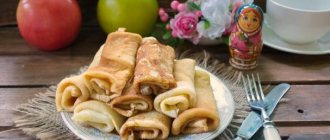
You can roll them into an envelope, or you can wrap them as in the photo below. This method is not only convenient for dipping into sour cream, but also for placing a spoonful of caviar inside the envelope.
On the edge of the plate , you can put a spoon of your choice:
- Sour cream
- Condensed milk
- Jam (any)
It’s convenient to make several options at once so that there is variety and you can choose which ones taste best. Let's start with the most festive...
Spring rolls for the holiday table. Photo recipe:
Below are several ideas for serving pancakes on the holiday table. Although you can have absolutely any filling. For example, we haven’t tried it with cottage cheese and red fish. Reviews say it turns out very tasty. But it's worth checking again...
I know for sure that the following fillings turn out 100% delicious. Several options for you:
Pancakes with caviar
The first and most popular recipe for serving pancakes is to put a spoonful of red caviar in an envelope. This delicacy is eaten very quickly. Tea is a must!
If you liked this method of submission, please click the class below the article. Thank you in advance!
How to wrap pancakes with caviar?
The photo above shows a simple way to make a sharp envelope into which the filling fits. It's easy to do...
First, the whole pancake is folded in half and then rolled into an envelope. I am attaching a photo:
If you use the same method of wrapping pancakes, click on the button on social media. net. Thank you!
Pancakes with condensed milk
Oh, well, this is just crazy. Very, very tasty! Whenever we make pancakes, we eat them with condensed milk. Yum-yum, and that’s all...
Condensed milk is liquid, so it is logical to eat it in a separate bowl.
Do you like pancakes with condensed milk?
Pancakes with sour cream
And of course, as without sour cream... This is a classic of the genre. A couple of spoons of sour cream directly into a plate, dip the pancake in it and eat with black tea. Tasty and satisfying!
Plus or click if you like it too!
Pancakes with cheese and ham (sausage) in a frying pan or microwave
They are done quickly and easily. And when you taste it, you understand that the filling is very nutritious. You can eat such pancakes, and they replace both the first and second.
Grate cheese and ham (can be replaced with sausage), and place closer to one edge:
Then we wrap the envelope as shown in the photo below:
Hold the edges and the pancake and carefully wrap it.
Place the filled pancakes in a preheated frying pan with butter and bake for 3 minutes on each edge. It is important here that both the edges are fried and the cheese inside is melted.
It turns out to be a very tasty combination. Be sure to try it. You'll like it!
Completion
Now it's time to take stock and evaluate the best version of pancakes. Of course, I vote for the first option with red caviar.
In the given recipe, the most affordable pink salmon caviar is used, the cost of a 100 gram jar is only 170 rubles. Be sure to try it! The charge of vivacity rises to 100% from such a delicacy)
What kind of pancakes do you like?
Did you know that...
Among the Maslenitsa rituals, children were given pancakes, and they rode astride a poker or grip, and shouted:
“Goodbye, snotty winter! Come. summer is red! Dry the harrow - and I’ll go plow!”
Thus, pancakes are not only a ritual food at a funeral, but also a symbol of the beginning of change, when one time changes to another - light (radiant sun) replaces darkness. In simple words, pancakes symbolized a time of change...
...and Maslenitsa, with the tradition of burning SCARED at the end of Maslenitsa week, is the most important ritual to burn away the darkness and present the ashes to the Russian land. The ashes from the burned effigy were scattered across the fields. This ritual was done so that the earth, after the winter awakening, would gain strength and produce a rich harvest.
In general, everything that was done before was all about reaping a rich harvest. The earth is our main breadwinner. And the interest of pancakes is that they not only served as a symbol of the sun, and a time of change. Everything is much more interesting...
"Maslenitsa". P. N. Gruzinsky, 1889.
Maslenitsa week is, first of all, an ancient ritual, the main purpose of which is to stimulate fertility in Mother Earth, which is especially relevant in connection with the upcoming start of field work, because planting will begin, and it is important to get a rich harvest. And before the start of Maslenitsa week, they always baked pancakes, celebrated Parents' Day, and used them to remember their deceased parents. The first pancake was left on the graves of the cemetery, then distributed to the poor, children in the yard, and nuns, so that they would remember the dead with a kind word. After all, they are in the earth, and it is believed that they should be commemorated with pancakes, not only because this dish is particularly archaic, but also because it is necessary to transfer some energy into the earth, through the deceased. Thus, affecting the fertility of the earth from the inside. And on Sunday, the day of burning the effigy came - this is the final ritual of fertility and fertility, and its farewell (another meaning is farewell to winter) was supposed to convey this fertility to the earth: the ashes from the effigy, or the torn effigy itself, were scattered across the fields.
The peasants were convinced that before Lent, it was necessary to leave food for their deceased ancestors. And therefore, after dinner, nothing is removed from the table, cups and spoons are not washed, even pots with leftover food are placed on the table. Anything left uneaten is left to the “parents,” who come out from behind the stove under the cover of darkness and eat.
This is the belief and history! And as we see, it is closely related to pancakes. A little creepy, but these are ancient traditions... And now that we know the history and recipe, please your loved ones with delicious pancakes.
I wish you bon appetit, and see you again!
Please click the button if you liked it) And thank you for being with us!
0
Author of the publication
offline 4 hours