Corrector pen
A correction pen is an indispensable attribute of any student. It is found in any office and often helps out when you need to quickly and quietly correct a mistake. But what to do if the corrector pen does not write?
In fact, they dry out quite quickly and also often begin to leak, which complicates the work.
If the new correction pen does not write, then it must be shaken well for several minutes. Then remove any leaking marks on the tip. And you can start working.
If this doesn't work, try pressing harder when correcting mistakes - this will release more of the corrective agent. In cases where the corrector is water-based, when it dries out, you can soak the tip and the pen will work again.
A new pen, like a car, requires running-in. Having bought a new pen, we sometimes encounter such a nuisance as intermittent writing. The pen leaves an intermittent stroke, which indicates an uneven ink supply. This is the first common problem. The second problem is that the pen scratches the paper. The third problem is the difficult movement of the piston in the dial mechanism. And the fourth problem is a sudden stop in the supply of ink to the pen.
Basically, this is a list of the most common faults with any fountain pen. But if we talk about the new pen, then this is the result of her “childhood illnesses”.
Why does the pen write intermittently? If it is working properly, then the problem is most likely with the factory lubricant, which has clogged the feeder channels. Why does this lubricant (usually technical petroleum jelly) end up in the feeder labyrinth and capillary? She shouldn't be here? It shouldn't. But factories that produce pens use continuous production. One section produces feeders, another produces barrels, a third produces caps, and a fourth collects handles. Production is organized in such a way that excess products are sent to the warehouse. This ensures the continuity of the assembly line - if the plant uses a conveyor production method. In addition, some of the finished feeders are sent to the warehouse as spare parts for repairing handles. To prevent oxidation of the surface of the feeder channels, an easily washable technical lubricant is used. Its particles clog the feeder channels - if the lubricant gets inside.
Typically, a new nib will be cleared of grease when you refill the pen for the first time. Expensive handles assembled by hand do not contain any preservative lubricant at all. Therefore, expensive fountain pens are not subject to such troubles. And cheap ones happen.
What should I do if my new pen doesn’t write or writes intermittently? Rinse it. To do this, you need a glass of clean water at room temperature (and sometimes a few drops of ammonia). You need to rinse the handle by rotating the handle of the dial mechanism - drawing in and expelling water from the reservoir until the feeder channels are completely clean.
How to determine the moment of cleansing? Very simple. We can only detect the effect of intermittent writing after refilling the pen or installing a new ink cartridge. Consequently, the feeder fills with ink. And you need to rinse the pen until the channels (labyrinth and capillary) are completely clear of ink. If washing does not help, repeat the procedure. Does your pen still refuse to write? Then you need to contact the service.
The fact is that the feeder capillary may be clogged with shavings (plastic, hard rubber, metal). Regular washing is not enough here. A radical “treatment” is required with disassembly of the writing unit. The problem is rare and only happens with cheap fountain pens. But it happens.
Along the way, let’s clarify the question - why the handle starts slowly. That is, the stroke does not appear immediately, but after a centimeter or two of the path traveled by the pen. The issue may be the same preservation lubricant, which can be solved by washing with water and ammonia. But there is another reason - the feather is not broken in.
A new nib always scratches the paper a little. We feel this through the resistance to writing and the creaking sound of the carbide ball of the pen rubbing against the paper. If the point of contact of the ball with the surface of the paper is too small, the pen will not start immediately.
How to fix it? Patience. The pen requires running-in, during which the ball of the pen tip is ground at a certain angle and takes on its final shape. The pen becomes a working tool quite quickly. The initial run-in requires 2 to 4 days. After this, the feeling of the scratching stroke of the pen decreases, and the pen acquires a soft stroke.
Full testing occurs within six months of regular writing. Six months is the maximum period. But owners of good fountain pens say that over the years their favorite pen writes better and better. This is the result of a deep run-in. The carbide ball wears out in such a way that the contact area with the paper becomes ideal for our handwriting. All microprotrusions of the ball are ground off. The stroke of the pen becomes not only soft, but also as comfortable as possible.
In my Soviet past, the office tricks and tips below were used very often. I also shortened the rods, changed the writing units of the pens I liked, shaded an incorrectly written letter or word...
Then I came across these tips in the Encyclopedia of Technologies and Methods . Let's read, remember our childhood?
Hand rest.
Make a springy hand rest out of wire and writing will become much easier. The part of the wire facing the hand is insulated with tape. The stand can be easily removed and put on your hand. Let's add: this trick prevents the paper from getting dirty when the hand touches the sheet, as a result of which the ballpoint pen malfunctions.
Unscrewing tight parts.
When separating tightly screwed parts (for example, handle housings), you can use a small piece of sandpaper.
Adhesive bandage to increase finger strength.
When unscrewing a stubborn pen tip, use two pieces of adhesive tape or insulating tape. You will immediately find that your finger strength has increased many times over.
Dried ballpoint.
Do not rush to recharge your ballpoint pen just because the surface of the paste on the open side of the refill has dried out and therefore the paste has stopped flowing to the ball. Drop 2-3 drops of acetone into the rod, and then slightly break the crust with a needle - the pen will regain its previous functionality.
Storing ballpoint pen refills.
A supply of ballpoint pen refills can be stored for years in a test tube with a tight stopper without fear of the paste drying out. If dried rods are placed in a test tube with fresh rods, they soon restore their properties.
Reworking the refill of a ballpoint pen.
If you have a smooth refill for a ballpoint pen at your disposal, but need a refill with a stop for a spring, no problem. Heat the tweezers and use the tips to make two pinch pinches on the shaft.
How to refill a ballpoint pen.
You can recharge your favorite ballpoint pen like this: remove the writing unit from the full refill. The rod is inserted into the channel of a disposable ballpoint pen or into an empty rod and a thin wire is passed along their entire length until it stops at the ball. Then the structure is placed vertically and after a few hours the empty handle or rod is filled with paste.
Short ball rod.
When you need to reload a ballpoint pen, and instead of the required writing unit with a length of 107 millimeters, there is only an 82-millimeter unit, cut a 32-millimeter piece from the old unit and place it on a short unit. And now you can safely insert the knot made up of two parts in this way into your fountain pen.
Treatment of a staining rod.
After repeatedly refilling the refill of a ballpoint pen, the gap between the edges of the refill and the ball increases and the pen begins to write worse - it gets dirty. This defect will disappear if the end of the rod is crimped. The simplest “crimp” can be a push pin stuck into a tree. Place the end of the angled rod in the corner of the button cutout and rotate it using light pressure.
Leaking fountain pen.
The pen cap is leaking ink. Unscrew the cap one turn and rub a piece of plasticine into the resulting gap. Replace the cap. Remove the squeezed out plasticine.
So that the handle does not leak.
If your fountain pen begins to leak and stain your hands, this problem can be eliminated. The threads of the body and cap must be washed, wiped dry and lubricated with a layer of Vaseline.
Repair of imported fountain pens.
In imported ballpoint pens (Hungarian Pax, American Parker), the branded large-volume writing unit can be replaced with a domestic one. It is shortened on the back side by 23 mm, the back part 25-30 mm long is cut off from the used unit and a new writing unit with a total length of 98 mm is assembled.
Flawless pen ink.
If a fountain pen becomes clogged and fails, the problem is most often not in it, but in the ink. Having bought a bottle of ink, you need to filter it through a layer of filter paper and then add a teaspoon of alcohol (you can use denatured alcohol or cologne). With this ink the pen will write flawlessly.
Refilling a fountain pen.
Use this tip when you need to refill your fountain pen with ink. A piece of paper will keep your hands clean and will later serve as a cleaning material.
Refilling used markers.
Used felt-tip pens will still serve if they are refilled with ink. To prevent the ink from drying out, you need to store the markers without access to air, for example, in a container with water. Just check whether the caps fit well enough to the body.
(True, I don’t quite like this advice - the ink dries out and gets dirty. I filled the felt-tip pens with simple ink of different colors. You just need to let it drain thoroughly - and use it to your health!).
Multicolor ballpoint pen with pencil.
In a multi-color ballpoint pen, one of the refills can be replaced with a pencil. You need to remove the writing unit from the used rod and insert a piece of lead 10-15 mm long in its place.
Scraper for graphic and retouching work.
A convenient scraper for graphic and retouching work can be made from a collet pencil and a piece of trapezoidal-shaped blade clamped in the collet. The number of collet jaws should be even; if odd, the blade will bend slightly.
A match instead of a poster pen.
Those who need to write a headline or announcement in large letters can be advised to write the inscriptions using a match inserted into a collet pencil.
Eraser feather.
A piece of eraser with a few notches attached to an old brush makes a great poster pen.
A fountain pen.
Graphic designers often use a fountain pen with multi-colored ink and ink to design artistic posters and panels. After working with such a pen for a long time, the pen begins to scratch and catch on the paper. To correct this defect, take a small piece of fine-grained sandpaper - “zero”, and with pressure (no more than required for writing) use a fountain pen to make about two dozen circular movements. The pen will be polished and write well. Save the sandpaper, it will come in handy more than once.
Preservation of steel feathers.
All writers are well aware of how quickly steel pens are corroded by ink and deteriorate even if they are thoroughly wiped each time after use. Meanwhile, there is a very simple way to preserve feathers for a long time. Before use, new feathers are immersed in a solution of copper sulfate for half an hour; they are then taken out so that they remain moist and allowed to dry. Steel parts and nibs treated in this way do not rust or be corroded by ink.
In addition to the above method, there is another, extremely simple way to preserve steel quills for a long time, which consists of sticking the quill into a raw potato after writing and leaving it there until the next use. Alkaline potato juice weakens the oxidizing effect of ink on the pen and completely protects the latter from damage.
Removing blots from a drawing.
To remove a blot from a drawing, erase it with an ink eraser, shade the area with a soft pencil and draw the line again. Ink does not smear on graphite. Once dry, erase the pencil with a soft eraser.
Removing ink from a drawing.
You can remove ink from a drawing in this way: clean the defective area with fine sandpaper, and then with the finest sandpaper - “zero”. Next, wipe with an eraser and polish with a smooth, hard object. At the same time, the paper fully retains its drawing qualities.
Cleaning up the carcass with a piece of glass.
Cleaning up ink on a drawing with a piece of glass from a burnt-out light bulb is much better than using a razor blade.
How to remove grease stains on paper.
Burnt magnesia is mixed with such an amount of completely pure gasoline that a granular mass is formed. Gently rub a small amount of this mass onto the greasy stain using your finger, then remove small grains of magnesia from the paper. Fresh grease stains usually disappear immediately, while old stains are removed with repeated rubbing.
Carefully removing lines.
With a small piece of eraser clamped in a drawing pen, you can easily remove a pencil line from a drawing without affecting another one located close to it.
Taken from the section Office tricks , © “Encyclopedia of Technologies and Methods” Patlakh V.V. 1993-2007
https://audiolanding.finbetting.info/
PS: A Profitable Reason to Start Studying the Free Multi-Format Course “How to Make Money in the Financial Markets Without Buying or Selling Anything”!
Since the New Year Holidays are approaching, by signing up for training right now, you are discovering a Phenomenal Exclusive CHANCE
Get the sensational Blockbuster
BETTING COURSE 3.0
with
a GREAT
SET
OF BONUSES
and
GIFTS
on Festive Saving Conditions!
Follow this link and start FREE
training and wait for details about the upcoming New Year Financial Opportunities:
Anything can become anything
After the holidays, economic citizens did not throw away wine and champagne corks. From a champagne cork, cutting off all the excess, it was possible to make a mesh for a hole in the kitchen sink. Ordinary corks served as floats in homemade children's fishing rods, and as convenient handles in pot lids (which were then made completely metal). If there was no drill and there was a desire to hang photographs of relatives on the wall, the nail under the photo was driven into a trimmed cork, glued end to end to the wall. Corks were used to make rattling curtains between rooms.
A good thing was a lipstick tube. You can attach something on one side and cover it with the other. For example, pincushions were popular: a cushion was sewn to fit the size of the tube, and, due to the fact that the tube could be closed, you could carry and take needles with you anywhere. A heating pipe was made from a black curved pipe from the back of a broken refrigerator for a tank in a country shower: the sun heated the pipe, and the water began to circulate, gradually heating up.
It was recommended to cut off the stem from an old toothbrush and, using heat, bend it to make a hook on the wall or in a closet, or attach the same broken crochet hook. From this, as well as a bolt and a piece of an aluminum spoon, they made a handle for a folding traveling spoon. Aluminum combs with a long thin handle were bent so that the handle could be hooked to the breast pocket: the comb was convenient to carry with you, and at the same time it slightly decorated clothes, making it possible to diversify your appearance and not cause complaints from vigilant citizens.
https://audiolanding.finbetting.info/
As a result, you receive a FREE
Distance Multi-format Course on Financial Betting, which is called “How to Make Money in the Financial Markets Without Buying or Selling Anything.”
You will receive one lesson every day. Total lessons - 7
.
To ensure MAXIMUM
The result is that each lesson is recorded in 2 formats: audio (
MP3
) and text (
PDF
). All information is presented in simple, understandable language, all terms and nuances are explained in detail.
During training you are FREE
you receive useful links to other information resources that will help you master this method of Making Money, both Theoretically and in Practice.
MOREOVER
, during the training process, you are provided with Great FREE
BONUSES
and
GIFTS
.
To become the owner of this Profitable Course right now, and literally in a few days reach the level of a specialist in Safely Receiving High Income on the Financial Markets WITHOUT Selling or Buying Anything, use this link:
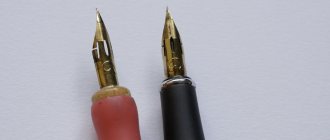
A fountain pen
What to do if he doesn’t write? Typically, inexpensive items suffer from this problem, while exclusive hand-built models are less susceptible to such malfunctions. But occasionally problems arise for them too.
If the new pen writes intermittently and with a slight squeak, this is a break-in problem, exactly the same as with a ballpoint analogue. The pen needs to be painted, and this takes time and patience.
But what to do if the problem does not disappear over time? Most likely, the problem is the factory lubricant that has clogged the feeder channels. Occasionally, tiny metal shavings may end up there. In case of this problem, it is recommended to rinse the pen:
- Disassemble the mechanism.
- Rinse under running water to remove the ink. Use only cold water, as hot water can deform some parts.
- Soak the feather for 1-2 hours in clean water.
- Dry the handle. The procedure will take from 12 to 24 hours.
- Assemble the mechanism.
Also, washing a fountain pen should be done if it has not been used for a long time and there is a risk that the ink has dried out. If the pen malfunction cannot be resolved by washing, you should contact customer service.