Today it is fashionable to visit all kinds of educational clubs and sections with your children. However, every mother can cope quite successfully with the early development of a child without the help of other people. There is no need to buy special tools and expensive materials for this. It’s easy to prepare salted dough for modeling, and it has a developmental effect no worse than purchased materials.
What is salt dough?
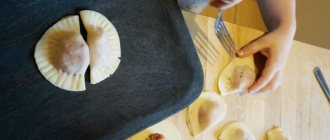
Modeling is an excellent educational activity for both very young children and schoolchildren. This process involves the fingers and palms of both hands, which has a great effect on the development of the left and right hemispheres of the brain. Bioceramics is a direction of children's creativity that uses ecological, “living” ingredients of salted dough for modeling - flour, salt and water. Any housewife has similar components in her kitchen, and the cooking process does not take more than 15-20 minutes.
Kids love to sculpt from soft and pliable dough, first the simplest elements, for example, balls and sausages, and then more complex figures. Older children will have fun making their own piece of art first, then drying it and coloring it. In addition, various ingredients can be added to the classic dough recipe: starch, food coloring, sunflower oil, cream of tartar, which will change the color and texture of the mass.
History of salt dough
Our ancestors also began to sculpt figurines from dough, which at first had ritual value, and then they began to be made as children's fun:
- The ancient Egyptians, and later the Romans and Greeks, used dough-shaped and dried figures of humans and animals to worship their deities.
- In China, craftsmen made bread puppets.
- The ancient Slavs also had customs on Christmas Eve to sculpt various domestic animals from dough and give them to friends and family so that the yards would be full of “living creatures.” Children made waxwings, roes and larks from dough. To protect the figures from mice and insects, a lot of salt was added to the mass, and this is how salt dough appeared.
Drying rules
Having created an original craft, you need to know how to dry play dough in the oven. Experts advise adhering to the following technology:
- The newly made craft should be left in the room for initial drying for two to three days.
- On the third day, the product can be placed in the oven at a temperature of 50 0 C for 15-30 minutes.
- Then the temperature should be gradually increased to 75, 100 0 and 150 0 C.
- Don't set the temperature too high right away. This will cause the dough to swell and then become covered with cracks.
- The finished product should make a ringing sound.
If bubbles form on the product, they cannot be corrected. Cracks can be covered with a mixture of PVA glue, flour and water.
How to make salt dough?
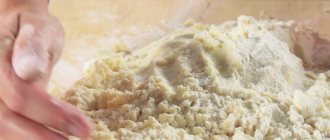
The standard ingredients needed to make salted play dough are flour, salt and water. The properties of the future plastic mass will depend on their ratio and quality:
- It is better to take the finest salt marked “extra”, then the mass will be homogeneous. With coarse salt, the dough will be more grainy and rough.
- You also need high-quality flour, preferably premium-grade wheat.
- The water should be cool for better adhesion.
Classic salted play dough has the following recipe.
Ingredients:
- salt – 0.3 kg;
- flour – 0.3 kg;
- water – 150 ml.
Preparation
- Pour salt into a bowl and mix with water.
- Gradually add sifted flour, adding another 50-100 ml of water if necessary.
- Knead the resulting lump well on the table, wrap it in film or a plastic bag and leave in the refrigerator for 2-3 hours.
To give the material additional qualities you can add to it:
- Vegetable oil
. Pour 1 tbsp into the pan. flour, 0.3 tbsp. salt, 1 tbsp. water and 1 teaspoon of vegetable oil. Gradually heat the mixture, stirring constantly; when it starts to stick to the spoon, turn off the heat and place the mixture on a plate to cool. This dough will be very soft and elastic, but it is not suitable for drying and subsequent coloring. - Food colorings
. For very young children, colored salted play dough will be an excellent alternative to plasticine. If the child decides to taste it, then the mother will not worry that “chemicals” have entered the child’s body, since all the ingredients are absolutely natural. - Glycerin
. By adding just 0.5 teaspoons of glycerin, the modeling mass will acquire a pleasant shine.
Salt dough without flour
If for some reason it is impossible to use flour, it can be replaced with starch and baking soda. This modeling mass will be more pliable and plastic.
Ingredients:
- starch - 1 tbsp.;
- soda – 2 tbsp.;
- water – 0.5 tbsp.
Preparation
- Mix starch and soda in a saucepan.
- Gradually pour in cool water.
- Cook the mixture over low heat to obtain a thick mass.
- After cooling, the dough will need to be kneaded, first sprinkling the surface with a small amount of flour. Please note that products made from salt dough without flour are difficult to dry.
Salt dough doesn't hold its shape
Although the recipe is simple, there are some surprises when working with homemade modeling mixture:
- Crafts made from salted play dough may not hold their shape. The main reason for this is excess water. You just need to add more flour. This also happens when there is an excess of starch or vegetable oil. Corrected by the same addition of flour.
- Salt dough cracks. This happens when little water is added, but a lot of flour is added. Cracks can also occur when there is an excess of salt, especially coarse salt.
Salty dough sticks to your hands
Doing testoplasty can be overshadowed by the fact that the mass is too sticky and gets your hands dirty. Children do not like this very much, and they may even abandon the game altogether. The reasons for excessive stickiness may be the following:
- insufficient amount of flour;
- incomplete dissolution of the salt, or it was coarsely ground;
- poor kneading of the dough;
- using the modeling mass immediately after preparation, without keeping it in a cool place for a couple of hours.
How to determine product readiness
It is important to determine the readiness of the workpiece in time during drying. You can calculate how long it takes a millimeter or centimeter of a product to dry under different conditions, but much in this case depends on weather conditions if drying is done in air, or on temperature if the workpiece is dried in an oven or on a radiator. You can keep the items for the same amount of time, but on different days or in different devices, they will dry slower or faster.
If the figurine is thin, then its readiness is immediately visible: it becomes hard. Larger products are checked for readiness in other ways. Medium-thick workpieces are checked by knocking. It is enough to tap the surface of the figure with your fingertips or a small hard object. If the sound is clear, then the product has dried well.
It is better to check thick figures with a thin match or needle, just as housewives check baked goods. A match is used to pierce the product in a place that can then be disguised. If there is dough left on the match or it easily fits into the workpiece, then the figure is not ready yet. If the product is difficult to pierce even with a needle, then it has dried out.
Cracks often indicate that the figurine has not dried completely. They appear after starting work with the workpiece, during its painting or varnishing. Such cracks appear if the product is still damp inside, so it needs to be dried.
How to color salt dough?
If a child has already become acquainted with modeling, and the white mass does not attract him, then he can be surprised with the help of color. Having prepared the salt dough, you need to choose what to paint it with depending on the age of the child:
- For babies who can still put everything in their mouth, it is better to choose safe food dyes. They need to be added to the water at the very beginning of cooking.
- For crafts with older children, you can pour gouache into the dough itself.
- If your child is old enough to paint his own crafts, buy him acrylic paints or gouache. They fit well, are easy to wash from hands and clothes when soaked in a timely manner.
- You can also paint on crafts with watercolors. Then the color scheme will be less saturated than when using acrylic or gouache.
How to dry salt dough?
When, after modeling, you want to save the craft or continue painting, you need to dry it. The answer to the question of how long it takes salt dough to dry depends on the method of drying it:
- The best option is to dry at room temperature. The time will depend on the thickness of the craft. As a rule, this is 2-5 days.
- If time is pressing and you are concerned about the question of how to quickly dry the salt dough, you can use household appliances. The figures are placed on a baking sheet and placed in a cold oven, which is turned on at a minimum of 50-80°C. It is better to leave the door ajar. Gradually, after 30-60 min. the temperature can be increased to 100-110°C, and the figures can be turned over if necessary. After 3-4 hours, the craft will be completely dry.
- Drying salt dough in the microwave is not recommended, but if there is no other option, you should do it with caution. The scheme is as follows: turn on for 1 minute, then 2 minutes. break for cooling, turn it over and turn it on again for 1 minute, and so on until it dries completely, which is determined by tapping your finger on the craft. A dull sound means the product is still damp, but if it is loud, it is already dry.
How to dry dough crafts
Drying is an important step in making dough figures. The workpiece may deteriorate, crack, burst or warp due to improper drying. Drying dough products can be done in different ways.
The natural way is in the air
In summer, dough pieces can be air dried. It is better to choose sunny places. There, a millimeter of the product will be dried in a few hours. You can dry a small figurine in a day. However, items that are too thin may bend slightly. Therefore, it is better to place thick products in the sun. For drying, you need to choose flat surfaces so that the figures do not spoil their appearance or become deformed.
On the heating radiator
Dough crafts cannot dry in the air in winter, so the heat of the sun will replace the heating radiator in the cold season. The main thing is that its surface is smooth. The products are also laid out on the radiator. They dry faster than in the sun if the radiator is hot. If the radiator has a complex shape, then the dough figures can simply be hung next to each other by a thread. This is more convenient to do, for example, when drying on a radiator.
In an electric oven
The electric oven is heated to a temperature of 50°C to 150°C. At the highest temperature, a millimeter of the product will dry in 30 minutes. However, it is better to dry large items at 150°C. For small pieces, the oven should be preheated to 100°C. At this temperature, the small product will be ready within an hour.
The figures are simply laid out on a baking sheet, but you need to sprinkle it with a little flour before doing so. Place the salted dough for crafts in a cold oven. On a dark-colored baking sheet, the workpieces dry faster. In addition, it is not recommended to dry dough that is colored with gouache in ovens. Paint may change color when exposed to high temperatures.
In a gas oven
Traditionally, the dough is dried in the oven, which takes about 3 hours on low heat to prevent the dough from burning. When using this method, the following steps are provided:
What can be made from salt dough?
You can start learning bioceramics with children from 8-9 months, who already sit confidently and show interest in the material. There is no upper age limit for this activity. Adult craftsmen create real works of art from such ordinary material. When choosing which salt dough figures to make, be guided by the age and level of training of the child or adult:
- The youngest children begin to learn modeling from simple figures - balls, sausages. You can pinch off pieces and make “leaves” or “seeds for the birds.”
- Older kids are asked to sculpt plot objects, for example, animals (hedgehog, snake, caterpillar), birds and mushrooms.
- Once the modeling skills are acquired, you can move on to more complex tasks, for example, making cartoon or book characters.
- Skilled craftsmen can fashion real paintings from salt dough.
Salt dough figurines
You can sculpt both flat and three-dimensional figures from dough. For example, you can attach a string to a dried and painted house and wear it as a keychain. Salted dough for crafts allows you to create products on a variety of topics:
- forest inhabitants;
- fruits and vegetables;
- dishes;
- equipment and transport;
- dinosaurs and monsters;
- cartoon, film and book characters;
- new Year decoration.
Salt dough paintings
Panels made from salt dough have special developmental potential. Here, imagination and a sense of composition, modeling and artistic painting skills are trained. Such paintings can take more than one week to create. You just have to take into account that the dough is a heavy material that has a certain margin of strength. If overloaded, such a picture can simply crack and fall apart, so the elements should not be too large.
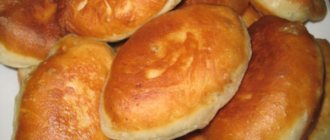
Rules for browning products
You can beautifully brown a dough craft in a natural way, and not by tinting it with paints. To do this, at the end of drying in the oven, increase the temperature. If the baking sheet is on the lower or middle level, the thin parts of the product will brown. However, it is important not to overexpose the product so that it does not burn. Therefore, you need to monitor the process and leave the oven door open for this.
Large products are browned on the top tier. This will give the convex parts of the workpiece a beautiful brown tint. If you combine 2 types of browning, you can get an unusual product, but this can often be done by experienced craftsmen.
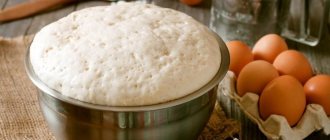
How to store salt dough?
The best place to store salt dough is the refrigerator. A mass prepared according to a standard recipe will not lose its properties in the cold for several weeks, and with the addition of vegetable oil it will not lose its properties for several months. Before storing salted play dough in the refrigerator, wrap it in cling film, wrap it in a bag, or place it in a container to restrict air flow.
The history of salt dough goes back hundreds of years. This easy-to-prepare material is loved by both adults and children. You can practice bioceramics at any age, because fine motor skills affect the functioning of the brain of both children and adults. In addition, this is a very cheap material, which, having prepared once, can be safely stored for several weeks, or even months, in the refrigerator.
patience and a little effort
Site search
Drying salt dough and baking
What is the difference between drying and baking ? Drying is drying the product in the open air, be it in the sun or on a radiator, and baking is done in the oven.
There are two main drying methods. The first is in the sun and the second is on the battery. Air drying has disadvantages. Firstly, it takes a long time, since in the open air the drying rate is approximately one millimeter per day. You can guess how long it will take a large craft to dry. In addition, large parts can settle, which will lead to deformation and damage to the appearance of the craft itself. Also, air drying should not be used when making complex crafts, when subsequent parts are added only after the previous ones have dried. But it’s good to dry flat crafts outdoors, unless you’re in a hurry, of course. The drying process is faster with a battery.
Both gas and electric ovens are suitable for baking salt dough . An electric oven has an advantage over a gas oven in only one way: its temperature is more convenient to regulate, but otherwise everything is identical.
Do not attempt to dry the dough in the microwave. She's not suitable for this.
baked either at once or spread out over several days. It all depends on your free time. If the craft is not completely dried, then over time it will begin to collapse from the inside. In addition, it may change color and crack.
Helpful advice:
The color of the baking sheet greatly affects drying. If the baking sheet is light, it reflects heat and thereby slows down drying. On black, on the contrary, the drying process is faster. This factor must be taken into account. We indicate the drying temperature for a light baking sheet, so make adjustments for the temperature if you are cooking on a dark one 20-25 degrees lower.
Below we have given an accelerated baking method:
- put the craft in a cold oven
- Dry for the first hour at 75 degrees
- then raise the temperature to 100 degrees and dry for the second hour
- divide the third hour in half and create a temperature of 120 degrees in the first 30 minutes, and 150 degrees in the second 30 minutes