The ability to unscrew a drill without a key can save you in a difficult situation. If you have started repairs and discovered that the key to the chuck is lost, traditional methods will help you change the drill. Of course, dealing with the problem with a pair of screwdrivers or a vice is much more difficult. But this method will allow you to finish the job without running around the shops looking for a new key.
How to open a drill chuck?
The purpose of the drill chuck is to securely fasten the drill or other attachments (construction mixer, grinding wheel, etc.). Fixation is carried out by three mechanical “fingers”, which are brought together and apart using a threaded mechanism.
There are two main types of cartridge:
- Keyless variety. To open such a structure, it is enough to wrap your fingers around the body and, turning on the reverse rotation, briefly press the trigger of the tool. The drill itself will rotate the shaft, spreading the “fingers” that fix the drill. Such a chuck is easier to use, but the reliability of fixing the tool will be somewhat lower.
- A type equipped with a key. The key is a T-shaped device, at one end of which there is a bevel gear. The other two ends serve as a handle for rotation. To unscrew or tighten the cartridge, the key is inserted into the hole in the housing and rotated while holding the housing with the other hand.
Typically, a key is included with the power tool. It either lies in the box or is attached to the power cord with a special fastener.
The essence of opening with a key
If everything works as it should, then getting a drill is easier than ever. There are 2 types of cartridges, key and keyless. With the second, everything is simpler: you just need to turn the drill in reverse, fix the cartridge in your hand and carefully press the trigger. This way everything will unwind and you can insert the drill.
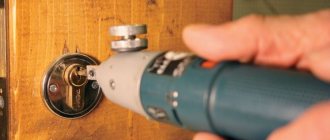
Key access to the drill. Source: instrument-tehnika.ru
Key access - a special small tool is inserted into the grooves of the drill and then rotated counterclockwise. Unwinding works on the principle of gears - the teeth unwind the chuck. Typically, keys are included with the drill, some are inside the box, some are attached directly to the wire. But what to do if the key is lost?
What to do if the key is lost?
If the key is missing, removing the drill will be quite difficult. The easiest option is to deal with the problem with brute force. The parts of the clamping device are held by the right and left hands and rotated in opposite directions. However, if the chuck is tightened too tightly or the drill has been used for a long time, it is unlikely that you will be able to unscrew the thread.
During operation, parts of the power tool become hot and the metal expands. This leads to jamming. To make releasing the chuck easier, wait until the tool has cooled completely.
To enhance the applied impact, use various tools or homemade devices. Here are some ways:
- Experienced craftsmen loosen the cartridge with several tangential blows with the edge of the right palm. The drill is held with the left hand in a position with the drill facing away from you. The disadvantage of this method is that if you are not used to it, you can injure your palm. And even with a tightly tightened (and even more so misaligned or jammed) mechanism, this is not a way to deal with it.
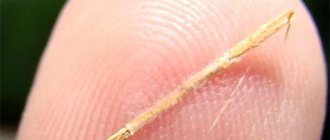
- Select a metal shaft whose diameter allows it to be inserted into the hole on the chuck. For this purpose, you can use a nail, an old drill, or a hairpin. The main thing is that the metal is strong enough and does not bend from the applied force. The screwdriver is inserted into the slot of the cartridge and acts as a lever (the support goes to the shaft). It is enough to slightly loosen the thread, and you can pull out the drill by unscrewing the mechanism with your hands.
- The cartridge is clamped in a vice or held tightly with a gas wrench. The shaft is inserted into the hole, and then, applying muscular force, the mechanism is unscrewed or tightened.
The second method can help if the chuck is clogged with chips. Then its body is clamped in a vice, and the lever is lightly tapped with a hammer. Vibration causes parts to shift, and the mechanism becomes wedged.
The effectiveness of the described folk methods is significantly less than when using a factory turntable. But it is possible to tighten or loosen the locking mechanism once or twice in this way. After finishing the work, you need to purchase a new key from the store.
Replacing a drill without a key
It happens that you don’t have a key at hand or it doesn’t fit in size, then you can unscrew the chuck and remove the drill using the following method. For it we need a flat-head and Phillips screwdriver or a rod of a suitable diameter. It should fit snugly into the key hole.
Having fixed the rod (it can even be a simple nail) in the socket, use a flat screwdriver to rest against the recess on the ring and act as a lever. If everything is done correctly and the screwdriver does not fall off, you will be able to turn the cartridge a little. We rearrange the tool and repeat the operation until the drill can be removed. In a similar way, you can securely clamp the tool in the chuck.
Advice! If you have a yew or a gas wrench at hand, it will be more convenient to clamp the head and use a Phillips screwdriver as a lever.
How to avoid losing your key?
To avoid being left empty-handed with unfinished work, it is important to properly organize your workspace. This organization will allow you not to lose sight of the key every time you change the tool.
It is better to provide the key with a large bright keychain. This way it won’t get lost in the clutter on the workbench or be forgotten in the pocket of your work clothes.
The easiest way to protect against loss is in your own workshop. Here you need to create a permanent place to store the turntable and always put it there. In this case, the storage location should be quite convenient and at hand:
- Many manufacturers provide their instruments with an eyelet for attaching a turntable. It is placed either under the handle or close to the fork. By inserting the key into this hole, you can rest assured that it will not get lost. The only drawback is that over time the fastening wears out and breaks.
- The eyelet for the key is made from insulating tape. It is attached to the power cord. The attachment point is usually located 50–60 cm from the handle. This way the turntable will not interfere with your work and will always remain at hand.
- Having attached a ring to the key, you can hang it on a hook next to the workbench.
If possible, you should stock up on another key. It is stored in a box in the workshop, away from the place of work. If the main key is lost, the backup key will be at hand and save the day.
If during the work it turns out that the pinwheel from the clamping mechanism has been lost, the main thing is not to panic. Using traditional methods, it is quite possible to release the chuck, remove or change the drill, and finish the job.
How to remove a drill with a working chuck
If everything is in order, then in theory there should be no problems with getting it out. Therefore, this section is rather dedicated to users who are completely ignorant of power tools, since the operation itself is elementary. But there are still a lot of people, so maybe someone will need this information.
In this situation, you will need a special key to unlock the key chuck, or straight hands to loosen its quick-clamping counterpart.
In the first case, you need to insert the key into one of the recesses on the cartridge and start rotating it counterclockwise. Unwinding occurs due to the existing teeth on both objects.
In the second, the drill should be turned on in reverse mode (reverse rotation). With one hand we hold the outer body of the cartridge, and with the other we press the start button. If your machine is not equipped with reverse, then this is not very good - in fact, this should not happen, since only key cartridges are installed on such devices. But still, if this happens, then you need to somehow fix the drill axis (for example, with an open-end wrench) and rotate the outer body of the chuck counterclockwise. In general, it would be better to remove such a cartridge here and install a key one.
Removing a drill in a normally working chuck
The design of the chuck depends on the purpose of the tool and the diameter of the clamped drills. Among screwdrivers and drills, the most common are 2 types of clamping devices:
- quick-release chuck with a special jaw head;
- key chuck with toothed ring and 3 movable jaws.
If the mechanisms are working properly, then there will be no problems with replacement. To unwind the quick-clamping tool, completely stop the rotation of the tool, move the speed control lever to the reverse position, then firmly hold the head by the grooved part and press start. The force at the very beginning is enough for the cams to start moving and the drill to quickly release.
With a traditional chuck, we carry out the actions in this order: turn off the drill, insert a special key with a toothed cone into one of the recesses and turn it counterclockwise. The gear will move and loosen the cams. If the force on the key is not enough to unscrew, then it can be increased with a small tube.
How to change a drill bit in a drill without a key
As is clear from the subtitle, we are talking about key cartridges here.
The most common method is to use a Phillips screwdriver or a nail of a suitable diameter, which is inserted into any of the existing recesses on the cartridge, thereby fixing its first half. You can try to twist the other half by hand. Usually this makes it quite easy to unwind.
However, if you can’t unscrew it this way, you can use a gas wrench or a vice instead of your hand. Using them, you will be able to create the necessary force, which will most likely be enough to carry out the rotation.
If these steps still don't work, try what's described in the next section.
What to do if there is no key
To do this, they usually use a Phillips screwdriver, a drill, or any object of suitable diameter. Each cartridge has a recess into which it can be inserted, thus fixing the position of one of the parts. After this operation, you must manually try to rotate the cartridge. Usually, everything unwinds quite easily. However, if the drill has been used for a long time on the same drill, the force may not be enough. Then a gas wrench or a vice can come to the rescue. Using these items, it can be possible to create the necessary load to unwind the cartridge.
Open the cartridge with a screwdriver. Source: i1.wp.com
How to remove a drill from a damaged chuck
Here we will also talk about cases when the drill itself is damaged.
Damage usually occurs in the form of a broken cam or damaged threads. It also happens that the drill is damaged, for example, by turning between the cams. As a result, chips are formed, which interfere with normal rotation, as they are driven into different slots, which prevents rotation.
So, first you can try to relax your fists. This can again be done using two gas keys or one in conjunction with a vice.
In the first case, each part of the cartridge is clamped with its own key and rotated to unscrew. In the second, one of the parts is fixed not with a key, but with a vice. Since this creates a fairly large force, unlocking occurs quite easily.
In addition, in the absence of a gas wrench, you can clamp one part in a vice, and apply gentle tangential blows to the second with a hammer. Relaxation occurs due to the vibration created.
If the previous methods do not help, for example, because the threads on the cams are broken, then you will have to resort to the next step.
If chips are clogged
It is possible that chips could get inside the chuck and interfere with its rotation. There is a way out of this. It is necessary to secure the cartridge in a vice and apply light tangential blows with a hammer. This will cause the chips to be distributed throughout the chuck due to vibration and allow the mechanism to unwind smoothly. Sometimes you will need to remove the chuck from the drill and insert its pin into a vice, and try to unscrew the outer edge with a wrench. Thus, you will definitely be able to achieve results.
The cartridge is in a vice. Source: mekkain.ru
This article discussed options for opening cartridges, what to do if the key is lost, and what actions to take if chips get into the threads of the cartridge.
Did you like the article? Subscribe to our Yandex.Zen channel
Main types of drill chucks
According to their design, drill clamps are divided into two main types:
- toothed chuck, in which the tool shank is clamped using a special key;
- a quick-release chuck for a drill (KZP), in which the clamping sleeve is actuated by manual rotation.
Types of drill chucks
Clamping jaw chucks installed on modern drills allow you to securely fix tools whose shank diameter is in the range of 1–25 mm. Devices of this type are practically free of disadvantages, the most significant of which is their fairly high cost.
The most popular type of clamping device installed on modern drill models is the quick-release chuck (KLC). It only takes a few seconds to lock a tool into a BZP chuck, and there is no need to use a special key. The tool shank is clamped by manual rotation of the adjusting sleeve, the outer surface of which is knurled to facilitate this procedure. To regulate the mechanical force created on the tool shank, this type of clamp is equipped with a special locking device.
To fix the drill, hold the lower coupling with one hand and tighten the upper coupling clockwise with the other.
The most significant disadvantages of the BZP include the fact that in cases where the elements of its mechanism wear out, it does not reliably fix the shanks of large-diameter drills. This leads to the tool turning during operation.
Compared to clamping devices of the BZP category, toothed chucks for equipping drills provide reliable fixation of the tool in any situation. Users who frequently work with electric drills prefer this type of chuck. The only significant drawback of such devices is that the key with which they are activated is quite easy to lose. Meanwhile, the occurrence of such a problem can be easily avoided if, immediately after purchasing a drill, you fix the key on the device’s wire using insulating tape or ordinary rope.
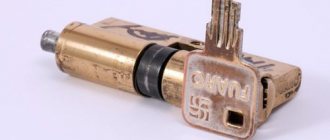
The diameter of the shank of the nozzle clamped in the mini-chuck depends on the caliber of the collet
The mini-drill chuck, installed on compact drilling devices, is also very popular. The latter are actively used by jewelry craftsmen. The mini chuck belongs to the category of quick-release chucks for a screwdriver or light drill. This small chuck, made primarily of brass, is used to hold tools with a shank diameter in the range of 0.1–4.5 mm.
Design and features of the toothed chuck
The classic drill chuck is a collet or cam type clamping device. They can hold not only various tools with a round shank, but also cylindrical workpieces for further processing. The main design elements of jaw chucks are:
- cylindrical body;
- an adjusting ring or sleeve rotating on the outer surface of the housing;
- a cam mechanism or collet installed in the inside of the device body.
Design of a jaw (gear-ring) chuck with a key
In turn, the collet mechanism, the elements of which are made of hardened steel, consists of three absolutely identical cams, which, when rotating the adjusting ring or sleeve, simultaneously approach each other, thereby ensuring reliable clamping of the tool shank. In the first models of chucks for mechanical drills, the collet jaws converged due to the rotation of the adjusting wheel; now an adjusting sleeve is used for this.
On one side, the drill chucks are installed on the shaft of the equipment used, and on the other, the tool with which the processing will be performed is inserted into them. Jaw chucks are primarily used to hold the following tools:
- drill;
- cutters;
- taps with small diameter shanks.
How to remove a cartridge with a threaded connection
The question of how to remove the chuck from a drill, which is fixed to it using a threaded connection, arises among home craftsmen quite often. Such a clamp must be removed taking into account the fact that it is installed using a non-standard left-hand thread.
The threaded element of the clamping device is located in its internal part, so you must first move the clamping jaws as far apart as possible, which will provide access to the fixing screw, which can be unscrewed using a regular Phillips screwdriver. In drills without such a screw, the chuck is simply twisted off the shaft without carrying out the above-described preparatory work.
The head of the fixing screw can be Phillips, slotted, hexagonal or even star-shaped.
The left-hand thread screw that secures the threaded chuck to the drill can wear out over time. To restore the reliability of such a connection, you can do the following:
- insert a Phillips screwdriver into the head of the chuck screw on the drill;
- Lightly tap the hammer to deepen the screw into the threaded hole.
Such actions will not harm the drill’s mounting unit, but will allow the clamping device to be fixed to it more accurately and reliably.
Replacing a threaded chuck on a drill can also be done using a 14mm wrench, which greatly simplifies this process. In order to avoid making mistakes when you decide to disassemble a cartridge of this type, you can first familiarize yourself with theoretical material on this topic and watch the corresponding video.
Replacing and disassembling the chuck on a drill
There is nothing complicated about the question of how to replace a worn-out cartridge in a drill. To do this, it is enough to purchase the appropriate clamping device, remove the old one from the drill and install a new one on it. It should be borne in mind that two types of chucks can be installed on both a regular and a mini drill:
- with cone connection;
- threaded.
The chucks, which are threaded for installation on a drill, are removed and fixed according to the scheme described above. When replacing such a device, it is not enough to know that it is threaded; it is also important to take into account the markings that are necessarily applied to it. Such chucks may be marked as follows:
Marking of threaded cartridge
The interval 1.5–13 present in the designation data indicates the minimum and maximum diameters of the cutting tool being installed. The rules for replacing a chuck on a drill suggest that the new clamping device must have a marking that is completely identical to the designation of the old one.
With the question of how to replace a conical chuck on a drill, everything is somewhat simpler. Devices of this type can also be marked with various markings, namely:
Marking of a cartridge with a Morse taper
To replace a chuck of this type with a drill, you simply need to select a clamping device with the appropriate marking and insert its seat into the conical hole of the drilling equipment. It is quite simple to navigate this marking: the letter “B” means that this is a cone-type cartridge, and the number indicates the diameter of the lower part of the mounting hole.
Removing a cone-type chuck from a drill is as easy as installing it. In order to perform this procedure, you simply need to knock out the clamping device from the mounting hole of the drill, for which you use a regular hammer. You can also get acquainted with the details of installing and removing the conical chuck of an electric drill by watching the corresponding video.
On Soviet drills, the chuck with a cone mount was simply knocked out; the design of the gearbox allowed such roughness. To remove the cartridge of modern models, you need to use pullers or special devices
How to disassemble a screwdriver or drill chuck? This procedure must be performed periodically for maintenance of the device (cleaning and lubricating all its internal elements), as well as for minor repairs. This allows you to significantly extend the life of the cartridge.
When disassembling a cartridge, you should consider what type it is. Based on the instructions or videos, you must perform all steps to disassemble such a device as carefully as possible so as not to damage its components. After all maintenance or repair procedures for the elements of the drill chuck have been completed, it should be reassembled in the reverse order.
If the structural elements are severely worn out and it is not possible to restore them, it is better to replace the entire mechanism, which will cost much less than repairing it.