Andrey
13310 0 3
Andrey January 4, 2018 Specialization: facade finishing, interior finishing, construction of dachas, garages. Experience of an amateur gardener and gardener. We also have experience in repairing cars and motorcycles. Hobbies: playing the guitar and many other things that I don’t have time for :)
A simple and original way to decorate a room is to create a panel from wallpaper and baguette. Next, I want to share with you some important nuances of creating such decor. This information will certainly help you decorate your home.
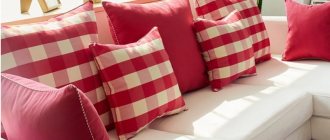
Wallpaper in a frame allows you to decorate a room simply and effectively
General information
The combination of wallpaper within one room has long been popular and is no longer considered something unusual. In particular, a technique called accentuation has become widespread among designers. Its principle is based on highlighting part of the wall with wallpaper that differs from the main trellises in color and pattern.
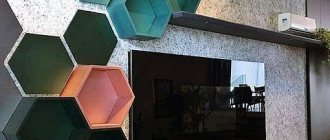
Wallpaper panels are great for classic style
But what if we go further and highlight the accent wallpaper with a baguette? The result will be a panel of wallpaper. Its installation does not require any special financial costs, but such decoration no longer looks like wallpaper, but as an effective decorative element.
Panels can be used in modern interior styles
As a rule, framed wallpaper is used in the living room, bedroom or office. Moreover, most often this technique is used in classical interior styles, however, if you choose the right trellises, there is a place for panels in modern interior styles.
To make the decor look beautiful and harmonious, you need to choose the right wallpaper
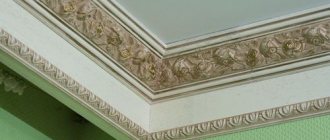
When you can and cannot use moldings
In most cases, molding is perfect for wall or ceiling decoration. Its main functions:
Hiding surface irregularities; Decoration of the junctions of walls and ceilings; Smoothing the surface; Room decoration; Identification of functional areas; Visual change in the size of the room.
Vertical molding makes ceilings appear higher, while horizontal stripes effectively expand the space. If the room is large enough, then you can use wide stripes with bright images. Such an interior will look very elegant and even aristocratic; creativity and art will be felt in it. But still, this option is not suitable in all cases - in small rooms the space will be overloaded.
It is not advisable to glue molding over wallpaper. In such a situation, it is difficult to predict its durability, and the risk of ruining the design with glue also increases. In addition, subsequent painting of the product may be necessary. If there is still such a need, then it is better to choose lightweight materials - for example, polystyrene foam or polystyrene.
Nuances of choice
In order for wallpaper with a frame to look good in the interior, you need to choose it wisely. In principle, there is nothing complicated, the main thing is that the coating meets the following requirements:
- It stood out from the rest of the trellises. It is not at all necessary to make the panel bright and catchy. The frame itself will draw attention to the decor and highlight it. But, at the same time, the canvas should not merge with the main trellises;
The decor should stand out from the walls
- The size of the pattern must correspond to the size of the panel. If the panel is small, it is best to use canvases with a small pattern for it, since several fragments of a large picture rarely look good;
The decor design should look harmonious in the interior
- The design should be in harmony with the interior. The color of the wallpaper for the panels, as well as the design style, should be combined with the main canvases and, of course, the interior of the room.
In this regard, the requirements are the same as for any other decor. The same applies to the frame framing the panel.
I must say that framed photo wallpapers often look interesting, especially modern three-dimensional ones. True, such decor will resemble not a panel, but a painting or a large photo.
Beautiful decor can be made from photo wallpapers
Lovers of handicrafts can make a panel in the form of an applique from wallpaper with their own hands. To do this, you need to cut shreds from different types of canvases and then stick them on the wall.
By adhering to these simple rules, you can easily choose the best option for trellises and beautifully decorate your room with them.
How to install molding
There are special construction rules for fixing baguettes and other home decoration elements. They should be followed so that the final result is a correct and beautiful decoration using a frame or molding. To glue structures, you need to use special compounds; you can also use liquid nails. Before installation, it is recommended to keep the planks for a day inside the room in which they will be installed. This is necessary to adapt the material to the existing microclimate of the room.
Installation must be carried out in the following sequence of work:
Thorough plastering and priming of the wall panel; Applying markings in areas of subsequent fixation of elements; Treatment of parts with mounting adhesive solution; The elements are secured starting from the corners; Checking the symmetry of the frames and the strength of fixation of the parts; You can then leave the surface for the glue to dry. This will take about 6 hours. Puttying cracks and cracks between the plank and the wall or ceiling; Clean off excess putty using sandpaper.
Installation technology
So, we figured out what a panel is and how to choose material for it. Now let's get acquainted with the nuances of installation. We will divide this work into three stages:
Main stages of panel installation
Next, we will familiarize ourselves with the nuances at each stage of the operation.
Preparation of materials
In addition to the wall covering itself, you will need the following materials:
- Baguette - can be made of plaster, polyurethane, wood or polystyrene foam. The choice depends on the style of the interior and your financial capabilities. The lowest price is for frames made of polystyrene foam, and the highest for products made of wood and polyurethane;
Polyurethane molding
- Glue for the frame - a frame made of polystyrene foam or plaster can be glued with putty or gypsum glue. For frames made of polyurethane or wood, liquid nails should be used;
- Wallpaper glue - selected according to the type of trellis;
- Penetrating soil;
- Water-dispersion paint for frame.
Use a miter box to cut moldings
As for the tools, you need a standard wallpapering kit. The only thing is that if the baguette is heavy, you will additionally need a drill and screws or dowels. In addition, it is advisable to have a miter box for cutting the corners of a baguette.
Surface preparation
First of all, I note that installation of the panels should be done before gluing the main trellises. However, their choice must be decided in advance, since the choice of canvases for decoration depends on the main background, as I already said.
Surface preparation is carried out as follows:
- Decide on the location of the panel. It is necessary to find a section of the wall that will be visible from anywhere in the room;
- Mark the location of the decor. To do this, use a level so that all lines are strictly horizontal and vertical, and the angles correspond to 90 degrees.
- Use a roller and apply primer to the surface. You can treat the entire wall, since before gluing the main canvases the surface will still have to be primed;
- After the composition has dried, reapply it.
Some types of wallpaper paste can be used as a primer. Manufacturers report this possibility on the glue packaging.
This completes the preparation.
Installation
As an example, let's look at how to frame photo wallpaper on the wall. The work is carried out as follows:
- Cut the strips to the length and height of the future decorative element;
- Cut the edges of the moldings at an angle of 45 degrees. For these purposes, use a miter box or miter saw;
- If the moldings are heavy, drill holes for self-tapping screws in 0.5 m increments.
- Apply glue or putty to the walls in a zigzag pattern, as well as around the perimeter of the molding, as shown in the photo;
- Place the molding against the wall, press it down and hold it in this position for some time;
- If necessary, additionally secure the molding with self-tapping screws.
- Cover the screw heads with putty;
- If necessary, fill the cracks at the joints.
- Treat the surface of the frame with a primer;
- After the primer has dried, apply two coats of paint using a paint brush.
After the frame for the photo wallpaper is ready, you can stick the main trellises on the walls.
- Apply glue to the back of the wallpaper;
- Place the canvas on the surface, align it with the frame and smooth it with a brush or rag. It is necessary to smooth out from the center to the edges.
After gluing the main background trellises, do not forget to install a frame to protect the wallpaper under the switch. This will allow them to last longer, and, accordingly, you will not have to change the decor.
This completes the design of the photo wallpaper.
Required Tools
Devices for work are selected based on the selected material. To make a neat cut on wood, a hacksaw for metal or wood is suitable. Such a tool must have small teeth for an ideal result. Polyurethane can be processed with a hacksaw or an ordinary construction knife. To accurately trim joints at corners, you will need to purchase a special tool called a miter box. It greatly simplifies the creative process and is sold in many construction stores.
Artificial stone does not require the use of special devices, but it is applied to an adhesive composition, which requires a mixture for dilution. Gypsum and other dissolving materials also require a container to hold the mixture.
At the final stage, you will need glue or other fasteners for the frame to fix it to the surface. You can use “liquid nails”, which reliably hold even relatively heavy elements. The ability to fix heavy objects is usually indicated in the instructions for the composition, so you must read it before starting work.
Options for frescoes and photo wallpapers in the interior
If you are interested in decorating your space with a fresco or photo wallpaper, then you probably have two questions: how to harmoniously fit photo printing into the interior and how to combine it with other decorative finishing materials. In fact, framing a fresco on the wall is not a problem, but on the contrary, quite an interesting task, especially for people with a good sense of style and imagination. Let's look at the options for integrating frescoes and photo wallpapers into the interior and you can choose the one that suits you best.
1. If the size of the canvas is relatively small (up to 1x1.5 m), then you can decorate the fresco and photo wallpaper in the form of a picture. This option is suitable for those who are not planning large-scale renovations, but only want to diversify the existing design. It is enough to choose an image that in your opinion will ideally complement the space, the texture of the fresco or photo wallpaper and order the canvas on a stretcher or frame it yourself in a baguette.
2. Decorating the wall with a fresco or photo wallpaper as a whole. In our opinion, this is the most ideal option. There will be no need to try to join the canvas with other materials, and the top and bottom will be framed by plinths. Window frames and platbands can also serve as limiters of their kind. Another plus in favor of this design option is the preservation of the integrity of the picture and its full “ownership” of the space.
3. Another option for integrating frescoes and photo wallpapers into the interior is to decorate interior doors or wardrobes with them. This method is also suitable for those who are not ready for a global renovation, but simply want to diversify the space and bring bright accents to it. By the way, a well-chosen image for a fresco or photo wallpaper can create the effect of a kind of portal, leading not to the next room or wardrobe, but to another world and dimension.
4. An option for those who have chosen thick fresco textures, for example, frescoes on elastic decorative plaster. It is based on reinforced fiberglass mesh, so the fresco will protrude significantly relative to other materials. In this case, decorative plaster can level the surface. You need to stick masking tape along the edge of the fresco and carefully apply a decorative coating. Painting the fresco to match the color of the product or the main design of the wall will allow you to fit the fresco into the interior as harmoniously as possible.
5. As an option for integrating products with images into the overall design, use background frescoes and ORTO photo wallpapers. We can create a background on any texture from our catalog, focusing on the color palettes of Pantone, RAL, etc. This technique will allow you to combine the canvas with the image and the background as much as possible, and repeating textures will allow you to achieve an imperceptible transition. A light visual effect of stains can be applied to the background product, which will dilute the monochrome.
Create the interiors of your dreams
All finishing materials to bring inspiring design ideas to life can be ordered in our online store.
Choose from a huge catalog of ready-made images from famous designers and famous artists, or create your own patterns. Our consultants will help you choose the optimal solution for the type and area of the room.
6. One of the easiest ways to introduce frescoes and photo wallpapers into the main interior is an uneven edge. This fairly simple effect of decorating the edges of the canvas will allow you to easily mount it on top of another finish, creating the effect of a picture “appearing” on the wall. By the way, an unusual stylish solution would be a combination of the uneven edge of the fresco and decorative lighting.
7. There are a huge variety of options for framing frescoes and photo wallpapers in the interior - these are baseboards, moldings, frames, stucco moldings, LED strips, stylized decorative designs and much more, whatever your imagination can do.
Don’t be afraid of interior experiments, because the main thing is that you feel comfortable in your space.
Theme of a photo collage on the wall for different rooms
The rooms in the house have different purposes and should be decorated based on the needs and purposes of the room. Therefore, it is necessary to choose the appropriate theme, type of design, materials and method of placing photo frames.
The style can be emphasized with a photo collage, hanging a landscape, a children's panel, sticking photo wallpaper, or making a picture in a frame from the remnants of wallpaper left after renovation.
We hang photo frames with family photos on the wall in the living room.
The living room is a place where the whole family gathers, relaxes, communicates, and shares news. The walls of this room can be decorated with photographs from family life, shared leisure time, or studio photos.
Combine photographs of the same subject into a large frame with several compartments, or select frames for the wall in the same style, texture and pattern. The main thing is that the composition pleases and makes a positive impression.
To create a collage you will need family photos, frames of suitable size, nails and a hammer.
Pre-draw the place where the pictures will hang, taking into account the size of the frames and the spaces between them. Drive in the required number of nails in the selected area, hang the photo - and the photo collage is ready.
Frames for photo collages on the bedroom wall
The bedroom is a place to relax. Bright colors and empathetic paintings or photographs would be inappropriate here.
A collage with a picture of nature or a photo of a family vacation is best suited for the bedroom. Don't overload the room with many small details. 3-4 small paintings or one large one above the bed will be enough.
Choose calm tones and scenes that will set you up for sleep and relaxation: flowers, nature, sea, clouds, everything that evokes pleasant thoughts and relaxes.
You can move away from conventions and use framed wallpaper on the wall in the interior as an option for decorating the wall at the head. Paste the wallpaper onto cardboard of the same size and insert it into frames or glue a baguette onto the wallpaper as a frame.
DIY wallpaper frames or false panels look great - this design solution can be used in many ways. After gluing and drying, they can be framed with molding or wooden slats, choosing a contrasting color. The openings of the false panels are filled with decor: clocks, mirrors, lamps, creating the impression of volume.
If your bed does not have a headboard, then wallpapering it to imitate it is a stylish and inexpensive option that will highlight the classic style of the bedroom. You can glue the wallpaper onto a plywood sheet, cutting out the headboard along the width of the bed.
What will be pleasant for a child to look at in a children's room?
Choosing the design of a nursery is a separate issue. Much depends on the age, gender and preferences of the child. You should also not forget that he will not only play there, but also sleep, do homework, and relax. Therefore, the design should not distract and attract all the attention. You can choose a plot from your favorite cartoon, TV series or an image of a hero.
Children's first drawings framed look cute. Ask your child to sign them - he will appreciate it and understand that you are proud of him.
Such little things add beauty to the interior, and the house looks more comfortable.
Should I hang photo frames on the hallway walls?
The corridor is a place where residents spend very little time and do not stay for long. You might think that its decoration is not as important as the interior of other rooms. But that's not true. It is the place through which you enter the house. This is the first thing you see after a hard day at work or a weekend away from home. It also creates the first impression on your guests who come for the first time or again.
Photo wallpapers framed with moldings or baguettes will look advantageous.
Installation technology
If you decide to update your interior with your own hands using photos or wallpaper placed in frames, you will need to perform a few simple steps.
Preparation of materials
For installation you need a roll of photo wallpaper and a baguette or molding, which you can choose to your taste. You will need glue specifically designed for this or that type of finish. It is recommended to choose glue and finishing material from the same company.
You need to prepare brushes, a ruler, a pencil, a stationery knife - all this will be useful during the installation process.
Surface preparation
The surface of the walls for painting must be smooth, even and dry. All irregularities will be visible through the wallpaper, especially thin ones.
Wash away the dirt and remove the old wallpaper from the wall. It is unclear how the wallpaper will behave after combining, so don't take any chances.
If the photo wallpaper is smaller than the size of the wall, first draw lines that will determine the location of the picture.
Installation
Prepare the wallpaper for hanging according to the instructions.
Dilute the glue before working. Apply the adhesive to the wall, and then apply the wallpaper. Paste the first fragment along the lines that you drew on the wall. Smooth with a roller to remove air and excess glue.
Repeat all steps for the remaining fragments. Leave the canvas to dry, while closing the windows.
Then you can frame the photo wallpaper on the wall. To do this you will need a baguette or molding. Now there are different models on the market, the choice depends only on your preferences. There are plastic, plaster, wood, and polyurethane moldings. Plastic ones are a budget option with low strength. A store consultant will help you choose the right product.
Panel installation is simple. The method of fastening to the wall depends on the material of the molding: tightening screws or fixing it with special glue. Sometimes the decorative strip includes a self-adhesive back surface. This option is suitable if you are using molding for the first time. Attach the pieces to the wall around the photo wallpaper, creating a frame.
These simple steps will make the interior more comfortable, and your home will sparkle with new colors.
Main types of frame materials
There is a huge variety of solutions, each of which has advantages and disadvantages. Let's look at the main varieties.
Wood
This is one of the oldest decorative options; it has been used to decorate the interior for many centuries. Traditional material is perfect for classic design trends; it can be decorated in various ways and painted. Before painting, the wood is treated with an antiseptic and varnished. The strips are fixed with self-tapping screws or an adhesive base.
Advantages of the material:
Easy processing; Durability and reliability; Possibility of painting and fixing with glue; Long service life if treated correctly; You can create openings for cables and other purposes.
Disadvantages of the product:
Poor resistance to moisture; Expensive; Heavy weight of planks.
Gypsum
Gypsum stucco molding is also a popular solution for room decor. You can install it yourself using gypsum or alabaster mixture.
Pros of gypsum:
Large selection of shades, shapes and patterns; Durability.
Among the disadvantages:
High price; Heavy weight; Fragility; Complexity and high cost of installation.
Polyurethane
The main advantage of polyurethane is its flexibility. For this reason, the material can be used to decorate surfaces of various shapes. Other advantages of this option include:
Smoothness and lightness; Possibility of painting and varnishing; Easy to use, can be glued to wallpaper and various other materials; Durability, which allows the use of polyurethane frames for about 30 years; Affordable price; Similarity to plaster products; Easy to care for.
Polystyrene
Frames for photo wallpapers can also be made from another plastic material - polystyrene. It is generally similar to the previous one and has the following advantages:
Easy to make cuts due to the smoothness and evenness of the material. This characteristic allows the product to be used for decorating complex shapes of surfaces and objects. Polystyrene is easy to paint in the desired shade. Simplicity and ease of care, moisture resistance and the ability to easily wash the material. Light weight and affordable price.
Despite all the described advantages, polystyrene also has a disadvantage - a grainy surface.
Styrofoam
Foam plastic decor attracts users with its cheapness and availability, but at the same time it cannot be called a quality product. Buyers choose it because of the following properties:
A light weight; Easy installation; Flexibility; Affordable price.
Among the disadvantages are:
Fragility and lack of strength; Insufficient clarity of the pattern and unexpressed surface relief; Unresistant to many paints and varnishes; Does not tolerate exposure to solvents and some types of cleaning products.
Metal
This material is not very often used for wall decoration; it is usually used for places where one finish transitions into another - on thresholds, steps, in corners and areas where elements join. At the same time, the metal performs not only a decorative function, but also protects surface joints from mechanical loads. You can fix the metal frames with glue or self-tapping screws. The trim should be placed over the outer edge of the material.
Other materials
The traditional choice for many homes is still plaster, which is fixed with alabaster mortar. This technology came to us from the last century and is still successfully used by craftsmen in construction. It is quite difficult to fix stucco molding yourself, since it is very fragile and requires careful handling. Most often, such work is performed by trained professionals. Also, gypsum decor is difficult to repair - falling off material threatens rapid destruction of the created frame and requires the purchase of a new product.
Wooden moldings are very rigid and also require a professional approach during installation work. But they are quite versatile and can be used in almost any room. For fixation, thin nails and special wood glue are used to strengthen the fastening.
Polyurethane frames have become increasingly popular recently due to their light weight, easy mounting, environmental friendliness and safety in use. The products are fixed to the surface with acrylic glue. Using polyurethane is simple and convenient, since the material easily transfers coloring to any desired shade.
Photo wallpaper in the interior - stylish and versatile decor
Many would add a question mark to the above title. The reason is that some people believe that photo wallpaper is a relic of the past, and this material makes the interior look fake and artificial.
In my opinion, photo wallpaper is an imitation of a certain virtual space in which a person would like to be, but, for various reasons, cannot. An example is the desktop wallpaper on a computer monitor. Photo wallpaper on the walls is decoration when the soul demands it, but circumstances do not allow it. This leads to unstable psychological discomfort in a person, as well as to the grotesqueness of the interior. I believe that photo wallpaper can be used only in very rare cases, and only in strictly measured doses. Then they look beautiful in the interior. This issue must be approached meaningfully and in conjunction with the stylistic and design features of the room. Photo wallpaper in every room is clearly too much.
Photo wallpaper cannot be sculpted thoughtlessly, according to the principle, as long as there is a bright picture on the wall. For example, if a small room is cluttered with furniture that does not stylistically match the photo wallpaper.
Even abroad, photo wallpapers are rarely used for interior decoration (do not confuse photo wallpapers with designer or artistic wall paintings).
Photo printing should meaningfully match the interior and geometry of the room, and complement the space of the room.
It seems to me that it all depends on how to fit the photo wallpaper into the interior. If you achieve harmony with the rest of the interior elements, then you won’t get tired of the picture. And if you simply paste over the wall with an autumn landscape, as my grandmother did in the 90s, then the picture will soon “fade out”.
A user of the Clude portal believes that photo wallpapers do not create discomfort. On the contrary, a person should be surrounded by what he likes and pleases here and now. Especially if you are a resident of a metropolis and see the same concrete “boxes” every day. In this case, photo wallpaper is a window to another world and an incentive to change something in your life. For example, if you want to go to the sea, put up photo wallpaper with a beautiful view of the ocean (of course, not thoughtlessly, but stylistically consistent with the entire interior). Look at it, dream about the splash of waves and warm sand under your bare feet.
Making Photo Frames
There are a huge number of options for making frames, and you can even come up with your own, guided by your imagination. Let's look at a few original ideas for example.
Frame made of tubes
This is a very simple method, but the result is always stylish and interesting. Technique:
Paper strips with a width of 2 cm are cut out, their size depends on the desired size of the future frame. Then tubes of equal thickness are made from the strips and glued together with office glue. After the glue has dried, the next stage of manufacturing begins. The tubes are placed side by side and cut on each side at an angle of 45 degrees. The edges must be made very carefully so as not to spoil the appearance of the workpiece. Then the entire structure is glued and reinforced with a piece of cardboard. The final stage may be decoration with sparkles and other decorative details.
To keep products in their original shape and prevent damage from moisture, cover them with paint and varnish. The paper must first be thoroughly primed with an acrylic-based solution.
Volumetric frame
Using this method, you can make an original frame using scissors and a small piece of paper. To do this, follow this procedure:
Take a piece of paper and draw four lines on each side, slightly indented from the edge. Then the lines need to be pressed a little, but this must be done carefully so as not to accidentally damage the material. Keep in mind that the size of the future frame depends on the size of the sheet. Then, where the lines intersect, the sheet needs to be cut. After trimming, notches are marked on the outer parts, which are also cut out. The last step is to fold the frame and enjoy the worthy result of the work done. This product will look great in any interior.
Classic frame
A fairly simple manufacturing method consists of making a frame onto which wallpaper is subsequently glued. The work is very simple and the process does not present any difficulties:
The frame is cut out of thick cardboard, then wallpaper is glued on top. A cardboard wall is installed at the back, then the product is glued and the work is completed. You can add decoration and coloring, for example, gilding will look great.
Among the advantages of such products is their low weight. This property allows you to attach frames without nails, using only double-sided tape.
Recommendations for choosing photo wallpaper
When a person is puzzled by the question of which photo wallpaper to choose and whether they are easy to use, he turns to the Internet for help. Once you enter the request for photo wallpaper, prompts will appear: “photo wallpaper on the wall”, “3D photo wallpaper”, “photo wallpaper catalogue”, etc. If you follow the links, you will see hundreds of pictures with beautiful pictures of photo wallpapers. My eyes widen. How to choose if most of them are advertising photos in expensive foreign interiors without the slightest connection to Russian reality .
The same goes for laudatory reviews. The solution is to turn to the practical experience of FORUMHOUSE users and participants.
I didn’t like photo wallpapers, but I looked at examples of their use and was inspired by this idea. Questions arose:
- It is true that photo wallpapers are very thin.
- Do folds form when gluing photo wallpaper?
- Photo wallpapers do not tear or scratch.
- Are they convenient to use in the room?
- Is it possible to wash photo wallpaper?
- Do they look stylish?
When we ordered and purchased vinyl photo wallpaper, we were pleasantly surprised that they were not thin at all. Glue to walls like regular vinyl. The ones we chose do not have a smooth, but a pleasant textured surface. These are more reliable. We decorated an empty wall and chose a picture with a perspective.
Vinyl photo wallpapers have a paper or, more practical, durable and stronger, non-woven base, and are covered with a polyvinyl chloride protective and decorative coating on top. Polymer film (vinyl) is not afraid of water. It is resistant to mechanical stress.
Ordinary paper photo wallpapers can tear when pasted, bubble and fade after a couple of years. If you want photo wallpaper to please you for 10-15 years, then choose a picture you like on the Internet that will fit into the interior, and print it on thick vinyl wallpaper.
Wallpaper for digital photo printing is not just vinyl, but specially designed for this purpose. There are many textures of photo wallpaper: from fine and coarse sand, to imitation canvas, in the form of frescoes, matting and other finishing materials.