What is a plastic apron
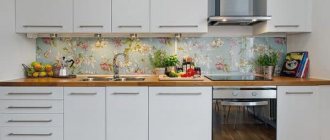
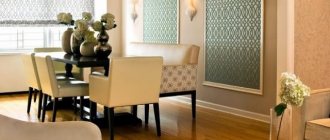
A kitchen protective apron is a kind of shield mounted above the work area. The main task of this element is to protect the finish (painting, wallpaper, plaster) from grease, drops and dirt that gets on the walls during the cooking process.
A kitchen apron is always made from moisture-resistant and easy-to-clean materials. Traditional ceramic tiles today compete with other, more practical and attractive materials. In addition to plastic, kitchen aprons are made of steel plates, composites, mosaics, artificial or natural stone, porcelain stoneware, glass, mirror panels or tiles, as well as MDF.
Interesting . You can often find original kitchen aprons made with a creative approach, for example, from pieces of CDs or sea pebbles. But professionals recommend additionally covering such materials with a tempered glass cover so that dirt does not get clogged between the tiny elements.
Repairs are always an expense, and you want to save on at least something. The cost of skinali (glass panels with photo printing), tile or metal apron is much higher, and plastic is an excellent option for budget renovation.
This board is made from polymers - PVC or polycarbonate. A wide selection of plastic panels attached to the walls of the kitchen allows you to harmoniously match the apron to any interior.
Some features of using glue
To achieve the maximum level of fastening, it is necessary to prematurely treat the surface on which the glue will be applied; it must be dry and smooth.
Regardless of the chosen glue, it must be applied to the product in dots in fairly large drops, then wait a certain amount of time (this information is always indicated on the glue packaging), after which the panel can be applied to the wall.
Be sure to tap and press the stump well against the wall covering to secure the hold. Remaining glue can be removed immediately; for this you can use a cloth or regular alcohol; if the glue has already hardened, then remove the glue with a knife.
Advantages
PVC protective panels for kitchens are an excellent alternative to expensive skinali for those who love a “zest” in the interior, but are not ready to spend a lot of money. It is easy to attach a plastic panel to the wall in the kitchen on your own and in a short time, however, provided that the surface is perfectly flat. Installing the panels does not involve “dirty” work.
A plastic kitchen apron has undeniable advantages:
- Save time. The material is installed quite quickly, the work is completed in just an hour.
- Easy to install . Even a schoolchild who knows geometry can handle the installation of such panels: the process does not require special tools or specific construction skills.
- Cleanliness after installation work . Cutting the panels and their subsequent fastening does not involve the presence of construction waste, so they can be installed even after the repairs are completed and the furniture is displayed.
- The pricing policy of alternative “skinals” is quite attractive.
- Wide range of colors and textures . A plastic apron can be matched to almost any interior.
- Easy to maintain and use. PVC is not afraid of household chemicals and does not require regular rubbing to a shine, like glass or a mirror. It is enough to wipe the plastic surface with a soapy sponge from time to time.
However, such a wonderful material has its drawbacks. Plastic is a synthetic material and highly flammable. If the hob is close to the wall or the free-standing stove does not have a shield, the apron will become deformed from the high temperature.
In addition, plastic cannot be cleaned with abrasives, which cannot be said about ceramics. Aggressive cleaning products can scratch the surface of the apron.
How to attach an apron to a wall
Installation of a plastic apron depends on whether the kitchen renovation is completed, whether furniture is installed and what quality the wall is. Depending on the circumstances, the following fastening methods are used:
- gluing directly to the wall;
- fastening with self-tapping screws;
- installation on a pre-assembled sheathing;
- insert into a structure made of guide profiles.
It must be taken into account that the tabletop and the apron do not fit tightly enough to each other. To eliminate gaps and protect the rear parts of the furniture, use an angular plinth to match the color of the working wall or surface. The extreme sections of sheets or lining are hidden with plastic corners. You can use leftover laminate flooring.
Application of lathing
To hang the covering using lathing, several points should be taken into account:
- The bars or profile are fastened along the entire perimeter of the plastic panel. Using a drill and self-tapping screws, is attached .
- Along the top edge it is necessary to secure the top bar and attach the side bars.
- To add rigidity and reliability to the structure, you can install 1-2 bars inside the perimeter. The distance between the bars and their number depends on the area of the panel.
- If you plan to equip the product with hanging structures (railing or hangers), it is necessary to install a block at the intended location for their further fastening.
- to make in the panels using a drill .
- Using self-tapping screws, install the panels onto the sheathing.
Finished sheets are mounted according to the tongue-and-groove principle, from left to right, from bottom to top, in rows. The lower left one is installed first. The adjacent right one is installed in the groove and the bottom row is filled. Using a building level, the correct installation is checked.
Fastening with glue
Plastic products are good because they can be installed within an hour. There is no need to move the tabletop, drill holes and install the sheathing.
How to glue a hanging apron in a plastic kitchen.
To do this you need to follow these steps:
- The walls need to be prepared for the upcoming work. To do this, it is recommended to remove the old coating, wallpaper, plaster or tile and apply a deep penetration primer.
- If there are cracks or chips on the wall, they are covered with mortar.
- The surface of the wall must be leveled using plaster and treated again with a primer.
- After the wall has dried, you can begin installation.
- It is advisable to glue the apron according to the same principle as installing it on the sheathing. Glue is applied to the panel, after which it is pressed against the wall and secured with spacers. The glue hardens within 10-20 minutes.
Types of plastic panels: advantages and disadvantages
Only the right choice of materials can guarantee satisfaction from the completed renovation. Before you rush to the hardware store, you should understand what types of plastic panels there are, and also learn about the advantages and disadvantages of each type.
Variety of plastic aprons
The simplest kitchen apron made of plastic is an ordinary plain PVC panel, which is assembled like clapboard. This is a cheap material that is often found on facades or balconies, as well as as interior decoration. The material is quite fragile and short-lived, so it is used in the kitchen in exceptional cases.
To decorate your kitchen interior with a more practical and aesthetic material, there are several options:
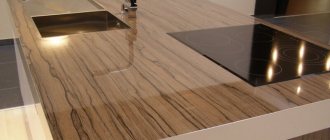
- textured apron. The surface of the figured panels quite clearly imitates mosaic, tile, natural marble, granite, different types of wood, stained glass or brickwork;
- panels with color photo printing are a rather interesting option that completely imitates skinali. The design is applied by embossing the plastic itself or the film covering it;
- different surface. The plane of the plastic apron is both glossy and matte. The choice of texture will depend only on personal preferences, however, it should be borne in mind that gloss requires more care and attention.
Also, kitchen protective panels for aprons differ in the materials used. These are: polyvinyl chloride, solid material, acrylic glass (polycarbonate), composites and ABS (acrylonitrile-butadiene-styrene copolymer resin).
PVC kitchen apron
Polyvinyl chloride panels are supplied in the form of sheets 150-500×2600-3000 mm, 5-10 mm thick. The larger the PVC size, the more durable the coating is considered. The image is applied to the surface of the panels during their production.
What is usually drawn:
- pattern or ornament;
- geometric pattern;
- imitation of natural materials (stone, wood, water drops).
The advantages of PVC aprons include ease and speed of installation, moisture resistance, a wide selection of patterns and textures, and an affordable price.
The material is fastened according to the lining principle, using the same fasteners. The need for lathing is determined by the degree of evenness of the walls. PVC panels should begin to be fixed from the corner side, gradually adding the following fragments.
Disadvantages of PVC aprons:
- The picture fades quickly in the sun.
- The material is quite fragile and does not like mechanical stress.
- The texture wears off quickly with frequent washing with household chemicals.
- Over time, PVC panels become less durable.
- Moisture between the slabs is not uncommon if their joints are poorly made during installation. When water enters a closed area, fungus forms.
- Plastic is easily flammable and deforms near a stove or electric kettle.
Reference . There are PVC panels with a certificate of compliance with fire safety standards. They are recommended for use in kitchen areas.
Solid sheet material
The plastic is supplied in solid panels, the dimensions of which allow you to cut a shield of any configuration. The material is more durable than the previous one and much more practical to use. The color spectrum of the panels allows them to be matched to any interior.
Such an apron is quickly installed using entire large fragments. The seamless coating eliminates the risk of mold and mildew in the kitchen. The all-sheet apron is attached to any of the adhesives. Glue is applied over the entire surface of the material, closing the voids. Upon completion of installation, the joints in the corners of the kitchen are carefully treated with silicone.
Advantages and disadvantages
Plastic finishing has a number of significant advantages.
They are as follows:
- ease of processing and installation;
- possibility of dismantling and replacement;
- long period of operation;
- relatively inexpensive cost;
- possibility of installing a seamless design;
- good water-repellent properties;
- products made of carbonate glass and PVC are resistant to high temperatures;
- the ability to hide engineering and communication lines;
- wide choice of design solutions;
- ease of maintenance;
- resistance to household chemical liquids;
- resistance to rotting, mold and fungal diseases;
- low own weight.
Along with numerous advantages, there are some disadvantages: susceptibility to mechanical stress and stress, as well as the ability to deform when placed close to the hob.
PVC prices
Apron installation instructions
Before attaching a kitchen apron made of plastic, the surface is prepared: everything unnecessary is removed from the work area, tables are moved away, walls are cleared of possible debris, or wallpaper is removed in places of future installation. The surface is also assessed. The method of attaching the apron will depend on its quality.
How to attach a plastic apron? Here are the main methods:
- on the sheathing,
- on glue,
- on self-tapping screws.
Fastening panels with self-tapping screws
Plastic plates are quite easy to drill, so installation will not be difficult. The only condition is the need for a perfectly flat surface. Self-tapping screws are important if you need to protect expensive wall coverings with a transparent panel. Mounting points on the surface are easily hidden using plugs.
This method does not provide for a tight fit of the panel to the wall. There remains a small gap between the wall and the slab. If the apron is not transparent, the electrical wiring is hidden under it. This shield can be easily dismantled.
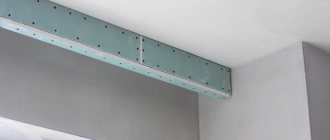
Installation on lathing or guides
The method is used when the walls are very uneven. The disadvantage is that the method “steals” a lot of space, but the undeniable advantage will be the ability to conduct electrical wiring inside the frame. This method is considered the simplest when it is necessary to level the rough surface.
The sheathing is a frame made of wooden beams or aluminum profiles, which is installed around the perimeter of the future apron. Inside the perimeter, bars are attached vertically and horizontally in increments of 30-50 cm, depending on the selected material.
Advice . Before installing the apron, do not forget to check the sheathing using a level.
Gluing to liquid nails or other composition
This installation method is the most optimal. It is easy to install a kitchen apron on liquid nails, the main thing is not to forget about the level. The advantage of the method is that if the walls are slightly uneven, the panels can hide this defect.
When gluing panels, it is important to fill the entire space with the composition, leaving no voids. The joints in the corners must be additionally coated with silicone, and the upper cut should be edged.
No moisture will get under the glued panels, and the adhesive base will add strength to the material.
Installation of an apron using lathing
The mentioned structure can be made of wood or metal. If lumber (for example, timber) will be used to organize it, they must initially be treated with water-repellent impregnation, an antiseptic and a fire retardant in order to protect the tree from negative influences.
Profiles and strips must be installed level. According to the masters, there is a quick way to install a plastic apron in the kitchen using lathing:
- Secure bars or metal profiles at a distance of no more than 50 cm with dowels or staples.
- Secure the plastic panel with self-tapping screws.
- Cover the edges and sections of the apron with decorative strips.
This technique has several advantages:
- Possibility of installation on uneven surfaces;
- a free gap is formed between the wall and the apron, in which you can hide the wiring and install decorative lighting.
How to install a kitchen apron made of plastic
PVC apron panels are a budget option and are used to protect and decorate walls. Due to the high cost, skinals are less common - tempered plexiglass with decorative design. Since panels are produced in different qualities, products made from ABS plastic are especially popular. A plastic apron can be purchased ready-made or made to order, and installation of the apron does not require specialized repair skills.
What is an ABS plastic apron?
Due to the soft structure characteristic of polymers, this material is flexible, which avoids deformation during operation. When installation is carried out, the sheet is equally successfully cut with a table knife and a jigsaw. ABS panels in stores are presented in two standard formats: 601x3001 and 601x2001 mm with a thickness of 1.6 mm.
Opaque ABS plastic and similar products are decorated with a special film or using photo printing. Family photos and unique travel snapshots are displayed on the surface, and an exclusive gallery adorns the perimeter of the kitchen. Compositions of flora and fauna, motifs on the theme of nature are considered a priority. First, a design is selected from a photo from the catalog, then the membrane is applied to the skins.
Advantages of plastic kitchen aprons
- Damaged polycarbonate (acrylic glass) skins can be easily replaced with your own hands;
- A plastic kitchen apron visually forms a smooth surface between the upper and lower cabinets. After installation, each joint between the panels is treated with colorless silicone;
- Despite the fact that ABS polymer is a technological product, it and its analogues meet quality standards, which allows them to be classified as harmless materials;
- Inexpensive plastic kitchen aprons are suitable for those who prefer to frequently change their interior design;
- Skinali are not afraid of moisture, therefore they are not attacked by microbes and mold that develop in the joints between the tiles;
- The variety of designs allows you to choose a pattern for different concepts and decorate the wall for the kitchen in any style;
- Simple installation allows you to save on calling a technician;
- Easy maintenance is another plus in favor of a plastic kitchen apron.
Advice! An apron made of transparent polycarbonate is indispensable for small spaces. For example, ABS skins with a transparent watercolor pattern will visually expand the space. At the same time, you can install an LED strip under the skinali as a backlight; this looks especially good if the panels are fixed to the frame.
Disadvantages of a plastic apron:
- Insufficient strength. After any dynamic load, a mark remains on the surface of the polymer;
- For 3-5 years the material will retain its original appearance, but then the panel will begin to fade. Light-colored products turn yellow over time.
Important! A plastic kitchen apron is comparable in fragility to glass and requires careful handling. Products made from polycarbonate are characterized by a degree limit of +66 °C, so the hob should not be installed close to the wall.
The principle of attaching a plastic apron with your own hands
Do-it-yourself installation of plastic skins is done in several ways: with glue and lathing. Traditionally, a kitchen apron made of plastic is installed using classical technology - on slats. With any method of fastening, first of all the wall is carefully leveled.
- 1Before installation, you should prepare your tools. You will need: a drill, a level, a screwdriver, as well as fastening elements: dowels, self-tapping screws with washers.
- 2A frame is made from wooden or metal slats around the entire perimeter. The floor rail should be fixed 5 cm from the floor using dowels. To avoid distortions when installing it yourself, it is better to use a building level.
- 3The top rail is similarly screwed to the wall at the level of the top drawers or hidden under them. A third one is attached between the lower and upper strips. It makes no sense to make a fine lattice with a step of 50 cm, since the material is light.
- 4Now you need to decide on the location of the railing and all kinds of holders for kitchen accessories. A board of the required width is laid at the marked height and also fixed to the wall.
- 5A plastic apron for the kitchen is attached with self-tapping screws to the frame or with staples from a stapler.
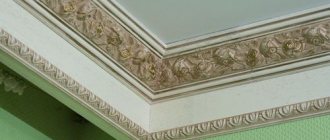
- 6At the last stage, the corners are installed. You will need profile corners with opposite grooves. After connecting them with the side strips, a continuous plastic apron for the kitchen is formed. It is possible that the panels in the corner will have to be adjusted to size using a construction knife.
Technological nuances
You can attach the panel with self-tapping screws, since the caps will be hidden behind the cabinets. If you need to assemble a kitchen apron from small segments of plastic - 30 cm in width, the modules are made according to the principle of wall panels. The first strip is inserted into the lower profile. The second is fitted into the groove and secured with staples. One end of the fastening element clings to the frame, the other holds it. The following modules are installed identically. To ensure that not a single joint is noticeable, each plate is adjusted to the previous one with a rubber hammer. The finishing module snaps into the groove. Installing an F-profile will completely hide all the lines.
The disadvantage of this method is the free space between the sheet and the wall where mold can develop. The advantage is that the screen can be easily replaced if damaged. If you want your polymer apron to last a long time and not lose its attractiveness, you can pay attention to more expensive analogues, for example, glass skinals.
You can only glue an ABS plastic apron with liquid nails onto a perfectly flat wall. The glue is distributed in a dotted line over the surface where the polymer sheet is applied and pressed. The sheet is supported from above by spacers. At the corners and at the bottom it is additionally secured with self-tapping screws.
This installation method is simpler if the walls are smooth and no additional work is required to level them. The disadvantage is the inconvenience of dismantling and replacement.