How to hang a thermometer on a plastic window?
When getting ready for work, school or just for a walk, it is important to know what the weather is like outside in order to dress properly and feel comfortable while being outside for a long time.
To do this, we resort to using an outdoor thermometer. Previously, thermometers were attached to small nails, since windows everywhere were made of wood. Today, it is rare to find wooden windows. They were replaced by plastic windows, and accordingly the method of installing an outdoor thermometer on a window has changed. Let's look at step by step how to hang a thermometer on a plastic window.
For clarity, we will accompany all the stages with photographs, although it is difficult to make a mistake here.
Types of thermometers
Nowadays, outdated wooden window structures are gradually becoming a thing of the past, they are being replaced with modern plastic ones a street thermometer on a window has changed accordingly
In this regard, the question arises of how to choose the right outdoor window thermometer for plastic windows and how to attach the thermometer to a plastic window. There are several types of measuring instruments for windows.
- A mechanical thermometer is the most common, simple and cheap mechanism. Thanks to its design, it is clearly visible from afar, but the accuracy of its readings is low. That is why such a device is not widely used.
- Liquid is the most accessible option for consumers, proposed by the inventor of the temperature scale, Celsius. These devices determine temperature quite accurately. Therefore, when choosing a price-quality option, this thermometer will be the best choice. These models have a significant advantage - a long service life.
- Electronic outdoor thermometers, the latest technological achievement in this field. Thermometer with a digital display in a translucent glass case, the design requires power. There is a function to remember information about the maximum and minimum temperature, and also shows time, pressure and air humidity. But it is characterized by high cost and short service life.
Options for installing a thermometer on a plastic window
1. Standard option - Velcro fastening.
2. Installation of the thermometer with double-sided tape.
3. Installation using glue, for example, “Second” or “Moment”.
4. Thermometer with suction cups.
5. Fastening with rubber seals.
A thermometer on a window or a news informer: old school versus the Internet and TV
Greetings, comrades. Do you want to know how many degrees it is outside at any time of the day? And what outdoor thermometer is suitable for installation on a plastic window? Is it possible to fix it with screws? And where is the best place to place it on the window? You will find answers to these and other questions in this publication.
A transparent version of a window thermometer with a built-in barometer is most preferable.
Velcro installation
Before you start attaching the thermometer, you need to buy an outdoor thermometer with Velcro. An example of such a thermometer is shown in the photo below.
Now you need to decide on the installation location. The thermometer shown above can be turned in reverse by rearranging the lower and upper legs.
Next, remove the mosquito net from the window, holding it by the “ears” located on the sides.
Mosquito net for plastic window
Clean the entire window or just the part that will be installed. After the dirt has been completely washed off and the glass has dried, it is necessary to wipe the glass unit with alcohol or window cleaning liquid. They will degrease the window and improve adhesion.
Window cleaner
We remove the pieces of paper from the Velcro and install the thermometer, pressing the Velcro tightly to the glass. It is not recommended to glue the thermometer to a plastic profile for two reasons. Firstly, the glue can leave marks on the profile. Secondly, the distance from the thermometer to the glass unit should be minimal to ensure good visibility of the thermometer readings from the room, especially at night.
Remove the film from the thermometer's Velcro strips
That's all, all that remains is to install the mosquito stack back.
Why doesn't the suction cup hold?
On sale you can find suction cups made of silicone or rubber. But the material from which they are made has virtually no effect on their wear and tear.
Both silicone and rubber Velcro begin to fall off the glass over time:
- The service life of the device depends on its quality. Velcro with uneven edges or a rough surface will begin to fall off almost immediately due to the presence of air underneath it.
Dirt, wool, glue particles or other irregularities on the glass will also prevent it from attaching tightly.
How to attach an outdoor thermometer to a plastic window?
A street thermometer was simply screwed to wooden windows, but how to properly attach a thermometer to a plastic window?
You shouldn’t spoil a plastic window; you don’t need to glue a thermometer to it, or drill it and screw it with screws or self-tapping screws. It is enough to carefully use a knife or a thin screwdriver to lift the sealing rubber that presses the glass, and slip the top of the thermometer under it first, and then the bottom. The elastic band will press it and hold it very securely; no wind will blow it away. And the plastic frame is intact. But this method is for an ordinary thermometer, which used to be nailed to a wooden window with nails (Fig. 1). Now you can buy a special device for plastic windows, with Velcro, the choice is huge (Fig. 2 and 3).
At the beginning I would like to give advice, you don’t need to attach anything to the plastic window, just drill two holes in the outer slope, hammer in the dowels and secure the thermometer with screws.
If it’s to the window, it’s better to glue the thermometer, although if you bought an outdoor thermometer like this,
We applied the thermometer to the plastic window at a distance from the double-glazed window (from the double-glazed glass beads) of approximately 20 mm, no less.
We made markings through the holes of the thermometer (by opening the window sash).
We marked (for example, with an awl, so the drill “doesn’t go wrong” at the entrance) the approach.
Drill at low speeds, the drill is slightly smaller than the diameter of the screw (it is clear that we do not need a hole to the depth of the length of the screw, a through hole).
That's it, the same “fleas” (two self-tapping screws) were screwed into the prepared holes through the thermometer mount.
If you glue it, then take glue that can be used for exterior work (Moment has such glue), but the thermometer must have a “platform” (that is, for an adhesive mount).
Marking, then degreased the surface, dried it, applied glue to the “platform” (see above), slightly retreating from the edges, pressed, waited, released.
Or immediately take a thermometer with self-adhesive, but in any case, degrease the surface first.
Double-sided tape is the least reliable option.
When installing a thermometer on a window, it is important to follow the rules, because if you do not follow them, it will not last long, or we will show incorrect data.
We fix the thermometer so that it is at the required distance from both heat and cold sources. Heat can come either from direct sunlight or from the window itself. This must be taken into account.
So, you need to take all this into account and install the thermometer on a window on the north side.
General installation recommendations
The question of how to attach a thermometer to a plastic window worries many after a purchase has been made. Before attaching an outdoor thermometer for plastic windows, decide on the installation location so that it is convenient to view the readings .
To avoid measurement errors, attach the outdoor thermometer away from heat sources and direct sunlight. For example, vents, ventilation systems, and external parts of the air conditioner will have an unnecessary impact on the thermometer readings. The sun's rays have a similar effect, so try to install the thermometer on the north side of the building . This will make it possible to obtain more accurate readings and increase the service life of the device. Only the electronic thermometer does not depend on the location.
It should also be remembered that an outdoor window thermometer is an inertial device; the time period for establishing its data readings is about 10 - 20 minutes. Therefore, when it is taken out of the package and installed, do not expect it to change its reading immediately.
Remember: an outdoor thermometer for plastic windows must be installed at positive outside temperatures and a minimum level of relative air humidity.
Attaching a thermometer is usually not technically difficult. But before that you need
just follow a few simple steps:
- The surface of the plastic window must be cleaned of dirt and degreased at the fastening points using solvent or turpentine. This must be done even on a new window. The thermometer will not last long on dirty glass.
- Wipe the surface of the glass dry, as the thermometer holders will not stick to wet surfaces.
Features of installing an outdoor thermometer
It is almost impossible to find out the exact air temperature using an outdoor thermometer located on the window frame. The main reason for this can be called thermal radiation, which comes from the building structures, and to a greater extent from glass, through which about 30% of the heat from the room is lost. This heat will somehow affect the measuring device and increase the value it receives by a certain number of degrees.
In winter, when the outside air temperature differs from the inside temperature by 40-60 degrees, the thermometer readings will be elevated by 2-4 degrees.
In summer, sun exposure can cause an even greater difference between actual and displayed temperatures.
In winter, the thermometer readings differ from the actual temperature by at least 2-4 degrees
To ensure that deviations are minimal, when choosing how and where to attach the thermometer, you must be guided by certain rules, the main ones of which include:
- installation at the greatest possible distance from heat sources (window vent, ventilation system outlet or remote air conditioner unit);
The window is a direct source of heat, and it is not recommended to place the thermometer near it
It is not recommended to install the thermometer on windows facing the “sunny” side.
Also, you should not install the thermometer on those doors that will often open and close, as this can lead to loosening of the fastening elements, which will inevitably lead to the device falling.
It is not recommended to mount the thermometer on frequently opened doors.
How to install a thermometer or its sensor correctly
We have already told you a lot about installation, about the types and features of thermometers. At the same time, they have not yet spoken about the most important thing, about ensuring the accuracy of the readings. Let's start from afar. If you have ever seen how thermometers are installed at a weather station, then you know that for correct readings they must be placed in a place protected from the sun, not in the open wind, and not on the ground.
To be more precise, the thermometer must be protected from direct sunlight, otherwise it will greatly distort the result. Also should not touch metal. The ideal solution is to install the thermometer sensors or the thermometer itself in a ventilated casing, protected from the sun. Something like that.
Well, now that you already know so much, not only about installing and attaching thermometers to the window, you can summarize all the above information.
The safest and simplest methods for fixing the device
There are several ways to attach outdoor thermometers:
The most common method is to attach an outdoor thermometer using adhesive tape. If it was not included in the kit, it can be replaced with double-sided tape. Anyone can install the device using tape; this will not require much effort or additional materials, except for any suitable degreasing composition. As the latter, you can use alcohol, turpentine or nail polish remover, as well as any other product designed to degrease the surface.
If there is no adhesive tape on the “holding legs”, then it can be replaced with double-sided tape
To ensure that the thermometer is held securely, the place where it will be attached is treated with a degreaser and wiped dry with a lint-free cloth. The protective film is removed from the adhesive tape, and the thermometer is pressed against the surface with little force. The disadvantage of this method of fastening is its unreliability. If the window sash is opened frequently, the device may fall.
Surface degreasing is an important stage in surface preparation.
If you were unable to attach the thermometer using this method the first time, a knife wrapped in a cloth soaked in solvent will help remove it. In the same way, the adhesive tape should be removed from the device itself and replaced with a new one. After this, you cannot glue the thermometer to the same place. It is better to prudently choose a new position and repeat the same steps.
Attaching the thermometer to adhesive tape
Also, suction cups are not a very reliable way to attach a thermometer to the frame or glass of a window. Most often, electronic thermometers are attached in this way. Suction cups can only be used if the frame cannot be opened at all.
Before installing the thermometer, the surface is also degreased, wiped dry, and only after that the device is installed on it.
However, in strong gusty winds or rain, detachment of the suckers is almost inevitable.
Mounting the thermometer with suction cups
Outdoor thermometer on a plastic window - new technologies or the old-fashioned method
One of the anachronisms that has migrated into the life of modern people is an outdoor thermometer, which, according to established habit, is screwed or glued to the window frame in order to determine the air temperature outside. Why anachronism and why is it not needed? We will try to tell you in the article we bring to your attention. Outdoor thermometers are installed on plastic windows everywhere. In most cases, without even thinking about whether it makes sense to waste time on this useless activity.
But, since such a need exists among a certain category of citizens, we, of course, will answer questions about how best to do this.
The bee who loved to lie died in the winter :)))
Having become interested in the above review and tired of constantly Googling the weather forecast, I decided to purchase this thermometer.
The first bee that we attached to the suction cups that came with it flew on its plastic wings from the 12th floor the very next day. I found her lying on the lawn in the morning, but while my husband was slowly getting ready. someone has already managed to “attach legs” to our bee. I had to get another pet.
So, I’m telling you about the pros and cons of this miracle:
1) Nice design, children like it, looks interesting from the street
2) shows the temperature only when the sun is not shining.
3) not overpriced
More details about point 2:
Waking up early in the morning, I went to check on my bee, and smiled contentedly - the bee showed me 12 degrees, everything was fine. Happy as an elephant, I went to take care of the child, at lunchtime the sun came out and we began to get ready to go for a walk, but when I approached my bee, she assured me with an impudent face that it was 40 C outside.
In general, the thermometer turned out to be unusable during solar activity. It may be stupid, but I was hoping that the volumetric hollow body would somehow protect the thermometer from overheating, but no.
1) Fastening with suction cups turned out to be completely unsuitable, fortunately they are easily removed, I attached the bee with double-sided thick tape.
2) In the sun it shows abnormal temperatures, even my grandfather’s old window thermometer didn’t do that weird
In general, you be the judge.
We bought it at OBI for 200, I think.
As the temperature dropped below 7 degrees, it began to make more and more errors, and then finally died, now it always shows +6, although it is -10 outside the window
Having an outdoor thermometer makes the life of a modern person much easier, but only if the installation was carried out according to all the rules. To attach the device to a plastic window, you do not need to have specific skills. In this case, it is necessary to remember a number of nuances, otherwise the thermometer will produce unrealistic numbers or will not last long. In addition, it is recommended to choose fastening methods that cannot harm the plastic window by reducing its tightness or spoiling its appearance.
Do I need a thermometer behind a plastic window?
From the time of their invention until the recent historical past, street thermometers more or less coped with their responsibilities - showing the air temperature on the street. Just like today and fifty and a hundred years ago, they lied godlessly. This was not due to the characteristics of the devices themselves, but to the fact that they were installed anywhere and anyhow. Therefore, it was not uncommon for there to be disputes about how cold or hot it was on a particular day. The debaters simply forgot that the street thermometers, the readings of which they relied on, were placed in different conditions. For some - on a window illuminated by the Sun in the morning, for others - on the frame of an eternally shaded balcony, and for others - on a post in the courtyard of a private house.
In the 21st century, the need for this device outside the window has completely disappeared. Almost everyone has a cell phone or smartphone, which with one touch can show on the display absolutely accurate and objective data on air temperature, humidity, wind strength and “subjective” sensations of the weather, if necessary adding to the readings the value of atmospheric pressure and a precipitation forecast for the coming a day or a whole week.
But the power of inertia of thinking and habit is so strong that instead of finding out without getting out of bed what the weather is waiting for you outside, many wander to the street thermometer outside the window and learn with joy or sorrow that the weather outside is not like that at all. what they dreamed about.
A little about thermometers (thermometers)
Traditionally, in everyday life, two types of thermometers are used to measure outdoor air temperature: alcohol and bimetallic. The first are a hermetically sealed capillary tube with colored alcohol, which, as the temperature rises or falls, the air either expands or contracts, sliding along the capillary along the applied metric scale.
Bimetallic thermometers are a spring consisting of an alloy of two metals with different expansion coefficients, at the end of which an arrow is installed. When heated or cooled, the spring either compresses or unwinds. In accordance with this, the arrow located at the end of such a spring also moves, showing a certain value on an arcuate degree scale.
The third type of outdoor thermometers are electronic ones, which receive signals from a sensor located outside the room and transmit it to an electronic device that displays the temperature digitally on an LCD display.
Currently, these three models are distributed to approximately the same extent and serve as the subject of endless complaints from owners about the quality of the devices and the reason for mathematical calculations of the arithmetic average in the event of a discrepancy between the readings on two or more thermometers.
What to do to prevent the thermometer from lying?
It is almost impossible to obtain absolutely reliable information about air temperature from an outdoor thermometer located on the frame of a plastic window. The first reason is thermal radiation emanating from the house. If it is known that up to 30% of heat is lost through windows, then, accordingly, the radiated heat will make adjustments to the thermometer readings in the direction of increasing the temperature.
The second factor is incorrect installation of the thermometer. They are usually mounted on windows that provide the easiest and most constant access. These are kitchen windows or bedroom windows. At the same time, few people think about checking with a compass or 2GIS program before installing a thermometer and determining in which direction your plastic windows are oriented. If in the east, the thermometer will “lie” in the morning, if in the west, in the late afternoon, if in the south, throughout the day. This is due to solar activity. Even in cloudy weather, the southern wall of the house will warm up more strongly and the heat emanating from it will not allow your thermometer to show a reliable temperature.
The most accurate readings possible are given by street thermometers located on the north side. They are objective because they are not exposed to direct sunlight. The third mistake that affects incorrect readings is ignoring the thermometer shielding requirements. It must be covered from the outside with a reflective screen, which will protect it from the influence of direct solar radiation.
The fourth condition is that there is sufficient clearance between the thermometer and the wall (not even the frame or glass) of the house. It follows from this that without observing these conditions, you will always receive very approximate readings in the range of +/- 3-5 ° C.
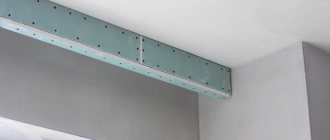
Alternatives for a window thermometer that do not mount it directly on the window
The main purpose of a thermometer on the frame is to be able to look at it and see what the temperature is outside. But who said that the thermometer should be installed on the window sash!? The thermometer can be mounted on a slope outside, while its functionality will be fully preserved, and it will be convenient to monitor the readings. In this case, the frame of the plastic window will probably not be damaged. All you need to do here is to bend the metal fasteners to the diameter of the thermometer and drill holes in the wall for the dowels. Next, we screw the entire structure to the window slope and voila, the thermometer is in place. It may be unsightly, but it is pragmatic and the frame is intact.
Well, another option would be to purchase an electronic thermometer with a remote sensor. The advantages here are obvious. You can simply place the thermometer on the window sill without drilling or gluing anything at all. There is no need to talk about installation here. The wire with the temperature sensor is simply thrown outside, and the thermometer itself is located in the room. If you want the thermometer to be in place, you can embed it into the slope, which in most cases are PVC panels. They are easily cut with the simplest stationery knife.
Then the wire is routed to the frame, and there it is also brought out beyond the sash. It is even better to install such a thermometer when the slopes are being made and the frame has not yet been foamed. Then the wire can be completely routed behind the panels and frame, directly to the street. He will not be visible in the room at all. The third option is weather stations with signal transmission via a wireless channel. Such stations work as follows. A sensor for measuring temperature and more is attached to the street, often it is also a barometer and a hygrometer. The sensor is mounted on standard mounts in the housing using a dowel.
Digital telemetry data is then transmitted at high frequency (433 Hz) to the main station, where it is decrypted and displayed.
In this case, the main station can now be placed not only by the window, but also in the room, in any place convenient for you. The signal transmission range is about 20 meters. The most popular well-known brand is stations. True, the price for them is “biting”. Well, the fourth option, or special case, is a thermometer installed directly on the glass, using suction cups, or using mounting tape.
Let's say right away that the option is not very successful, since the LCD screen is located on the street. During the cold season it may fail. It is better not to consider this option as a possible installation. And we also don’t need to mention about attaching the suction cup in the cold. Not reliable, which means not practical! Now that we have presented various options for thermometers and stations and methods for attaching them, let's look at all the pros and cons of each, as well as installation features. Let's start with the safety of each of the thermometers.
Installing a thermometer
If the above arguments do not convince you, and you still want to attach a thermometer outside your window, then carefully consider its choice. As already noted, bimetallic thermometers produce the largest errors. This is due to the fact that it is very difficult to select and calibrate the scale for each specific spring located inside the device. A deviation in the thickness of one of the metal strips by a few microns is enough for the readings of two thermometers to differ. In mass production, no one makes their own scale for a specific spring. Therefore, thermometer readings are inaccurate.
The most common alcohol thermometers can serve you for many years, but every year their readings, as the liquid evaporates, will differ in the direction of “lowering” the temperature. When choosing an alcohol thermometer, you should strive to buy a device with as long a capillary tube as possible. Numerous souvenir thermometers, equipped with paper scales inside the flask, are not initially calibrated and show the temperature with large errors.
If you choose an electronic weather station, then its choice will depend solely on your financial capabilities and the number of functions that the device can perform.
It is best to attach the thermometer not to the frame of a plastic window, since reliable fastening is only possible by mechanically screwing it with plastic screws. And it’s hardly worth spoiling your profile for the sake of installing a thermometer. You can glue the thermometer, having previously washed and degreased the PVC profile, onto double-sided tape, but it is very short-lived and one fine day you may not find a thermometer outside your window, the reason for this could also be birds, especially curious titmice, which are ready to perch on any surface .
Can be glued with transparent construction adhesives used for PVC plastics or transparent plumbing silicone sealant. It is not recommended to glue with Secunda adhesives containing cyanoacrylate. Despite its outstanding qualities in terms of speed and strength of initial setting, the substance itself decomposes quite quickly under the influence of air humidity and UV radiation and after about a year the glue no longer holds.
Therefore, the best option would be to mount the thermometer on the wall of the house on a remote bracket and secure it with small screws or nails. Do not forget to equip the thermometer with a simple homemade screen made of foil material, which will protect it from the direct rays of the Sun. The thermometer should be secured on the side of the window that does not open, so that the sash, which is slightly opened for ventilation, does not make adjustments to the readings of the device due to the warm air from the room.
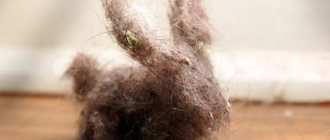
Which type of outdoor thermometer is the most reliable and most accurate?
Mechanical thermometers are the most capricious of those mentioned above. It may fail within a few days after installation. Or even initially show the wrong temperature. And changes from extreme minus to plus will even more quickly render it inoperable. Let's just say this is not a reliable thermometer. Of the 2 I bought, the first one failed after a week, the second after a year. At the same time, even incorrect temperature readings can be considered a breakdown of such a thermometer, when it seems to react to temperature, but shows it incorrectly. But alcohol thermometers have proven themselves since Soviet times. The design is reliable and proven. Except that the plastic ears holding the tube often break off, and here you have to do something tricky, like in the photo above. Electronic thermometers can be called the most reliable. Even Chinese manufacturers produce such thermometers quite successfully. If you don't mess with them and only change the batteries on time, they will serve you for years. This does not apply to electronic thermometers when they are installed outdoors. We have already talked about this option. ZhKI does not like cold weather. As a result, it can simply “spread” between the glass of the screen, that is, it will become unusable. If we talk about the accuracy of each of the thermometers. Here the palm can also unconditionally be given to an electronic copy. They are the most reliable and accurate!