Choosing a cabinet design and model
There are not many models of corner cabinets.
There are only 4 varieties:
- Triangular wardrobe. The model differs from others in that the insides (shelves) are not attached to the cabinet wall. Everything is attached to the wall to which the cabinet is placed. That is, it does not use side walls. A triangular cabinet brightens up corners and adds harmony to the room. One of the cabinet subtypes is the “radius cabinet”. The overall design is practically the same, the only thing is that it has a much more interesting door shape. They are made in the shape of a semicircle, which is provided by guides. But the originality of the model does not end there. A door of an interesting shape can also be concave, convex or wavy.
- Trapezoidal. One side of the cabinet has a side wall. Due to this, the whole structure looks very interesting; it has the shape of an irregular trapezoid. The closet space is very convenient to use, as you can place things of non-standard shapes and sizes there.
- L-shaped wardrobe. This is the most common type of corner cabinets. They are universal and most often suitable for any interior. The design takes up much less space than other types, which is also a definite plus. The design of the L-shaped cabinet is assembled from two straight lines, so it is the easiest to assemble. It looks compact and concise.
- Five-walled. The structure is made up of several side walls that are connected to each other. Due to its non-standard nature, this variety can rarely be found in stores. But it is quite possible to assemble it yourself. If the desire arises, it can be supplemented with the necessary elements inside.
Minimalism is a trendy style at all times.
The cabinet design is selected to match the interior. The only thing that is important to consider is that corner cabinets will look harmonious only in modern styles. Historical styles such as baroque and classics do not imply the presence of modern interior items.
How to pack a disassembled wardrobe for moving?
For high-quality packaging you will need sheets of cardboard, film for painting, tape, foam rubber or polystyrene foam. You can pick up empty used boxes from any store for free. So let's get started:
- Cover all panels and shelves with corrugated cardboard to prevent abrasions on the laminated surface of furniture parts during transportation.
- Fold long slabs first, then smaller panels.
- Cover glass or mirror sheets with bubble polyethylene film or foam strips.
- Wrap all stacks with two layers of covering polymer film for painting work. Pre-wrap the ends with foam rubber or corrugated cardboard.
- Secure the plastic cover with tape along both the length and width of the panels.
- Wrap drawers and cabinet bodies with film with foam or foam padding at the corners.
- Place bags of accessories in one box.
- Do the same with packing the back walls.
- Now, all this can be taken out and put into transport.
How to assemble a corner cabinet
Assembling a corner cabinet is a simple process if you carefully read the instructions and prepare all the necessary materials.
Preparing parts
Preparation of parts consists of preliminary measurements. It is important to take into account all the nuances of the design and calculate the dimensions. A cabinet diagram and a drawing of the proposed location are created. It is important to measure everything and put it on paper.
Before you order a cabinet, you should design it.
The usual design involves one large compartment for placing things on hangers. The other section is narrower; it is divided into compartments by future shelves. If desired, you can perform the so-called open pencil case on the left or right side.
Use special programs to design the cabinet.
Each department has its own part prepared. They are made taking into account allowances. If the cabinet has a back wall, then much more material will be needed.
Installation of fittings on corner elements
Installing fittings is one of the most crucial moments. Therefore, everything must be done with extreme caution. Each action is checked several times, only after which the transition to the next occurs.
Fittings are an important element in furniture.
The first fastening element, the eccentric tie rod, is screwed to the lowest part of the cabinet, that is, to its bottom on the sides. In sequence. Then the dowel and lock are inserted. The same procedure is done with the top part, that is, with the “roof” of the cabinet. The fittings are installed on it in the same order.
Preparing the Side Panels
The side panels are the tallest parts of the cabinet as they are the side walls. It is necessary to nail the legs to their bottom so that the future cabinet stands stable. Then the rods are screwed in and the dowels are inserted.
There is a difference between assembling a regular and corner wardrobe.
There is no need to rush; it is better to check everything several times and correct it if necessary. In the first stages there is a good opportunity to dismantle everything, so you need to use it to avoid mistakes. The side of the cabinet is attached to one of the side panels (right first). The hinges are being installed. And on the left side you need to secure several shelf holders.
Internal vertical panels
Metal connecting corners are installed on the rear internal vertical panel. Then the locks and small rods for the largest and top shelves are installed. It is necessary to drive several shelf holders into the adjacent wall and screw in rods (small) for the remaining middle shelves.
You can make a built-in corner wardrobe.
Since this stage involves the introduction of shelf holders into the design, they must be checked for quality of installation. Otherwise, there is a risk that all things may fall off of them as a result.
Installation of the housing structure
The bottom is placed on the previously installed legs. Next, the internal vertical panel is installed. Each one in turn on top. The part adjacent to the inner vertical panel is attached in the center, and the vertical panel itself is attached to the background at the edge. They can be securely connected to each other using metal corners.
Leave the assembly of the structure to professionals.
The next step is to attach the opposite side panel. The locks are closing. The part needs to be held a little. The corner top of the structure is applied and the part with panels that stand vertically is fixed. Since the structure is probably high, you can use a stepladder.
A corner cabinet is a great way to rationally distribute room space in a small room.
The left vertical panel is attached, the locks are all locked immediately. Next, all the shelves are inserted using small rods. Then the back wall is filled according to the principle of installing all the others.
Arrange the shelves in your closet functionally.
After which all the allocated space for shelves can be safely filled.
Hanging a door on a corner cabinet
Hinges are installed on the door and screws are screwed in. Door hinges must be inserted into the hinges. The hinge structure is usually equipped with a special screw, which regulates the correct insertion of this screw into the hinge.
Try to accurately align all the holes, do not force them together by inserting a tie when the holes do not yet line up completely.
All hinges are fixed with screws. The door is adjusted in the required direction and aligned. The last step will be to install the handle on the door.
Corner cabinet assembly tools and components
To assemble the cabinet you will need the following tools:
- screwdriver;
- drill;
- screwdriver;
- hexagon;
- square;
- hammer and rubber mallet (carpenter's hammer);
- measuring tape;
- drawing pencil;
- iron for edge tape;
- cord plumb line (when installing built-in products).
Tools used in assembling the structure
Typically, each factory cabinet comes with all the necessary components. Therefore, when purchasing a product, you should make sure that the set contains:
- fasteners (screws, confirmations, wooden dowels for connecting parts, metal corners, etc.);
- fittings (guides, door handles, hinges, locks, etc.);
- internal filling (will differ depending on the selected cabinet model).
If the kit does not include the above elements, then you will have to purchase them yourself, because otherwise you will not be able to assemble the cabinet - the elements simply will not have anything to hold them on.
The manufacturer usually provides the availability of components
Prices for popular models of screwdrivers
Understanding the panels
Any furniture intended for self-assembly is supplied in packages in the form of collapsible elements. Most often, the manufacturer puts numbering on each package and indicates a list of contents, so before assembly you need to read the instructions and then arrange the boxes in the appropriate numbering order.
Corner cabinet diagram
It is thanks to such marks that even a beginner can cope with the process. In addition, even at the factory, they try to arrange the parts in an exact sequence in order to simplify assembly. Typically, the same box contains the frame elements, as well as the side and bottom parts of the structure. In a separate kit you can find the components of the doors, the back wall, the internal parts of the cabinet and fittings.
It is necessary to carefully disassemble the panels and not confuse different packages with each other.
It is quite difficult to make a mistake with the connection of these parts, because each of them already has ready-made holes for fasteners. If assembled incorrectly, these holes will not line up.
Installation of fasteners
Each assembly kit must contain a package with a full set of metal fasteners (hardware), wood and plastic connections. It is recommended that you first familiarize yourself with their description and installation method.
Table 4. Types of fastening elements.
| View, illustration | Description |
| Such fasteners are a good alternative to outdated self-tapping screws; they are distinguished by a large thread pitch. The confirmations are screwed using a screwdriver or hexagon into the prepared holes. They are very flexible, rarely break during assembly and can be easily removed if necessary. | |
Ties (eccentric clamps) | The previous fastening option, despite its convenience, will be visible from the outside after assembly is completed. Such problems do not arise with eccentric clamps; they remain invisible after installation (these are collapsible hardware). |
| Lamello Tenzo R-14 | A variant of hidden fasteners that are installed in shaped grooves. They are pre-coated with assembly adhesive and then snapped into place, resulting in a very strong connection. The only downside is that such a cabinet will be difficult to disassemble. |
Wooden dowel (chopik) | Before fastening, holes are made in the parts (they must match), into which choppers coated with glue are placed. The result is a hidden connection that does not stick out - most often shelves are attached to choppers. Keep in mind that a cabinet with adhesive clips will be difficult to disassemble. |
Wooden dowel and euroscrew | The previous fastening option is not strong, so in special cases the chopsticks are reinforced using European screws. In this case, there is no need to use assembly adhesive. In this case, the connections become noticeable from the outside, but are quickly disassembled. |
| For the purpose of perpendicular fixation of parts, various plastic and metal corners are used. They are installed at the junction of flat parts, and screws are screwed into the holes. There are other types of corners that serve as shelf holders. |
Video - Assembling furniture. All about furniture joints
How to make a corner cabinet with your own hands
You can assemble the corner cabinet according to the instructions provided. If you follow it, you will get a standard version of the cabinet. The design will have a swing door. It can be made from any material, even durable glass. The most important thing is to carefully mount it and attach the handles so as not to damage the glass.
Follow the instructions when assembling the cabinet.
If you want a more complex version of the corner cabinet, you can make your own adjustments. Let's say you cut it at an angle to get a trapezoidal shape. This design will look much more interesting and attractive. Well, for lovers of standard options, this instruction on how to assemble a corner cabinet with your own hands is perfect.
The number of shelves in the cabinet is not limited. It can be filled completely or completely, or you can leave space for placing a beam under the hangers. If desired, you can also install a storage structure below.
Where to put the closet
Choosing the right place to install a corner cabinet is 40% of the success in its design. If you correctly compare the footage of the room and the dimensions of the future cabinet, then you won’t have to dismantle it later.
A corner cabinet is placed in the corner.
Additional Information! It is important to evaluate the location not only for a few months in advance, but also for several years. For example, triangular corner cabinets cannot be reinstalled or moved. Such structures are installed thoroughly and irrevocably.
For a clear example of installation, you can make a detailed drawing of the room and calculate all possible options to choose the most suitable one.
The cabinet drawing will help you quickly assemble it.
It is worth saying that cabinet furniture can be reinstalled, but this process is very labor-intensive and time-consuming. A cabinet that has all the walls, that is, not attached to the load-bearing wall of the room, can also be easily moved to another location.
Often corner cabinets are built-in.
How to properly throw out a closet?
If the furniture is so decrepit that you decide to throw away the cabinet, then there are two options:
- Take out the entire wardrobe.
- Disassemble the cabinet for disposal.
Take out the entire wardrobe
You can move the cabinet without disassembling it by renting two lifting belts and inviting an assistant. That's what movers do. Carrying bulky furniture using belts is not particularly difficult. The technology can be mastered in a short time. If your home has a freight elevator, this will make the task much easier.
You can’t just put old furniture near the entrance or trash can. There is a specially designated place for bulky waste in each locality. Usually this is a solid waste landfill or simply a landfill. Residents of private houses were luckier. Burning waste in your own fenced area is not prohibited.
Disassemble the cabinet for disposal
In this case, arm yourself with a pry bar and a hammer. You can tear the doors out of their hinges by pressing them away from the body with a mounting spatula. Insert a pry bar into the cracks and separate the panels. Using a hammer and spatula, remove the filling elements. Collect everything disassembled into bags and take it to the garbage container site. Make sure this is not prohibited by your building code. Otherwise, use a waste removal service.
The management company is responsible for the removal of large-sized rubbish.
Advantages and disadvantages of a corner cabinet
Any design has its advantages and disadvantages. The corner cabinet is very popular due to its multiple advantages.
Corner furniture has many advantages.
The positive aspects of a corner cabinet include:
- Compact design.
- Saving room space.
- Due to the proper arrangement, cabinets of this design are large.
- Spaciousness.
- Convenient storage of all things and their location.
- If the design is carried out independently, then additional storage space is specially installed.
- Versatility.
- Large selection of design solutions.
- Practicality.
Assemble furniture directly at the installation site.
The negative aspects of the design can be considered:
- The cabinet is not mobile.
- A large number of parts will have to be purchased to order.
Specialists know exactly how to assemble the product correctly and quickly.
Self-assembly of a corner cabinet is a labor-intensive process and requires concentration. Any wrong action can lead to a major reinstallation of the structure. It is important to observe all the nuances and follow clear instructions for assembling a corner cabinet.
Corner cabinet assembly sequence
Any factory product must be accompanied by detailed assembly instructions.
Approximate instructions for assembling the cabinet, which should be included in the package
Important point! It should be taken into account that a separate instruction is developed for each individual cabinet model; it is impossible to replace a ready-made diagram with any other. Experts recommend strictly following the sequence of actions when connecting parts, otherwise the kit may be damaged.
Installation of any cabinet corner cabinets should begin from the lower sections. The following assembly stages are distinguished:
- Installation of the base (if available).
- Connection of body parts and fasteners.
- Installing the back wall.
- Installation of internal parts.
- Installation and adjustment of doors.
Step-by-step instruction
Step one: assembling the frame of the corner cabinet (base), which is located at the base. This is an important part of the frame, because if it is missing, the hinged cabinet doors will touch the floor. Usually the base is located at a distance of about 5-10 centimeters from the floor. The base material is chipboard. In shape, it follows the frame of the cabinet itself, but does not stand out beyond its boundaries (compact).
The parts of the base are connected to each other with self-tapping screws or European screws. Sometimes such an additional element is made high, which allows you to get a lower shelf for storing something.
Step two: installation of housing parts. At this stage it is necessary to connect the side, top and bottom parts of the entire structure. They are fixed using European screws, plastic and metal corners. The place where the parts are combined is additionally reinforced with the help of wooden choppers. In addition, at this stage the partitions should be secured, which give the body stability.
If the design assumes the presence of a base, then all elements of the housing are fixed to it. If it is not available, the cabinet is assembled on a flat floor, after which the cabinet is raised and fixed in a vertical position.
Installation of housing parts
Step three: mounting the back wall. This is an important element of the cabinet design, which not only serves to limit the space inside, but also provides stability. Typically, sheets of durable plywood or fiberboard are used to make this part. The first option is more expensive, and the second is budget (less durable).
It is necessary to secure the rear part in such a way as to assemble the sides into a solid structure. It is fixed with self-tapping screws along the edges. Connecting this part with internal partitions is only permitted if they are securely fixed.
Rear wall installation
Step four: installing shelves and rails. If desired, you can securely fix the shelves or leave them movable. The second option allows you to take them out and change places in the future. Reliable fixation involves installing parts using corners and screws directly to the cabinet walls. In another case, holders are attached to the walls of the structure, and then the shelves are installed.
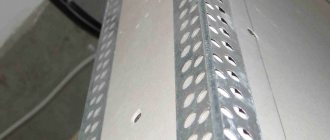
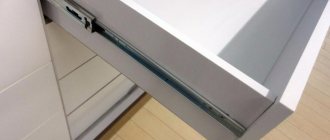
Guides must be installed in cases where the design involves the presence of moving doors (wardrobe). For such purposes, you will need to take aluminum profiles; they are fixed at the top and bottom. In the finished design they will be invisible. Sometimes additional guides are installed when there are drawers, so that they will slide out smoothly.
Installing shelves and guides
Step five: installation of doors. After installing the guides, it is necessary to fix the sliding doors. They are mounted first from the top edge, and then from the bottom. The door leaves should be positioned relative to each other so that they can be easily moved apart.
Hinged doors are hung on furniture hinges. Previously, shaped grooves are made in the structure. At the same time, they will be fixed from the inside with European screws.
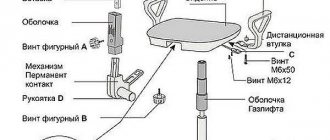
Step six: adjusting the doors. Thanks to the presence of hinges, swing doors can be moved slightly. Screw No. 1 allows you to move the door horizontally in different directions. Adjusting screw No. 3 allows you to move the door to the cabinet as close as possible. Other screws are not adjustable; they are used only during installation.
You can adjust the doors on the wardrobe model by pressing or loosening the lower wheel. This is done thanks to the presence of a screw at the bottom.
Lower wheel adjustment
Step seven: close the connections with plugs. If after installation the fastening structures are visible from the outside, they can be covered with special furniture plugs. They are sold in any furniture store in various colors.