I turn to the recipe for making homemade cheese very often. It always turns out very tender and tasty. Cheese made from fresh milk is good on its own, but it can also be used to make a lot of different dishes. I learned about this when my husband and I first visited India. By the way, the Indians call homemade milk cheese paneer. It is added to both soups and main courses. Unusual desserts are also made from cheese.
In India, you can try a variety of dishes with vegetables, rice and paneer fried in spices. At first glance, such combinations may seem a little strange, but in fact, all the ingredients of Indian dishes complement each other perfectly. Later, I will definitely share with you recipes and my step-by-step photos of various interesting dishes with homemade cheese. But in order to move on to them, we need to learn how to cook paneer in the classic form.
Making cheese at home is very simple. You only need two ingredients: fresh cow's milk and lemon juice. At the same time, the milk must be real, not store-bought. Fresh cow's milk contains a lot of protein, which will curdle when lemon juice is added. It is from the curdled lumps that we get cheese. There is a high probability that nothing will come out of store-bought milk at all. This is due to the fact that store-bought milk, most often, contains no milk at all, because... It is made from a small amount of powdered milk with the addition of a large amount of preservatives for long-term storage. Even simple yogurt cannot be made from such a mixture, not to mention cheese.
A recipe for making homemade cheese must include an element that will cause the milk to ferment. In addition to lemon juice, it can also be another ingredient. But today we will add lemon juice. This cooking technology is very simple and has been tested by me personally many times. ?
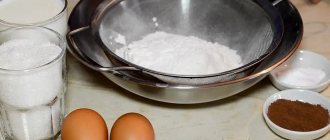
Ingredients:
– fresh cow’s milk 3 l
- lemon 2 pcs
Yield of finished dish: 480 g.
Cooking time: 20-30 minutes + 2 hours for tamping (if necessary).
Homemade cheese from milk (paneer) - step-by-step recipe with photos
- Place three liters of fresh cow's milk in a saucepan over high heat. At this time, you need to squeeze the juice from the lemons into a separate bowl. We try to avoid lemon seeds; we don’t need them at all in the future cheese.
While the milk is heating up, let's prepare the structure that will be needed to separate the fermented pieces of milk from the whey. To do this, you need to take a pan or ladle, put a colander on top, and cover it completely with gauze. In the photo below you can see what this design will look like.
Dear readers, we have opened a channel on YouTube. In addition to recipes, we will post lectures on health, internal development and meditation on the channel. Be sure to subscribe! 
- When the milk starts to boil, immediately reduce the heat to medium. If you notice that the milk may escape, it is better to keep the heat to a minimum.
Now pour lemon juice into the milk and mix everything with a spoon. I usually use a wooden spoon or spatula.
It is better not to drag along the bottom of the pan, as the milk may burn a little there. The pieces that separate from the bottom of the pan will be dark in color and slightly different in taste, which will affect the appearance and taste of the cheese itself.
Immediately when you add lemon juice to the milk, you will see that it begins to curdle into large white flakes. This is our cheese. All that remains is to collect it. A greenish-yellow liquid forms around the flakes - this is whey. By the way, it’s a very healthy product that you can simply drink or add to other dishes, so you shouldn’t throw it away. For example, I use this whey when making yeast-free wheat bread instead of water.
The milk can be stirred for two to three minutes until all the protein contained in it curdles. The longer we mix, the harder the cheese will become.
- Next, pour everything from the pan into our structure, covered with gauze. If the volumes of the pans are different, make sure that the whey does not overflow. You can gradually pour it into another container.
There will be white cheese flakes on the cheesecloth. When the separation process is complete, the pieces of cheese must be thoroughly rinsed with water. If this is not done, the finished product may taste slightly bitter. These are the taste properties of the connecting substance that forms the pieces of cheese. Using water treatments we get rid of the bitterness in the taste.
- Now we wrap the edges of the gauze into the center, completely covering the cheese. We place the weight on top. For example, a three-liter jar of water. Leave it like this for a couple of hours. If desired, it can be longer. The cheese will become harder.
If you are going to make any dessert from cheese, then there is no need to compact the product. For sweets, soft cheese is usually used immediately after preparation.
When you remove the weight from the gauze, you will get a homogeneous piece of cheese. Now you can try it immediately or put it in a bag in the refrigerator until your next meal.
You see how easy it is to prepare natural white cheese (paneer) at home. And then we use a flight of fancy - you can make different dishes based on the cheese, or simply cut it up for a hearty breakfast. Sandwiches with paneer, fresh vegetables and homemade yeast-free bread are also good.
Bon appetit!
If you have questions or comments about this recipe, you can leave them on our forum in this thread.
Do you want to get a nutrition program that will help your health? Sign up for an individual consultation on health and nutrition with a naturopathic specialist - Regina Kutimskaya Sign up and ask questions
©
Subscribe to our Telegram channel and always be aware of new articles:
Tags: Vegetarian recipes
« Previous entry
Recipe based on milk and citric acid
Paneer cheese at home will turn out soft and tender if you follow the cooking instructions correctly. It can be added to soups or dishes with vegetables, pre-cut into cubes, fried or raw, or served with a variety of sauces and favorite spices. At the same time, the taste and consistency of the finished dish immediately changes. This makes the food delicious. The following components will be needed:
- Milk - 2.3 liters;
- Citric acid - 1 small spoon. You can replace it with another substance for coagulating the milk mixture, for example, lemon juice in the amount of 5 large spoons, sour whey (600 ml), or yogurt (300 ml).
Cooking time – 30 minutes.
The scheme is as follows:
- Place the pan with milk on medium heat and make sure that it does not run away when it starts to rise. The dishes should be large and roomy;
- It is necessary to prepare a coagulating substance and a colander, lay two layers of gauze in it and place it in a bowl where the whey will drain;
- When the milk boils, add a curdling agent;
- Immediately the cheese mass is quickly separated from the yellowish-green whey. You need to remove the pan from the stove. If the whey turns out to be opaque, the dishes need to be put back on the gas and a little more coagulating agent added. You cannot keep a milk product on fire for a very long time, because it will become hard. Pay special attention to this;
- If desired, you can add turmeric seasoning. Then the product turns out to be very crumbly, yellowish and original in taste.
- Nowadays, stores sell milk to which a large number of preservation components are added to prevent it from curdling. Therefore, even if there is a lot of coagulating agent, the milk still does not reach the required degree of coagulation and turns out whitish. In this case, the product is left to “rest” for several hours. During this time, solid particles rise to the surface and form a curd-like, very dense layer;
- As soon as the curd and whey are completely separated, you need to remove the saucepan from the heat and throw everything into gauze, then rinse it under cold water for half a minute. This procedure removes the coagulating mass, which can dramatically spoil the taste of the product;
- Now is the final stage, at which you need to squeeze out the remaining liquid. There are several methods for this, depending on what result you want to get. The first option: tie the cheesecloth in which the cheese lies and put it under a press for a while. This method is suitable for making the final dish dense. The more you keep it under pressure, the harder it will be. The second way is to hang it in gauze and leave it for a while until all the moisture has drained and the mass becomes solid. You can also tighten the gauze and squeeze out the water. This produces paneer cheese with a softer consistency.
Unroll the gauze, cut the finished product and enjoy the delicate taste.
Homemade Paneer cheese (recipe with photos)
Recipe 1. Homemade paneer cheese
“Paneer” is a traditional Indian unleavened cheese, very similar to “Adyghesky”. It has a delicious taste, so even a regular Paneer sandwich will be delicious. It can be added to various dishes. This cheese in various salads goes well with spicy tomato sauce or spinach sauce. It can be fried, and it will not melt, but will be covered with a beautiful golden brown crust. With Paneer you can prepare more than a hundred different dishes, from snacks to Indian sweets. In terms of nutritional value, it successfully replaces animal protein, gives the body strength and a feeling of satiety. Paneer can be prepared at home. For your first cheese making experience, this recipe is best for you. You can prepare Paneer in 30 minutes. Cheese yield - 11-13%. From 2.5 liters of curdled milk, approximately 280 g of “Paneer” of excellent quality comes out.
Ingredients:
✵ fresh milk - 2.5 l; ✵ lemon juice ‒ 5 tbsp. spoons (or 2 teaspoons of citric acid diluted in 50 ml of water). To calculate the weight of a particular product, the Comparative Table of Weights and Measures will help you.
It is important!
✵ 0.5 liters of milk yields approximately 100 g of soft and 75 g of dense cheese; ✵ from 1.5 liters of milk - approximately 250 g of soft and 200 g of dense cheese; ✵ from 3 liters of milk - approximately 400 g of soft 350 g of dense cheese.
Preparation
1. Squeeze the juice from the lemon and strain. You can use citric acid instead. To do this, the crystals need to be dissolved in boiled water. 2. Pour milk into a saucepan with a thick bottom, put on fire and bring to a boil, stirring constantly so that the milk does not stick to the bottom and walls of the pan. 3. Reduce heat and slowly add lemon juice to the boiling milk in a thin stream, cook for a few seconds, stirring constantly, and then turn off the heat. 4. The milk will instantly begin to curdle before your eyes. You need to gently shake the pan several times to make the curdling process more active. 5. Place a muslin cheese towel or gauze in several layers in a colander (sieve), strain the curdled milk and drain the whey. Carefully gather the edges of the fabric together and hang it over the sink to remove excess liquid. 6. After 5-10 minutes of intensive whey separation, you can install the load. For juicy cheese, you need to keep the Paneer under weight for 30 minutes or 1 hour - if you want to get a dense cheese that can be cut into bars and added to your favorite dishes or fried.
Tips for the recipe
● Sometimes milk that is sold in stores cannot always be curdled using the above method. This is due to various preservatives added to the milk to prevent it from turning sour. In this case, the milk must be left for several hours. Then, after a few hours, all solid particles will rise to the surface and can be collected. ● You need to add enough lemon juice (acid) so that the milk curdles and curd flakes are visible in the translucent whey. This process must be monitored very carefully, stirring constantly. Because if you add too much juice (acid), the curd grains will become too hard, which will not be desirable for this type of cheese. ● Store cheese in the refrigerator for 1 week. You can sprinkle it with salt and spices, or send it swimming in salted whey. It depends on your desires and preferences.
Have fun cooking and be healthy!
ஓજஓજஓ
All rights reserved. Copying material for publication on other sites is prohibited! It is allowed to use an announcement with a picture if there is an active link to the source ladies.by
ஓજஓજஓ
You may also be interested in other sections: Appetizer recipes Salad recipes First course recipes Second course recipes Dessert recipes Drink recipes Sauce recipes Preparing fish for the winter Preparing vegetables and mushrooms for the winter Preparing fruits and berries for the winter All about healthy eating
If you found the page interesting and useful or have something to share, please leave your comment. We will be very grateful to you. ☸ڿڰۣ–
Clotting substances and their properties
Can also be used to make paneer cheese:
- Lemon juice. Gives a sour taste. In order for 0.6 liters of milk to curdle well, you need 1 large spoon of lemon juice;
- Yogurt. When using it, the snack turns out soft and thick. Before you need to add yogurt to boiling milk, you can dilute it with lukewarm milk. 4-5 large spoons of this ingredient will be needed to curdle 0.6 liters of milk;
- Serum. It should have a sour taste, and the milk will curdle better. It is advisable for it to stand for two days or more. This will give a sour taste. 150 ml of whey is needed to curdle 0.6 liters of milk.
LiveInternetLiveInternet
Quote from ananyeva57
Read in full In your quotation book or community!
Paneer cheese recipe or how to make homemade cheese
Paneer cheese is very similar to Adyghe cheese. But paneer can be prepared at home, at home. It does not melt, so it can be fried and added to various dishes. It has a delicious taste, so even a regular sandwich with paneer will be very tasty! You can cook over a hundred different dishes with paneer! From snacks to Indian sweets. Some recipes will definitely appear on the pages of this site. And in terms of nutritional value, paneer successfully replaces animal protein! It gives the body strength and a feeling of satiety.
What you need to know when preparing paneer? 1) You need high-quality milk Sometimes milk that is sold in stores cannot always be made to curdle using the method described below. This is due to various preservatives added to the milk to prevent it from going sour. In this case, the milk must be left for several hours. Then, after a few hours, all solid particles will rise to the surface and can be collected. 2) Yield of paneer From 600 ml. curdled milk yields approximately 100 grams of paneer. 3 liters of curdled milk yields approximately 400 grams of paneer. 3) Clotting agents Lemon juice – 600 ml for curdling. Milk will require about the juice of half a lemon. Lemon juice will give the paneer a slight sour taste. Yogurt – 600 ml for rolling. milk takes 4-5 tablespoons of very sour yogurt or kefir. But before adding yogurt to boiling milk, you need to dilute it with a small amount of warm milk. Now, let's get to the recipe!
Paneer cheese recipe We need: 1 liter of milk 1 lemon Preparation:
1. Put the milk on the fire in a saucepan.
2. Squeeze the juice from 1 lemon into a bowl or bowl 3. Immediately prepare a colander lined with several layers of regular gauze 4. When many, many bubbles begin to appear on the surface of the milk, gradually add lemon juice. The milk immediately coagulates: the light yellow-green whey and curd mass (future cheese) are separated. 5. When separation has occurred, immediately remove the pan from the heat. If the whey is not yet transparent, then put the pan back on the heat and again add a little lemon juice. Do not keep the pan on the fire for a long time, otherwise the paneer cheese will turn out tough! 6. After completely separating the whey and future paneer, pour the pan through cheesecloth into a colander. Paneer remains on the gauze. 7. Squeeze the paneer depending on what we need:
Thick paneer (for frying in cubes, sandwiches, vegetable stews) We tie the cheesecloth in which the paneer is located and put it under a press. This can be an ordinary plate, on which you can place a jar of water on top. The longer the paneer is pressed, the denser and harder it will be. But no more than an hour.
Soft paneer (for whipping, preparing curd sweets) If we need soft paneer, then tighten the gauze tighter and simply squeeze out the water. That's it, fresh homemade paneer is ready!
Thank you: https://krasavolga.ru/recept-panira/
Option made from milk and kefir
This paneer cheese recipe uses kefir as the rolling ingredient. You don’t need to spend a lot of time on the cooking process, and the result is a dish with a delicate, delicate taste. The algorithm is similar to the previous scheme. The following ingredients are required for one serving:
- Kefir – 150 ml;
- Milk – 1 liter. (Homemade or expensive, high-quality store-bought items with a shelf life of several days will work very well).
Now let's look at how to make paneer cheese from kefir and milk.
- Take a saucepan with a thick bottom, pour milk into it and put it on the fire;
- When it boils, take some kefir and pour in a thin stream. Don't forget to stir. Two minutes will pass and the process of separating the curd from the whey will begin, after which the curd will float to the surface;
- Now we take out the gauze and strain all the ingredients from our saucepan. In this procedure, the curds are separated from the whey;
- You need to tie the gauze very tightly. Take a saucepan and fill it to the top with water. This will serve as a makeshift press under which we place our product;
- Several hours will pass and all the curd particles will combine into one;
- As a result, we got the most beautiful, delicious paneer cheese, prepared at home, which in Indian cuisine is prepared as a separate dish, and it also serves as the basis for many dishes.
One final tip: don’t throw away the whey. It is universal in use. It is added instead of water to dough, all sorts of healthy drinks are prepared from it, and used as a base for delicious soups or borscht. If it sours a little, it is used for curdling.
You can fry ready-made Indian cheese in butter, using different spices (black pepper, turmeric). Then boil it in a special sauce with spices (tomato chutney). It is imperative that the food sits and the paneer absorbs the sauce. You will receive a culinary masterpiece incomparable in its taste, the taste of which will be unforgettable.