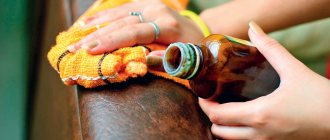
Hand-knitted items require special care and handling to constantly maintain an attractive appearance. Starching, or treatment with a starch solution, is an old, but effective and inexpensive way to give a knitted product the desired shape and rigidity. In this article we will take a closer look at how to starch a knitted product.
What you can’t starch
In addition to many positive qualities - stability of shape, less susceptibility to contamination, straightening of the curled edge, straightening of the pattern, starched items also acquire some properties with a dual effect. Thus, a film is formed on the surface of starched products, which, in fact, provides all the good qualities listed above. But the fact is that it does not allow air to pass through.
That is why it is not recommended to starch knitted items that were originally intended to be “breathable”.
Also, you should not treat things knitted with black threads with starch solution, as this will result in unsightly white stains.
And it is completely useless to starch products made from synthetic threads. Simply because yarn of this composition will not accept starch.
What you need to prepare for starching at home
Of course, you need to prepare the starch itself or another substance used for the starching process. But we'll talk about this a little lower.
Now let’s list the general things that you will need:
- pins made of stainless steel with heads;
- thin wire for inserting into the edges of the product for alignment;
- tape measure;
- spray bottle or bowl for solution;
- towel;
- flat surface (this can be a special board, carpet covered with film). It is desirable that the surface be covered with a checkered material; such a pattern can be used as an additional guide when laying out the product;
- if the product needs to be given some special shape, for example, if a cap is starched, then you need to prepare the appropriate blank. In its role, it is quite possible to use a jar or pan of the required size. Shuttlecocks can be dried on pencils, curlers or plastic bottles.
How to starch a knitted product
We use starch
Various types of starch are used - potato, corn, rice. The most commonly used is potato. It is the most affordable, and the solution with it is concentrated.
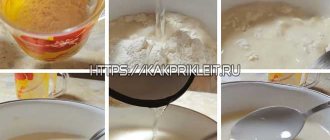
Method one - hot
First you need to prepare a solution. To do this, heat the water in a container large enough to accommodate the item being processed. Bring the water to a boil and pour the prepared starch solution into it in a thin stream, stirring continuously.
Solution concentration:
- soft starching - calculate 1 tablespoon per 1 liter of water;
- average - one and a half tbsp. spoons per 1 liter;
- hard - 1 tbsp. spoons per 1 liter.
To prepare a starch solution, you need to pour it into a small container and add 1 glass of cold water. Then mix thoroughly so that there are no lumps. If desired, you can add laundry blue to any of the solutions by first diluting it and straining the solution.
There is an opinion that the best effect is achieved if you replace water with milk. But, if you can use any starch with water, then it is advisable to mix only rice starch with milk.
True, some craftswomen criticize this decision, arguing that after milk the product retains a characteristic smell. In any case, the choice is yours.
Bring the solution to a boil to avoid a cloudy tint. If you add a good pinch of salt to the solution, the product will also acquire a beautiful shine. Remove the solution from the heat and let cool. Next, you can proceed using different methods, depending on the size of the product.
Soak
We immerse the entire product in the solution.
We make sure that no corners of the starched item come to the top. If necessary, lower them into the solution with a stick.
Let stand for an average of 10 minutes so that the starch is absorbed into the material. For thick threads, you can increase the time to 15 minutes. For thin threads (this is how napkins are usually knitted), a sufficient holding time of 5-7 minutes.
After the required time has passed, place the items on the edge of the container, allowing the water to drain. Lightly squeeze and place on a horizontal surface.
We straighten the product, giving it the desired shape, and fix it with pins until it dries.
Advice - how to starch a napkin and preserve the openwork pattern
If you are starching an openwork napkin, then it is advisable to first redraw the shape and pattern onto a white cloth or absorbent paper. This will then help to correctly fix the fragments of the pattern according to the drawing.
Working with a brush
We will need a regular wide paint brush. We slightly moisten the product and lay it out on a flat surface covered with a cloth. Let's level it out. Then apply the paste evenly with a brush. Let it dry. This method is especially in demand when you need to starch not the entire product, but its individual parts.
Spraying
The prepared solution is poured into a sprayer and sprayed onto the fabric. Delicate items are usually starched in this way, using a weak concentration of starch.
Method two - cold
Suitable for products subject to mild starching.
Dissolve starch in cold water. Stir, eliminating all lumps. We place the item in it and leave it for 30 minutes. Then we squeeze it out and place it on a horizontal plane. Straighten, fix the edges and dry. If we are processing a product that has a three-dimensional shape, then after spinning we place it on a workpiece of the desired profile and dry it.
Method three - dry
A very easy and quick method that does not involve cooking paste. True, the result is short-term. But, as an emergency solution, it has a right to exist.
Place a napkin on clean paper and moisten it with a spray bottle. Sprinkle starch (potato or rice) on top and rub it into a napkin. Shake off excess starch. Finally, iron the product through the gauze to make it tougher.
Method four - in the microwave
With this interesting method you can quickly and permanently starch a panama hat, hat or other item.
Prepare a solution from 1 liter of cold water plus 2 tbsp. spoons of starch. Pour the solution into a container suitable for heating in the microwave. Quickly stir the solution and dip the cap into it. Place the dishes in the oven for 5 minutes at maximum power.
Then, after cooling a little, squeeze it lightly. We put it on a suitable form and leave it until dry.
Things starched using this method retain their shape even after washing.
We use sugar
Concentrated sugar syrup makes knitted items stiff when they harden. But keep in mind that knitted items treated with diluted sugar can attract various insects - flies, ants.
Pour two glasses of sugar into one glass of warm water. Then place in a water bath and stir constantly. After waiting until the mixture begins to thicken, remove from heat and leave to room temperature. After this it is applied to the product.
A less weak solution concentration - 3 tablespoons of sugar per 100g of water + 1 teaspoon of starch is brought to a boil over direct heat. First, starch is diluted in cold water, sugar is boiled in hot water. Then the mixtures are combined and brought to thickness. And in this case you need to stir constantly.
The paste is boiled until bubbles appear around the edges.
Place a napkin in the cooled solution, leave for 15 minutes, then wring out and dry as recommended above.
You can also cover the product with a brush with the prepared solution, and the number of layers is determined depending on the desired hardness of the product.
We use PVA glue
Another alternative way to starch crocheted or knitted items if there is no starch. You can starch napkins, hats, and vases using PVA glue. Since it is water-based, it is ideal for solving this problem - it is easily diluted with water to the desired concentration and does not leave stains on things.
Step-by-step instructions will help you figure out how to complete the process correctly:
- dilute glue with water. Proportion 1:1 or 1:2 depending on the required hardness;
- immerse the product in the solution or apply diluted glue in another way (brush, spray);
- lay out the flat product on a plane covered with a white cloth; We put the voluminous product on the prepared form. If you use improvised means as a form - a vase, a pan, then it is advisable to first wrap it in cellophane film;
- dry the starched item at room temperature;
- If at the end of the process it turns out that the shape needs to be adjusted, then we hold the defective fragments over steam, then give it the desired shape and dry it.
We use silicate glue
Prepare an aqueous solution of glue - 1 teaspoon per 5 liters of water. Then we repeat all the previous technology.
We use gelatin
An undoubted advantage of using gelatin is that it does not crumble, unlike starch, and therefore keeps its shape perfectly until the next wash.
Solutions using gelatin:
- The first option is to pour two tablespoons of gelatin into one glass of cold water and place in a water bath. Heat until the ingredient is completely dissolved. If there are any undissolved lumps left, remove them;
- the second option is used to obtain denser and stiffer products. Pour one packet of gelatin and one tablespoon of salt into a container. Pour in 0.5 liters of water. Heat in a water bath with continuous stirring. When the gelatin is completely dissolved, remove the solution from the heat, avoiding boiling;
- The third option is used when a knitted item needs to be given a little elasticity. One teaspoon of gelatin and 0.5 teaspoon of glycerin are diluted in a glass of cold water. Leave the gelatin to swell. Then heat in a water bath until the gelatin is completely dissolved.
Cover the product with the prepared solution or immerse it completely in the solution for 10-15 minutes. Next, give it the desired shape and dry it.
We use ready-made mixtures
Gloss – starch
This mixture gives the desired rigidity to the product and creates a beautiful shine on the surface. It contains starch (rice or wheat), white talc, borax powder in a ratio of 5:3:1. The second composition option is rice starch, borax, boric acid in a ratio of 8:10:2.
Mix all ingredients well, add water to the mixture until it becomes mushy. Then we apply the paste to the item being treated using a sponge. Finally, iron the product. It is under the influence of temperature that we obtain the desired density and gloss.
Solution - fixative
The finished solution is sold in aerosol packaging. Before ironing, treat the selected surface.
In conclusion, an important piece of advice: if you do not have experience in starching products, then before starching a knitted napkin, start with tests on waste material. The indicated proportions of solutions are very arbitrary; it all depends on the composition and properties of the material. You can determine the desired concentration for yourself only experimentally.
How to starch things at home: 3 methods
Housewives can starch things with potato starch or another substance either manually or using an automatic washing machine, as well as using special ironing products.
Manually
Peculiarities. The recipe for manual starching is the same for all types of substances and fabrics. The only difference is in the concentration of the solution and exposure. The longer the product is aged, the denser it becomes. Do not dry soaked items on the radiator.
Execution steps
- Wash your clothes, remove all noticeable stains using bleach, hydrogen peroxide, soap (yellowish stains can be left: starch will whiten them in the process).
- Calculate the volume of the solution in accordance with the dimensions of the product, prepare the required amount of water and starch.
- Dilute starch crystals with water.
- Mix the mixture thoroughly so that there are no lumps left.
- If lumps do form, they will be difficult to dissolve. Pass the liquid through cheesecloth and squeeze well.
- Place the remaining water on the stove and bring to a boil.
- Without ceasing to stir, gradually pour in the resulting paste.
- Stir, turn off the heat.
- If the liquid turns out cloudy and very viscous, boil for five minutes or add a little more hot water.
- Cool the mixture.
- Place the item in the solution and soak the item well.
- Let it soak according to the texture of the fabric and the desired effect, from a few seconds to two minutes.
- Remove and remove excess moisture.
- Hang or shape the fabric into the desired shape and leave to dry.
- When the product dries a little and remains damp, but without excess water, iron it through cheesecloth.
We recommend: Why the washing machine does not fill with water: causes and troubleshooting
When starching clothes tightly, you should first dilute the borax in 100 ml of warm water and cool. Borax is poured in after adding starch paste. The resulting mixture is removed from the heat and stirred. The finished product is infused for two hours.
In an automatic car
Peculiarities. Starching bed linen by hand is quite problematic. An automatic machine will help with this. The machine is convenient for starching large fabrics - bedding, curtains, tulle, as well as products of the same structure. It is necessary to starch clothes in the washing machine without the use of additional rinsing agents and conditioners. After the procedure, you should wipe the centrifuge and door first with a damp and then with a dry cloth.
Execution steps
- Prepare a weak starch solution or dilute a thick paste with water (a concentrated product can clog machine parts).
- Pour the paste solution into the receiver for liquid cleaners (conditioner).
- Set the washing mode appropriate for the type of fabric.
- At the end of the cycle, remove the clothes and hang them to dry without creases.
When ironing
Peculiarities. It is more convenient to starch the laundry a little while ironing. The method allows you to starch small areas of clothing without soaking them completely. It should be remembered that the method is only suitable for soft starching.
Execution steps
- Prepare a weak paste solution or purchase a special spray (for example, Luxus “Superform” or Yplon “Expert”).
- Pour the solution into a spray bottle.
- While spraying the product, iron the fabric.
- To avoid possible carbon deposits on the iron, place gauze.
According to housewives, some professional sprayers leave yellow spots and stains, which are very noticeable on snow-white fabrics. In order not to spoil the item, it is recommended to test the product on a small area of the item or on a similar piece of fabric.
How to properly starch a hat
To obtain the required concentration, the calculation is approximately as follows: 2 tbsp is consumed per 200 ml of cold water. l. starch. Stir the mixture until it becomes homogeneous; there should be no lumps left. Then you need to boil 1 liter of water (preferably in a large saucepan) and pour the starch mixture into it. Without removing from the stove, stir the contents of the pan for a few seconds. After cooling, the paste should be transparent. If it turns out cloudy, you need to keep it on the fire for another 5 minutes.
Now you need to immerse the hat in the prepared paste for a few minutes. If the size of the pan does not allow this, pour the mixture into a larger container, such as a basin. To dry a hat with a brim, you can use a jar or pan of a suitable size. The most convenient way, of course, is to use a special blank. The fields must be given a horizontal position during drying. When the hat dries a little and becomes slightly damp, you need to iron it. Use a cloth to avoid damaging the appearance of the product with the iron. Now you can return the hat to the blank, give it the desired shape with your hands, straighten the brim and let it dry completely.
You can starch a cap not only with starch; gelatin is perfect for this task. To prepare the paste, you need to soak 1 tbsp. l. gelatin in a quarter glass of water and let it swell (20-30 minutes). Then add water to the swollen gelatin to a full glass and heat over low heat.
When the gelatin is completely dissolved, wet the cap in the resulting solution and dry it on a blank in the same way as described in the case of starch.
Marina Andreevna, especially for the Be Fashionable website.
© 2015, Be fashionable. All rights reserved. Without the written consent of the author or an active, direct and indexable link to the source, republication of materials in whole or in part is prohibited!
modnitsam.ru
Textile glue - see here
True, we sell it to another company, but the meaning is the same. Sold in the “Everything for your Hobby” store. Or I think in household goods. It is usually used for fabric paintings.
And the fields can be processed with it as Larisa Pavlovna Novakovskaya described. True, I use blanks and cardboard. Without nails I just lay everything flat. And instead of tying with braid, when knitting a hat, when moving from the crown to the brim, I knit the first row behind the back wall, so that the brim already begins to hold its shape.
As for PVA glue, it’s not for everyone, but definitely not for children. The hat itself becomes prickly and prickly. But the fields hold their shape, but not together with the transition.
And I’m generally silent about sugar - we haven’t even had sugar for ten years now. Therefore, there’s not even a reason for them to starch anything...
We also have on sale products for starching (shirts, linen) and for starching. But they also do not give the desired effect.
Openwork fields are generally very difficult to starch so that they always keep their shape. It's better to use tight knitting. She keeps her shape herself.
Here's an example: these fields are knitted with single crochets, using a hook one size smaller. The brim turned out to be very dense, and even when the child is mobile, they retain their shape. Border width 9cm
here the fields are smaller in width. And they keep their shape even better.
And this hat is one of those that passed the test. As a result, I had to stick a butterfly so that the fields would not fall, but the child refused to wear it. And she looks terrible in real life. It was as if an asphalt roller had gone over it.
So, it’s better to think about an interesting crown and design, and leave the fields classic.
www.livemaster.ru
Three degrees of starching of a hat
There are 3 degrees of starching, differing in the concentration of substances in the solution: low, medium, high.
Low degree
For a low degree, make the solution as follows.
- Dissolve 1 teaspoon of starch in 1 liter of warm water, avoiding the formation of lumps.
- Next, put the required volume of water on the stove and let it boil.
- Add dissolved starch, stirring continuously.
- Soak the hat in the cooled solution.
- Then pull the wet product onto a three-liter jar or a special blank. Let things dry.
ATTENTION! To prevent the hat from losing its shape, do not dry it in a vertical position. Instead of a can, you can use a ball of a suitable size.
Average degree
At medium level, do the above steps, adding 1 tablespoon of starch mixture to one liter of water.
Immerse the item in liquid. Place the wet headdress on a three-liter jar, giving the brim a horizontal position. After the field has dried, level it and carefully iron it, placing a gauze cloth underneath it.
High degree
If the degree is high, add 2 tablespoons of starch mixture to the same volume of liquid.
In the future, the procedure is performed similarly.
IMPORTANT! To starch things, you can use any starch: potato, corn, rice.
The higher the degree of starch, the longer the product keeps its shape.
Starch solution
This is a popular way to starch small knitted items. It is suitable for knitted napkins or collars as it gives little liquid and is easy to prepare. You can prepare a solution from starch in the following way:
- Take a liter of water into an enamel container, add a tablespoon of rice, wheat or potato starch and place on the stove, bring to a boil.
- Remove the pan from the stove and cool the solution (so as not to burn your hands).
After the solution is ready, carefully place the product in it and wait 7-10 minutes. Lay a dry towel on a flat surface and place the product on it until completely dry. A towel is necessary to prevent the napkin or collar from losing its shape or curling up.
With this method, housewives will no longer have questions about how to starch a crocheted collar or an openwork knitted tablecloth.
Hard starching
Do not keep starched items in damp conditions, as mold may form on them.
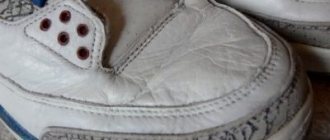
If the housewife is faced with the question of how to starch a crocheted hat (especially if it has a brim around the circumference) or knitted boots, you can use the hard starch method.
It differs from the usual one in the concentration of the finished solution. The amount of water remains the same (1 liter), and 150-300 g of starch is taken (depending on the size of the product). The solution is prepared in the manner described above.
Potato starch is usually used for this recipe, but if you don't have any on hand, rice starch works great. To give shape to voluminous things, improvised objects (cans, boxes, bottles) are used. For example, boots can be put on plastic bottles of water or lemonade with a volume of 1.5-2 liters, and a hat or panama hat can be put on glass jars.
Note to the needlewoman
If you decide to starch your favorite knitted (and other) items, then these useful tips will be in your favor:
- If liquid gets on a product that has been starched, the procedure will have to be done again;
- You need to dry things carefully. If you iron them wet, all the snow-white parts may turn yellowish;
- You should not send freshly starched items to damp places for storage - they can “acquire” mold, which will simply destroy the item;
- If the mixture is not very clean, but has turned gray or yellowed, then before work it must be thoroughly mixed until the dirty layer disappears;
- When using sugar syrup for starching, remember that such a thing can become an “object” of attention of various insects;
- In order for the product to “stand” after starching, you need to prepare the thickest possible solution, then stretch the product onto a strong frame and dry it in the sun or in a warm place;
- If any elements stick together on the product after starching, you can simply hold them over a boiling kettle for a couple of minutes, and then “comb” them with a comb;
- To prevent starched items from sticking to the iron during ironing, starch should be made with milk rather than boiled water;
- To speed up the process as much as possible, the product soaked in the solution should be placed in the microwave for a couple of minutes, setting the maximum power, then squeezed out, and sent to dry. Starching with this method is carried out more efficiently.
We recommend: How to remove a broken key from a door lock
A few words about drying
It is worth considering one important point - starched items should not be exposed to frost, since at low temperatures the starch can turn into sugar and become sticky.
All starched items must be placed on a dry, clean white cloth and sent to a well-ventilated area, waiting until completely dry. You can also use a regular towel - pin the product to it with pins.
Starchy, damp items can also be ironed by placing a clean, thin cloth on the item and setting the temperature to the minimum setting. But this must be done extremely carefully.
Follow these simple instructions and recommendations, and all your knitted items will be elegant and very beautiful.
Sugar solution
Pour 2 cups of sugar into a glass of water and bring to a boil.
Using sugar, you can stiffen small knitted items (knitted hats, collars). The sugar solution is prepared similarly to the starch solution, only the proportions of the components will be different:
At the end of boiling, you need to add 2 teaspoons of potato starch to the composition, then lower the product into the mixture and leave for 5-10 minutes.
Starching with a sugar solution has advantages over the standard method using starch:
- the product does not turn yellow;
- the rigidity of a starched item is higher;
- products hold their shape longer and are resistant to moisture.
Solutions options
Textile hats, as well as crocheted hats, can lose their shape. It is these products that need to be starched periodically. This can be done not only in the traditional way using starch, but also using other types of solutions.
Starch
The classic method involves preparing a solution from starch. You can use any type of product - potato, rice, corn.
The solution is prepared as follows:
- put water to boil;
- Stir starch in a small amount of cold water until a homogeneous suspension is obtained;
- pour the suspension into boiling water, constantly stirring the liquid;
- bring to a boil and cool.
Cooking proportions depend on the desired result. If you only need to slightly compact the hat material, take a teaspoon of starch per 1 liter of water. To give a clear shape to the headdress, a more concentrated version of the solution is required; for the same amount of liquid, take 1 tablespoon of dry product. If you need to give a knitted or textile hat a rigid shape, you need to take 2 tablespoons of dry product per liter of liquid.
With milk
To stiffen and whiten the hat, you can prepare a solution in milk. It is prepared like this:
- 800 ml of milk is put to boil;
- Stir 1 full tablespoon of rice starch into 200 ml of cold milk;
- pour starch suspension into boiling milk, stirring constantly;
- stir, bring to a boil and cool to 40 degrees.
If you add 0.25 teaspoon of salt to the hot milk-starch mixture, the hat will also acquire a beautiful shine.
We recommend: How to care for suede shoes at home
Gelatin
Traditional starching is suitable for light-colored hats. If the headdress is dark, then whitish stains may remain on it. For dark hats you need to use gelatin.
Preparation of the solution:
- Pour 15-20 g of gelatin into a glass of cold water, leave for 30-40 minutes;
- heat the mixture until the swollen gelatin is completely dissolved, avoiding boiling;
- cool to a temperature of 35-40 degrees.
Treatment with a gelatin solution allows you to give the headdress its shape for a long time. But this method is not recommended for white hats, as they may acquire a yellowish tint.
Sugar
To stiffen knitted items, you can use a sugar solution. Preparation procedure:
- mix 900 ml of water and 120 g of granulated sugar, bring to a boil;
- stir 2 teaspoons of starch in 100 ml of cold water, pour the solution into the boiling syrup;
- stir, bring to a boil and cool.
The disadvantage of this method is that a hat treated with sugar syrup will become a “magnet” for wasps, bees and other insects.
Adhesive
To prepare the adhesive solution, PVA glue or stationery silicate glue is suitable. PVA is diluted with water to half its volume. A solution is prepared from silicate glue in the proportion of a teaspoon per glass of water.
Starching with gelatin
Dissolve a tablespoon of gelatin in half a glass of water.
Gelatin can be used to starch a crocheted panama hat or a hat with a brim, since products with this processing method will be more rigid compared to other starching methods. This method can also be used to starch boots, knitted toys, and hats. How to do it?
- Mix a spoonful of gelatin with a glass of water and leave for 60 minutes to allow the gelatin to swell.
- Heat the composition (do not boil!).
- Place the product in gelatin until it cools.
- Take out the product, give it the required shape and leave to dry.
How to starch a cap
A starched item keeps its desired shape for a long time, and is also less dirty. An item treated in this way will subsequently wash better. To know how to starch a thing, you first need to remember that only starch and water are used in this process.
Under no circumstances should sugar be used to starch medical and chef's hats - it attracts insects and becomes a source of unsanitary conditions.
Before you begin the procedure of starching the product, you should first prepare it for this.
For something to look perfect, it must first be unequivocally clean. If the cap has stains from medications, it will not be possible to remove them with regular washing. If this is not done, stains will subsequently be visible on the starched item. They must be pre-treated with soda and vinegar. The dirt is sprinkled with soda and a small amount of vinegar. The item should be left in this form overnight, then it can be washed in the usual way.
You need to starch a medical cap or a chef's headdress according to the same scheme, the difference is only in the degree of hardness. The amount of starch must be accurately calculated, focusing on how hard the item should be.
A chef's hat, for example, should keep its shape well, so the starching of this item should be enhanced:
- if you need to starch the medical cap not too harshly, it will be enough to dilute 1 teaspoon of starch in one liter of water,
- for medium hardness you need to take 1 tablespoon of starch for the same amount of water,
- for strong starching you will need to use two tablespoons for the same amount of water.
Starch should be diluted in a separate glass or enamel container, gradually diluting with a small amount of cold water, avoiding the formation of lumps. Set the resulting mass, which has a consistency similar to thick sour cream, aside. Bring the remaining water to a boil, pour the diluted starch into it, stirring thoroughly. If you want to get a clear solution, then leave it on the fire for another three minutes, remembering to stir all the time. Then set the mixture aside to cool. Dip the clean cap into the warm paste, leave for 2-3 minutes, then take out the item and gently wring it out.
When starching, you do not need to unscrew the cap.
Cold method
Used for products made from yarn that stretches and deforms when exposed to high temperatures. These may include hats, tablecloths, napkins, knitted capes. To process an item using the cold method, follow these steps:
- Pour 1 liter of cold water into a saucepan and add 60 g of starch.
- Mix the ingredients until completely dissolved.
- Place the item in the pan for 30 minutes.
- Remove, squeeze and shape.
PVA glue
Dilute the glue with water in a ratio of 1:1 or 1:2.
A non-standard way of starching things, which not all housewives know about, is using PVA glue. It is very simple to prepare the composition for processing - you just need to mix the glue with warm water in equal proportions.
If the item is small, it is immersed entirely in the composition. If the product is large, or you want to achieve a soft starch effect, you can simply apply the composition on both sides. This way the glue will not be absorbed into the deep layers of yarn and will not create the effect of increased rigidity.
Mistakes when starching knitted items
- Products knitted from dark threads and yarn cannot be starched using any types of starch. When ironing, items treated in this way may lose their appearance due to light spots and streaks appearing.
- Items made from synthetic threads cannot be starched! Any method can lead to stretching of the product and loss of shape.
- Starched booties cannot be worn without cotton socks, since after starching the hygienic properties of things are reduced. It is also not recommended to starch clothes for children that are worn every day.
- Snow-white knitted items (collars, napkins, tablecloths) should be starched with a solution of skim milk and rice starch. This way they will remain white and will not turn yellow after processing.
If you don’t have the time or desire to bother with preparing a solution to stiffen knitted items, you can buy a ready-made product in the store. It is not inferior in effectiveness to traditional methods, therefore it can be used to process the types of products indicated on the product packaging.
How to starch a knitted product with starch? Video instruction:
kakpostirat.com
www.livemaster.ru