How to choose a pumpkin for drying and creativity
The key to getting a good result is choosing the right fruit. Not every variety is suitable for drying and making crafts. Decorative varieties have a rounded shape and pronounced convexities. The surface of the “inedible” pumpkin has an even orange or brown color. It is easy to determine the maturity of a decorative pumpkin. You need to shake the cut fruit - if you can hear the rumble of seeds inside, it means the harvest is ripe.
The size of the vegetable is chosen based on your creative idea. The smaller the product should be, the smaller the fruit can be taken. It is better to avoid drying giant fruits yourself!
Regardless of the grade and size chosen, the surface should be hard, smooth, and free of dents, soft spots, and signs of rot. Only a healthy fruit will produce a complete dry product. It is important that the pumpkin has a stalk. If the fruit is cut incorrectly, the juice will leak out during the drying process and the insides will begin to deteriorate.
Popular varieties of decorative pumpkin:
- Small orange (8-10 cm in diameter);
- Small warty (10-16 cm in diameter);
- Pear-shaped (10-12 cm long);
- Ten praises (10-15 cm in diameter);
- Large-fruited turban (30-50 cm in diameter);
- Lagenaria vulgaris ("bottle");
- Baby boo (diameter 10 cm).
Necessary materials
To cut out the craft, you will need not only a bright orange or yellow vegetable. You will have to arm yourself with the following tools:
- knives of different sizes;
- marker;
- awl;
- scissors, tape;
- spoon with pointed edges;
- prepared template;
- flashlight or candle (can be replaced with a garland).
For the cutting to be successful, you need to choose the right main component - the vegetable itself. It should be smooth, without visible defects or dents.
Color and shape also play a big role. It is better to choose a round, slightly elongated pumpkin; the color should be bright. The larger the vegetable, the more interesting the holiday lamp will turn out, although with larger sizes it will take longer to work. And it’s inconvenient to cut out faces on small vegetables.
What you need to dry a pumpkin for crafts
The process of drying ornamental vegetables should be approached carefully. Preparation for drying:
- Wipe off any visible dirt with a soft cloth.
- Rinse the surface under warm running water.
- Dry with a towel.
- Leave in a dark, dry place for 60 minutes, then wipe again with a dry cloth.
- Make sure the peel is completely dry.
Further drying can take place indoors at room temperature (there is a high risk that the vegetable will rot). You can also speed up the process using various devices:
- air fryer;
- electric berry dryer;
- microwave;
- oven.
Peel softening methods
I experimented with pre-preparing fruits before cleaning. I read all these methods on the Internet; my mother or grandmothers did not teach them to me. Two methods are thermal and one method is water.
I soaked a pumpkin that had been stored at room temperature for a long time and its peel had become woody, that is, dried out. ))
I placed the pumpkin in a bucket of cold water overnight: relatively large fruits do not fit in an ordinary basin. And left it to soak overnight.
In the morning, the skin absorbed the water and seemed younger and fresher. And more pliable. Next, I cleaned it according to the standard step-by-step procedure. The method has been tested and you can use it!
I placed a small fruit in the microwave. And she turned it on at maximum power for 2 minutes: I was afraid to leave it on longer. In general, I took the pumpkin out of the oven hot and there was even something crackling inside it. It was scary. :)
I cut it with a serrated knife, and then the peel was surprisingly easy and quick to peel all around using a vegetable peeler. I didn't even have to cut the whole fruit into small pieces. All the flesh inside was warm, but still firm. The method is good, I liked it, suitable for small pumpkins.
We suggest you read: Washing tiles in the bathroom until they shine
Place the fruit in an oven preheated to 180 degrees for 3 minutes. Then I take it out and read it step by step. The difference from the microwave is that the pulp inside did not heat up and remained cool.
I also liked this method; it can be used for hard-barked varieties or specimens that have been stored for a long time. But still, I would use thermal processing methods only if I then turn the pumpkin into puree, bake, or boil. In case I hold it too long.)) And it is clear that after heat treatment such fruits will not be stored for a long time.
Wait, what about the seeds?
How to dry a pumpkin for crafts
You can dry the decorative pumpkin whole or in parts, depending on the desired result. There are several methods for preparing vegetables for creativity.
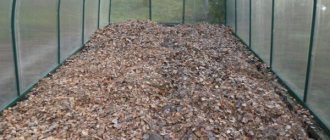
Whole drying
To obtain a whole piece, choose a small fruit. Drying can be done in a dry room without insects. It will take at least 3 months, during which the vegetable is regularly turned over to check for rot or mold. You can also use an oven.
In the oven
The simplest and fastest drying method. Algorithm of actions:
- Preheat the oven to 60 degrees, and place the pumpkin on a baking sheet covered with parchment. Keep the door open.
- Turn the vegetable over and check every 10-15 minutes.
- Dry for 2-8 hours, depending on size.
In this way, both pumpkin slices and the whole fruit are dried.
Do you always follow the correct storage of food/medicines and their product proximity?
Yes, of course, this is very important so as not to spend money on your health later.
50%
Not really, because there won’t be anything like going to the toilet.
25.64%
I look at it by appearance and if I use anything after heat treatment.
24.36%
Votes: 156
What to do with seeds
To remove the core, I take a tablespoon. I choose among the utensils: which spoon has a sharper edge, it is most convenient to use.
I took a child's soup spoon. Grabbing all the pulp, I scrape out the middle along with the seeds.
I had incidents with large fruits: I cut it into 2 parts. I used one, and left the pulp and seeds in the other half. Well, you can’t cook everything at once, even if you eat orange dishes for breakfast, lunch and dinner!
After just a couple of days of storage, mold forms in the middle. And this is on the balcony at a temperature of less than 10 degrees.
Oh yes. The middle or core with seeds. I threw away the pulp of three pumpkins. Along with the seeds. But in the fourth, the white seeds looked like those that could be cooked.
This is exactly how many fruits I peeled while describing all the nuances in order to share my experience with you.
10 kopeck coin next to pumpkin seeds
Next to the seeds is a coin with a face value of 10 kopecks. That is, the size is almost the same as that of sunflower seeds, only inside the pumpkin seed the nucleolus is flat.
If you knew how many times I tried to cook pumpkin seeds extracted from the pulp at home in the oven, and then threw them away!
The advice is this: if you have a large pumpkin or you see that the seeds are plump and large, then try one seed. Peel, eat. Big kernel, tasty? Then you can safely start mining seeds.
I select all of them from fibrous pulp. Since the center with the seeds is sweet and sticky, I put a bowl of water next to it: as soon as my hands become sticky, I rinse them in cold water.
I throw away the pulp because it is not eaten. I wash the seeds and place them on any surface to dry first. I cover the baking tray with baking paper and spread the seeds evenly onto it in a thin layer. I dry it in the oven for 10-15 minutes at a temperature of 160-180 degrees. I turned on the oven at 180 degrees, at the 9th minute the seeds began to crackle and bounce as if they were alive. I sat in front of the oven and watched them carefully, as they burn easily.
At the 11th minute I pulled out my white, browned seeds - they were ready.
From my own experience, I can say that most pumpkins from the store contain seeds with very small kernels. Large seeds are found in large specimens.
For example, like this.