There is dampness on the ceiling in the cellar There is dampness on the ceiling in the cellar, then this is the first signal that measures must be taken to eliminate it. Today we will tell you how to eliminate dampness in the cellar.
This is not just work, it is a set of measures to eliminate moisture penetration. First of all, you need to determine why the cellar is damp. After all, nothing just happens. After this, decide how to get rid of dampness in the cellar.
In this article we will look at several of the most acceptable options for doing the job. You can also see photos and videos on this topic.
Reason one: material that allows water to pass through
The material used for walls, floors and ceilings should be selected based on its low hygroscopicity. If the material conducts water well, then no matter how you try to get rid of dampness, it will constantly make itself felt.
To construct cellars, it is best to use M400 concrete.
The only negative is its high cost. To reduce the cost of constructing a structure, you can use concrete M 250, having previously enriched its composition with water-repellent substances.
The cause is often poor waterproofing of the cellar or basement. This may also depend on the quality of the material itself. For example, if the building is lined with sand-lime brick, then moisture in the form of steam in large quantities will penetrate through its pores and settle on the walls and ceiling.
To solve the waterproofing problem, bitumen mastic is applied on the outside in two layers. If for some reason it is difficult to do external waterproofing, for example, if the cellar is underground, you can protect the walls from moisture penetration from the inside.
To do this, you should use special impregnations that penetrate into the coating, be it brick or concrete, and close the capillaries that conduct water.
Their effectiveness has been proven more than once.
How to improve waterproofing
In order for a room to be highly resistant to moisture, you need to take care of a reliable waterproofing system. A drainage system will help get rid of dampness.
External drainage
External drainage is done both at the stage of construction of the building and after the construction of the garage:
- A trench is dug outside around the basement. The depth of the cavity should be 50 cm and the width 38 cm.
- Plastic tubes are installed at the bottom at a distance of 1.5 meters, which will serve as drainage. Don't dig them too deep.
- The tubes are covered with metal mesh on top to prevent debris from getting inside.
- To prevent the trench from flooding, the bottom and walls are covered with geotextiles.
- After all the work is completed, the trench is completely filled with crushed stone.
- A layer of geotextile is again used on top of the crushed stone.
The last stage of the work is to fill the trench with soil, after which the layers are carefully compacted.
Internal drainage
More time and material costs will be spent on installing an internal drainage system. The system is more reliable, and the room will always be dry.
Holes are made across the entire surface of the drainage tubes. They are installed inside the garage basement, along the perimeter. The work involves performing the following actions:
- Dig a trench 50 cm deep.
- The soil at the bottom of the trench is thoroughly compacted.
- The trench is filled with crushed stone or a medium-sized gravel mixture to prevent clogging of the drainage pipes.
- Then comes a layer of soil, which is thoroughly compacted.
- During the work, it is assumed that a well will be installed to accumulate excess moisture. It is placed in the lowest place in the basement. You can either make a well yourself or buy it ready-made.
- A drainage pump is placed in the well.
- The accumulated water should be disposed of outside, preferably into the sewer.
Penetrating moisture protection
This method of waterproofing is the most effective. Thanks to a special solution, the entire treated surface is enveloped. The technology for doing the job is simple:
- The store buys a special composition that is diluted with water.
- The walls and floor of the basement are treated with a protective compound.
- The mixture, getting into the pores, hardens and does not allow moisture to pass through.
- Then the room is antiseptically treated.
As soon as everything dries well, you can bring all your things back.
Injection method
More time and material costs are spent on the injection method of combating moisture. But the option is the most reliable and effective.
Stages of work:
- Holes 5 mm deep are drilled along the entire perimeter of the basement at a distance of 75 cm.
- Expandable packers are installed in the holes.
- Then, under high pump pressure, a special waterproofing compound is injected into the packers.
The injection method allows you to block all pores and voids. The work can be carried out at any time of the year. The materials are safe and durable.
Other reasons
Reason two: inadequate insulation of the building. If the insulation was done incorrectly or in insufficient quantities, in winter moisture will enter the cellar through the walls and roof.
Reason three: underground water. In addition to thermal insulation, the basement also needs waterproofing installed under the floor. Otherwise, water may penetrate inside from below. It is especially good to monitor the groundwater level in spring and autumn, when it increases.
See also: What products are effective in combating black mold?
Reason four: poor ventilation. If the moisture accumulated in the air does not leave, this is also fraught with an increase in the level of humidity. Therefore, experts advise ensuring good inflow and exhaust. To do this, you need to place two pipes in the cellar, the diameter of which will be at least 125 mm. One pipe should be finished ten centimeters above floor level. With its help, fresh air will penetrate. The second pipe must be installed 10 cm from the ceiling level. Air will escape through it. It is recommended to install a deflector on the exhaust pipe for better draft.
If we are talking about an underground basement, then a vapor barrier must be laid between it and the room above.
Reason five: condensation. Water deposition on individual elements of the basement can occur as a result of ill-conceived design. For example, if the floor is earthen and the ceiling is concrete, then water vapor will rise from the floor, which is warmer than the ceiling, and settle at the top.
If there is an earthen floor, first it is leveled and compacted, then covered with plastic film. The thicker it is, the better. It is not recommended to use roofing material because it is less elastic, which means it can tear easily. To prevent the film from tearing, it is best to make wooden panels and place them on the floor. Instead of covering the basement ground with film, you can create a solid concrete floor that will have good waterproofing. This is more complicated and more expensive, but such a base will not cause the spread of moisture in the room.
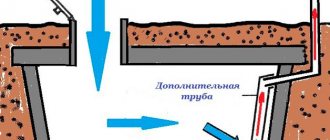
Reason six: inappropriate drainage system. When water accumulates right next to the cellar building and is not drained outside the area, it can get inside the building. A cellar located on a slope needs to install a drainage pipe inside the ground, through which precipitation will be removed from the slope. It is necessary to build a blind area around the building, with the help of which water flowing from the roof will be drained.
Which method should you choose?
You can make the cellar absolutely dry and suitable for storing fruits and vegetables using any of the proposed methods. You should choose one method or another based on the total area of your cellar. For example, there is no need to buy an expensive dehumidifier if your cellar area does not exceed 2 square meters. m. In this case, the problem of humidity can be easily solved with the help of a brazier or a candle.
You can put fruits and vegetables into the cellar immediately after all work on drying the room has been completed. It is worth noting that it is not recommended to dry the cellar additionally during operation. This approach will negatively affect the quality of stored vegetables.
To avoid the need to frequently dry the cellar, it is necessary to provide in advance for the presence of a high-quality ventilation system. For small cellars, a design consisting of two pipes (supply and exhaust), located at different heights, is quite suitable. They will ensure continuous air replacement. If the cellar has a large area, then a forced ventilation device is recommended. In addition, if the ceiling of the cellar is the floor of a living space, you will need to make high-quality thermal insulation of the ceiling. Cold air from the storage facility should not be allowed to affect the microclimate in the house.
How to dry a basement with your own hands
But even if you eliminate all the shortcomings, you will still need to remove existing dampness from the cellar. To dry the cellar with your own hands, you can use several methods. Some of them are time-tested, but quite complex to implement, while others are based on the use of modern technology, which requires additional costs. Let's consider methods for drying the cellar and basement.
Method one: using a fryer
The first step is to dry the cellar naturally for several days and only then use the roaster.
See also: What products effectively remove mold?
First, all openings leading to the cellar or basement must be opened. Then place the brazier at the bottom of the cellar, light a fire in it and maintain it for a certain time.
How it works? The method of drying a cellar using a brazier is based on the elementary laws of physics: the warm air formed during the heating process will gradually displace the damp air through the holes that were initially open.
You can make a roasting pan from a bucket without a bottom. There are some nuances to consider during the process. To start a fire, it is recommended to use sawdust first. Once the fire has started, you can add wood material to the bucket. If you are going to lower the brazier to the bottom using a hook, then you need to light a fire in it first.
You should not worry that during the process the room will fill and become saturated with smoke, because this will not only dry the cellar, but also eliminate biological activity in it.
If condensation appears again after using the fryer, you should wait a little and then repeat the procedure. If the method does not help at all, you need to change the ventilation system.
How to effectively dry the walls and floors of your home?
Of course, the first thing you should do is pump out the excess water and then remove all damp furniture, furnishings and carpets from inside the house. In extreme cases, if there has been extensive flooding of the walls, it will also be necessary to remove the plaster from the walls.
There are two different ways to keep your home dry after a flood:
Let's look at their features in more detail.
How to properly drain a house naturally after a flood?
This method assumes that you will not use any devices to remove excess water and moisture from your home. Of course, today there is a lot of equipment and solutions that allow you to effectively pump out water and dry a house, but they can sometimes ruin the repairs made or damage some elements of the house’s structure. Therefore, it is better to first try to dry the house naturally.
Method two: candles
You can dry the basement or cellar with your own hands using another method. But even here you will need fire. Take a candle, light it and place it under the pipe that acts as a hood. This will increase draft, which will ultimately rid the room of dampness. The disadvantage of this method is that it will take a lot of time to dry the cellar.
The nuance of the method is that it is necessary to increase the length of the supply pipe. Lighting a candle is not enough - you need to set fire to the paper. This will give the impetus to start the pull.
The average time to dry a cellar with a candle is three days. It is best to use this method a few days before placing the crop in the cellar. It is worth keeping in mind that the method will not work if the size of the basement is too large.
Instead of a candle, you can use dry alcohol tablets, which, when burned, will disinfect the room.
Why is it dangerous?
Mold is dangerous to any surface it touches. Food products affected by fungus should not be eaten. Wooden objects and buildings can be destroyed almost entirely by mold; Previously, oak houses, where the floor was affected by mold, were burned so that neighboring buildings would not be damaged. People staying in a room affected by mold are exposed to harmful substances.
For living organisms
Mold harms all living organisms; it is also dangerous for human health, since when it enters the body it leads to the development of intoxication and allergies. Children, elderly people and those whose bodies are weakened due to illness or decreased immunity are especially affected. The impact of fungi on humans occurs through inhalation of spores, due to contact with skin, as well as through consumption of foods spoiled by mold.
When spores come into contact with the skin, allergic reactions occur. Infection of the mucous membranes with mold spores leads to the appearance of a chronic runny nose and dry cough, and the eyes may become inflamed. The fungus can cause asthmatic attacks and diseases of the cardiovascular system, joint-rheumatic complex.
Method three: dehumidifiers
These devices are used when the area is large enough.
A dehumidifier, unlike other DIY drying methods, works by cooling the air. It enters the apparatus raw and cools, leaving moisture in a special receiver.
This method of getting rid of dampness is very different from the others, because in the end you get not only dry, but also cold air. However, if you do not want to cool the room, there are models of devices on sale that, after drying, heat the air to the required temperature.
See also How to treat a wooden surface against fungus and mold?
Tips from summer residents
- The heater can be lowered into the cellar if the moisture level does not exceed 60%. You need to monitor its position and not leave the device turned on without your presence at home.
- A fan heater works on the same principle, but it not only warms the air, but also moves it.
- It is easy to use silica gel in a small room. Place it in bags indoors. The granules will gradually absorb moisture.
- Calcium chloride powder is capable of absorbing moisture in a volume that is twice the volume of the powder itself. Place the preparation on an inclined board. Place one end of the board in any container. Once dried, the powder can be easily reused.
- High groundwater can be redirected using an external drainage system, which will allow it to be directed away from the foundation.
- Mold is washed off with boric, acetic or citric acid.
Eliminating moisture in the basement is a rather labor-intensive process, so it is better to take care of dryness with waterproofing in advance during construction. If a problem occurs, use the proposed methods and extend the life of the cellar.
Surface protection with lime
Another way to protect your cellar from dampness with your own hands is to cover its walls with lime. However, it is recommended to do this as an additional preventive measure before the main drying of the room. What is good about this method? Firstly, lime absorbs moisture from the air well, and secondly, it prevents the development of fungus and mold. Lime treatment is carried out in several stages.
- Stage one: preparatory. First you need to take out everything, from vegetables to wooden structures. The latter must be inspected for signs of fungus. If mold is detected, the wood must be soaked in a solution of 5% copper sulfate.
- Stage two: creating a composition for whitewashing. In order for lime to work to eliminate dampness, it must be applied to the walls in a thick and thick layer. To do this, prepare a bucket of the mixture and add pre-diluted copper sulfate (5-10%) to it for disinfection. The resulting composition must be poured into halves into different containers.
- Stage three: processing. Next, you should treat the walls with the first half of the lime composition. Apply this to all corners, and then use a paint brush to spray the ceiling and walls so that the surfaces are covered with limescale bumps.
- Stage four: repeat. When the first layer of lime has dried, which will take about a day, you need to take a second container and repeat the whitewashing procedure. As a result, you should end up with uneven lime walls. This is done specifically so that condensation cannot be retained.
How to get rid of dampness on walls
In order to kill fungus on the walls once and for all, you need to determine the cause of its appearance. Once you have located the affected areas, moisten them with water. This is necessary to prevent further spread of spores.
All mold removal work must be carried out wearing protective gloves and a respirator.
Next, special chemical and biological preparations are applied to the moldy areas to destroy the mold. All surfaces must be treated. This is done at least 2-3 times with breaks for each layer to dry completely. As a rule, follow the instructions for use of the drug.
Take a metal brush, scraper, spatula and clean the surface of the fungus. During the cleaning process, the layer of finishing material is removed and scraped out to the entire depth of penetration of the fungus. Wooden and stone surfaces are also treated.
If a material or individual structural element is unsuitable, it is completely replaced. The affected fragments are burned, and the walls are dried and treated with durable protective drugs and coatings.
Dampness in hot weather
Often during hot periods, cellar owners experience increased dampness in the premises, even with a well-organized ventilation system. The reason lies in the fact that in hot air moisture is also present in the form of vapor, and when it enters a cool place, condensation settles on the ceilings and walls during the cooling process. If you notice such a phenomenon, ventilation must be stopped to eliminate the influx from the outside. In this case, you can dry the cellar only in the fall using any of the proposed methods.
Why does humidity rise in the garage?
Why moisture accumulates inside the garage is a question that does not have a single answer: there may be several reasons for this.
We list the most likely of them:
- It may be damp due to storing fruits or vegetables in the basement, from which moisture appears.
- Melting snow from the wheels of a car that is stored inside.
- Moisture condensation on the car body. This is possible when a warm car drives into a cold garage.
- Raindrops on the car (body).
- Lack of ventilation. The main reason for rising humidity levels. If the room has properly functioning ventilation, then even all of the problems listed above will not lead to dampness.
Why and where does condensation occur?
Condensation can form on the ceiling, on the door/gate (from the inside), on the walls and even on the floor. Often, high humidity is observed in the garage cellar (but condensation does not always form there).
Accumulation of condensation in a brick garage
Moisture will condense on the inner surface in places where the distance between warm and cold air is smallest. If there are no other buildings in the vicinity of your garage, then these will be the walls, ceiling and gate. If the garage is in a row, then drops will appear on the ceiling and on the gate.
The main reason for the formation is the lack of insulation. In most cases, this is the main reason: there is warmer air inside, while outside in winter it is colder. Between them there is only a thin partition (if there is no insulation) made of brick/metal/concrete (depending on what the room is built from), that is, from materials that do not perfectly retain heat.
What are the dangers of increased humidity in the garage?
Dampness can lead to very serious consequences, both for the building itself and for the things stored in it (including a car).
Possible problems:
- Corrosion formations on the body of a stored car. Due to dampness, it may begin to rust: in places where there is no paint, or where it has peeled off/chipped off.
- The appearance of mold. It is dangerous for wood, metal and textile products that will be stored inside, as well as for food (which is often stored in garage basements). Mold is also dangerous for humans, but people usually stay in the garage infrequently and not for long, so the main damage will still be caused to the building itself and the things inside.
- Accelerated destruction of the building. Metal garages suffer the most from this (they begin to rust), but the same problem, although to a lesser extent, is observed in concrete buildings.
- Failure of the gate opening/closing mechanism (which can also rust).