In every home you can find dishes and decorative items for interior decoration made from porcelain and ceramics. These are Soviet collectible table setting sets, figurines and other trinkets dear to the heart, many of which were inherited from parents. And sometimes, no matter how carefully they are handled, products often break due to carelessness. Let's look at the methods and determine how and with what to glue porcelain and ceramic products with our own hands, so that the product will please the eye for many years to come.
- Types of glue for porcelain and ceramic products
- How can you glue porcelain?
- Glue for gluing ceramics
- Universal glue for ceramic and porcelain products
- Ways to glue porcelain with your own hands
- Instructions for gluing ceramics at home
- Finally
First, you need to figure out what to do if your favorite porcelain figurine or mug given by your mother breaks. So, before starting repairs, you need to choose the appropriate adhesive for the fragile product.
Types of glue for porcelain and ceramic products
If the product breaks, do not rush to throw it away immediately. There is a special glue for porcelain that will help you do the restoration yourself. To restore a porcelain or ceramic item, you need to choose one of the brands of glue for a specific case.
- UHU Porzellan Keramik is a transparent super glue that makes the seam invisible. In this case, the thinner you apply the adhesive layer, the faster and more reliably it will set. Such fixation will withstand only minor exposure to liquid, so the glued product can be washed, but cannot be used as a full-fledged container for liquid.
- ABRO EC-510 is a two-component adhesive for food utensils based on epoxy resin. Reliably restores the integrity of glass and porcelain cups. After drying, it remains transparent, so the seam is not visible. To prepare the adhesive, you need to mix both components. It is important that the gluing process must be carried out quickly, because this type of glue hardens in 5 minutes.
- Super Moment is a universal cyanoacrylate adhesive. It glues any type of material in a matter of seconds. Before use, be sure to read the instructions.
This is a partial list of all existing adhesive compounds. There is a wide range of products in this category to choose from on the market. Before gluing porcelain dishes, it is important to clean the product from grease and dirt using a degreaser.
How can you glue porcelain?
So, on sale you can find a huge assortment of adhesive compositions for gluing porcelain in order to reliably glue a porcelain cup and other dishes. Pay attention to the following adhesives:
- STANGER;
- Cosmofen CA-12;
- Araldite Rapid.
The presented list consists of products from foreign manufacturers, and among Russian manufacturers, carbinol glue is considered the best. EPOXY GLUE epoxy resin is also suitable, which can be easily purchased at any construction and hardware supermarket.
To restore porcelain figurines at home, cement made from gypsum is also used. To prepare such a mixture, you need to beat 1 chicken egg into the gypsum powder and mix well. So, you can easily glue any porcelain products.
There is another way to prepare glue yourself, which will allow you to carry out the restoration. To do this you will need 1 protein and baking soda. Beat the egg white well and leave it for a day. Then, only after standing, add soda in small portions, kneading the mixture. The consistency of the mixture should resemble dough.
In addition, restoration is carried out with food glue. So, it won’t be difficult to make it yourself.
- Take 4 tbsp. water, add 1/2 tbsp. l. sugar and lime. Only slaked will do.
- Then the mixture must be boiled for 3 hours, but not allowed to boil.
- Cool the mixture and let it sit for a couple of hours. At the same time, if excess water appears, it is drained.
- Add 500 grams of tile adhesive, mix and leave overnight.
- If excess liquid forms again, carefully drain the excess through gauze.
- Boil the mixture again over low heat, and only after that begin to use it for its intended purpose.
It is worth noting: this composition is considered the safest for restoring kitchen utensils at home.
Glue for gluing ceramics
Ceramic dishes are often glued together with various adhesives purchased in the store on the advice of sales consultants. Ceramic utensils can be returned to use using cyanoacrylate-based super glue. In addition, epoxy glue from Russian manufacturers is also suitable for such purposes.
You can also find other adhesives freely available that will help restore plates and other products:
- Second;
- Monolith;
- Super moment;
- Elephant;
- Waterproof glue Mars.
Universal glue for ceramic and porcelain products
To restore combined products, you should use universal compounds that will help restore the integrity of the dishes. So, let’s determine the best way to glue ceramics and porcelain at home:
- Casein or epoxy adhesive composition made in Russia. Affordable price is perhaps their main advantage.
- Porcelain Potch from the Hobby Line brand. This adhesive varnish is imported to Russia from Germany. Serves as an optimal all-rounder.
How to glue ceramics to ceramics?
There is a specialized glue for ceramic products. There are quite a few companies that actually provide an excellent product with unique setting speed characteristics. The use of glue makes it possible to subsequently operate the products in difficult conditions.
"Second"
Differs in properties of instant setting. Transparent, reliably connects any parts of ceramic products while forming a strong connecting seam.
You can buy this glue at any store. Convenient packaging in the form of a small tube with a sharp tip allows you to precisely apply the glue to the desired areas of the product. Application is very simple and measured.
"Super Moment"
This glue is considered universal and is also suitable for gluing ceramic products. There are a number of unique characteristics that have made the glue popular and relevant.
The main advantages include:
- It is economical in consumption.
- It has high resistance to high and low temperatures and is moisture resistant.
- Almost instant grip.
"Use of PVA glue"
This glue is most often used for food products that are planned to be used in the future. Since its composition is more environmentally friendly than its analogues, many people use it for gluing kitchen utensils. You can glue products whose surface does not have an additional varnish coating. From our review you can learn how to make PVA glue at home.
After restoration, it is recommended to additionally treat the product with several layers of varnish to create increased strength and reliability.
Ways to glue porcelain with your own hands
To reliably glue porcelain, you need to follow these step-by-step steps:
- wash and dry the product thoroughly;
- then treat the joint with acetone;
- Apply a layer of glue to the joints and let the substance dry;
- apply a second layer of adhesive, then connect all the parts and press firmly;
- To make the fastening more reliable, secure the product with a tourniquet.
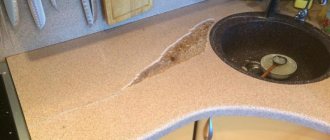
Porcelain cups break most often in cases where they have been used for a long time in family tea parties. To give the container a second life, arm yourself with super glue and do the preparatory work: wash, dry and treat the joints with nail polish remover.
Next, collect all the parts, fragments and glue each element in two layers. Then the cup should be placed in a small saucepan, filled with water and boiled for three hours. When finished, remove the pan from the stove and leave the product to cool directly in the water. After complete cooling, the cup should be removed and the result of the work checked.
If you don’t want to bother with boiling, an oven is suitable for heating. But this must be done extremely carefully, avoiding overheating. Otherwise, the utensils will simply burst under the influence of high temperatures, and then they can only be thrown away.
If a fragment breaks off from a vase, you can return the product to its integrity as follows:
- Prepare the product for restoration work.
- Choose a patch whose dimensions will be 0.5 cm larger than the fallen fragment.
- Glue the broken parts with waterproof glue and apply a patch.
- Pour water into the vase, but so that it does not wet the patch.
- Let it boil for 2 hours. It is necessary to drain the water only after it has cooled completely.
- Armed with paint of the required color, process the joint.
Restoring porcelain at home is not a difficult task, the main thing is to strictly follow all the step-by-step steps. Then plates, cups and other kitchen utensils will last for many more years.
How to care after restoration
When restoration of porcelain or ceramics is completed, the restored item requires a special approach.
- To prevent cracks from spreading further, do not wash dishes with hot water.
- Do not use abrasive products when washing.
- Do not load the dishes with heavy objects (do not put fruit in restored bowls).
- Do not use utensils for everyday meals.
Try not to let moisture get on dishes or porcelain figurines. Water will wash away the adhesive joint and it may collapse. Wipe dust from ceramics with a soft, dry cloth, without cleaning products.
Instructions for gluing ceramics at home
Edible dish glue is suitable for gluing ceramic products. To glue a broken ceramic cup, you need to follow the instructions:
- you need to start by collecting all the elements of the product;
- if you need to restore a cup that has previously been glued, then use a knife to remove the remnants of the old adhesive;
- wash all elements with dishwashing detergent, rinse and let the water drain;
- put the details together in order to visually evaluate the planned work process;
- treat joints with acetone;
- Apply a thin layer of heat-resistant dish glue to the gluing areas;
- leave the first layer to dry a little;
- apply another layer and gently but firmly press all the elements together;
- it is advisable to fix the product more reliably, for example, by wrapping it tightly with knitting threads;
- leave the cup in a cool, dry place for three days.
Method 2. Based on shellac and turpentine
Another option for gluing ceramics.
Ingredients:
- turpentine;
- light shellac.
Combine the ingredients and place the container over low heat. The mixture requires cooking until the shellac has completely melted. During preparation, the glue is constantly stirred until a homogeneous consistency is obtained. This composition takes longer to harden, so it can be prepared as a backup option. The mixture is allowed to cool and, divided into portions, placed in storage or used to treat cracks or chips in the toilet bowl.
As necessary, it is heated and applied in a thin layer to the surfaces to be bonded. As a result, the reinforced parts are compressed, which ensures their tight adhesion. The resulting glue residue should be wiped off immediately.
Synthetic glue
Synthetic adhesive intended for gluing faience and ceramics: BF-2, EDP, MC-1, EPO, Mekol, Rapid, Ago, Mars, Elastostil-2, Supercement, Unicum " Of course, this list is far from exhaustive. Today in specialized stores there are probably other brands of glue, which quite possibly have better characteristics than those listed here. However, if you use any of the indicated brands, earthenware and ceramics will also hold up perfectly. The most important thing is to glue it correctly.
First gluing option
Steps for gluing sewer pipes.
In order to seal a crack or glue a chip in a toilet bowl or cistern, you need to prepare the following:
- waterproof glue, cold welding, epoxy or silicone sealant;
- fine sandpaper;
- acetone or solvent;
- narrow spatula for convenient application of adhesive material;
- rags;
- construction hair dryer (you can also use a home hair dryer).
First of all, the chip and damaged surface is thoroughly cleaned with sandpaper, a hairdryer or rags, and freed from small particles. Then both surfaces are degreased with a solvent or acetone and then heated well with a hairdryer to evaporate as much moisture as possible from the area of the future seam.
If the tank or toilet has received a small chip as a result of damage, then it would be more correct to glue it with waterproof glue.
Stages of installing a toilet.
How and with what to glue broken plumbing fixtures?
Sometimes it happens that chips or cracks appear in a normally working toilet, often the cistern and bathroom shelves made of ceramics, marble, and so on are guilty of this. After all, even high-quality and expensive plumbing fixtures tend to crack and break, even despite a fairly good level of strength. But if the plumbing fixtures are expensive, then changing them just because of a small misunderstanding is simply not advisable.
Let's talk about how and with what to glue a toilet bowl, tank, shelves from a similar material. It is not possible for all cases to say the exact time of possible operation of a thing after its repair: it is individual for each case and depends on the location of the damage, its size, gluing method, and so on.