Hello dear readers. Today I will share with you a recipe for honey cake “Ryzhik”, with custard, this is my mother’s favorite cake. The cake turns out very tasty, tender, well soaked, and just melts in your mouth. The recipe, of course, is from my mother, but I prepared it over the weekend. I remember my mother told me that at work, colleagues often baked cakes and treated each other to homemade cakes at lunch; my mother’s signature cake was “Ryzhik”.
The cake turned out to be really delicious, the family was happy with the cake, and I’m happy that everyone liked the cake. I liked it so much that I baked the saffron milk cake for the second weekend in a row, only today my cake turned out to be really “red.” The first time I added honey, just 2 tbsp. spoons, and today 2 tbsp. spoons with a large mountain, probably it turned out not 2, but all 4 spoons, if you take it in tablespoons. The cake didn’t even have time to cool, we already tried it, it’s just so delicious, but if you let it soak, it completely melts in your mouth.
Honey cake Ryzhik at home
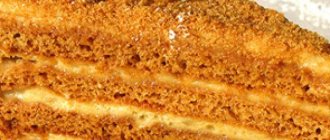
The honey base for creating cake dough is often brewed in a water bath. However, for Ryzhik it is prepared a little differently - it is brewed immediately in a saucepan or saucepan. This is what actually produces that reddish color that gives the baked goods their name.
I will make cakes with a diameter of 20 cm. There will be 8 pieces in total. The cut part will be used for sprinkling the sides and top. I don't decorate the cake anymore. I’m used to doing this kind of design and it suits us. Although the top can be decorated with cream or fruits and berries.
What we need to prepare the dough:
- flour - 4 cups
- butter – 150 g
- eggs – 3 pcs.
- honey - 3 tbsp. spoons
- sugar – 1.5 cups
- soda – 3 teaspoons
Preparing the choux pastry:
1. Remove the eggs from the refrigerator in advance. This needs to be done so that they quickly dissolve the sugar crystals at the moment of churning the mixture with sugar. Cold eggs will take longer to complete this task.
2. Prepare a deep bowl and break the eggs into it. Immediately add sugar and use a mixer as an assistant. Mix the ingredients into a single mixture. Beat at maximum speed until the color changes to almost white. During this time, the grains of sugar will have time to dissolve, and the mass itself will increase in volume. Set the mixture aside and go to the stove.
3. Place the butter, cut into cubes, into a saucepan or saucepan.
Pour honey into it and turn on medium heat. Stirring continuously, melt the mixture until liquid.
4. Then begin pouring the egg mixture in a thin stream. At the same time, constantly stir both mixtures with a spatula so that it does not burn and the eggs do not curdle. To do this, adjust the fire.
Heat the mixture and bring until the first gurgles appear, that is, to a boil.
Be careful and attentive at this stage. The mass will thicken and collect at the bottom. This often results in burning. To avoid this, stir the contents constantly . And not just on top, but also collecting the thick stuff from the bottom.
The burnt base will give an unpleasant odor to the kneaded dough. And nothing can fix this.
5. After the first bubbles appear, remove the saucepan from the heat and place on a free, not hot burner. Add baking soda and stir the mixture until smooth.
6. Put the saucepan back on low heat and wait until the soda reacts with the honey base while stirring. You won't miss it. The base will begin to foam a lot, so have plenty of space for this reaction. Bring the contents back to a boil.
There is no need to extinguish the soda. There will be a lot of foam even without this.
7. After boiling, add half of the sifted flour to the hot mixture. Keep the fire minimal. Immediately mix it with the liquid base. The flour will cook immediately, but the mixture will still be runny.
Sift all the flour at once. During the kneading process we will determine how much it will be needed. Its quantity depends on the size of the eggs and the amount of honey added. And as a rule, it is determined by eye.
8. Turn off the gas and add another half portion of flour from the one that remains. Continue kneading with a spoon and stirring until incorporated.
So, gradually, knead the remaining flour until it can be mixed in. As much as the mixture will take when kneading with a spoon. There will still be time to add what is missing if necessary.
9. Cover the dough with a lid or towel. Leave to steam and cool for one hour.
Let it cool until warm.
Recipe for Ryzhik cake with custard
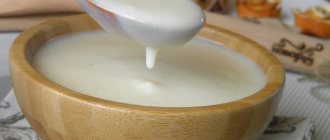
While the dough is cooling, let's prepare the custard with milk. Below is a list of the components needed for this.
- milk – 1 liter
- eggs – 3 pcs.
- sugar – 1 glass
- butter – 1.5 g
- flour - 3 tbsp. spoons
- vanillin – 1.5 g
In Soviet times, vanillin was often not added, because it was not always available in the kitchen. And those who are especially sensitive to smells felt the egg taste in the cream.
With vanillin, or a piece of vanilla, the smell of eggs will not be felt. The egg smell overpowers any other flavoring.
Preparing the custard:
When choosing milk for making cream, a reasonable question arises: “What percentage should I use?” There are no clear instructions on this matter and opinions differ. The issue is decided by everyone's personal opinion. If you want to make the cake more satisfying, take a product with a percentage of 3.5-6. Light cream is prepared from milk with 2.5% fat content. This choice does not greatly affect the taste.
1. Pour milk into a saucepan and put it on the fire.
2. While it is heating, break the eggs into a bowl and add sugar and flour to them. Add vanillin or vanilla extract if desired. Vanilla on the tip of a knife will also work.
Add flavoring if you are sensitive to egg odors in creams. We add it because we love the smell of vanilla. And the cream with its aroma seems more filling and tasty to us.
3. Mix the ingredients using a whisk or mixer at low speed. There is no need to knock them down, just stir until smooth.
4. Meanwhile, the milk has already warmed up. It’s not boiling yet, but it’s already hot – that’s what you need. Pour the egg mixture into the milk in a thin stream, while constantly stirring the mixture with a spatula or long-handled spoon. You get a lot of cream, so mixing with a tablespoon will be hot on your hands.
5. Do not leave the pan during cooking and stir frequently. When the cream begins to thicken, you need to stir it constantly. Be careful not to burn. If it burns at the bottom, the smell will spread throughout the entire mass. Under no circumstances should this be allowed, so that the cream and the cake itself are not spoiled.
6. To do this, cook the cream over moderate heat. As soon as it boils, turn it off immediately. By this time it will have thickened and become the consistency of semolina porridge. This thickness will allow you to coat the cakes with the required layer and they will be properly soaked.
7. Place a piece of butter into the cream. Stir the resulting mass until it melts and leave to cool. After cooling, the cream will become thicker. So don't worry that it's a little runny for now.
It’s better to cook the cream ahead of time, because it takes a long time to cool!
Custard recipe
Boil 1 liter of milk and cool
In a separate bowl, I beat 3 eggs with a glass of sugar and add 3 full tablespoons of flour. I rub everything until white, I do it with a whisk. You can add vanilla sugar to the custard.
I add the egg mixture to the cooled milk and mix everything well. I put a saucepan with milk on low heat and stir the custard all the time, do not leave the cream for 1 minute, stir with a whisk until the cream thickens and boils. Then I turn off the stove and immediately spread the hot custard over the cakes. Then the cake turns out soft and well soaked, this is my mother’s secret.
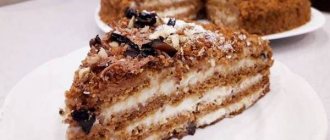
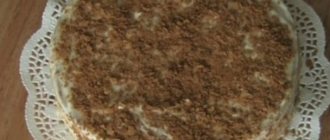
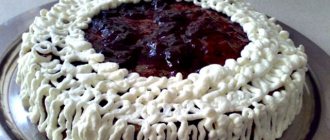
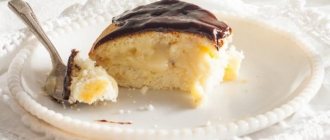
For one cake I add 3 tbsp. spoons of cream and spread it well over the cake. All the cream was gone. I smeared it on 10 cake layers. This is how I decorated the cake last weekend. I grated the dark chocolate on a fine grater and sprinkled it on top of the cake. There are also frozen cherries on top, just for decoration.
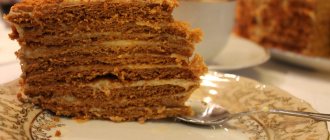
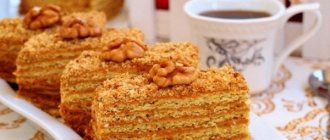
This weekend I baked the cake for the second time. I really liked the cake, and the “Ryzhik” cake is easy to prepare and bakes quickly. But in general I didn’t decorate it in any way. I just coated the cakes with custard and that’s it. But, you can roast walnuts, chop them and sprinkle on top and sides. But my walnuts were in shells, I didn’t want to peel them, I remembered it was too late. Today I made a really beautiful cake, here is a piece of the cake. I cut it while it was still warm, and it had time to cool; the children were already standing with their plates. I managed to photograph a piece against the background of my violets on the windowsill. Now they are just blooming, such beauty.
I see that every time I make a tastier and better cake, that’s what it means to practice. Such a cake can be baked for any occasion, the main thing is to decorate it beautifully, to show your imagination, so to speak, I have a little difficulty with this. Well, how does it work out, although it happens on birthdays, for example, when I bake cakes.
Enjoy your meal. I hope you liked the honey cake “Ryzhik” with custard. Cook with pleasure.
Classic Ryzhik cake - a Soviet-era recipe
The dough has already become warm and does not burn your hands. It's time to start baking the cakes. But it is still sticky and needs to be brought to the desired condition.
1. Dust the work surface of the table with flour and dump out the resulting mixture. Mix in, adding the required amount of sifted flour. As much as the dough takes. When ready, it will not stick to your hands. But you shouldn’t make it harsh either. Otherwise, it will crumble when rolling.
As soon as a lump begins to form that does not stick to the table or hands, it’s time to stop.
2. Form a thick sausage from the dough and cut it into 8 equal parts, according to the number of cakes we need. Roll each of them in flour, as we do for dumpling dough. Form into a thick cake. Leave one on the work surface, put the rest under a towel so that they do not get airy.
3. Roll out the workpiece into a layer 2 mm thick. The diameter of the plate will be 21 cm. Our cakes will be 20 cm in diameter, everything else will be cut off and used for sprinkling.
It's okay if the edges of the pancake turn out to be uneven when rolling out. The irregularities will be used for trimming. And the cake itself will turn out smooth and neat.
As a rule, it is no longer necessary to sprinkle flour to form cakes. But still keep some of it in reserve. It will be needed if the workpiece sticks to the surface.
4. After rolling, transfer the workpiece to a silicone mat or baking paper. The product is dense and easy to carry. If you have difficulty with this, then wrap the plate on a rolling pin. It will be easier to move on it.
5. Place the workpiece on a baking sheet without removing it from the mat or paper. By this time, preheat the oven to 180 degrees. Bake the cakes for 4-5 minutes until golden brown. Do not turn. The thicker the workpiece, the more time you will have to spend baking.
Do not overcook the cakes in the oven. They bake quickly and if you leave them for even a minute longer, they begin to burn.
6. While the cake is baking, roll out the next one on the work surface. If you bake on a mat, then wait until the first one is baked. You can use the same mat as many times as you like. But take new baking paper.
7. Once ready, take out the baking sheet and remove the cake using a spatula. It can be removed easily, the main thing is to pick it up evenly from all sides. Place the workpiece on a cutting board. Prepare a lid, plate or sides of the mold in which you will assemble the cake. This will be the cutting template. Using the prepared template, cut out the cake with a diameter of 20 cm.
Place the scraps in a bowl and place the crust on a plate.
Cut the pieces while they are hot. In this form they crumble less.
Bake the remaining cakes in the same way. Wait until they cool down and only then stack them. Otherwise, the hot workpieces will stick together.
Ryzhik cake - the best recipe
The cakes are ready and the cream has cooled. It's time to assemble the cake. We will assemble it in a detachable cooking form. As has already been noted more than once today, its diameter is 20 cm. The height of the treat will be 8.5-9.5 cm. Therefore, measure in advance the height of the dish in which you will assemble the prepared components.
If the height is not enough, then increase it with additional sides. There is a special film for this. And if you don’t have one, then take a plastic folder where you place files. Cut the plates to the required size. It will become a substitute for thick cooking film.
1. Place the baking dish on a plate or dish and place the first cake layer in it. It should lie tightly to the bottom. There should be no space between it and the wall. Use immediately the dish on which you will serve Ryzhik to the table. It will turn out heavy and it will not be possible to move it later.
2. Coat it liberally with custard.
Then place the second cake layer and press it tightly with the palms of your hands. Cover with a thick layer of cream. In this way, collect all 8 cakes. Don't forget to put custard on the top crust. The culinary form turned out to be filled to the top.
3. Apply the cream in a thick layer each time. But try to calculate so that it is enough for the prepared preparations. Leave two to three tablespoons for coating the side walls. We will sprinkle them the same way as the top. That's why we made a lot of cream so that there would be enough.
4. Place the assembled cake as it turned out in the refrigerator. Leave it to cool for 4-5 hours. During this time, the cakes will absorb the required amount of cream and become saturated, leaving a thin layer between them.
5. Place the cooled and dried trimmings from the cakes into a plastic bag. After tying a knot on it, roll it with a rolling pin on a cutting board to achieve crumbs. If the trimmings do not want to crumble, then first tap them with a meat hammer.
Large parts will break and it will be easier to make crumbs out of them.
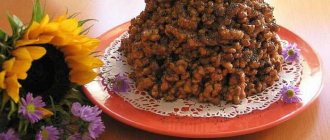
6. It took us 5 hours, the cake was frozen and soaked in cream. Take it out of the refrigerator and sprinkle some of the resulting honey crumbs on top. Distribute it over the surface in such a way as to hide the cream and create an even and dense area.
7. Pull apart the locks of the baking pan and remove it from the cake. The cream has frozen and it is removed without the slightest difficulty.
8. Coat the sides with cream, first of all apply it where the surface is dry. If the sides are coated, then there is no need to apply an extra amount of cream. Sprinkle the edges with crumbs.
To prevent it from crumbling, place your palm or a piece of cardboard underneath. Use your hand or cardboard to press the crumbs against the walls. It must be applied as tightly and evenly as on top of the product. Remove the remaining crumbs from the plate using a silicone brush.
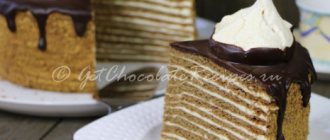
If desired, the cake is decorated. Use tinted cream to match the colors used in the treat. Or pieces of fruit and berries are laid out on the surface with crumbs. The existing decoration in the form of crumbs is enough for us. Therefore, we stop there.
The cake is ready and it's time to serve it. Cut it into pieces in the form of triangles. The pieces turned out neat. The cakes were soaked in cream, but the coating remained in the form of a thin layer. What decorates the treat and makes it beautiful and appetizing. The honey cake turned out not too sweet, which is good. We don't like overly sweet cakes. A cloying taste dulls other sensations, and sometimes the true taste is not felt.
Friends, as you can see, the cooking process is not complicated. But you won’t get off quickly here. Previously, there were no computers or phones with chat rooms. Therefore, we calmly spent the day cooking. Now the time is different. If you decide to make Ryzhik honey cake, be patient.
And believe me, it's worth it. You can't buy a cake like this in a store. It is prepared only with your own hands. Therefore, do it on holidays and on Sundays. Delight your family and friends with a taste of Soviet times.
That's all I have for today. Until next time. And Bon Appetit!
Author of the publication
Cooking saffron milk cake according to the classic recipe
A classic cake that is sure to delight your guests.
Many people have known it since childhood, when our mothers and grandmothers prepared it. A special feature of this delicacy is the signature combination of honey and milk flavors. Moreover, the recipe for saffron milk cake at home can be prepared with either custard or sour cream. Accordingly, you can choose the option that you like best. However, custard is still considered a classic, so we will consider it in the recipe below.