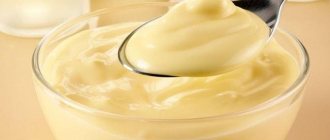
In the world of beauty, culinary modern desserts, stunning in their beauty, have appeared and firmly taken their place. They attract our attention, amaze us with their palette of colors and extraordinary shine. All this splendor comes from the mirror glaze that covers cakes and pastries. As you get closer, you might even see your reflection on the cake. Apparently, this is where this name, which accurately reflects the beauty of the cake, comes from - mirror glaze! When I first saw photos of these cakes, they simply fascinated me.
It seems impossible to prepare such a miracle at home. But no - knowing the technological techniques and the “formula” of the ingredients, it’s quite possible to master everything. This article for the site “Tasty and Simple” was prepared by amateur cook Lyudmila, who independently studied all the intricacies of the cooking process and now shares her experience with us and tells us how to make mirror glaze for mousse cakes. All photos shown in the article are Lyudmila’s works. Agree, these desserts look like a million dollars and seem like they were made by the pastry chef of a chic restaurant!
We will study and develop the topic of mousse desserts in the future, and now - a review article on how to make mirror glaze in different ways: with or without glucose syrup, with invert syrup, with honey. There are recommendations for choosing dyes for preparing colored mirror glazes for every taste - white, chocolate, mother-of-pearl. To give you a complete understanding of the technological process, the article provides a detailed step-by-step cooking recipe. Yes, it's not easy. But how exciting!
What dyes can be used?
As can be seen from the composition of the ingredients, the newfangled mirror glaze is nothing more than an emulsion - it has a water part (syrup) and an oil part (chocolate). Therefore, to make colored glaze, water-soluble and fat-soluble dyes can be used as dyes. Americolor dyes are very popular among cooks. You need to add them in drops until you get the desired color. You can also use dry fat-soluble dyes.
If you add kandurin (powder) of gold or silver color, the glaze acquires a stunning pearlescent sheen. To prepare a white mirror glaze, titanium dioxide is used - this is a white powdery substance, since pure titanium dioxide TiO2 is the most stable of all known white pigments.
Basic recipe with glucose syrup
First, let's look at the basic universal method of preparing colored mirror glaze using glucose. Accuracy is important in the technology for preparing this confectionery miracle, so you will need measuring instruments - electronic scales and a culinary thermometer. You will also need an immersion blender with a tall glass.
Ingredients:
- 12 g – leaf gelatin
- 75 g – water
- 150 g – white sugar
- 150 g – glucose syrup
- 100 g – condensed milk
- 150 g – white chocolate
- 3-4 drops – food coloring
Preparation:
- Let's start with gelatin. Soak leaf gelatin in ice water. It’s easier to work with sheet gelatin! But if you like to use powdered gelatin, then you need to fill it with ice water, but in a ratio of 1:6, i.e. take 12 g of gelatin and fill it with 72 g of water. We measure everything on electronic scales.
- Let's prepare a tall glass from an immersion blender or a jug into which we put condensed milk, then finely chopped white chocolate.
- First pour water into the saucepan, then add sugar and glucose syrup, put it on the fire and gradually heat the mixture until the sugar dissolves. At the same time, you don’t need to stir the sugar with a spoon yet, move the saucepan slightly on the stove, this will help the sugar dissolve faster. The sugar has dissolved and the mixture is boiling.
- We begin to measure the temperature of the syrup with an electronic thermometer. Stir with a spoon and bring the syrup to a temperature of 103 degrees. At this stage, 2 points are very important: 1. if the icing is not cooked enough, it will drain from the sides of the cake; 2. overcooked - the glaze will be very thick, and most likely you will not be able to pour it over the cake.
- Pour the hot syrup into a glass, the temperature of the syrup gradually decreases to 85 degrees, the chocolate melts, add the squeezed gelatin. Powdered gelatin can first be slightly melted in the microwave and poured into a glass. Mix everything carefully.
- Add a few drops of dye and start punching the glaze with a blender, and you can see how the color of the glaze changes. Add dye if you want a more saturated color. Tip: You can see the color of your cake without pouring it - freeze a white plastic spoon, then dip it into the finished frosting.
- Hold the blender at an angle of approximately 45 °, turning only the glass, and you will see how bubbles go into the funnel that forms (if you use the blender incorrectly, their number will increase). The blender runs at minimum speed.
- Excellent result if you punch without bubbles. Any bubbles that form can be removed by straining the glaze through a fine sieve into another glass or jug and cover with cling film. Glucose syrup forms a film on the glaze, so immediately cover the glaze with cling film in contact. Place the glaze in the refrigerator for 12 hours or overnight to stabilize.
- After 12 hours, you can check how well it turned out - press your fingers on the glaze, if it is elastic and springy, then the result is excellent!
- We heat the glaze in the microwave or in a water bath and beat it again with a blender and measure the temperature again, the operating temperature should be 30-35 degrees. Strain the glaze through a sieve into a jug with a spout (this is easier to pour from) if bubbles form.
- The icing is ready, the operating temperature is 30-35 degrees, you can remove the frozen cake from the freezer and immediately start pouring. Important point: If your cake sits on the table for at least 5 minutes while you go somewhere and are looking for something, the temperature of the glaze will change, and condensation will form on the surface of the cake and the glaze will simply drain from the cake.
The recipe for honey cake with glaze from pastry chefs is not from books
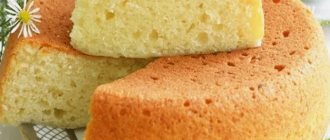
I suggest you prepare a very tasty, unforgettably airy cake “Honey Delight”, please do not confuse it with a honey cake! We will decorate the dessert with exotic glaze from Pierre Herme.
I would like to immediately note, dear lovers of sweets, that I have never made such an unusual cake!
Firstly, it was interesting to mix soda with honey over the fire, and secondly, its excellent taste exceeded my expectations, and the dough turned out fluffy and delicious! I accidentally came across this mixing method on the Internet, I want to share it with you, be sure to try it and maybe this honey cake (not honey cake!) will become one of your favorites in your cookbook.
Ingredients:
For the biscuit:
- 3 eggs.
- 0.5 cups sugar.
- 1 cup flour.
- 4 spoons of honey.
- 1 teaspoon of soda.
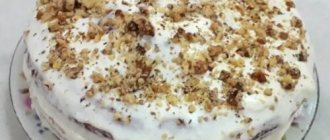
Cake “Honey Delight”
For cream:
- 1 egg.
- 1 cup of sugar.
- Half a liter of milk.
- Half a glass of flour.
- 200 grams of plums. oils
- Vanillin - on the tip of the knife.
For the glaze:
- Water – 1000 ml.
- Citrus fruits (orange, lemon) – 0.15 kg each. for every fruit.
- Vanilla Bourbon - a piece of the pod.
- Granulated sugar – 0.4 kg.
- Pectin – 0.04 kg.
- Lemon juice – 2 tbsp. l.
- Fresh mint leaves – 1 tsp.
Let's look at the whole cooking process point by point:
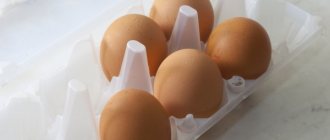
- Beat all the eggs (chilled) until stiff.
Eggs whipped until stiff
At this time, take a saucepan with a thick bottom and heat honey in it. There is one peculiarity here - honey should not boil! When bubbles appear on the surface, add baking soda and stir until the foam turns a light caramel color.
- Add foam, 1 tablespoon at a time, to a mixer where eggs and sugar are beaten.
Sift in the flour in small portions, continuing to whisk.
Line the pan with parchment paper, pour the dough into the round pan and bake in the oven for 40-45 minutes. By the way, you need to cover the pan with foil on top, I didn’t do this, perhaps for this reason the cake got a little tanned on the bottom, but this didn’t worsen its taste at all, since I removed what was unnecessary with a knife.
Cut the cake into 2 or 3 parts with a sharp knife. All cheers, now let our cake rest for a few hours, cover it.
Make cream, I think custard is suitable for this sponge cake, just don’t forget the soaking. For this I used sugar, lemon and water, so everything is brilliant - simple!
Make custard like this:
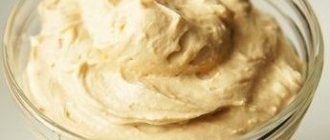
Mix 1 egg with 1 glass of sugar, add half a liter of milk and half a glass of flour, beat lightly with a whisk and place on the stove over low heat. Stirring continuously, add a little vanilla sugar or vanillin; when the cream thickens, continue whisking, removing from heat.
Custard
Add whipped butter little by little to the now cooled cream and beat again. 200 grams of butter went into the cream.
For lovers of baked milk, you can make cream from condensed milk. To prepare, beat half a stick of softened butter with a can of boiled condensed milk.
I decorated the cake using an experimental method: exotic icing from Pierre Hermé. It turned out simply Belissimo! The recipe for such a neutral glaze is below.
Remove the skins from citrus fruits. This can be done easily by using a vegetable peeler.
Place the zest and 4/5 of the vanilla pod into a saucepan. Fill everything with filtered water. Heat the contents to 50 degrees.
Mix sugar and pectin and boil for two minutes.
After 3 minutes, remove everything from the heat and, adding lemon juice and mint, leave for half an hour. Pass the confectionery liquid through a sieve.
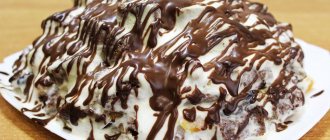
After cooling, the transparent icing for the cake should be infused in the cold for at least a day. After cooking, the cake needs to be soaked in the refrigerator. During this time, the glaze will mature to such an extent that it can be worked with. To sprinkle the finished confectionery sweets, use crushed nuts or chocolate chips.
What to do if there is no glucose syrup?
This syrup is not sold everywhere; it is difficult to find in small towns. In this case, we present two proven recipes for preparing mirror glaze without using glucose syrup: one based on honey, the other with homemade invert syrup.
Honey Glaze Recipe
Another option for colored glaze: if you don’t have glucose syrup on hand, you can take the same amount of light liquid honey. The magnificent aroma of honey and the aroma of flowering herbs will give your dessert an incredible taste in combination with delicate mousse and fruit fillings.
Ingredients:
- 12 g – leaf gelatin
- 75 g – water
- 150 g – white sugar
- 150 g – natural honey
- 100 g – condensed milk
- 150 g – white chocolate
- 3-4 drops – food coloring
Preparing glaze with honey is similar to preparing mirror glaze with glucose syrup.
Mirror glaze with invert syrup
In this method of preparing mirror glaze, we use invert syrup instead of glucose syrup. To prepare invert syrup you need sugar, water and citric acid. The finished invert syrup has a consistency similar to liquid honey. We won’t go into the details of its preparation now, but if you’re interested, there are recipes on the vast expanses of the Internet.
Ingredients:
- 7 g – leaf gelatin
- 50 g – water
- 100 g – white sugar
- 100 g – invert syrup
- 70 g – condensed milk
- 100 g – white chocolate
- 3-4 drops – food coloring
Preparation:
- Heat water, sugar and invert syrup, bring the temperature of the syrup to 103 degrees. Pour over condensed milk and white chocolate pieces, stir well, add gelatin, pre-swollen and squeezed out, and food coloring.
- Blend everything with a blender until smooth. The working temperature of the glaze should be within 30-35 degrees.
- The prepared glaze can be left in the refrigerator under cling film for several days, i.e. prepare in advance, and before covering the cake or pastries, heat in the microwave or in a water bath to operating temperature.
Colorless transparent glazes are used to produce coatings through which the color (texture) of the shard or the painting on it is visible. Transparent glazes are a good basis for producing brightly colored glazes, especially those glazes in which the coloring material is an oxide (see Salts, oxides). Sometimes (and incorrectly) transparent glazes are called fluxes. Transparent glazes can be used as a flux in the preparation of engobes, underglaze and majolica paints and ceramic masses sintered at low temperatures, as well as as a covering layer for other glazes.
BRUSH COMPOSITIONS. Made for most glazes and available in 200 ml and 0.5 liter packaging. The brush composition code begins with the number 2. For example, S-2128 is a brush version of the S-0128 glaze.
Main characteristics.
1. IDEOLOGY OF TRANSPARENT GLAZES AND BASIC GLAZES IN GENERAL.
This section is especially important for those who do not want to be limited by the meager offers of ceramic supply companies and feel the strength and great desire to receive the quality of the product as intended. Everything is allowed!
The whole ideology can easily be reduced to a slogan: spend maximum time searching for a basic glaze, learn how to quickly modify the color, shine, and dullness.
AMATEUR APPROACH. Many people use it in Russia. It is facilitated by the lack of literature and normal service in terms of ceramic materials and equipment. This approach is not even discussed here (otherwise there will be a temptation to say “everyone does it!”).
PROFESSIONAL APPROACH. It is assumed that it is possible to carry out a large number of test firings, to produce different compositions by mixing the main components and additives, and there is an understanding of the importance of maintaining a work log. Any beginner, if he wants to become an experienced master, sooner or later comes to a professional approach. There is no other way to do it in ceramics: there are too many different tasks and too many factors acting simultaneously and, at first glance, unpredictably.
Knowledge of glaze chemistry is important in a professional approach. This is not as scary as it might seem to a person far from the exact sciences. This is extremely necessary to minimize the number of samples, to save money both due to materials and by reducing defects, to ensure 100% quality of products. Glaze chemistry is the shortest path to perfect glaze.
There are several ways to achieve the desired glaze (or color).
Method 1 is to find exactly what you need somewhere, or listen to what a friend says who has succeeded. The results are good and bad with equal probability. You will most likely not be able to find exactly what you need. And a friend had a completely different firing regime. This method is not far from trying to find a miracle technologist who, just by looking at the sketch, will say the cherished magic word. But an experienced technologist will not say anything other than “tests, tests, and more tests.” Next to this method is the practice of “getting attached” to the technology of large production. This is normal practice, since large production facilities have well-established technologies, control, and supplies. Trouble awaits any attempt to change something.
Method 2 is a step in the right direction. It consists of carrying out many trial firings. We take the glaze and make a test. Let's say the glaze turns out to be too refractory. We take the low-melting flux we have on hand, add percent... how much? Let's do a fire test again. If everything worked out, write down the recipe. The method leads to positive results if you have enough patience for all the work of sorting through the compositions.
| In October 2005, in Horses there was such a Russian-language glaze calculator, working in MSAccess XP, with a large database of glazes. Today it is already an online calculator. And the base is 5 times larger. |
The right way . All that is required is to know the chemical formula of the glaze that is needed and, using a ceramic calculator, find out which glazes are available and the components in what proportions must be mixed to obtain it. This will require chemical formulas (Seger formulas) of the available glazes and materials. It happens that they are published by manufacturers. We publish the formulas in the corresponding description of the base glazes. In addition, you need to have a glaze calculator, i.e. program for calculating Zeger formulas. As a rule, calculators are equipped with reference books on many existing glazes and materials for all occasions; they allow you to predict CTE, firing temperature, calculate the replacement of some materials with others, etc.
In practical work, ceramic artists rarely encounter more than one or two clays: some work exclusively with earthenware at 1200°C, others with fireclay at 1150°C, and others with red PG-100 with double firing at 1000°C. This means that you need to once find your own glaze (or two glazes) that would satisfy you to the maximum: it would be available (one or three materials, which are always available), would suit the shard, and would give the desired color response with pigments and paints. Finding such an ideal (we mean specific conditions) glaze can take quite a lot of time. But it's worth spending! We must search systematically. And having found it, do not deviate from the recipe and obtain your hard-won ideal glaze by all means.
SYSTEMATICS IN WORKING with glazes is the basis.
| They forgot to write down the composition of this amazingly beautiful coating... |
The first thing you need to do is keep a journal and record every step of the work. The entries might look like this:
……..
January 01, 2006 Glaze S-0121. Diluted with water (100 g of water per 1 liter of glaze). Dipping the “piggy” (PG-100, waste 900°C). Thick, especially in the folds. Placed in the oven 4 hours after glazing. Firing - standard (1050°C with holding time for 30 minutes). The shine is good, there are cloudy streaks in the folds. =>> You need to dilute it with more water!
……..
Second: dose everything. Ideally, on a scale. Now there are excellent household electronic scales; in most cases their accuracy is sufficient. But if you don’t have scales, you can use standard plastic cups, tea and mustard spoons, which are sold in abundance in disposable tableware stores. The entries will look like this:
……..
November 07, 2005 No. 25 - 200 ml glass S-0121 + 1 tablespoon of zircon. No. 26 - glass S-0121+ 1 teaspoon of zircon. Watering the tiles. 1050°C. No. 25 - white, shiny. No. 26 - white, the shard is slightly translucent. => You need 2 TEASPOONS!
……..
For a professional, the last entry would look something like this:
... No. 25 - S-0121 W=38% Zircon 15.7% over 100% (ZrO2 0.642, CaO=0.128, Si/Al =13.6). Reduce ZrO2 to 0.5 mol. Add wollastonite to CaO 0.3...
It would be good to indicate the color in a color sample magazine, but it is more convenient to have LATEST SAMPLES.
| You can use pieces of broken scrap plates for samples. |
They must be signed (the same number 25 that is indicated in the magazine). For samples there is always a piece of clay, a small unoccupied space in the oven, a cardboard box. Never miss the opportunity to make a sample for future use and substitute it for current products. When we are working on the design of a product, interesting ideas often come to mind: what if this painting on white enamel is dusted with pale blue transparent? Don’t waste time, do it at the next firing on a sample the size of a matchbox, and what if it really turns out to be very unusual and beautiful?
There is a problem with describing color in words. The phrase “light brown with a dark dot and a yellow spark” will, in a couple of years, become disconnected from the real image of the surface in our head, and the imagination will draw something fantastically attractive based on this phrase. Therefore, it is better to look for words with familiar analogies: “linden honey,” “unripe cranberries,” “coniferous forest.” Another option is to specify computer RGB, or better yet, color coordinates in CIEL*a*b*. But this is not a solution either, because the color coordinate will not describe those same “yellow sparks”. Then all that remains is photography, and in good lighting. (In order to deepen the topic: photography not only lies with color. It also does not convey color dynamics. For example, it is impossible to show aventurine in a photograph. Our eye is tuned to dynamic perception, and here the best way to convey the color of a sample is to make a short film about it , even with poor color settings.)
| An example of a composition triangle. At Horses, it was used in the development of the mirror aventurine composition S-0122-34. |
There are little things that make searching for color and storing samples much easier. One of them is scrap honeycomb, S-4674. Burnt honeycombs can be easily pasted onto a thick sheet of paper and placed in a folder. Honeycombs do not take up much space either in the kiln during firing or in the folder.
The shape of the honeycomb was not chosen by chance. It is convenient to form so-called composition triangles from them. Let’s say we need to evaluate the color mixing of three glazes: colorless A + brown B + green C. Let’s prepare 300 grams of each glaze and cover three samples with glaze. They will be at the vertices of the triangle. Since pure glazes are no longer needed, we divide each into 6 parts (i.e. into approximately 50 gram portions) and prepare mixtures: 2 parts A + 1 part B, 1 part A + 2 parts B, 2A + 1C, 1A +2C, 2B+1C, 1B+2C. We use each mixture to make the corresponding honeycomb. Finally, pour all the glazes into one container - we have a mixture of A+B+C for the central sample. We burn all ten hundred at the same time and arrange them into a triangle. Now it's easy to see all the influences and easily select the required composition. The great thing about this method is that you only need to carefully prepare the original three ingredients!
2. MAIN CHARACTERISTICS OF TRANSPARENT GLAZES AND POSSIBLE CORRECTIONS.
All transparent glazes have the same characteristics as glazes in general (see group Glazes). The most important of them are listed below.
COMPOUND. The chemical composition, as already mentioned, is completely determined by the Zeger formula. The component composition, as a rule, is not indicated by the manufacturer. Of the proposed glazes, glazes S-0128, S-0135, S-0145 are multi-component feldspar-based, the rest are ground frits with technological additives. To adjust the composition, the following components are often used; all of them must be finely ground so that they can be added to the glaze by simple mixing.
— Feldspar (S-4628). Operates from 1100°C. Adds aluminum and silicon to the glaze, i.e. increases the refractoriness of low-melting glazes, melts refractory glazes and usually increases the likelihood of tsek. ⚫ Feldspar K8 200M, S-4
| From transparent shiny S-0120 it becomes transparent matte if it is diluted twice with wollastonite. |
— Quartz (S-4617). Reduces CTE, i.e. tendency to tsek. Increases the viscosity of the glaze melt, improves the chemical resistance of the glaze coating. ⚫ Finely ground quartz sand
— Aluminum oxide (in finely ground form—alomat S-4622). Increases refractoriness, chemical resistance and hardness. Mattes the surface (aluminum matte glaze). ⚫ Alumina G-00, S-4621
— Wollastonite (S-4609). Source of calcium and silicon. Improves the brightness of many pigments. In large quantities at low temperatures it mattifies the surface (calcium matte glazes). ⚫ Wollastonite, S-4609
— Zircon (S-4595). Powerful muffler, i.e. with its addition, transparent glazes become opaque. Increases the hardness and chemical resistance of the glaze surface. May reduce CTE. ⚫ Micron zircon, S-4595
— Zinc oxide (S-4510). In large quantities - a matting additive (zinc matte glaze) and a muffler. Actively affects color and not always in a good way. ⚫ Zinc oxide, S-4510
— Faience (S-6003, etc.). Gently increases refractoriness, in small quantities, 5-10%, practically does not affect transparency. But it gives stickiness to the glaze, often eliminates clumping and reduces the likelihood of sticking. ⚫ White-burning ceramic
— Salt (ordinary, table salt) is a good thickener for the glaze suspension. 1 teaspoon of salt solution per 0.5 liter of glaze can turn the glaze into a dense mess. Salt prevents liquid glazes from settling quickly and makes the glaze sediment softer. Not for sale in Horses! But we sell another salt, the so-called. Epsom salt is simply magnesium sulfate. His code is S-4203. ⚫ Glaze stabilizer Mag
— CMC (S-4524) — glaze glue: enhances the stickiness of the glaze, preventing it from falling off after drying. Since we are talking about sticking glaze powder to the shard, before firing, you can use not only CMC, but also similar things, for example, starch, or dextrin, or some kind of wallpaper glue. There are also more special formulations, such as Optapix S-4892. ⚫ Carboxymethylcellulose in ⚫ Glaze glue Optapix G
TRANSPARENCY. Glazes S-0122 (high lead), S-0120 (low lead), S-0118 and S-0128 (lead free) have very good transparency. Transparency depends on thickness. If only transparency is required from the glaze, it should be applied in a thin layer, thinner than similar colored ones. The visual transparency of the glaze on the relief can be increased by adding a small amount of blue or red pigment to the glaze, then the relief appears much more prominent, and flat areas “do not notice” the addition of color due to the thinness of the layer.
Features of the technology.
All glazes must be filtered through mesh No. 02 - 014 (mesh size 0.2 - 0.14 mm) immediately before use.
To obtain transparent coatings, colorless glazes are applied using all known methods, see Glazes. Glaze consumption, as a rule, is less than in the case of colored or white glazes - 1 kg or less per square meter of surface, excluding losses. In other words, transparent glazes are applied in a thin layer. To obtain thin layers, a low density of the glaze suspension is almost always required - 1.3-1.5 according to the hydrometer and even less. The density is adjusted by diluting the glaze with water (see Hydrometer). If a settling problem arises, thickeners must be added to the glaze, the simplest of which are solutions of table salt, table vinegar, calcium chloride or magnesium sulfate, milk of lime, see above.
For the preparation of colored glazes, see the Pigments group.
Known problems and how to resolve them.
Problems encountered when working with transparent glazes are described in the appropriate sections for specific glazes.
A specific problem is defects in underglaze painting. See description of underglaze paints.
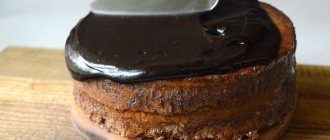
Mirror chocolate glaze
She's just incredible. The bright chocolate taste of the glaze is slightly bitter, like dark chocolate, and in contrast goes well with the delicate and sweet mousse. There is no dye in this recipe; cocoa plays its role. We take good quality cocoa, for example alkalized cocoa powder, Cacao Barry.
Frosting recipe with cocoa and cream
Ingredients:
- 12 g – leaf gelatin
- 160 g – cream 33% fat
- 240 g – sugar
- 100 g – water
- 80 g – glucose syrup
- 80 g – cocoa
Preparation:
- Soak gelatin in cold water, sheet gelatin for 10 minutes, powder in accordance with the manufacturer's instructions.
- Heat the cream over medium heat. Next, we need to cook the syrup from water, sugar and glucose syrup to a temperature of 111 degrees; we use an electronic thermometer to measure it. A very important point is not to overcook, otherwise the syrup will be thick and it will be difficult to pour the cake.
- At a temperature of 111 degrees, remove the syrup from the heat and pour in the boiled cream, then add cocoa. You need to mix everything well and put it on the fire again. Bring the mixture to a boil and add the squeezed gelatin.
- Then pour it into a tall glass or jug and puree it with a blender. We punch at minimum speed until smooth, while trying to reduce the number of bubbles to a minimum.
- The glaze is ready. The working temperature of the glaze should be within 36-40 degrees. You can take the dessert out of the freezer and cover it with delicious chocolate glaze. We are sure that you will make this glaze more than once.
Milk chocolate recipe
In this mirror glaze recipe we do not use food coloring, perhaps this is what will be of great interest to someone. Here we will take a bar of milk chocolate, it has a soft, delicate and caramel color. The cake will look amazing.
Ingredients:
- 12 g – leaf gelatin
- 75 g – water
- 150 g – sugar
- 150 g – glucose syrup
- 100 g – condensed milk
- 150 g – milk chocolate 55%
Preparation:
- Soak gelatin in ice water.
- Heat water, sugar and glucose and bring to 103 degrees.
- Pour over a mixture of condensed milk, finely chopped chocolate and swollen, squeezed gelatin.
- Blend with a blender at minimum speed. Cover the contact with cling film; this must be done, since glucose syrup forms a film on the glaze. Place in the refrigerator for at least overnight or 24 hours.
- Before pouring the cake, heat it in the microwave or in a water bath to 30-35 degrees.
Coating of cakes and pastries
Surely you were curious about how to cover a mousse cake with mirror glaze? This is the most interesting and exciting moment in cooking. Our glaze is already ready, it’s in the refrigerator, covered with cling film. Let's look at the whole filling process step by step.
- We take the glaze out of the refrigerator and heat it in the microwave or in a water bath to a temperature of 30-35 degrees Celsius.
- Remove the film and beat with a blender until smooth. Any bubbles that appear can be filtered through a sieve. Let's prepare a wire rack for placing the frozen cake. Place a wire rack on a tray or large dish to catch any icing dripping from the cake.
- Remove the frozen cake from the mold. If the edges of the cake are sharp or not quite even, you can smooth them out with the help of your hands. Do not hold it in your hands for a long time, excess heat and the formation of condensation on the cake will spoil the icing, it will drain from the cake. At the correct glaze temperature, the cake is covered with an even glossy layer.
- Fill it up. If you have a cake with a flat top surface, you can remove the excess glaze immediately after pouring, the layer will be beautifully thin and there will be less sweetness. We confidently do it once with a spatula, carefully moving the glaze on top of the cake. But it’s better not to touch if you are not sure of your actions. We wait a little while for the glaze to set and carefully tuck the hanging strands of glaze under the cake.
- Take the cake from below with your hand and transfer it to the base using a spatula (or knife). Place in the refrigerator for about 5 minutes. Then remove the cake from the refrigerator and decorate.
- We return it to the refrigerator again so that the cake begins to gradually thaw, this will take 5-6 hours. The cakes take about 3 hours to thaw. Here you can calculate the start time of the festive event and decide when to start filling the cake with icing.
Some useful tips
- We collect the excess glaze in some container and store it in the refrigerator for about a month.
- If the glaze thickens during pouring, it can be heated again in the microwave to operating temperature.
- The glaze can be heated several times.
- Frozen mirror glaze has a brighter color than still warm one, take this into account when adding dye.
- Frosting batches can be mixed if they are made from the same recipe. If, for example, you have some icing left over from a cake, make a new batch and mix it with the leftovers.
- Frosting that drips onto a tray or dish can be collected and reused as long as there are no cake pieces in it. If crumbs get into the glaze, you can pour it through a sieve into a common container with glaze.
- The cake, filled with mirror glaze, must be cut with a hot, dry knife.
- If you want to get a snow-white color, add titanium dioxide to the hot glaze.
In conclusion, the author’s wish to all readers “Tasty and simple”: “I want to wish good luck to all those who were inspired by the process of making mirror glaze. This exciting new world of flavors and textures will enrich your taste buds and improve your mood! Try it, do it and you will succeed!”
Recommendations for preparation and use
- The remaining glaze can be carefully collected, stored in the refrigerator for up to a week (covered with film “in contact”), if necessary, heat the glaze to a temperature of 27 degrees and reuse.
- The icing on the cake can be slightly smoothed out with a metal pastry spatula if it is too thick.
- If the glaze does not lie very smoothly on the cake , it means the cake is not frozen well. Try to remedy the situation by icing the cake again.