Girls, I’ve had a Mulinex meat grinder for eight years now. My daughter recently washed it and assembled it herself for the first time. Apparently something was wrong, because now I turned it on and immediately the meat got stuck. And now I can't unwind it. Just neither here nor there. I’ve already tried to spin it with pliers from behind and hit it with a metal hammer in the direction of spinning. Nothing helps.
What needs to be removed and unscrewed? The meat grinder is still Soviet and all the parts turn hard. We are afraid that nothing will be torn off.
Disassembling a mechanical meat grinder, like all other mechanisms, requires the person involved in this disassembly to be attentive and knowledgeable about the design of the mechanism. After all, the correctness of the subsequent assembly of this mechanism depends on how a person accurately and correctly remembers the disassembly sequence. And this ultimately affects the correct operation and longevity of the mechanism.
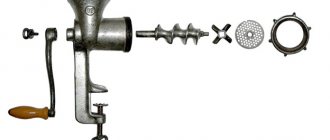
A mechanical meat grinder has a simple design and consists of: a body (grandmother’s meat grinders are made of cast iron, modern ones are made of light aluminum alloys), an auger (a screw shaft with a square-section seat for a knife and a round-section seat with a flat for a handle), the handle itself for rotation of the auger, a screw (a part with ears “for fingers”), a knife (a part with four petals), gratings (a round disk with frequent holes), a tension ring (looks like a large washer with an internal thread).
- First, by rotating counterclockwise, remove the tightening ring. If the meat grinder was “in operation”, you may have to apply some significant force, because. this ring could self-tighten during operation;
- on the opposite side, unscrew the eye screw;
- remove the handle;
- remove the grate and knife from the auger. Here it is important to remember (notice) which side the grate was facing the knife. During operation, the knife grinds against this side of the grate and ensures the best cutting of meat. As a rule, this side of the grate has a circular mark from the work of the knife;
- Remove the auger from the meat grinder body.
If your meat grinder is Soviet and is quite old, then it is quite possible that the parts have become “stuck” to each other, because They stood motionless relative to each other for a long time. Try pouring a few drops of kerosene into the threaded connections (don’t be surprised - kerosene has a great ability to penetrate into narrow crevices and will provide liquid lubrication between the threaded surfaces of the meat grinder parts). When you disassemble the meat grinder, wash the kerosene from the parts of the meat grinder. If it turns hard, then, apparently, the tightening ring is too tight - loosen the tightening. Another reason for poor rotation is that the knife and grid do not fit well together. They need to be “finished” (sharpen the knife and grind the surface of the grate with sandpaper placed on a flat surface or with a fine-grained sanding block). Well, the worst option: the parts and body of the meat grinder are worn out so much that the auger becomes skewed - replace the worn parts or the meat grinder itself.
A manual or electric meat grinder is considered a fairly popular kitchen appliance. It is used for processing meat into minced meat, squeezing juice from fruits, stuffing homemade sausage, preparing vegetable puree or preparing pasta. In order for the equipment to work correctly, you need to familiarize yourself with the nuances of its design. From our article we will learn how to assemble and disassemble a meat grinder.
How to disassemble a meat grinder
It happens that the meat grinder washer gets stuck and you don’t want to unscrew it. This happens often, and it happens because the meat grinder sits unwashed for some time in its assembled state. Even if you don’t see dirt, this does not mean that it is not there, the particles may be very small and insignificant. Also, a little rust also promotes “sticking”.
ATTENTION!
To prevent this from happening, wash all parts very thoroughly after use, then dry them and store them disassembled.
If a short circuit does occur, the following techniques will help you:
- soak the meat grinder in water along with dishwashing detergent. It will eat away the fat and perhaps help you turn;
- Dip the entire structure in boiling water for 5 minutes, then, without waiting for it to cool, try to unscrew the washer. Use silicone gloves to avoid getting burned;
- use an adjustable wrench or a hand vice;
- the very last method: knock with a hammer, in the hope that it will move slightly and you can unscrew it. Use this method in extreme cases, as there is a high probability of breakdown.
Tips for using a meat grinder
- The minced meat should not be completely defrosted, then it will be easier for the meat grinder to work.
- If the meat is too fatty, after finishing work, roll in crackers or raw potatoes; they will absorb the remaining fat and it will be much easier to clean the device.
- Cut the meat into small pieces.
To avoid damage to the meat grinder, you should wash the device thoroughly after use, do not dry it in the open air, but wipe it dry with a towel. It is best to store parts in a paper bag.
Household appliances Meat grinder
Common causes of breakdown
Among the obvious visible and technical reasons why a meat grinder does not spin meat, there are those that can be eliminated on your own:
- The most common cause of malfunctions is incorrect assembly. It would seem that what is so difficult about connecting several parts? In fact, you need to take into account several subtleties and follow the instructions, firmly attaching each one. Most often, the problem lies in the knife. When installing, its wide part should be on the outside.
- The knives and grill are tangled. With such a defect, the meat grinder will continue to work, but the meat will not be twisted, but compressed and torn. In this situation, it is easier to take the parts to a workshop where they will be sharpened by professionals. But if you have the necessary skills, you can try it at home. Don’t forget to lubricate the parts with oil when finished; regular sunflower oil will do.
- The knife is not in tight contact with the mesh. In this case, turn the meat grinder on its side and you will notice that some part is loose. With the help of a properly selected washer, you can easily seal the structure. Place it between the knife and the auger.
- It's the meat itself, not the machine. If the product contains too many veins, veins, and cartilage, this complicates the whole process. They do not twist, but only wind around the spiral, thereby clogging the passage. If you have this type of meat, you will need to stop and clean the grinder often.
ADVICE!
To make your task easier, use underfed defrosted meat, then the pieces will be a little tougher and it will be easier to grind them.
A manual meat grinder is a necessary tool in the kitchen, because, unlike an electric one, it will never stop working due to power outages
Most modern hand-held devices are made of high-quality and reliable material to last for centuries. There are also modern meat grinders made of durable plastic. Such a meat grinder, of course, is easier to break than a cast iron one. Therefore, you should handle it more carefully.
Manual cast iron meat grinder
A cast iron meat grinder is a faithful assistant in the kitchen. It will serve for a very long time. And to break it, you need to try very hard. This is her advantage. The disadvantage of a cast iron meat grinder is that it is very heavy compared to other devices.
The cast iron meat grinder is very heavy, but it works flawlessly
Meat grinders made of aluminum alloys and plastic models
A meat grinder made of aluminum alloys is much lighter than a cast iron one. And during operation it will serve faithfully for a very long time. There is only one drawback of such a device - sometimes your hands get very tired from grinding large amounts of meat or other products.
Plastic models of meat grinders are made from high-quality and very durable materials. But, nevertheless, this model is not as durable as a cast iron meat grinder, and its parts can quickly fail. Therefore, it is important to use the meat grinder carefully.
Operating principle of a manual meat grinder
A manual meat grinder, from a design point of view, is a fairly simple device. Its operation is based on two things - a manual drive and mechanical pressure created by the screw. The grinding process looks like this:
- meat, fish or any other product is placed in the receiver and falls onto the screw shaft;
- then the product is pressed against the grid and cut off with a special four-blade knife, which slides along the surface of this grid;
- the products are crushed continuously: the meat is placed in the receiver and then comes out through the grate.
The principle of operation is simple: add food and get minced meat. Simply and easily!
Tools
If it was not possible to spin the meat grinder using boiling water and soda, you will need male strength and the use of a tool. To unscrew the washer, a clamp, an adjustable wrench, and a hand vice are used. If attempts are unsuccessful, they resort to the risky method of “tapping” the puck with a hammer and chisel. Carry out the work very carefully - there is a high risk of damaging the thread.
The best option is a wooden (not metal) meat mallet, which you can use to tap the auger from the back after removing the entire attachment.
What does a meat grinder consist of and what is the purpose of the parts?
What does a classic hand-held device consist of:
- Building: A. Meat receiving area; B. Fastening clamp;
- Lever;
- Auger with left-hand thread;
- Bearing bushing;
- Cutting knife with 4 blades;
- Lattice;
- Union nut;
- Eye bolt for attaching the handle
Meat grinder disassembled
The device can also be supplied with additional grates with different hole diameters, knives, attachments for making sausages, frankfurters and freshly squeezed juice.
IMPORTANT
!
The attachments must be sharpened regularly and should not be used for cutting too hard or stringy semi-finished meat products.
The screw shaft is an important and basic part. It has the appearance of a spiral, which during operation grinds excess meat, moving it towards the nozzles with knives. It is this mechanism that requires the use of durable metal.
Screw shaft - conductor of products inside the device
Knife and special cutting attachments. They do all the work of grinding, cutting and crushing meat or any other products. It is made mainly from stainless materials. It is necessary to sharpen knives for better and high-quality work, even though the steel is sharpened on the grate during rotation.
The knife must be installed correctly, otherwise the device may jam
IMPORTANT
!
The structure of the knife and its shape affect the grinding of the product. For example, if a knife has a curved blade, it means that it will easily chop the veins and fibers of meat, while preventing the auger shaft from clogging.
The grid has three types of hole diameters:
- Very large - 12 mm
. Grille with three or four holes. Used for stuffing sausages. Not always included. - Large holes - 8 mm
. This rack is ideal for preparing sausage mince. - Middle holes - 4-4.5 mm
. Universal grid. Suitable for preparing minced meat for cutlets. Included. - Small holes - 3 mm
. Pate lattice. It is ideal for making pate or puree.
Using these grates you can get coarse or finely ground minced meat. It all depends on your preferences
The nut (fixing ring) clamps and secures the grid, knife and auger shaft. Sometimes it can be difficult to unscrew it after finishing work. But this problem can easily be solved with the help of ordinary cloth thrown over the nut. So, the hand does not slip, and the part can be easily unscrewed.
A manual cast iron or aluminum meat grinder, especially from Soviet times, is attached to the work surface using a threaded device (foot). And therefore, in order to prevent the device from moving on the table, you need to place something under the metal base. This can be a newspaper folded several times. In modern models, the mounting base is plastic or rubber, and therefore the device is attached to the table much more securely.
How to properly assemble a manual meat grinder step by step with photos of the process
So, how to properly assemble a manual mechanical device? The easiest way is to follow the assembly procedure according to the product's operating instructions. But if the instruction is lost then follow the step by step assembly method. So here we go.
The first stage is to prepare all the elements and carefully lay them out in front of you
Installation of auger shaft
| Illustration | Description of action |
| For models with a collapsible body, it is necessary to install a meat feeding cylinder. | |
| Next, we insert the screw shaft into the housing so that the wide part of the shaft is at the place where the handle is attached. That is, in the narrowest hole of the meat grinder. The thin side of the auger should end up in a wide and round hole. The knife will also be attached there. |
How to properly insert a knife into a meat grinder
There are two types of knives: with a single-sided and double-sided cutting part.
| Illustration | Description of action |
| Once the auger is installed, take the single-edge blade and install it onto the auger shaft. ATTENTION! The flat part of the blade should face the grate and slide along it. But not the other way around. |
IMPORTANT
!
It happens that the knife is installed incorrectly. And then such a meat grinder is of little use. The meat is not ground, but only choked. And in this case, the device may simply jam.
A knife with a double-sided cutting part can be placed on either side. There is no difference. You can see how to properly install a knife in a meat grinder, and what they are like, in this video.
Installing the grille and screwing the handle
| Illustration | Description of action |
| After the knife is in place, you need to install the grill correctly. It's easier than a knife. The main thing is to install it so that the recess on the grill coincides with the protrusion on the body of the kitchen assistant. | |
| Then simply secure the entire structure with a locking nut, also called a union nut, on the body of the meat grinder. | |
| Next, we secure the meat receiver. |
Now all that remains is to screw the handle from the back using a screw. All. The meat grinder is assembled. You just need to install it on the work surface, and you can start working.
Installing the meat grinder on a work surface
The meat grinder should be as stable as possible, otherwise you will have to make efforts to hold the unit in place while working on it
It is easy to screw the meat grinder to the work surface. You need to attach the device to the table using a “claw”. And to firmly fix the kitchen unit, you can put newspaper or soft cloth between the table top and the “foot”. Thick rubber is even better suited for this role.
How to properly assemble a manual meat grinder if you need to install an attachment
Most meat grinders are equipped with various attachments and grates for making sausages, sausages, juice and many other delicacies. But not everyone knows how to correctly insert an attachment, knife or grid into a meat grinder. After all, the procedure for assembling a meat grinder with an attachment is slightly different:
- Insert the screw shaft into the main body
. The wide part of the shaft is placed in the place where the handle is attached. The thin one should be in the place where the grille is attached; - then install the grate
. It can have very large or medium holes. It all depends on the recipe and your preferences; - then install the nozzle
. Just make sure that there are no chips or roughness on it. Otherwise, you risk tearing the intestine, which is put on the nozzle when making sausages and kebbe; - secure the structure with a clamping nut
, and now all that remains is to screw the handle. That's all. Nothing complicated. Is not it?
ATTENTION!
When making sausages and kebbe, no knife is used. And all because ready-made minced meat is put into a meat grinder with such attachments;
Rules for caring for a manual meat grinder
After grinding the meat, it is very important to wash the grinder immediately. Some housewives advise passing a piece of cracker through a meat grinder, they say, it cleans out all the remaining meat, and you don’t have to wash it anymore. But no, pieces of meat may remain, and then a very unpleasant rotten smell will appear in the kitchen. It will not be difficult to get rid of it, but it will be very unpleasant. Therefore, after work you need to immediately rinse the unit. First you need to disassemble it:
- unscrew the handle;
- then unscrew the fixing nut. If your hand slips and you can’t unscrew it, use a cloth. Just throw it on the nut, and then everything will work out;
- remove the grill and knife;
- remove the screw shaft.
After this, clean the parts from pieces of meat and wash them under running water with any dishwashing detergent. Then place the parts on a dry and clean towel and dry well. It is best to store the meat grinder directly disassembled.
So, definitely nothing will rust from water accidentally getting inside. Collect only before work. So, as you can see, the process of assembling the kitchen helper is very simple. The main thing is to pay attention to how you install the main elements. Good luck to you!
A meat grinder is considered one of the most popular kitchen appliances; all modern food processors and blenders have not been able to supplant it from the kitchen. With the help of a meat grinder you can make not only minced meat and pates, it is used for making homemade sausages and sausages, squeezing juice, preparing vegetable puree, original cookies and pasta. All this will be available to any housewife, but to do this you need to know how to properly assemble a meat grinder so as not to call your husband into the kitchen when you urgently need to grind meat or squeeze out juice.
Mechanical meat grinder
Electric meat grinder
Before assembling a meat grinder, you need to study its design. Since the times of the USSR, we were well aware of the old, but very reliable Soviet design - a manual version that still helps users in the kitchen today. Then its analogues began to appear, but only with an electric drive, but the main details remained the same.
- The one-piece body was made of cast iron, then they switched to various alloys based on light and durable aluminum. In the upper part of it there is the neck of the meat receiver
, where processed products are placed. - An auger
is a specially shaped shaft that, when rotated, propels products toward the exit of the product. - At its end, a knife
, which performs the grinding - it can be disk or with wings. - The grid
regulates the degree of grinding of products; instead, shaped devices are inserted into the meat grinder when working with dough. - A round-shaped clamping device
, which is used to securely fix all elements in the body. There are special protrusions on it for easy fastening. - A handle is attached to the rear of the shaft with a special wing screw to rotate
the entire mechanism.
In electric meat grinders, the set of main parts is identical, they must be assembled in exactly the same way, the only difference is in the drive and the housing, which is made of hard plastic. Such a device is controlled using keys located on a special panel, and rotation is carried out by an electric motor.
Important! The manual version of the product is installed on the edge of the table and secured using a special threaded device. Material must be placed under the metal base to prevent the product from moving on the table.
Step-by-step assembly algorithm
How to assemble a mechanical meat grinder? To do everything correctly, you need to follow the operating instructions that come with each product. If it is missing, then we will tell you a step-by-step assembly method.
Manual meat grinder
We described in detail how to correctly assemble a manual meat grinder yourself; the main task is to correctly install the knife and grid, otherwise the product will not work. How to properly position the product for work is shown in the photo below.
Electric meat grinder
We figured out how to assemble a manual meat grinder, now it remains to find out the nuances and differences in assembling its electric counterpart, which is much more complicated in operating principle, but the process of assembling the main body is identical.
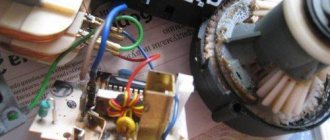
To assemble an electric meat grinder, for example, the most popular and widespread brand Mulinex, you need to take into account some of its features.
- Installation of the product should be carried out using a similar method as was done when assembling a manual meat grinder. Then the housing with all the main parts must be connected to the electrical part. To do this, insert the hexagon of the auger
into the special hole and turn it counterclockwise until it clicks. - Then we install a special bowl or tray for loading products
into the socket located on top - the meat grinder is ready for use.
When assembling different models, there may be minor differences; to find out, you need to check the instructions. For clarity, there is a video that shows the whole process step by step and clearly:
For preparing homemade sausage or frankfurters, there are special conical attachments.
, and instead of the grate and knife, you need to insert a special washer (see photo). All parts are assembled in the same way: the nozzle has a groove identical to the grille, then everything is secured with a clamping device. The conical part can be made of the same alloy as all internal parts. If it is made of plastic, it is secured with a nut made of a homogeneous material.
It is worth remembering that sausages, wieners and other similar products require a special casing, which is made from the intestines of large animals; without it they cannot be cooked.
Sausage attachments
Features of assembling an electric meat grinder
When assembling an electric meat grinder, it is important to tightly attach the shaft to the groove in the body
The electric meat grinder has an important advantage - a durable, stable body that does not need to be attached to the countertop. It stands firmly on the surface and does not slip thanks to rubber feet.
To assemble the electrical appliance, you must perform the following steps:
- 1. Insert the screw shaft into the housing, put on the knife and the grid on top so that the flat side of the knife rests against the grid.
- 2. Secure with a clamping nut.
- 3. Attach the finished structure to the body of the meat grinder. To do this, you need to insert the protruding end of the auger into the metal groove and turn it counterclockwise. When installed correctly, a click will be heard.
- 4. Insert a food bowl into the meat receiver.
- 5. Connect the device to the network.
Now you can begin the process of preparing minced meat. When using the electrical appliance, you should not load a lot of meat at once and try to push it into the meat receiver using a plastic pusher. This can lead to damage to the device, since the knife will not have time to chop the food.
After cooking, the device must be disassembled, washed and placed in a box or drawer until next use. All parts must be clean and dry. This will avoid corrosion and extend the life of the device.
It is strictly forbidden to wash an electric meat grinder without disassembling the housing together, since water entering the internal parts will lead to failure of the device. Only removable metal parts can be washed under running water. If necessary, the plastic case should be wiped with a damp, clean cloth.
If you are sure that all the parts are attached correctly, but the products are still not crushed, then it makes sense to check the quality of sharpening of the knives.
A meat grinder is simply an indispensable device for grinding different types of meat. If previously most housewives used manual machines, now more and more users prefer electric devices. This is not surprising, because an electric meat grinder grinds meat of any quality in a matter of minutes, saving the housewife time and effort.
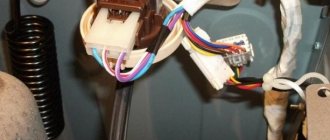
Unfortunately, all electrical appliances tend to break down, and repairing them is somewhat more difficult than manual ones. This article will tell you how to repair a meat grinder at home, and what you can do with your own hands.
Proper care
Having figured out how to assemble an electric meat grinder, now you need to figure out the correct dismantling process
, because all the insides of the mechanical unit must be cleaned of residues after grinding. Disassembling the product is carried out in the reverse order:
- first remove the bowl, then press the rotation lock button at the top of the main body and disconnect the mechanical part;
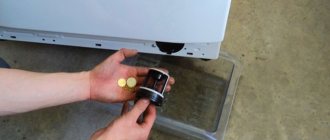
- Now you can unscrew the clamping nut so that it does not slip in your hand (use a clean rag);
- then the internal parts are removed and cleaned of any remaining crushed products;
- Now you can wash all parts with warm water and detergent;
- After rinsing, the parts are placed on a towel until completely dry.
Disassembling a manual analogue is practically no different from the process of dismantling the mechanical part of an electrical product described above. Many people, after the parts have dried, store the device assembled until future use. Experts advise storing all parts in an unassembled state, and during assembly, lubricate the auger with vegetable oil before use. Such care, as a rule, extends the life of the product.
In order for the meat grinder to function fully, you need to be able to assemble it correctly. If the meat is not chopped and the device “chews” the food, this indicates that some parts are not attached as they should. If such a problem occurs, it is recommended that you familiarize yourself with the internal design of the device and read the detailed instructions that will help you understand how to properly assemble the meat grinder.
Assembly and operation of an electric meat grinder
If the user has encountered assembling a manual model, he can easily figure out an electric household appliance.
How to properly assemble an electric meat grinder
The assembly diagram of the meat grinder is as follows:
- We connect the plastic gearbox to the metal rim of the auger; the grooves of the parts must align. Turn the gearbox counterclockwise until a characteristic click appears. If the parts are connected incorrectly, the engine will not be able to turn the auger.
- The inside of the auger must exactly match the outline of the hole on the body.
- We put a sharp knife on the output part of the auger and install a grate. The holes and protrusions must match. When carrying out such work, it is necessary to position the knife correctly.
- We tighten the clamping nut and install the loading hopper in the upper part of the device body.
Now that we know how to assemble an electric meat grinder, let’s get acquainted with other nuances of this process.
How to properly insert a knife into an electric meat grinder
When installing the part, the cutting part of the knife should be in contact with the grid, which will facilitate thorough chopping of the supplied products. After installing the knife, secure the grill, fixing it in a special groove, then tighten the nut. If the cutting element is installed incorrectly, the meat will clog and remain inside the device.
How to use an electric meat grinder
At the initial stage of work, we cut the processed products into small pieces; they should fit into the opening of the receiving hopper. We plug the device into the outlet, press the start button and begin to push the product using a pusher to the auger. Once on the shaft, the raw material will move and end up on the knife. Here the product is crushed and goes out into the receiving bowl.
When the engine is running, the recycling process occurs continuously. If the auger becomes clogged, the user only needs to turn on the reverse and remove the remaining product. Later they can also be used along with a new portion of meat.
There are several simple rules for using an electric meat grinder. Do not throw bones into the loading hopper together with meat. Before serving, any product is cut into small pieces. After carrying out the work, it is necessary to disassemble the household appliance, thoroughly wash and dry all parts.
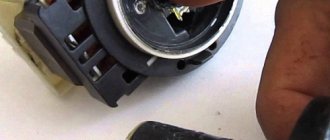
How to disassemble an electric meat grinder
Previously, we learned how to assemble an electric meat grinder - this is a simple job that every user can do. Disassembling the household appliance occurs in the reverse order. First you need to unscrew the clamping nut, remove the metal grid and the knife. Then turn and pull out the auger along with the gearbox. At the final stage of work, remove the loading container. All removable parts must be cleaned of residues and rinsed in water, then wiped with a soft damp cloth.
Manual models of meat grinders have a similar design and operating principle. Electrical household appliances differ in power and functionality. Such devices will last a long time if used correctly. During such operations, you need to pay attention to the position of the knife - the cutting part should be in contact with the surface of the grate.
My dear readers!
I always read your comments on my articles with great interest. If you have any questions, do not hesitate to ask them, please leave your feedback in the form below. Your opinion is very important to me. Thanks to your criticism and gratitude, I can make this blog more useful and interesting.
I would be very grateful if you rate this publication and share it with your friends. This is easy to do by clicking on the social media buttons above. Don’t forget to bookmark the article you like and subscribe to new blog posts on social networks.
The meat grinder is jammed, but physical effort is not enough to disassemble the device? The means at hand that can be found in every home will help. Start with boiling water, immersing the entire structure in a container for half an hour. To soften food residues, add baking soda or detergent. Unscrew the washer using a clamp, hand vice, hammer, or adjustable wrench. WD-40 also activates the jammed device.
There are a lot of reasons why the meat grinder mechanism can jam. These include a long stay in assembled form, rusty, unlubricated parts, improper assembly or violation of operating rules. But, no matter what the provoking factor is, it is necessary to solve the problem. A proven algorithm of actions will help you unscrew a jammed device yourself.
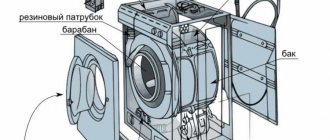
Main details and principle of operation of the device
The main difference in the design of a manual and electric meat grinder is that the first type has a handle that drives the entire mechanism. In the second case, it is replaced by an internal motor and a button on the top side of the case. After pressing it, the device independently twists the minced meat, which greatly simplifies the work.
Manual meat grinder device
The meat grinder consists of 6 main parts. To understand the principle of assembly of the device, you need to familiarize yourself with the functions of each of the elements. These include:
- 1. The body is made of durable metal alloy. It is in it that the products are crushed. In electrical appliances it is usually made of plastic. There is a motor inside.
- 2. The meat receiver in manual meat grinders is connected directly to the body. In some electric models (for example, Polaris) it is removable.
- 3. Screw shaft - a spiral-shaped part that moves the crushed products to the grid.
- 4. Knives in classic meat grinders are disc or with wings for different types of grinding. Complete with electrical appliances, other types are also available for finer cutting. Knives for manual meat grinders are not suitable for electric ones, since they do not have the same dimensions of the internal holes. This means that you will not be able to attach the wrong blade to the auger.
- 5. The grid is an element that affects the degree of grinding of products. The more holes there are, the larger the minced meat is, and vice versa.
- 6. Clamp nut. Allows you to firmly fix all internal elements, covering the entire circumference of the mesh. To fix it, you need to tighten the thread tightly so that the nut becomes motionless. Otherwise, the minced meat along with the screw, grid and knife will end up in the plate.
Elements numbered 7 and 8 are found only in manual meat grinders. The handle allows you to start the mechanism, and the fastening screw allows you to press it to the body so that it does not fall out.
VD-40
Your strength is running out, but the mechanism still won’t give in? Spray the grille and threads with an all-purpose spray. WD-40 restores surfaces, cleaning them from dirt, rust, and corrosion. The aerosol activates stuck zippers on boots, jackets and bags, so this product is also suitable for treating augers.
After applying WD-40, wait 15–30 minutes. If you managed to unwind the device, degrease, wash and dry each part. If there is corrosion or rust on parts of the device, remove them.
Proper assembly will prevent further problems
These methods are enough to spin the meat grinder and put it into operation. If the mechanism remains in its original position, contact your home appliance service center. It may be necessary to repair/replace appliance elements or sharpen knives.
The process of assembling and disassembling a manual meat grinder
The principle of assembling and disassembling an electric and manual device is similar. There is a slight difference in the method of fixing the structure: manual models are equipped with a foot at the base of the body, which allows you to attach the device to the table. To prevent the meat grinder from sliding on the countertop, it is recommended to place a dry cloth.
Assembly
The further operation of the meat grinder depends on the correct installation of the knife.
Before assembly, you need to make sure that all necessary parts are clean and dry. This will avoid device malfunctions.
Algorithm of actions:
- 1. Insert the screw shaft horizontally into the housing with the narrow part facing outwards and the wide part towards the side where the handle will be fixed.
- 2. Place the handle on the thickened auger rod and fasten it with the fastening screw.
- 3. Attach the knife to the auger on the other side so that the blade faces outward and the convex side is turned inward. This is an important point, because if you mix up the sides of the knife, the food will not be chopped.
- 4. Place the rack on top of the knife. There is a small notch on the part that should align with the protrusion on the body. If the structure is assembled correctly, the grille will not protrude much outward. Otherwise, the clamping nut will not be able to secure the entire structure.
- 5. Screw the clamping nut clockwise, tightening the thread tightly. It should not dangle, otherwise during work it may fall along with the mesh, knife and minced meat.
- 6. Fix the meat grinder on the countertop by tightening the claw tightly.
After such manipulations, you can check the correct operation by turning the knob several times. If it jams and the shaft does not rotate or moves with difficulty, it is recommended to reassemble it. Ideally, the handle should rotate easily, as should the auger.
If you want to use the attachment for making homemade sausages, you need to remove the grill with a knife, install the attachment and secure it with a clamping nut on top. It is necessary to load the finished minced meat into the meat receiver, since in such an assembly the device will not be able to grind the meat.
Disassembly
To extend the life of the meat grinder, it must be washed after each use. It is impossible to clean all the parts in the assembled state, so the structure must be disassembled.
The operating principle is simple:
- Remove the device from the tabletop by unscrewing the tab.
- Unscrew the fastening screw and disconnect the handle.
- Unscrew the clamping nut counterclockwise. For convenience, you can hold the part with a rag so that your hands do not slip.
- Take out the knife, grid and auger.
All parts must be treated with dishwashing detergent using a sponge. You can clean the grill using a toothpick, pushing out any remaining food from the holes. Then carefully place the parts on a dry kitchen towel or paper towel. The meat grinder must be stored disassembled.
To avoid corrosion, all parts must be wiped dry before putting the device into the box. Otherwise, the metal will oxidize and rust will appear on it.
Mechanical method
If the meat grinder is stuck, unscrew the fixing screw on the side (it is not always found in self-locking heads). Insert any wooden object into the meat feed spout that can be used as a lever (the handle of a rolling pin will do) to multiply the physical effort applied. Holding the body with one hand, use the other to turn the working area of the meat grinder (this is the entire duralumin body) against the rotation of the rotor (usually the clamping ratchet is made in the direction of rotation to increase the clamping force). The direction of the latter is indicated by an arrow. In any case, turn clockwise (when viewed from the side where the ground meat is fed) - you definitely can’t go wrong.
Helpful information! How to sharpen your own meat grinder knives