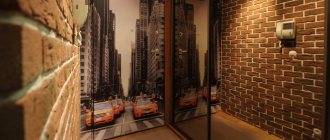
Gypsum tiles for brick interior decoration: advantages and disadvantages
Gypsum is a lightweight material that, if necessary, takes on the required shape, structure, and relief. The use of this material in decorating the interior space of a room is a simple, financially feasible and physically feasible task.
Advantages of gypsum stone finishing inside a building:
- A wide range of products differing in texture, price, size and appearance.
- Relatively low pricing policy.
- Natural compositions.
- The ability to customize finished tiles to suit the surface features.
- Simple design, wall mounting.
- Light weight of the finished product, which allows it to be used on any surface without the risk of wall deformation.
Disadvantages include such features as moisture absorption, lack of resistance to mechanical damage and crumbling. However, such disadvantages are insignificant, and during operation the material will not require labor-intensive care. If necessary, you can replace damaged burst tiles with new ones without compromising the integrity of the wall.
How to properly lay gypsum artificial stone under a brick
Installing gypsum tiles on the wall is not a labor-intensive process that will only require time and patience. The main thing is to follow the recommendations for decorating a wall or part of it.
Leveling the base
The first thing you should pay attention to before laying a gypsum wall is the evenness of the surface. Of course, you can also lay it on uneven walls, filling the holes with an adhesive mixture, but in this case, the consumption of expensive glue increases, and it is also possible for the tile itself to crumble, which bursts when pressed.
Therefore, before laying gypsum bricks, it is worth leveling the wall with putty. After applying the putty and letting it dry, you should sand the surface and apply a primer for better adhesion. After all the work, you can start gluing the gypsum tiles.
What to glue on: choosing an adhesive mixture, what to glue with
Depending on the area to be treated, the size and color of the gypsum tiles, it is worth choosing a separate version of the adhesive mixture on which the tiles are attached to the base. Today there are several options for fixing gypsum on walls:
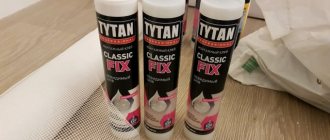
- Dry semi based on gypsum and cement. If you choose dry mixtures for preparing a solution for gluing yourself, then you should pay attention to the composition of the material: cement is not recommended for use on light-colored tiles without varnish treatment for the reason that they will absorb moisture, take longer to dry, and possibly become deformed during work . The gypsum base is safer to use, but will require certain skills on the part of the worker. If the technology is not followed, the tiles will absorb water, becoming soggy over time. Popular manufacturers of dry mixes for gypsum tiles are Perlfix, Litokol K, Satyn PKG-28.
- Liquid nails or sealant. It is possible to glue gypsum tiles to sealant or universal glue such as “Dragon”, but the process is unreasonably labor-intensive. In addition to the fact that each tile needs to be sanded to form uneven surfaces for better adhesion to the wall, it also needs to be held for at least 2-3 minutes, which unnecessarily increases the duration of installation of the entire wall.
- Ready-made gypsum-based mixtures are the best option out of all existing ones. This glue has the outward consistency of very thick white sour cream, is applied with a special small spatula, adheres to any surface in a few seconds, and dries for up to 24 hours. In terms of price, such mixtures are more expensive than all previously mentioned ones, but the advantages of working with them are much greater:
- quick adhesion to the surface;
- no need to hold one tile for more than 3 seconds;
- the seams of light-colored tiles can be sealed without using special grout;
- powerful adhesion after complete drying;
- there is time to correct already attached bricks: if within 10-20 minutes after gluing it is necessary to correct a set brick, then this can be done without effort.
Can it be combined with wallpaper?
The advantages of finishing with gypsum bricks are not only the attractive appearance of the room, but also the ability to combine materials for wall decoration. The tile, chosen for combination with wallpaper, emphasizes and shades the walls, complements the room with accents, and, at the same time, is a self-sufficient material that looks on any surface.
How to lay decorative bricks on a flat wall
A smooth, ideal wall is the best surface for decorating with artificial plaster stone. The tiles, having an average size of no more than a standard brick, when laid out on the wall, create a holistic image, a single canvas without seams or gaps.
To glue decorative bricks to the wall, you need to:
- Rub the inner smooth surface of the tile with sandpaper to remove irregularities and protrusions from the hardened plaster. A peculiar relief surface is formed, which is better attached to the wall, holding the glue.
- Apply a thin layer of glue with a special spatula (which usually comes with the finished mixture inside the jar). The layer of adhesive solution on the tile should not exceed 0.2 mm, otherwise it will take a long time to harden.
- Place the tile against the wall, pressing it slightly with your hands for adhesion, hold for 3-5 seconds and release.
- Spread the side seam of the tile on the wall for adhesion to the subsequent brick.
Thus, make the design of a brick wall from gypsum in the quantity in which it is necessary. Bricks can be cut, combined, matched and broken to create an uneven edge on the wall.
Installation of stone: sealing joints
After the wall is completely decorated and frozen, you can begin decorative work to give integrity to the canvas. To prevent gaps between the bricks from being visible from different angles, it is worth using grout for the seams. There is a huge amount of colored grout in the store, but if there is any glue left that was used for installation, you can use it. To prevent the adhesive solution from standing out and hardening into white spots, you can add the color of the required shade to it. In this case, it is worth remembering that the color when drying will be several tones lighter than that of the wet mixture.
It is recommended to seal seams with your fingers without using a spatula. To do this, apply a small amount of glue to the seam, rub it, and wipe off the remaining residue with a cloth. Do all the grouting in this way.
Gypsum tiles - laying rules
Preparing the walls
As in any case, it is very important to prepare the base for decorative gypsum tiles. This mainly involves removing old paint, deep cracks, peeling plaster or any finishing layers that may be peeling off the wall. The cleaned wall must be leveled and primed to ensure maximum adhesion to the tiles.
As with other tiles, gypsum tiles begin by laying from the corners. This is the easiest way to avoid joints in more open areas. And if the last tile extends beyond the edge of the wall and needs to be cut, this is done... with a regular wood saw. It’s worth remembering to buy a good saw blade, because a bad one simply won’t cope with hard plaster.
Processing gypsum tiles
There are sometimes sagging gypsum coatings on the back of each tile. This is not a disadvantage, but tiles cannot be laid this way. They need to be cleaned, for which they use a spatula or a metal brush. Due to the large mass of gypsum tiles, they must be laid from the bottom. This way, the pre-laid layers will take some of the weight of the higher rows and they can all be held together perfectly.
Recommendations!
To avoid the effect of a repeating pattern, in the vast majority of cases, gypsum tiles are laid with an offset of 1/3.
Gypsum tiles are only available in one color: they are all white. Luckily, they can be freely dyed. In many cases, it is recommended to do this only after the glue has completely cured. This takes about two weeks. Theoretically, you can paint earlier, but you should wait.
The finished wall, finished with tiles, will still have to be treated with an impregnating agent. Again, theoretically this is not necessary, but plaster is quite an absorbent substance and skipping this step may result in slight staining of the tile. As for the construction chemicals needed to lay gypsum tiles, you will need three products: primer, adhesive and grout.
1. The primer is always selected according to the base
At least in theory, it will never come into direct contact with the decorative gypsum board, and its dual purposes are to increase the cohesion of the substrate and increase adhesion. Even on walls that are in good condition, it is worth using stronger primers designed for damaged surfaces. This will not cause any damage, and given the significant weight of the gypsum stone, it may prevent the panels from tearing off the wall
2. Gypsum tiles - which adhesive is best?
Again: adhesive strength is the main criterion. It is good to attach heavy slabs using elastic, strong adhesive. Thin-layer gypsum adhesives are also used. They are applied to the back side of the tile in a very thin layer (no more than 3 mm) and distributed evenly, gently pressing the plate to the base
No grout needed
You can buy tiles without grout (sometimes criticized for their aesthetics, but they still have their charm), with cast grout (however there may be a minimal gap between them) or with grout. In the latter case, special spacer crosses for gypsum tiles are purchased. Usually there is no need to use them, but it is worth remembering that the thickness of the grout should be small.
If desired, impregnation for gypsum decor can also be useful - these are special preparations that reduce absorbency and make it easier to keep it clean. In most cases, impregnation will be recommended if the gypsum brick or imitation stone is not going to be painted, although the use of impregnation is still not technically required.
How to glue gypsum stone: ideas for the interior
Interior design in an apartment using plaster walls allows you to decorate a room without using unnecessary furniture. At the same time, they began to increasingly use stone finishing instead of the previously familiar walls and wardrobes.
How to lay it in the hall
If the room is not spacious enough, then you should not clutter it with unnecessary furniture. In the living room it is enough to place a large corner sofa, a coffee table, and decorate one wall with brick in warm sandy shades.
It looks interesting to decorate with plaster stones on one wall with design elements for the side corners of the hall. You can also decorate the side corners near the entrance by decorating the entrance to the hall with conventional stone columns.
Ideas on how to glue stone in the hallway and living room
Decoration with artificial stones is possible not only in the hall, but also in the corridor and living room. You can use individual design elements as several bricks along the edge of the wall at the entrance, and also decorate a small amount above the door. The stonework looks interesting in the form of baseboards near the floor.
How to care for stone
Caring for gypsum stone will not require much effort on the part of the housewife. All that is required is to periodically wipe off the dust from the varnish base. It is worth noting that if bricks with an aging effect were used in the interior, then the dust on them is not visible as on dark varnished bricks. The varnish, in turn, protects the plaster from moisture.
Gypsum bricks for decorating a room are the best budget solution. With the help of such inexpensive materials, you can create a cozy interior in any corner of the house, and all that is required to design an interior solution is imagination, time and compliance with installation technology.
Material advantages
Decorative gypsum brick is practically no different from natural stone. In its production, only environmentally friendly materials are used: sand, cement, water, gypsum. Therefore, this material does not emit harmful toxins and does not cause allergic reactions in consumers.
Its advantages include:
- light weight. This makes it possible to use it even on fragile interior partitions;
- simple processing. If necessary, decorative stone can be easily sawed with hand or electric tools;
- resistance to negative factors. It is resistant to direct sunlight, high humidity, and sudden temperature changes;
- ease of care. It is easy to clean with various means, dust and dirt do not settle on its surface;
- high sound insulation qualities;
- long service life;
- bending and compressive strength;
- pleasant texture that is soft to the touch;
- wide color palette.
Using decorative gypsum bricks, you can decorate a room in any style. The positive qualities of decorative stone include its appearance.
Tools and accessories for installation
Having decided to use gypsum bricks in the interior of your home, you need to prepare the following tools and materials:
- plastic container;
- pallet;
- hacksaw or grinder;
- plain and notched spatula;
- building level;
- roulette;
- paint brushes;
- file;
- pencil;
- primer;
- electric drill.
Now you can proceed directly to preparing the surfaces to be treated.
Preparing walls and laying gypsum bricks
Preparation of the working surface is one of the most important stages of work.
- The treated surfaces are inspected for the presence of: stains, dust, old finishes, moisture, fungus.
- Next you need to get rid of all large irregularities using putty.
- The surfaces are coated with several layers of primer for better adhesion to the material.
- According to the instructions, the tiles are dipped into the primer solution for a certain time.
- A composition of tiles is laid out on the floor in advance. It is better to use bricks from different boxes, mixing them during installation.
- If necessary, we adjust the material to the required size, cutting off excess edges.
Before you begin laying decorative stone, you must carefully read the manufacturer's instructions. All work is divided into the following stages:
- Surfaces are prepared.
- The amount of material is calculated.
- The adhesive composition is selected.
- The material is prepared (sawed and adjusted to size). All cuts are cleaned with a file.
Decorative bricks must be laid only on clean and dry walls. Old finishes are removed and cracks are repaired.
Primer of walls
Before decorative treatment of walls, they must be primed. To do this, the base surface is cleaned of debris, dust and dirt. All cracks and defects are sealed with putty and cleaned. You can apply the material to surfaces using:
- paint brush;
- roller;
- spray bottle.
When working with primer, your hands should be protected with gloves. It is also recommended to wear safety glasses, a respirator or a medical mask.
When choosing a primer, you need to pay attention to the type of base. Walls can be made of various blocks, bricks, monoliths. On top they are treated with cement mortar or putty. For brick, monolithic or block walls, as well as for surfaces treated with putty, universal materials are suitable:
- acrylic;
- perchlorovinyl;
- based on minerals.
The advantages of mineral primers include:
- environmental friendliness;
- quick drying;
- ease of use.
Perchlorovinyl primers are suitable for working with concrete, plaster and metal. They fit well with tiles and gypsum materials. The material is applied to the surfaces to be treated in 2 layers. The drying period is from 15 minutes to an hour.
Acrylic-based primers are universal, suitable for treating surfaces of all types.
Before applying the mixture to the walls, the bottle with primer should be shaken well. Priming is carried out carefully and carefully. After applying the first layer, the material should dry. Then you can apply subsequent layers.
Choosing a mounting mixture
The construction market offers a wide selection of mounting mixtures for decorative bricks. This can be either ready-made glue or special dry mixtures:
- silicone glue;
- acrylic sealant;
- gypsum mixture with PVA;
- liquid Nails;
- cement dry mixtures;
- putty;
- mastic;
- polyurethane foam.
Experts in the construction industry recommend using special gypsum glue or putty for installing decorative stone.
When choosing a mounting mixture, you should consider the following factors:
- wall type;
- tile composition;
- type of masonry;
- scope of application.
If you choose glue, then it is applied to the base of the decorative tiles and to the wall. Thus, better adhesion to the surface is achieved. The gypsum brick is glued with glue within a few seconds.
To glue gypsum stone to brick, concrete or plaster, it is worth using special gypsum assembly adhesives. Their composition is dominated by alabaster and plasticizing additives.
When choosing an adhesive, pay attention to the ingredients from which it is made. It is better to choose mixtures that do not contain white quartz sand. Because it impairs adhesion.
Preparing the mixture
If you purchased a dry mix for styling, it must be prepared according to the manufacturer's instructions. Pour the mixture into a container with water and mix thoroughly with a construction mixer or drill with a special attachment.
The ratio of water and glue should be as specified by the manufacturer. If the proportions are not observed, the consumption of the mixture increases and the strength of the connection decreases.
It is necessary to stir the glue until it becomes homogeneous so that there are no lumps in it. The finished mixture should resemble a thick paste.
Installation technology
U
The laying of gypsum bricks is carried out according to the following scheme:
- Before laying gypsum bricks, preliminary markings are made on the walls. To do this, use a pencil, ruler and level. To lay the material on the walls evenly and neatly, horizontal lines are drawn.
- It is recommended to lay the cut material at the bottom of the walls.
- The installation process starts from the corner and gradually moves to the center of the room. Laying can begin either from the top of the wall or from the bottom. If the stone is laid from top to bottom, the material is less dirty with glue.
- After marking, the adhesive solution is applied to the walls and tiles using a notched trowel. Its layer should be no more than 4-7 mm.
- After this, the material is applied to the working surface and aligned with the markings.
- The brick is pressed to the surface, the remaining glue is wiped off.
- All cracks are sealed with the same adhesive.
The following tiles are covered with glue and attached closely or at a short distance from the rest.
According to the installation technology, gypsum bricks can be laid with or without gaps. If you decide to leave gaps, you will need to use special liners. They can be purchased at the store or made independently from scrap materials.
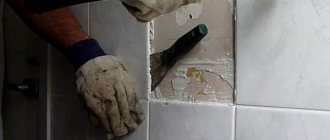
Sealing seams
Joining the joints gives the wall a finished appearance and protects the masonry from destruction. Since the grout prevents moisture from entering, leading to peeling of the tiles. To seal joints, you can use grout from different manufacturers. It can be colored or white. To seal the seams, it is recommended to use a special gun or you can use a plastic bag. The seams are filled with a thickness of 6-10 mm.
Which adhesive should I choose for gypsum tiles?
Almost every person faces the need to redecorate their home. At such moments, the main choice arises: entrust the work to professionals or do it yourself. For those who chose the second option, it will be very important to learn how to choose adhesive for gypsum tiles. You will also need information on how to prepare the surface and perform the installation itself.
Criterias of choice
Deciding on a product that will help securely attach the material to the surface should take into account a number of factors. It is possible that the surface to be treated and the tiles will need to be pre-primed with impregnation, for example, acrylic-based. A special mixture of PVA glue with gypsum, various polymer mixtures, foam and putties of various compositions may also be suitable.
To guarantee high adhesion strength of the tiles to the surface, you need to select an adhesive composition, taking into account the following points:
- what type of work needs to be done,
- type of surface being treated, including its degree of porosity,
- the composition of the tile itself,
- type of masonry required.
Specifications
In modern stores you can find cement mixtures or their analogues based on gypsum. Immediately before use, they need to be diluted, following the instructions on the package. Reactive mixtures generally do not need to be mixed.
The dry mixture is used on those surfaces that have a screed or mineral base. Reactive mixtures are simply irreplaceable if you need to get the job done as quickly as possible.
Dry mixtures for gluing
When choosing between a gypsum- and cement-based mixture, it is better to give preference to the first option. Tiles are a porous material that quickly absorbs any moisture; because of this, the cement mixture will take much longer to dry.
To work, pour warm water into a container and pour the selected dry composition into it. For better mixing, it is best to choose a construction mixer. The resulting mass hardens very quickly, so the gluing process must be carried out immediately.
If you need to glue the tiles onto a warm floor covering, additionally mix latex-based Latexcol.
Professionals recommend paying close attention to the following adhesive solutions:
- Plusfix. A powdery mixture based on construction cement and quartz sand. Also contains cellulose. Plusfix is used to glue small tiles (maximum dimensions - 25x25 centimeters). The basis for laying tiles with such adhesive can be surfaces made of cement, concrete and brick.
- Litokol K is very similar to Plusfix in its main characteristics.
- You can also buy Litokol X11. The mixture contains Portland cement, as well as sand in the form of granules. Suitable for gluing large tiles.
- Perlfix is a mixture made from gypsum and building polymer additives. Perlfix has a minimum consumption per 1 square meter. Also among the advantages can be noted its environmental friendliness.
- Satyn PKG-28 is a mixture based on gypsum and mineral fillers. The composition also includes additives, thanks to which the composition is very plastic and fits perfectly on any surface.
- The dry white composition, which has a gypsum base, is “Gipsolite”. It sets fairly quickly and has good grip. Excess can be easily and quickly removed - a rag moistened with plain water is suitable for this.
- the Monte Alba adhesive composition for interior work.
This adhesive is perfect for tiling with gypsum-based decorative tiles.
Liquid nails and dispersions
Such products are suitable for high-quality laying of tiles on drywall; they can also be used if the wall has been previously primed. Such compositions are quite expensive, but they can justifiably be called universal.
Today, ready-made formulations of such a brand as “LITOKOL” are in great demand.
The mixture must be used within eight hours of opening the package, as it hardens very quickly.
Among the varieties of the mixture are:
- LITOACRIL PLUS is a mixture in the form of a paste. Its base is acrylic. This composition is considered universal and has increased moisture resistance. Even if applied on a vertical surface, it will not drain. It dries quickly, which significantly speeds up gluing work.
- LITOFLOOR K66 is an adhesive that is used for both interior and exterior work. The composition is quite resistant to low temperatures and high humidity. Even if the surface has a lot of unevenness, LITOFLOOR K66 will be able to provide good grip.
- Casco EXTREMFIX can be purchased as a liquid emulsion. Hardens very quickly. The result is visible within two hours. Quite convenient if used in hard-to-reach places.
Reactive adhesive for gypsum tiles
Reactive agents are considered the most convenient to use - they have proven themselves excellent due to their versatility. They can be used on almost any type of tile. The surface for installation may also be different.
When working with gypsum material, it is advisable to use reactive adhesive. This glue has only two components: the main one - the adhesive base, and the additional one - the hardener.
It is advisable to work with it extremely quickly - the mixture hardens quickly. At the same time, it is characterized by excellent elasticity - even if the surface has a lot of unevenness, reactive adhesive can be used.
The most popular models of reactive glue are:
- A composition that has a high-quality epoxy-polyurethane base is “Lithoelastic” . With its help, you can glue tiles to various types of surfaces, for example, concrete (including natural stone) and cement; it is also convenient to work with it on plywood and drywall. There is no shrinkage after hardening. There are also no cracks. Suitable for vertical as well as horizontal surfaces. Resistant to sudden temperature changes. Has good adhesion to any surface. With its help you can carry out work even on the street.
- A universal remedy is Litokol Epoxystuk , but it is afraid of exposure to chemical compounds with a fairly aggressive effect. But this solution is characterized by exceptional heat resistance.
Advantages and disadvantages of decorative stone
The main advantage of the offered varieties of goods is their relatively low cost. Unlike natural brick and stone, imitation tiles do not require special equipment to manufacture; you can even cast them yourself at home. Environmentally friendly and inexpensive raw materials (gypsum and colors) make production inexpensive, and this affects the final price of the product.
Despite its cheapness, gypsum stone differs little in strength from other types of wall coverings and has the following advantages:
- ease;
- easy installation;
- the ability to absorb and release moisture, maintaining an optimal indoor microclimate;
- non-flammability;
- absence of volatile and harmful substances;
- color fastness and long service life.
During operation, gypsum materials can be damaged by strong mechanical stress (impact from a hard object). The advantages of using tiles include the ease of repairing the coating: just remove the damaged element and glue a whole one in its place.
There are practically no disadvantages to gypsum imitation of stone surfaces. Tiles are not recommended for finishing facades, but when carrying out interior work they compete with facing bricks and clinker, tiles or ceramic tiles.
Gluing instructions
Gluing artificial stone to the wall must comply with the requirements for the installation of coatings of this type. There should be no voids or uneven areas under the tiles, as the thin layer of gypsum above them will be especially vulnerable to impacts. The gluing technology is simple and does not require special skills.
Surface and Material Preparation
For work, you need to prepare all the necessary materials and tools to speed up the process of installing stone elements. Required:
- artificial stone made of gypsum (you should buy the entire amount of material needed for finishing at once);
- tile adhesive or special gypsum composition;
- primers;
- measuring instruments, building level;
- putty knife;
- hacksaw;
- metal brush;
- brush or roller;
- a narrow blade for filling the seam (6-8 mm).
Work begins with preparing the base: it needs to be leveled and rubbed, eliminating large differences in surface height. Small irregularities can be filled with glue during the installation of each element, so alignment is done on your own, without calling in professionals:
- Remove the old coating from concrete and plastered surfaces and eliminate potholes; after drying, treat the wall with a wire brush;
- stick a fiberglass reinforcing mesh onto a wooden wall;
- Apply the primer solution according to the manufacturer's instructions, maintaining the drying time of the composition.
What glue is used when working with decorative stone?
Depending on the material of the surface to be finished, different types of glue can be used:
- putty, tile or cement-sand mixtures - for brick, concrete, plastered walls;
- PVA, acrylic, Bustilat - for installation on drywall under putty;
- liquid nails, thick rubbed paint, sealants and mastics - for fastening to metal, plastic and similar partitions and architectural elements.
When choosing an adhesive, you need to pay attention to its suitability for use on existing surfaces. The manufacturer indicates this information on the packaging. Gypsum brick tile adhesive can also be used to fill joints.
How to glue a decorative stone with your own hands?
When choosing a method for interior decoration, take into account the need to leave a gap between the elements. There are:
- Installation without jointing. Used for finishing to resemble torn or chipped stone, trying to create a uniform surface without joints. The masonry elements are installed close to each other.
- Masonry with jointing. It is used to imitate a brick wall, flagstone or cobblestone paving, pebble mosaics, etc. A gap of 0.5-1 cm remains between the individual stones, which, after gluing the coating, must be filled with grout mixtures.
In addition to these differences, laying decorative stone from gypsum is carried out according to general principles:
- Open several packages of stone from the purchased batch. The material may differ slightly in shade, and mixing different elements will allow you to obtain a coating with a subtle color transition, like natural stone. It is advisable at this stage to lay out the outline that will be on the wall. This will help match the tiles to each other so that they best resemble staggered brickwork or the uneven texture of geological rock. You can cut off part of the slab with a hacksaw (with small teeth).
- Wipe the back side of each tile with a wire brush and coat it with the same primer used for the wall. Prepare the glue in advance if the manufacturer of the mixture recommends infusing it before use.
- Adhesive compositions are applied depending on their type. Putty or gypsum-based tile adhesive is spread over the back surface of the part with a notched trowel. Sealants and liquid nails are used according to the manufacturer's instructions: applied pointwise or in strips, waves, etc. Cement-based mixtures are applied to the wall in a layer of up to 6 mm (in separate sections of 1 sq. m).
- Glue the tiles using a pressing and rotating motion. If any composition other than cement is used, it is better to glue from the top corner, gradually lowering towards the floor. It is more convenient to attach tiles to a cement-sand mortar applied to the wall, starting from the bottom. If a seamless technique is used, the elements are rubbed close to each other. To imitate brickwork, you can use thin, even sticks, placing them in the joints. They will make the seam uniform.
- After finishing, the wall must be dried according to the instructions for the glue (usually about 24 hours). Then grouting compounds are applied to the masonry with jointing, filling the gaps between the tiles. A wooden spatula 6-8 mm wide will help to rub the compound into a narrow seam. For seamless masonry, grout is not used, since the space between the tiles is often filled with excess glue during installation. If they are squeezed out, the composition must be removed immediately, before it hardens.
After drying the walls in a room with high humidity (kitchen, bathroom), it is necessary to treat them with moisture-proof varnish. A shiny or matte finish is sometimes used to decorate a wall in a room with normal humidity.
How to paste on wallpaper?
A fashionable method of wall decoration, combining the use of wallpaper and fragments paved with gypsum tiles to look like stone, requires compliance with special rules. It is not recommended to glue tiles directly onto the wallpaper: the mass of parts can tear the panel from the wall.
To properly complete the finishing, glue decorative stone to the wall in combination with wallpaper as follows:
- level the wall and mark its parts where different materials will be mounted;
- stick the wallpaper in the traditional way, leaving bare areas intended for the stone;
- if the wallpaper is already pasted and does not need to be changed, remove part of this coating in the right places;
- when gluing or removing part of the wallpaper, the line of matching textures should extend 2-3 cm onto the pasted surface, then the junction of different parts will be invisible;
- You need to prime the wall and glue the decorative gypsum stone according to the principles described for installing such tiles, slightly placing the edges of the parts onto the wallpaper.
Wall cladding with gypsum tiles
After carefully completed preparatory work, markings and mixed glue, you can begin laying gypsum tiles on the wall. There are 2 methods here.
Wet method
- The diluted adhesive is applied with a notched trowel to the place where the tiles are glued.
Applying glue to the wall with a notched trowel - Using a regular spatula, apply the adhesive to the underside of the tile.
Apply glue to the tiles - The layers of glue should be thin. The tile is applied to the wall.
- After slightly pressing and leveling the tile, you should hold it for a while.
- Having retreated the gap, the second tile is glued. You should use not only the markings, but also the level.
- Installation of tiles begins from the lowest corner from the floor and moves horizontally.
- If you need to glue cut tiles, this must be done at the last moment. Thus, there will be savings in material.
- The tiles can be cut with a hacksaw or grinder.
Cutting gypsum tiles with a grinder - After laying several rows of tiles, you should take a break for 6–7 hours. The glue will set and give the desired shrinkage. In this case, there will be no load on the bottom row.
- After covering the entire wall and gluing all the pieces of tile, wait 24 hours for the glue to fully adhere to the surfaces.
After the glue has hardened, you can start working on the seams. Excess adhesive that appears during installation of tiles is immediately removed with a wet rag or sponge. Because if it gets on the front side, the glue dries out and spoils the appearance.
Dry method
With the dry method, the tiles should contain protrusions on the sides. How to lay gypsum tiles using the dry method:
- The tiles are laid from top to bottom horizontally.
- No need to thin the glue. Gypsum tiles are attached to the surface with self-tapping screws.
- The first vertical row is laid out.
- Without leaving a seam, the second vertical row is laid out.
- Self-tapping screws are fixed to the protruding part of the tile and the base.
We fix the tiles with self-tapping screws - The cut tiles are fixed with liquid nails and self-tapping screws.
After covering the surface, the tiles are processed. After tiling the wall, you need to do the grouting. There are two methods for doing this yourself:
- Glue solution. The joints are filled with this solution using a spatula. To avoid covering up the gypsum tiles, use masking tape.
- Grout. For it you need a bag with a cut corner or a construction syringe. Grout fills the gaps halfway.
- After the grout has dried, to prevent moisture from entering, the seam should be completely filled with a special paste.
- How to paint seams? If a different color than the paste is expected, then the seam is painted over using an art brush and acrylic paint.
Painting the seams of gypsum tiles
After the paint has dried, to prevent dust from falling on the tiles and not being affected by temperature changes, you need to cover the tiles with acrylic varnish. In some cases this is done twice.
Technology and nuances of laying decorative bricks on the wall
For several years now, decorative stone, namely brick, has been used in the interiors of apartments and country houses for wall cladding.
This material is sold at any hardware store. Customers have access to tiles of any color and size, which allows them to decorate the walls in the room. The main advantage is that the material can adhere to any wall made of any material, and the result will be similar to real brick.
The artificial material contains perlite, sand and expanded clay, although there are other types. Before you start decorating the walls in your house, you need to know what to glue gypsum bricks to and how to glue decorative bricks correctly.
Tips for installing gypsum tiles
When tiling a wall with gypsum tiles, you should:
- Make the wall flat.
- Gypsum tiles are purchased with a margin of 5%.
- You should definitely find out the details of what gypsum tiles are laid on.
- Tile adhesive is diluted to a very thick consistency.
- A metal saw is used to cut tiles.
- The seam width is selected individually. In the kitchen and bathroom, the seam should be up to 0.8 mm.
Features of the material
Decorative masonry material is in great demand, because it has many advantages over natural brick. Artificial bricks are created from different materials, which are presented in the table:
| Material: | Description: |
| Clinker: | The clinker material is durable and the surface is wear-resistant. Sold in different colors. Can be used as a finishing material for interior and exterior work. |
| Gypsum: | Gypsum bricks are fragile, but they are light in weight, which makes it possible to stick the material onto plasterboard sheets, plywood and other weak materials. The blanks are made white, but during production they are painted or the person himself will paint the brick in the desired color. |
| Polyurethane: | This brick is lightweight and is often used to decorate walls in a house or apartment. Often sold in white, but pigmented materials are also available. |
| Styrofoam: | Foam materials are intended only for cladding inside buildings. The material is very light and fragile. |
To decorate the walls inside, it is recommended to choose the best option - gypsum brick. It will be cheaper than clinker and even more so than porcelain stoneware. Gypsum is stronger than other polymeric materials and is natural. Gypsum tiles are easy to make with your own hands by mixing water, gypsum and PVA glue. After pouring into the mold, the facing material should dry and it can be used for work.
Tools and material calculations
Before gluing gypsum bricks to walls, you need to prepare tools and calculate the amount of material. To calculate, it is necessary to measure the length and height of the walls on which the installation will take place and multiply the resulting values. Door and window openings are removed from the resulting number in order to reduce costs. After calculation, about 10% is added to the total value for the reserve. Knowing how much material is needed, it is necessary to take into account that it is flat and angular, which is used at the corner of the room.
Tools for laying decorative stone
To work you will need:
You may need a hand tool in the form of a saw for cutting bricks. The adhesive composition is sold differently, depending on where the brick walls are being finished: inside, outside. The glue can be dry or liquid, in the form of a paste. Additionally, crosses are purchased so that the seam is even everywhere.
Laying decorative bricks with your own hands (video)
Preparation and use of gypsum glue
To prepare gypsum glue, you should carefully read the instructions on the package. Initially, a certain amount of water is poured into the container, the dry mixture is poured into it in a thin stream and gradually mixed. This way you can avoid the appearance of lumps.
Gypsum assembly adhesive After mixing, the glue should stand for a while to dissolve the constituent elements of the adhesive. The dissolution time is indicated on the package. The surface on which the adhesive solution will be applied must be clean and primed. The seams in the tiles should be smoothed with sandpaper.
The glue is applied to the base with a notched trowel in a thin layer, and also with a regular trowel on gypsum tiles. After gluing the tiles, excess glue is immediately removed. The thickness of the glue between the tile and the base should be 15 mm, no more.
To prevent glue from remaining or drying on the instrument, it should be washed in water.
The process of applying glue to gypsum tiles Basically, the glue completely hardens after installing the decorative tiles after 24 hours. The drying time of the glue depends on the room temperature, as well as air humidity.
Choosing adhesive for gypsum tiles
Plaster bricks should be laid with the correct glue; there are several options for this:
- Cement tile adhesive. Used for tiles. Used to glue any cladding.
- Plaster based on gypsum. Excellent for interior work. The mixture is white and will not be noticeable under the brick.
- Silicone sealant. The method is unusual, but effective. Allows you to place the brick tightly against the wall.
When using glue for external masonry, frost-resistant compounds should be selected, otherwise the mixture will crumble and fall off with the brick. Only fresh glue is used and prepared according to the instructions on the package.
Laying gypsum tiles under brick
To make the room look attractive and unusual, laying gypsum tiles under brick or natural stone must be carried out carefully, in compliance with all rules and technologies. You can lay decorative bricks with your own hands, but first it is recommended to read the instructions in detail and select suitable decorative options. You can lay tiles on the wall using different methods; everyone decides for themselves what kind of atmosphere they should have at home.
Design options
Decorative gypsum facing tiles are laid on the surface indoors using different variations of decor. Most often, all the walls of the room are completely decorated with bricks. However, no less popular is the option of partial cladding, when the material is mounted on 1 or 2 walls. Gypsum bricks combine well with decorative plaster, wallpaper, and tiles.
Using bricks you can beautifully decorate an arch, a door portal, niches, mirrors, and a vertical work surface in the kitchen. The internal corners are also sealed with this material, this protects them from contamination and cracking. Another option for using gypsum facing tiles is decorative finishing of fireplaces to resemble natural brick.
DIY installation methods
Flexible brick tiles are attached in 2 ways:
- Dry. Fastening and laying of decorative bricks is carried out using bolts and slats.
- Wet. The bricks are fixed to the wall using glue.
Return to contents
How to prepare?
Materials and tools
Before you begin tiling the interior of the room, you need to calculate how many tiles you will need to finish the walls. To do this, calculate the area that will be finished. If there are elements on it that do not require decoration, find out their area and then subtract it from the total. Facing is carried out using the following materials:
- deep penetration soil solution,
- gypsum brick tiles,
- special glue for fastening,
- grout mixture and acrylic paint,
- varnish, which at the end needs to be coated with the finished masonry.
It is convenient to lay the material using the following tools:
- notched spatula,
- hacksaw for cutting,
- level, plumb line, ruler, tape measure, pencil,
- rollers, a wide and artistic brush for decorating seams.
Return to contents
Preparing the wall
Before you start gluing tiles to the wall yourself, it is recommended to prepare the surface so that the material holds firmly. To do this, the wall or other area is thoroughly cleaned of old decor and then leveled. Next, the surface is treated with a primer, and after that you need to wait a little until the liquid dries.
A layer of primer must be applied on top of the plaster.
If the wall is plastered, you should carefully check the strength of the plaster and when there are fallen areas, you need to plaster them, let them dry and prime them. When the wall is covered with a layer of paint, it is worth getting rid of this coating; if this is not possible, frequent notches are formed on the surface, which will ensure reliable adhesion to the brick. If the wall is wooden, fiberglass is attached to the surface, after which everything is plastered and primed. The plasterboard wall does not require any pre-treatment. Before installation, it is covered with a primer solution, and when it dries, they proceed directly to the masonry.
How to properly lay gypsum tiles under brick?
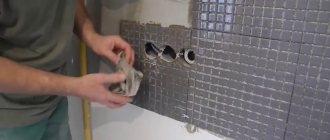
Installation of the material begins with markings on the wall, which will serve as guidelines and help position the decorative tiles evenly. It is also important to decide how the tiles will be laid under the brick - dry or wet, because the installation technology is different. If the dry method is chosen, the bricks are laid vertically, from top to bottom. A strip is fixed vertically in the upper corner, then a tile is applied to the surface and its width is measured. The size is fixed and a horizontal rail is laid from it. In the resulting space, gypsum tiles are attached using screws or self-tapping screws.
After gluing, the tiles must be pressed well against the wall.
If it is decided to attach a gypsum brick using a wet method, using soft, white cement glue, installation is carried out, on the contrary, from the bottom up. Before laying, the surface is sprayed with water, and the back side of the tile is treated with a primer, after which the material must be allowed to dry. Next, take a notched trowel and apply the adhesive mixture to the surface and tile. The brick is placed on the wall and pressed down. To ensure that the masonry is level, it is recommended to check each row with a level and plumb line. The adhesive mixture for interior decoration dries completely within 24 hours. It is not recommended to begin further work before this, otherwise the masonry will be deformed.
As an adhesive base, it is recommended to use Monte Alba brand material, intended for laying and installing decorative gypsum tiles indoors.
Forming neat seams
To ensure a neat appearance of the seams, it is recommended to grout the space with a special grout mixture or adhesive solution. To do this, the selected material is drawn into a construction syringe, then with its help, paste is placed into the seams. You can trim the seam with a wooden stick or a plastic tube cut lengthwise. When the grout is completely dry, you can paint it. Acrylic paint and an art brush are suitable for these purposes. When painting the seams, you need to be careful and careful, otherwise the lines will be uneven, which will ruin the appearance of the cladding.
How to cover the masonry?
When the installation and joint grout are completely dry, it is recommended to additionally treat the surface with acrylic varnish. The resulting protective film will protect the gypsum brick finishing from the negative influence of external factors. If plaster lining was carried out in the bathroom, on the balcony or in the kitchen, it is recommended to protect the masonry with a sealant. The coating will be reliable if you cover it with varnish in 2 layers. It is important that the first coat is completely dry before applying the second coat. If desired, a pigment is added to the varnish material, which will ensure a uniform color of the surface. To highlight the texture, it is recommended to use a brush or airbrush. Pigment can be added to the grout, but it is not always possible to guess the result.
Conclusion
Decorative gypsum brick is a convenient, easy-to-use material that is easy to work with even for a person not involved in construction and repair. However, before you begin installation, it is useful to familiarize yourself in detail with all the nuances and rules, because it is important that the new surface looks neat and beautiful. If you follow the instructions and do not violate the stages of work, you will be able to independently make high-quality cladding, which will become the main decoration of your home.
Types of decorative brick masonry
Cladding with artificial brick is not complicated, the brick material is made in the form of a panel, and can be laid out on the walls in different ways. The technology depends on the type of brick used:
- The long edge is spoon.
- End - butting.
Spoon laying includes 4 rows of spoons and 1 row. When using the bonding method, the entire masonry will be made only from bonded parts. Types of masonry can be different, the most common are:
- Gothic - work is carried out using long and short rows of bricks, alternately. An offset is made between the rows by half a brick.
- Brandenburg - made from a pair of long rows and one short one. Glue the brick so that the butt side is a couple of rows above each other. Each row will be mixed by half a brick.
- Cross is a complex type of masonry. Decorative bricks are glued to the walls alternately with different sides. Between the rows there is an offset of half a brick.
In general, there are quite a few options for laying decorative bricks; it is recommended to look at photos on the Internet and decide on the desired type that will suit the specific decor of the house. After that, you can lay out everything yourself.
Pros and cons of finishing material
The advantages of tiles include:
- appearance of the product;
- the weight of the tiles, which allows installation on almost any surface;
- gypsum tiles do not contain impurities toxic to people and animals;
- it is easy to stick to the wall and this is possible not only for a master;
- With proper preparatory work, gypsum tiles on the wall will last a long time.
Disadvantages of this tile:
- Fragility of the material. Gypsum is a fragile building material, so you should work with it carefully. After installation, do not apply hard blows to the tiles for 10 years.
- Gypsum loves water, so when installing in rooms with high humidity, the tiles should be treated with additional special products.
Laying gypsum tiles on the wall If you carry out all the necessary manipulations and handle the tiles carefully, then the disadvantages will be smoothed out. Before gluing gypsum tiles, you should take into account some recommendations.