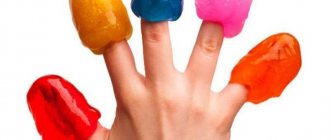
How to avoid mistakes when making slime
Not all experimenters succeed in making homemade handgams the first time. This is due to the fact that there are no recipes with a clear indication of the proportions of the components. A properly executed slime should be soft, homogeneous, and elastic. How to avoid mistakes:
- Combine components in small portions.
- Before performing the next step, you need to mix the prepared mixture well.
- Soda, glue, flour should be added to the liquid composition, and the thick mass should be diluted with water and sodium tetraborate.
- If the consistency is uneven, you need to continue kneading.
- When the slime sticks to your hands, you should add liquid starch or grease it with vegetable oil.
Dyes can spoil the composition, so they should be used in small quantities. Handgams prepared according to some recipes must be kept in the refrigerator or outside for the specified time so that the mass thickens.
Toy made from flour without adding glue
Make slime from toothpaste without glue. Using toothpaste and flour you will get a strong and stretchable slime.
You will need:
- flour, 300 grams (preferably corn);
- toothpaste, about 100 grams;
- dye, a little bit.
Slowly add a pinch of flour to the toothpaste and dye mixture until thick. Leave the mixture to sit for 20 minutes.
Alcohol slime
A beautiful and interesting toy is made from alcohol and borax. To create it you will need:
- polyvinyl alcohol (sold in powder form);
- borax or borax;
- dye;
- water.
It is recommended that only experienced craftsmen take on the preparation, otherwise the result may not be satisfactory.
To begin with, the alcohol powder is mixed with water and placed on fire. Boil the polyvinyl alcohol solution for 45 minutes over low heat. While the alcohol is boiling, it should be stirred constantly so that it does not burn.
When the alcohol is ready, you need to let it cool to room temperature. In the meantime, you can work on the remaining components. Borax is dissolved in water. You will need 1-2 tablespoons of powder per glass of water. The crystals should dissolve well in water.
Now you can mix polyvinyl alcohol and borax solution. They are combined in a ratio of 3 to 1 - 1 part borax solution is taken to 3 parts alcohol.
Features of toy care
The main rule for caring for a toy is regular washing and proper storage . Small debris and lint stick to the slime, so it needs to be bathed:
- Take some water into a bowl.
- Put in the slime.
- Wash it and put it in a jar for storage. The container must close tightly.
It is optimal to make a new handgam after 5–7 days of playing, even if the recipe specifies a longer period of use. After this time, the components of the slime erode and disintegrate. Nutrition - water and salt - will help extend its “life”. Pour water into the container (to the bottom) and add a pinch of salt, shake.
Play with handgam carefully, do not throw it on the floor, ceiling or walls . Making slime from shampoo is easy. Don't be afraid to experiment, add sparkles, beads, bright confetti. The main thing is to maintain proportions.
DIY slime thickener
Sometimes, to make slimes, they use nail polish with vegetable oil or with glue and borax, and hand creams. You can replace PVA with a glue stick, preheated in the microwave until softened. In recipes with guar gum, baking soda and water, you can use lens fluid (2 tbsp) instead of sodium tetraborate. The prepared mixture should be filtered through a strainer.
An important component of every slime recipe is a thickener:
- sodium tetraborate;
- lens liquid;
- boric acid;
- Visin eye drops;
- hydrogen peroxide.
If no product is available, you can use a thickener you make yourself. For example: soda with water, dissolved gelatin, liquid powder, starch, propylene alcohol, salt or powdered sugar. An interesting effect is obtained by using boric ointment, glue and soda.
Slime made from flour and soda
This flour and baking soda slime does not require a thickener. The hand cream will bind the two dry ingredients together.
Anti-stress is very simple:
- Take an equal amount of dry ingredients and mix them in a deep bowl.
- Add the cream and start stirring. The amount of cream may be different: you will need more thick cream, less liquid cream. The main thing is that the mass is homogeneous and dense.
- After this, you need to knead the toy with your hands until its surface becomes smooth.
Slime, made from baking soda and flour without glue, resembles dough and does not form a film when stretched. But it is very pleasant to the touch and softens the skin of the hands well.
From shampoo and detergent
According to the recipe, an airy slime is made that stretches to a transparent bubble, clicks loudly and leaves no marks on the fingers. This method of making slime is very simple, despite the abundance of components. You can play with it for a long time without fear of drying out your skin, since it does not contain borax.
Components
- 1 tsp. shampoo,
- 1 tsp. dishwashing detergent,
- 1.5 tsp. water,
- a pinch of soda,
- 1 tsp. tooth powder,
- 50 ml neon gel,
- 1-2 tsp. solution for contact lenses.
Cooking method
1. Place shampoo, dish detergent and water in a container.
2. Close the lid and shake to transform the liquid into foam.
3. Beat the resulting mass with a spoon.
4. Pour soda into this foam and dissolve.
5. Add tooth powder and stir.
6. Pour in the neon gel and work well into the mixture with a spoon.
7. Thicken it with lens solution and knead it with your hands.
Watch this video on how to make fluffy slime:
Soap and baking soda recipe
To make the following slime using baking soda and liquid soap, you will need a third ingredient - salt. The toy will be very simple in composition and safe for the skin. As with the previous recipe, you will need to cool the slime to complete the process.
Mix 2-3 tablespoons of thick soap with dry ingredients. Add salt until the entire mass reaches the desired thickness. After this, we send the container with the future anti-stress to the refrigerator. You will have to wait about an hour and a half. That's it, the slime can be pulled out, it's ready to play.
From shampoo and flour
Using the proposed method, a soft handgam is made. It can be squeezed and untwisted, but it does not stretch very well.
What to make slime from
- 3 tbsp. l. shampoo,
- a small amount of any dye,
- 1 tsp. hydrogen peroxide,
- 5-6 tbsp. l. flour,
- 1-2 tsp. oils for baby skin care.
Method of making slime
- Pour hair wash into a container and tint it.
- Add peroxide, mix and place in the freezer for 3 minutes.
- Remove the container and add flour to the mixture.
- After kneading until the dough slightly sticks to the skin, put the mixture into a container, close and leave for 24 hours.
- Remove from the container and add oil, knead with your hands.
Slime made from soda and glycerin
Glycerin in the slime makes its surface smooth and makes the toy glossy.
Ingredients for this recipe:
- PVA glue;
- borax;
- soda;
- glycerol;
- warm water;
- dye.
Let's start cooking:
- Dilute tetraborate (1 teaspoon) in a glass of water and add a few drops of glycerin.
- We pour approximately a quarter of the resulting solution into a container, add glue and pigment there.
- After mixing, evaluate the thickness of the slime and, if necessary, add another portion of the activating solution.
The density of the slime can be adjusted by the amount of liquid added. The toy will have a slightly oily, smooth surface.
Edible slime
For those with a sweet tooth, there is a recipe for edible slime. To prepare it you will need the following ingredients:
- condensed milk – 1 can 400 grams;
- corn starch - 1 tablespoon;
- food coloring.
The cooking process begins with pouring condensed milk into a saucepan. Corn starch is added to it. A saucepan with condensed milk and starch is placed on the fire. The mixture is boiled, stirring constantly.
When the milk and starch thicken, remove it from the heat. Food coloring is added to the mixture. The amount of dye depends on how rich the color you want to get (about 10-15 drops).
After this, the slime needs to be cooled. Now you can play with it or eat it. If the slime was prepared for food, you should not decorate it with glitter or other inedible materials.
Slime without PVA glue
An interesting option for those who often use eye lenses and forget to use disposable probes for facial care in a timely manner.
Required:
- face film mask of any color;
- shaving foam;
- filtered water - 1 tbsp;
- mask color dye;
- soda - ½ part tsp;
- liquid for contact lenses.
Progress:
- Open the package with the mask and squeeze it into a container.
- Shake and add foam.
- Fill with water and stir.
- Add dye to get a richer and more interesting shade.
- Place baking soda and a few drops of contact slime liquid in a bowl with the mixture and mix again.
- Knead the resulting mass in your hands so that it stops sticking to your hands. If this does not help, then add a little more liquid for the lenses, then it will turn out elastic.
Fact!
As a dye, you can use not only food powder or gel, but also acrylic paint.
Popular recipe: how to make slime?
Playing with slime is an interesting and fun activity. For adults, handgam can be used as an anti-stress; for children, such a game is a development of fine motor skills.
There are many ways to prepare slimes:
- based on sodium tetraborate or glue;
- with salt or sugar, soda;
- with the addition of toothpaste, shaving foam, hairspray, nail polish, film mask and much more.
One of the simplest recipes is making slime from baking soda and shampoo. This option is not only simple, but also inexpensive. All the necessary components are available in every home.
Preparing the Components
Required ingredients:
- shampoo ½ cup;
- baking soda - by eye;
- water – 1/3 cup;
- food coloring optional.
Shampoo can be used in any color and thickness. Baking soda acts as a thickener. It is recommended to use boiled water, but not cold.
Reference! Instead of dye, you can use gouache or watercolor.
What else can be used as a thickener?
You can substitute baking soda in this recipe. The thickeners used are:
- salt;
- starch or flour;
- toothpaste;
- sugar.
- The slime made from shampoo and salt is sticky. To eliminate this drawback, you need to add: liquid soap, PVA glue or lens solution if you wear them. Additives will give the toy elasticity and it will not stick to your hands.
- It is optimal to use corn starch and flour. The structure of the slime prepared according to this recipe is dense. If you add too much starch, the handgam will simply crumble.
- Toothpaste slimes have a distinct paste smell (most often mint), so it is recommended to add flavoring to the composition. The paste must be homogeneous, without granules or grains.
- Sugar slime quickly melts from the warmth of your palms, so you can’t play with it for a long time, and you should store the toy in the refrigerator.
Step by step diagram
Preparing handgam does not require any special skills; it will take 15–20 minutes. Additionally, you need to prepare a container for mixing.
Step-by-step instruction:
- Mix shampoo with water. The mass should be homogeneous.
- Then gradually add soda in portions until thickened. After each serving, mix the composition thoroughly.
- Add the dye carefully, drop by drop. If you overdo it with the quantity, the slime will stain your hands and the surfaces it touches.
- If the mixture turns out dry, add a little water.
- Knead the finished slime with your hands greased with oil (baby or vegetable oil).
Important! A child should play with handgams made from soda and shampoo only under the supervision of an adult. After playing, you must wash your hands with soap.
Tips and tricks
In order for the slime to turn out, you need to carefully monitor the progress of the recipe. Do not change the ingredients according to your own preferences, otherwise you may end up ruining the toy. Take your time and then you will definitely be able to make the slime right.
Don't forget that toothpaste slimes should be stored in containers with snap-on lids to create a seal inside. This will help preserve the properties of the slime for a long time.
Play with the slime carefully, do not drop it or place it on fleecy surfaces, otherwise various particles of dirt and dust will fall on the toy, making it unsuitable for further use. In this case, it will be impossible to save the slime.
For decoration you can use various decorative elements. These can be small beads, sparkles and other decorations. They will give the slime a more interesting consistency and beautiful appearance.
How to make slime without sodium tetraborate
And now you will learn how to make slime without sodium tetraborate. For this method, you can use everything you find at home: glue, starch, flour, washing powder. That is, you will receive a new exciting toy practically for free. And the YouTube video (at the end of the article), as well as our recommendations, will help you cope with this task.
The first way you can make real slime is to use starch.
- Prepare 100 grams of glue, about half a glass of warm water and ¼ cup of starch (you can use liquid starch, for washing, then you won’t need water), dye and a mixing container.
- Mix water and starch in an enamel bowl until you get a thick (but not hard) mass without lumps.
- If your goal is to obtain a colorless, almost transparent slime, then you don’t have to add dye. Or we add dye (or regular brilliant green) and continue reading further. You can also use gelatin instead of starch.
- Cool the resulting mixture in the refrigerator and transfer it to a bag.
- Add glue to the starch mass and shake the bag well. Knead the mass until it becomes viscous and plastic. Open the package and take out the finished slime.
Slime from washing gel
And in preparing this slime, household chemicals will help you - more precisely, washing gel. So you need to go to the store and buy office glue. Now you can easily and quickly prepare amazing slime. We describe the whole process step by step.
- Mix ¼ cup of office glue and a few drops of food coloring.
- Add 40 ml of washing gel. Mix everything thoroughly.
- We put rubber gloves on our hands and knead the resulting mass until it acquires a soft elastic consistency.
- Store the finished slime in a sealed container, you can also periodically put it in the refrigerator - it will last you much longer.
So you have learned many ways to make slime. By the way, slime is not only a cool, but also a very useful toy. It perfectly collects dust from all surfaces - your keyboard will become as good as new in just 1 minute if you try to clean it with a slime.
Let's add a little flour
To make gum for hands without glue according to these instructions, in addition to the two main ingredients, you will need sifted wheat flour and dye. Can be used:
- gouache;
- acrylic paint;
- watercolor;
- nutritional supplements.
Squeeze half a tube of toothpaste and 3 tbsp into a deep bowl. spoons of liquid soap. This quantity will produce a medium sized slime. If you want a larger toy, increase the volume of ingredients, but maintain the proportions.
Now add flour to thicken the mixture. You will need about 50 g. Add flour gradually, constantly stirring the mass. If it is too thin, add a couple more pinches of thickener.
Now is the time to paint the composition. Add 2 g of dry food coloring or gouache to the tip of a knife. Stir the mixture until it becomes homogeneous. Don't allow any lumps, otherwise nothing will work. Take it in your hands and knead it until it begins to stretch.
Slimes should be stored in the refrigerator and promptly cleaned of wool and crumbs.
Manufacturing scheme
To prepare slime from potato starch and shampoo, you need to prepare the following ingredients:
- 150 ml shampoo;
- 300 g potato or corn starch;
- warm water;
- dye of any color, glitter and other decor.
Step by step recipe:
Place shampoo, dye and glitter in a plastic container.
Mix everything thoroughly until smooth. Add starch in portions, stirring the mixture regularly. It is important to get rid of all lumps, the texture should be smooth and uniform. Pour 30 ml of water into the bowl with the mixture until the required thickness and texture is formed. Knead the slime with your hands. Such a toy can turn out to be liquid and thick, since the amount of starch can be adjusted to the required thickness
This slime will be very different from the toy that contains sodium tetraborate. It is much more difficult to stretch and has a short shelf life. As soon as it goes bad, you need to throw it away, without regret, and prepare a new slime
Such a toy can turn out to be liquid and thick, since the amount of starch can be adjusted to the required thickness. This slime will be very different from the toy that contains sodium tetraborate. It is much more difficult to stretch and has a short shelf life. As soon as it goes bad, you need to throw it away, without regret, and prepare a new slime.
Important. You need to prepare the toy with clean and dry hands, this may affect the final version... This slime should be stored in a plastic container; if it gets dirty, you need to clean it or make a new one
This slime should be stored in a plastic container; if it gets dirty, you need to clean it or make a new one.
- If the slime turns out to be too liquid, then you need to add starch a tablespoon at a time until the toy reaches the required consistency.
- If the slime is too crumbly and dry, then you need to add shampoo little by little until the desired result is achieved.
Slime made from salt and soda
This slime is made from baking soda without adding glue or sodium tetraborate. It will require bulk ingredients, accompanied by shower gel.
We proceed in the same way as in the case of liquid soap: first mix soda and gel, and then bring the toy to the desired thickness, gradually adding fine salt. The resulting slime will look like jelly. You can use it as finger slime by placing it in a convenient container.
Steps
Method 1 of 3:
Using shampoo and cornstarch
Method 2 of 3:
Using shampoo and salt
- 1
Pour some shampoo into a bowl.
The type of shampoo is not important, but the thicker it is, the better. The color and aroma of the shampoo also matter. X Source of information
- 2
Add some shower gel if you like.
This will help make the slime even thicker. Use equal amounts of shampoo and shower gel. Mix them until smooth. X Source of information
To prevent the slime from becoming cloudy, the shower gel and shampoo should be of a similar color.
- 3
Add a little salt until the shampoo thickens.
Since each brand of shampoo reacts to salt differently, it is difficult to predict how much salt you will need. Just add a pinch of salt and then stir the slime. Continue adding salt and stirring until the shampoo comes together. X Source of information
Method 3 of 3:
Using shampoo and toothpaste
1
Squeeze some 2-in-1 shampoo into a bowl. For some reason, universal 2-in-1 shampoos are best suited for this purpose. Choose a shampoo with a scent that goes well with mint. X Source of information
Regular shampoo will also work, as long as it is thick.
2
Add some toothpaste
It doesn't matter what toothpaste you use - white or gel. Add the same amount of toothpaste as shampoo. X Source of information
3
Stir the solution with a spoon
Continue stirring until the solution becomes homogeneous. As they mix, the shampoo and toothpaste will acquire a smooth consistency and form a gel-like slime. X Source of information
4
Adjust the consistency if necessary. If the slime is too thick, add a little more shampoo, and if it’s too thin, add toothpaste. Add the missing component and stir the mixture again. X Source of information
5
Play with slime. This slime won't be as sticky as store-bought slime, but it will be just as fun to play with. When you've had enough of playing, place the slime in an airtight container.
Adviсe
- For extra sparkle, add glitter or sparkly confetti.
- Add food coloring to give your slime a vibrant color. Liquid watercolor paint will also work. Use green food coloring or liquid paint to create a more traditional color for your slime.
- When you're done playing with the slime, place it in an airtight container and store it there.
- You can stain your whole house with slime! So play with it over the table and don't drop it on the carpet or clothes.
- Slime does not last forever and will eventually dry out.
- Use well-known brands of 2-in-1 shampoos.
- Add plastic pearls or polystyrene foam (used in ottoman chairs) to add texture or crunch to your slime!
- Do not give slime to infants. They may eat it, mistakenly believing that it is edible.
- To make the slime softer, add foaming soap.
- For something fun, you can take Head & Shoulders apple-scented shampoo and mix it with salt.
What you will need
Shampoo and cornstarch
- 280 g cornstarch
- 120 ml shampoo
- 90 ml water
- Food coloring (optional)
- Glitter (optional)
- A bowl
- Spoon
Shampoo and toothpaste
- 2-in-1 shampoo
- Toothpaste
- A bowl
- Spoon
Homemade slime
Making slime at home is a simple task. We offer you a selection of master classes on making this anti-stress toy. In the article you will find step-by-step instructions and training videos. The recipes are presented in a variety of ways, so you will have plenty to choose from, and you will be able to find the necessary components for making homemade slime in no time.
Slime is a popular toy that adults and children love. This thing is very useful for children, because it perfectly develops fine motor skills. Well, playing with her is fun and safe. If you make slime with your own hands, then such a toy will not be toxic at all, which is also a plus. Well, this craft is recommended for adults under stress. It has been proven that slime can relieve nervous tension. So take note of this.
This “smart jelly” came into fashion back in the 90s, when everyone’s favorite movie “Ghostbusters” was released. We all remember the main character Lizun, who so funnyly flattened, spread, stuck and rolled down the wall. It was fun to watch, and enterprising marketers decided to release a toy of this kind. Of course, it was immediately snapped up. Then many other funny trinkets appeared on the market, and the slime somehow got lost among them. Today he is again at the peak of popularity. Only now it is customary to call it the fashionable word hendgam, which translated means “chewing gum for hands.”
Of course, you can find slime in any children's department or hypermarket. However, picky parents, as well as adult lovers of anti-stress toys, are not inclined to trust such accessories. We understand you perfectly! Industrial slimes often smell like chemicals, and even on the tenth attempt it is not always possible to get rid of the rubber smell on your hands after playing with it. That's why making slime at home is a great alternative!
On the Internet you can find many different ways to make handgams. The most common is using sodium tetraborate. However, not everyone is ready to spend time searching for this component. We will tell you how to make slime without sodium tetraborate and even offer several options for such “recipes”. Well, for those who are ready to get a little confused, we will conduct a master class on making so-called chewing gum for hands using this component. So let's get started!
Homemade slime made from plasticine and gelatin without sodium tetraborate
If you have a child in your home, then you most likely already have all the components for making a handgam.
We will need:
- bright plasticine – 100 g
- gelatin packet – 15 g
- cold clean water
Progress:
- In a metal plate or saucepan, mix gelatin with water and leave the mixture alone for a few minutes (check the instructions on the gelatin bag for the exact time). When the gelatin swells, place the container on the stove and bring the mixture to a boil over low heat. Then remove it and leave to cool.
- At this time, take a piece of plasticine and warm it in the palm of your hand. Then we begin to slowly warm up. We do this until it becomes completely soft. Place the mixture in a bowl and add 50 ml of water to it. Mix the ingredients thoroughly using a plastic spoon.
- When the gelatin has cooled down and is no longer hot, but simply warm, mix it with the plasticine mass. Mix well and immediately put in the refrigerator. It will take about half an hour for the components to “get to know each other” and set.
Advantages and disadvantages
+ This recipe makes the toy durable
— if a child decides to lay it on light-colored wallpaper, it will be quite problematic to wash off the slime mark, so it’s better to play with it on the floor or wooden surfaces
You can make slime from plasticine without using gelatin. Here you will need transparent glue. The properties of this toy will be the same.
How to make slime from starch with peroxide without sodium tetraborate
This is a very inexpensive and simple option for creating a handgam. The components are elementary.
We will need:
- starch – 100 g
- glue (regular school glue, PVA type) – 100 g
- bright dry dyes (preferably food coloring)
- regular peroxide
Progress:
- Mix starch with a glass (250 ml) of water at room temperature. Pour in the liquid gradually, in a trickle, dissolving the starch in it. The consistency of the gruel should resemble jelly.
- Add glue. We also introduce it gradually and mix the mass thoroughly.
- Now you need to add dyes and add a few drops of peroxide.
Advantages and disadvantages
+ the most budget option
+ The slime turns out to be very light and airy, but at the same time it is elastic and bounces perfectly
— if the glue or starch is of poor quality, the toy may not last long
Slime at home from soap with toothpaste without sodium tetraborate
This slime smells delicious! Paste and soap do their job. All the components for making a toy are definitely available in every home: just look in the bathroom and kitchen.
We will need:
- toothpaste – 20 ml
- liquid soap – 20 ml
- dry dyes (optional)
- wheat flour – 5 teaspoons
Progress:
- In a plastic bowl, mix toothpaste and soap and mix thoroughly
- We begin to add flour, continuously stirring our mixture with a spoon. When all the flour has been poured out, start kneading the mixture with your hands, as if you were making dough.
- If desired, you can initially (while still dry) mix the flour with bright dry dyes. However, we advise you to leave it as is, because the end result is a very nice bluish-transparent slime, which looks very cool even without additional dyes.
- Wet the future toy a little and continue kneading until it becomes stringy.
Advantages and disadvantages
+ available components
+ excellent stretch and flow
+ leaves no dirty marks
— Some toothpastes do not allow the slime to set, and it seems to fall apart a little, so you may not be able to make the toy the first time - you will have to try toothpaste from several companies to achieve the ideal result
If you have any questions, the following video will clearly demonstrate how to make a slime from paste and soap.
Slime made from flour without glue and sodium tetraborate
This option is suitable for those whose children love to taste toys - all components of the handgam are food-grade.
We will need:
- flour – 2 cups
- cool water – 1/4 cup
- hot water – 2-3 tablespoons
- bright food colors (dry or liquid - it doesn’t matter)
Progress:
- You need to sift the flour and add all the cold water to it. Mix thoroughly and add hot water so that the consistency of the mass resembles thick sour cream. Stir everything until the lumps are completely dissolved.
- Add food coloring. If it is liquid, then drip gradually and stir constantly. Do this until the mixture reaches the desired shade. At this stage you can add dry glitter if you want. If your dye is dry, then it will be easier to first mix it with flour (at the very first stage, immediately after sifting), and only then add water.
- Place the resulting mass in the refrigerator for 3-4 hours. Then we take out the future toy and knead it thoroughly again.
Advantages and disadvantages
+ no toxic ingredients: they are all safe if your child accidentally ingests them
+ You can make a toy together with your child
+ slime is quick and easy to make
— in consistency, it still differs from its analogues containing flour, starch, liquids and other components: it is not as viscous and flowing as we would like
You can watch a master class on making slime from flour in the video instructions.
Slime based on shampoo without sodium tetraborate
It turns out that regular shampoo is great for making slime. You can make such a toy in no time, you just have to be patient to wait until you can enjoy it. By the way, the smell of this slime is simply incredible! So if you are making a craft for a child, it is better not to use fruit and berry shampoos, otherwise he will certainly want to taste the toy.
We will need:
- shampoo (take thicker) – 100 ml
- water at room temperature – 100 ml
- potato or corn starch - 200 g (if you want to make a sticky slime, replace the starch with glue in the same amount)
- dyes (ready-made food, brilliant green, beet juice, etc.)
Progress:
- In a plastic container, combine all three ingredients and mix them thoroughly. Do this carefully so that the shampoo does not start to foam.
- Close the container with a lid and place the future toy in the refrigerator for 12 hours.
- Take out the mixture and mix everything again.
By the way, instead of shampoo, you can use dishwashing detergent - the result will not change much.
Advantages and disadvantages
+ pleasant aroma
+ good shelf life (more than a month in the refrigerator)
— shampoos vary in consistency, and therefore the end result may be a liquid slime, which will not be as fun to play with as you would like; however, this can only be found out through experience, so go for it!
This recipe can be found in slightly different variations. Additional components will make it stronger and the consistency will be more pleasant. The video presents a master class from which you will learn how to make slime from shampoo, soda and salt without glue and sodium tetraborate.
Slime made from sodium tetraborate and glue
This option is suitable for those who want to make a slime that is practically no different from the store-bought one. Just keep in mind that borax (short name for sodium teraborate) is far from a natural component. Of course, there won’t be an unpleasant smell, but it’s still better not to give such homemade slime to small children. It is optimal for adults and teenagers who simply want to make an anti-stress toy, after which they will not have to wash their hands.
We will need:
- sodium tetrabonate – half a teaspoon
- PVA glue
- food coloring (dry or liquid)
Progress:
- Dissolve borax in a glass of warm water.
- Take another bowl, pour half a glass of clean water into it and dissolve dry dye in it or add a few drops of liquid dye; Add all the glue here and mix everything thoroughly.
- Now add the borax solution to the resulting thick mass - you need to pour it in a thin stream and constantly stir the “dough”.
- When all the components are combined, thoroughly knead everything again: the mass should be viscous.
Advantages and disadvantages
+ the toy turns out no worse than the store bought one
+ durability
— not suitable for small children
— Unfortunately, you can’t buy borax on every corner
A visual demonstration of the process of making homemade slime in a video master class.
You can make your toy even more enjoyable. If you want to add beauty to it, then feel free to add dry glitter or fluorescent paints to any of the presented recipes (with them the toy will also glow in the dark!). If you want to flavor the slime, add a few drops of your favorite essential oil at the stage of mixing the components.
How to store slime:
- if you made it from food ingredients, put it in the refrigerator after playing
- if the handgam contains glue, after playing, close the slime in a vacuum bag or container with a tight lid so that it does not dry out
- It is also better to keep slime from shampoo, soap or detergent in a container and in the refrigerator so that it always remains viscous
In short, if you have doubts, it is better to close the toy tightly and put it in the refrigerator on the bottom shelf, where it is not so cold. This way it will definitely last longer.
That's all. Play for your health!
11+
Life cycle of slime: what to feed and how to care for it
Lizun is a real living creature. He needs to be fed, treated and looked after in every possible way. It may happen that your slime becomes pregnant, then there is nothing else left to do but to give birth to your pet. After all, regardless of gender, your slime can have a baby. This is such a small bubble or even several bubbles in which the life of a new slime is already emerging. Leave the lickers alone for 3-4 days, and then separate the babies from the “mom” or “dad”.
The slime also needs to be fed (salt) and water (water). Also for color you can let him eat paint (just a little). To prevent the slime from shrinking, place it in the refrigerator periodically.
How to extend the life of a toy
It is possible to maintain the elasticity of the toy and extend its life. To do this, you must follow several rules:
- It is better to store the “ghost” in a box or jar; you can use a regular plastic bag if there is no suitable place.
- Protect the slime from sunlight and heat. It is better to store it in a dark and cool place.
- Lizun does not like to lie idle. The more they play with him, the longer he will live.
- You cannot wash homemade slime. It may lose its properties and deteriorate.
Safety regulations
Manufacturers produce a wide range of handgams (anti-stress), but it is impossible to say which factories make them from safe components. With purchased and homemade slimes you need to follow safety precautions:
- It is not recommended for preschool children to play.
- Before you make slime with your own hands, you need to make sure that your child is not allergic to the components.
- Constant contact with products containing borax may cause skin irritation.
- When making toys yourself, you need to give preference to natural ingredients.
- It is necessary to prepare the mixture in a well-ventilated area and wear gloves.
- Non-toxic PVA adhesives can be used, but construction, silicone, and rubber adhesives cannot be used for children's toys.
- It is not recommended to use a large number of components and make huge slimes.
- If the toy is made of flour, starch or gelatin, you can play with it for no more than three days.
- Slime should be kept in the refrigerator, since natural products are a good breeding ground for bacteria, plaque, mold, and unpleasant odors.
To protect children from possible dangers when making slime, adults should supervise this process. It is necessary to check what components the child uses, since the compounds of some substances can cause chemical burns.
There is no need to prohibit anti-stress - just explain the rules of the game with slime.
You can make an unusual handgam at home in different ways, each of which has its own characteristics. Edible, transparent, glowing, magnetic slimes are interesting entertainment for any child. But slimes should be stored properly, let children play under supervision, and remember that such toys leave stains that are difficult to wash off.
Temporary toy
Before you make slime from soda, you need to pay attention to the fact that it loses its plasticity after 3 days, but it can be made very quickly. This toy is good if the child gets bored quickly. You won’t get tired of the soda slime, but if the children don’t have time to play with it enough, it can be quickly rebuilt.
How to make slime from soda? First, the necessary materials and utensils are prepared. For production you will need:
- container (you can use the bottom of a plastic bottle);
- stirring stick;
- cup;
- soda – 1 tbsp. l.;
- water – 100 g;
- glue (preferably PVA) – 50 g;
- dye.
The glue is mixed with half the water. The mixture should be homogeneous and thick. The color resembles milk or cream. To make the toy colorful, dye is added. It’s better to use food coloring – this way the slime will turn out translucent. Separately, in a glass, dilute the baking soda with the remaining water. Pour the soda solution into the colored glue mixture and mix well. After the substance begins to thicken, it is removed from the container and checked how soft it is. The toy is ready and can now be used for its intended purpose.
Toy made of water and borax
Many people ask the question “How to create a dense toy, what components will be needed?” So how to make slime? You will need a little sodium tetraborate to make it, and you can find it in almost any pharmacy. Making a toy at home with your own hands is not difficult if you have the following components:
sodium tetraborate or, as it is also called, borax (you can buy it at a pharmacy without a prescription, you will need a powder or solution of 4%); PVA glue - it is important that it does not dry out; water at room temperature - a little more than a glass; dye - food coloring, brilliant green or gouache; mixing container and stick.
The same amount of PVA glue is poured into a quarter glass of water at room temperature. Then you need to add dye. Add sodium tetraborate while stirring gently. You will need half a glass of solution. If you use powder for preparation, then first dissolve 1 tablespoon of the component in water.
Slime made from soda and water
Using this recipe for slime with soda, you can get a transparent anti-stress, which is also called glass. It is not customary to add dye to it, but glitter can be used.
First, let's prepare all the ingredients:
- a tablespoon of bicarbonate;
- half a glass of warm water;
- tube of transparent glue;
- sparkles, charms - optional.
The slime is prepared in an unusual way: instead of pouring the activator into the glue, we will place the glue in a thickening solution. To make it, dissolve the powder in warm water and let the liquid cool.
Now we will carefully pour the glue into the middle of the container in a thin stream. Do not mix the contents of the dishes. Our task is to help the glue located in the center of the liquid take shape and turn into a clot. Therefore, carefully pick up the edges of the glue spot with a stick and direct them to its middle.
Having knocked all the glue into a transparent “jellyfish” in this way, we catch it from the solution and knead it with our hands to get a homogeneous slime. When the process is finished, add sparkles and decor to the anti-stress.
How to make slime without sodium tetraborate: 14 recipes