Replacing bearings in a washing machine
We replace bearings in automatic washing machines of any design:
- with horizontal and vertical loading;
- with non-separable tank
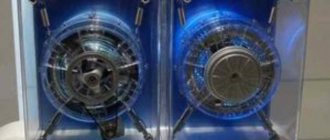
- with direct drive (mostly LG cars);
We provide home repair services in all areas of Moscow and in. The technician arrives within 24 hours of your call with all the necessary spare parts and tools and changes the bearings right in front of you in 1 to 4 hours.
After the repair, you will be given a 1-year warranty check for new bearings and repair work.
How much does it cost to replace a bearing in a washing machine?
To replace the bearing, you need to completely disassemble the tank (except for top-loading washing machines), so the service falls into the category of complex repairs and its cost is quite high. Bearing replacement prices start at:
- from 3300 rubles - for washing machines with a collapsible tank
- from 5500 rubles - for models with a non-separable tank
and depend on the brand, model and complexity of disassembling the machine. In the case of a non-separable tank, bearing repair is complicated by the need to cut the tank and then connect the cut parts using sealant and self-tapping screws. Therefore, replacing the bearing in such models of washing machines is more expensive.
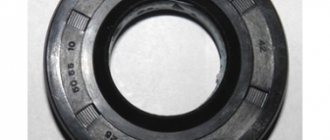
Note! When replacing, both bearings and the seal are always replaced. Otherwise, the new bearing will quickly become unusable and will have to be replaced again.
The exact price is determined by the technician after diagnosis, but here is the approximate cost of replacing drum bearings by brand of washing machine.
| Brand | Price* (spare parts + labor) | Duration | Guarantee |
| Visit of the master | For free | in 24 hours | — |
| Bosch washing machine | from 3900 rub. | 1 – 4 hours | 1 year |
| Washing machine Indesit | from 3400 rub. | 1 – 4 hours | 1 year |
| Samsung washing machine | from 3900 rub. | 1 – 4 hours | 1 year |
| LG washing machine | from 4200 rub. | 1 – 4 hours | 1 year |
| Washing machine Ariston | from 3500 rub. | 1 – 4 hours | 1 year |
| Washing machine Candy | from 3800 rub. | 1 – 4 hours | 1 year |
| Electrolux washing machine | from 4000 rub. | 1 – 4 hours | 1 year |
| Washing machine Zanussi | from 3900 rub. | 1 – 4 hours | 1 year |
| Miele washing machine | from 6300 rub. | 1 – 4 hours | 1 year |
| Whirlpool washing machine | from 4600 rub. | 1 – 4 hours | 1 year |
| BEKO washing machine | from 3400 rub. | 1 – 4 hours | 1 year |
| Washing machine Siemens | from 4600 rub. | 1 – 4 hours | 1 year |
| Washing machine Ardo | from 4600 rub. | 1 – 4 hours | 1 year |
| Washing machine AEG | from 4200 rub. | 1 – 4 hours | 1 year |
| Brandt washing machine | from 4700 rub. | 1 – 4 hours | 1 year |
| Washing machine Atlant | from 3300 rub. | 1 – 4 hours | 1 year |
| Washing machine Gorenje | from 4200 rub. | 1 – 4 hours | 1 year |
| Hotpoint Ariston washing machine | from 4000 rub. | 1 – 4 hours | 1 year |
| Other brand | from 3300 rub. |
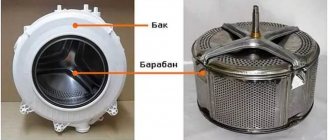
Features of disassembling the tank and replacing bearings
We begin to disassemble the tank of the LG washing machine. First of all, we disconnect the fastening elements (screws or latches) holding the two halves of the structure together. By dividing the tank into two parts, we expose the drum pulley and its fastening element, which we need to unscrew.
Note! If any bolts are difficult to unscrew, lubricate them with any lubricant you have on hand (preferably WD-40), wait 10-15 minutes and try again.
Having unscrewed the fastening element holding the drum pulley, we carefully pull out the pulley and screw the bolt into place. This little trick will subsequently help knock out the drum without consequences for the shaft. Next, we rest the metal pin against the bolt we have screwed in and begin to hit it with a hammer - our task is to gradually knock out the shaft. Under no circumstances should you hammer on the stud with significant force; this may ultimately result in costly repairs!
Having knocked out the shaft and bushing, we must carefully inspect them for damage. To better understand how worn the shaft is, you need to attach a bearing to it and spin it. If there is some play between the bearing and the shaft, the shaft must be replaced. You can read more about disassembling the washing machine tank in the article How to disassemble the washing machine tank?
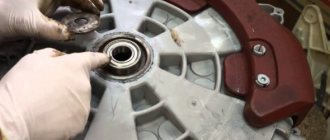
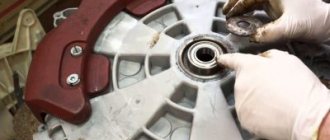
Let's start replacing the seals and bearings. We take the back of the drum and pull out the oil seal from the hole in the middle. This is easy to do, you just need to take a flathead screwdriver and just pry it out of the hole. With old bearings it is more difficult - they will have to be carefully knocked out. We take our pin, rest it on one edge of the bearing, then on the other, and knock it out of the hole with uniform blows of a hammer.
After removing the bearings from the drum, clean the hole from chips and oil. The new bearing must be “planted” only in a very clean place. Carefully drive the new bearings into the hole completely. Next, lubricate the seals and put them in place - the replacement is complete. We do all the above steps in reverse order to assemble the LG automatic washing machine.
Important! When assembling the two halves of the tank, experts recommend coating the seam with automotive sealant for better fastening of the parts and tightness of the structure.
What should not be done when replacing bearings?
Each stage of work to replace the bearings of an LG washing machine, including assembling and disassembling the machine itself, may be accompanied by mistakes, which in turn can lead to problems with the repair. Experts have identified a number of typical mistakes that beginners make when they first start repairing a washing machine. And so what they do:
- The wires of the door lock sensor are disconnected when removing the front wall of the washing machine.
- They tear the cuff of the washing machine hatch, trying to pull it out, while first forgetting to remove the clamp.
- They cause damage to the pulley if an attempt to remove it from the axle is unsuccessful.
- They tear off “stuck” bolts by acting too hard on them and without trying to lubricate or heat them first.
- The wires of the temperature sensor or heating element are broken.
- Tear off the filler pipe along with the hose.
- Pressing the bearings out of the drum causes damage to it. Replacing bearings ends with replacing the drum.
Be sure to pay attention to the above mistakes and never repeat them. And if you are not sure that you can carry out repairs yourself, contact a specialist, he will do everything quickly and efficiently.
To summarize, we note that it is quite possible to change bearings and seals on an LG automatic washing machine without the help of a specialist. But keep in mind that, without experience in this matter, you risk running into even more expensive repairs. As they say, one wrong step and...!
Interesting:
- Replacing a bearing in a Zanussi washing machine
- How to properly remove a bearing from a drum
- Replacing a bearing in an Electrolux washing machine
- How to change a bearing in an Ariston washing machine
- How to change a bearing on a Samsung washing machine
- How to change the bearing in a Gorenje washing machine?
Reader comments
- Share your opinion - leave a comment
Replacing a bearing in an LG washing machine Do-it-yourself. Replacing a bearing in an LG washing machine
Household appliances from LG, a popular company among Russian consumers, are distinguished by their comfort and low noise level during operation. Therefore, if a washing machine, which has served faithfully for several years, begins to hum, knock and shake during washing or spinning, this is the first sign of a malfunction. And, most likely, you will have to replace worn out bearings.
Replacing a bearing in an LG washing machine is not such a difficult task for skilled men’s hands. However, this type of repair will require some skills, accuracy and patience. Therefore, think twice whether to take on this troublesome task yourself or whether it would be more practical to turn to a specialist. To replace the bearings, you will have to almost completely disassemble the washing machine, and one awkward movement can lead to the breakdown of any part of the complex equipment, which will entail even more problems and expenses.
Do-it-yourself bearing replacement in an LG washing machine
Have you decided to change the bearings in your LG washing machine yourself? Then carefully study the instructions or find a suitable
Preparing for work
You won't be able to replace the bearings directly in the bathroom - you need a large space to disassemble the machine and lay out all the parts separately from each other. After all, after the work is completed, you will have to reassemble the unit, and it will be easier to do this if all the components are in place.
It is important to prepare in advance all the necessary tools for the upcoming work, so as not to be distracted by searching for this or that during the process itself.
What tools are needed to replace a bearing?
- Small hammer.
- Screwdrivers – flat and Phillips.
- Pliers.
- Set of open end wrenches and sockets.
- A metal pin about 40 cm long or a rod.
- Sealant and lubricant for bearings.
- Liquid WD-40.
Having prepared the tools, you can begin purchasing suitable replacement parts. It is best to buy original components from the LG manufacturer, but they also need to be selected based on the specific model. Therefore, before such an important purchase, check the component correspondence table and determine which spare part is suitable for your SM model.
Removing damaged parts
When repairing a bearing assembly, you will not only have to remove the bearing from the LG washing machine, but also change the seals. Therefore, we take out the mentioned gasket from the back of the drum, hooking the rubber band with a slotted screwdriver. It is worth remembering that these parts are replaced only in pairs, regardless of the degree of wear of the second seal.
Next we remove the bearings themselves. New ones can be simply pushed through, but old and rusted ones will require considerable effort. Immediately treat the surface with WD-40 and clean the seat. Then we bring the metal pin to the edge of the ring and, constantly changing its position, try to knock the part out with even blows.
The pin must be constantly moved - to the other edge, crosswise, closer to the middle, otherwise the bearing will come out longer and not completely.
There is no need to spare the old bearing, and if the base is destroyed, you can remove it piece by piece using pliers, tweezers or a pin. On the contrary, it is better to avoid the edges of the seat. If the hole is deformed, it will not be possible to install the new ring tightly.
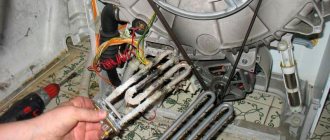
After removing the seals and bearings, do not ignore cleaning. All chips, rust, dirt and plaque accumulated in the seat must be treated with a cleaner. If the layer of scale is very thick and does not respond to WD-40, then we “walk” over the surface with fine sandpaper and sweep away the debris with a rag. It is not recommended to proceed with the installation of a new bearing assembly until the hole is clean and dry.
Interesting:
- How to disassemble a Zanussi washing machine
- How to disassemble the drum of a Beko washing machine?
- How to change a bearing on a Samsung washing machine
- Replacing a bearing in an Electrolux washing machine
- How to change the bearing in an LG washing machine
- How to change the bearing on a Bosch Maxx 5 washing machine
Reader comments
- Share your opinion - leave a comment
Replacing a bearing in a Samsung washing machine Do-it-yourself. How to replace a bearing: preparation
Replacing a bearing in a Samsung washing machine is the only correct solution in case of a breakdown, since repairing this component is often impossible.
You should start preparing for work by searching for suitable spare parts. Now the market (both stores, service centers, and on the Internet) offers a huge selection of bearings for any model of Samsung washing machine. In the kit you will receive:
- the bearings themselves;
- oil seals;
- lubricant
To avoid confusion and to avoid buying the wrong set, tell the seller the exact model and year of manufacture of your washing machine. To make it easier to navigate, look at the table of spare parts for Samsung machines:
In addition to the part itself, you need to prepare a small set of tools. To dismantle the fasteners, unscrew the tank into 2 parts, knock out the bearings, arm yourself with:
- small copper hammer;
- lubricant or WD-40;
- bent hex key;
- marker;
- metal pin;
- pliers;
- adjustable wrench;
- keys of various modifications;
- indicator, negative and positive screwdrivers;
- sealant.
All this will help you replace the bearing yourself according to all the rules.
Replacing a bearing in an Indesit washing machine.
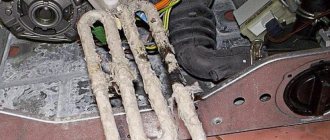
Hello everyone, I have a problem again. The other day, the washing machine broke down, the bearing began to hum, and the prices for new couscous, and even the crisis was approaching, well, without hesitation, I took it to the garage for an operation, I think the business is to change the bearings, race and that’s it)))! But that was not the case, the autopsy showed that the drum turned out to be non-dismountable, and with my hands down I went home to my favorite Internet, maybe I think I’ll find something smart, and I did! In short, I sawed the drum in half, changed the bearing, drilled a bunch of holes in the old seam of the drum, tightened both halves with screws and heated it with a hairdryer while tightening the screws so that the gaps between the two sawn parts were minimal and left it to start in a twisted form. The next day I unrolled the whole thing, sanded it and put it on plumbing silicone. While my drum was drying, I was cleaning the heater, the first night it stayed with me in Calgon and acetic acid, the second in lemon, well, it seemed to be cleaned, although not completely. Today I tested everything and put everything together, and even had my first wash, although without laundry, so far everything is fine, there are no leaks, and then the war will show the plan))! During the repair process, many difficulties arose and mistakes on my part even had to solder the drum with plastic in a couple of places, but I won’t tell you about that, if anyone is going to do the same pornography, I’ll tell you. And I’ll send you another photo, otherwise you won’t be able to figure it out right away in my set of words. By the way, the machine is 4 years old.