When replacement is required
Have you started to get bothered by a progressive hum during the spin cycle, which lately has been reminiscent of the sound of an airplane taking off? Perhaps when turning the drum you hear crunching, clicking, or strong vibration?
You'll have to change the bearing. The owners of the Indesit Wisl85 machine gun, a number of other Indesit models, and Ariston should be “congratulated” separately. The tanks of these machines are glued or soldered and are not officially collapsible. Official services will not undertake to repair bearings, and a new tank costs as much as half a washing machine.
Noise and vibration when washing
Rumble and vibration are possible during spinning and washing. Uneven stacking of laundry and overload quickly lead to disastrous consequences. Loosening of the bearing and breakage of its jacket leads to drum beating and vibration.
If the humming or crunching noise continues, check whether it is the engine bearings. To do this, you need to remove the belt and twist the drum strongly. If it spins quickly, quietly, and does not jam, the problem is in the engine. In other cases, these are precisely problems with the rotation of the drum drive.
Water is leaking
When the bearing loosens, the seal wears out and water leaks through it, again onto the bearing. Although it is a closed type, the water finds the alkali, washes away the lubricant, and promotes corrosion. These processes further destroy the already not new node. The flowing water is distinguished by brown stains - traces of it are visible from the back of the machine. Rust can get on your laundry and is difficult to wash off.
A worn bearing contributes to the formation of wear on the shaft and even a new oil seal ceases to hold water.
Common replacement mistakes
Please carefully study the following recommendations so that replacement does not become an expensive repair:
- the pulley is broken, you can’t pull it, just rock it slightly to the sides and pull lightly;
- breakage of the bolt heads; if the bolt does not fit, spray WD-40;
- break in the temperature sensor wire, be careful with the tank lid;
- the moving unit is damaged;
- The gasket of the moving unit has not been replaced;
- All sensors and wires are not connected during assembly.
So, you are convinced that replacement is quite a labor-intensive task, but doable if you have at least a little experience working with equipment.
If this process is difficult for you, we advise you to contact professionals, for example, an official service center; check the price on the website.
https://youtube.com/watch?v=uFpLe_Kd0NE
TOP stores of washing machines and household appliances:
- mvideo.ru/- household appliances store, large catalog of washing machines
- holodilnik.ru – Inexpensive store of household appliances.
- techport.ru - profitable modern online store of household appliances
- citilink.ru is a modern online store of household appliances and electronics, cheaper than offline stores!
- ru.aliexpress.com - spare parts for washing machines
Which bearings and oil seal are suitable for Indesit washing machines
The drum has a pair of bearings of different diameters. The outer one is slightly larger. Suitable for replacing 62202. The number 6 of the spare part means closed type, and the marking is 202. The bearing is cheap. And, if you remove the drum in time, it remains intact. The main load falls on the internal one. Its marking is 204.
The dimensions of the original oil seal are 22* 40-10/11.5. It's unlikely to be on sale. 22*40-10 will do. The thickness of both is 10 mm. Only the old one has a protective collar, increasing the size to 11.5 mm.
How many bearings are installed in the washing machine, where are they located?
In standard automated models, upper and lower p/sh are traditionally installed, which are located in the rear part of the drum, ensuring silent and reciprocating movement of the shaft, securely fixing it in the seats. The performance of this unit must be monitored especially carefully in order to avoid financial costs.
The resulting play, which is a consequence of improper operation, excessive loading, etc., can lead to leaks and imbalance of the entire unit.
Depending on the manufacturer and modification of the machine, the service life of the elements and planned replacement varies; you should carefully read the maintenance recommendations or get advice from specialists.
DIY replacement
Since the tank is sealed, access to the bearing is difficult - many are afraid to replace the bearing in the Indesit washing machine themselves. It is better to use two people to remove the tank. There is no need to disassemble the entire car. Only what gets in the way is removed. It is pulled out mainly through the top, in some cases from the back. The most inconvenient parts are the heavy counterweights. The top one can be removed immediately, easily, the bottom one can be removed only when the tank is removed.
When working alone, you need to be on the safe side: place something underneath the tank to relieve the springs.
Preparation
For repairs you will need a set of materials and tools:
- self-tapping screw 3.8*20 mm - 20 pcs;
- drill with a diameter of 3.2-3.5 mm;
- a simple pencil;
- Phillips screwdriver;
- metal saw;
- the best waterproof sealant;
- lubricant for the oil seal - Litol or Gydra-2;
- pair of bearings;
- stuffing box.
We mark the place of the initial connection with a pencil. Then, before cutting, we drill a couple of holes and screw in self-tapping screws - they will become guides in the future. We do not tighten the screws into the holes formed until they stop.
Some say that the pulley must be removed before sawing, others after. It’s better - after removing the tank, stock up on normal tools - a ratchet wrench, a T40 bat, a wrench. Before unscrewing, spray with WD-40 and wait 10 minutes. If after this it does not unscrew, place the chisel sideways on the bolt and hit it with a heavy hammer or half-sledgehammer.
Owners of cars with a regular hex bolt will have better luck.
Split tank
To cut the tank, we use a metal file or a fine-toothed hacksaw, which is more convenient. We saw along the existing seam. You should not rush, because if you cut incorrectly, a lot of material will be lost for assembly in the future.
After sawing, remove the cover that covers the drum along with the cuff mounted on it.
Get the drum
The drum is removed using pullers.
To knock out the drum you have to hit the shaft. In order not to spoil it, you need a piece of a pin with a diameter and thread suitable for the size of the shaft. Screw the pin in as deeply as possible, so as not to pull the thread. Slowly we begin to knock it out, tapping gently with a hammer. After knocking it out, unscrew the pin.
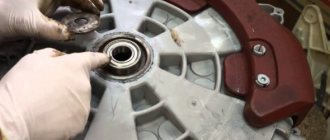
There are 2 bearings in the drum - external and external.
If the drum is covered with a layer of scale, you will have to remove it. Scale is difficult to remove. You can soak it in citric acid or remove it with a special drill attachment.
Remove the old oil seal and bearings
After removing the drum, we inspect the presence of wear on the shaft. If it’s not there, that’s already good. Next is the seat for the oil seal. It's not bad if it's still lubricated.
We pry the inner bearing seal with a powerful screwdriver and try to pull it out. It is additionally placed on sealant and often sticks. Now we have access to the bearing. The inner diameter of the bearing is 17 mm, the outer diameter is 18 mm. Preparing the puller:
- take 3 washers with a diameter of 8 mm;
- hairpin 12-20 cm long;
- We grind the washers so that they can press on the inner race of the bearing without any problems.
Now when you tighten the nuts it will come out. It is advisable to manufacture the puller with an impact on the outer diameter of the bearing. It is better to take a normal mandrel than to build it for the task.
To press out the inner bearing, another device is needed. Take a piece of pipe that fits into the base of the hole. Insert the stud with nuts. The principle is this: resting against a piece of pipe, when tightened, the nut, on the other hand, pulls the bearing along with it, pulling it out of the socket.
Before pressing out the bearings, spray with WD-40 penetrating fluid.
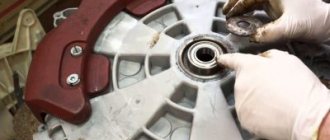
Install new oil seal and bearings
Before installing bearings and oil seals, all surfaces are carefully treated to remove stains, rust, and unevenness. It is recommended to buy parts of European quality or, if possible, Soviet-made.
All bearing seats are wiped thoroughly from dirt and lubricated for good passage of the unit.
We make a pressing machine. The essence is similar to a puller - we hold or rest against the opposite end of the hole, push or pull the bearing.
In this case, the nodes move towards each other, so we place the stops directly on them, tighten the nuts until they are installed in the standard sockets.
The nuts must press on the washer, which must press on the outer diameter of the bearing. Avoid applying force to the inner diameter to avoid damaging the holder. We reach all the way, but without excessive zeal.
When driving the part, distortion should be prevented. After pressing:
- We fill it with Litol lubricant. Even though the bearing is closed, the aggressive environment still destroys it. To reduce the speed of the process, lubricate the entire metal surface.
- To clamp the oil seal, place it in a free space and press it evenly with a hammer in a circle.
- We degrease the drum shaft and the oil seal seat.
- Lubricate the oil seal area with Litol.
It is more convenient to install the inner bearing first - this will make it easier to see whether it is seated or not. The outer one should not be in the plane of the bushing, but somewhat deeper.
Reassembly
We prepare the sawn-off cover of the drum compartment for installation in place: we remove the unevenness of the sawing and sand it. We remove everything not only from the lid, but also from the drum capsule - the place where it rotates. We take the lid and place it on the intended marks.
We tighten a couple of screws already present here. Using a drill with a 3.2 mm drill, we begin to drill mounting holes in a circle to fasten the two halves of the case. The distance between the screws is about 10 cm. You can install bolts instead of screws, but you will face the fact that the heads will have to be sharpened.
We stick the drum shaft back. We tighten the pin-tool and pull out the tank to the end.
Now we degrease the bonded plastic surfaces of the drum capsule and lid. We coat the surfaces with moisture-resistant silicone, without missing a single millimeter. We carefully install the top cover according to the marks and twist the parts with self-tapping screws. First we bait it lightly, then we pull it out without tearing off the plastic. Remove excess silicone. Let it dry for at least a day.
Upon completion of assembly, turn on the machine in boiling mode with descaling acid, such as “Adipinka”. It will eat away rust, plaque, and excess silicone.
How to replace a bearing: step-by-step instructions
Bearing replacement for models Indesit WISL 82, WISL 102, WISL 105 X, IWSD 5085 and others is carried out according to a general algorithm. The only difference may be the order in which the tank is opened. In devices of this brand, both collapsible and solid elements are installed. In the first case, getting to the bearing will be easy; you just need to disconnect the tank mounts. If the washing machine is equipped with a non-separable element, the plastic sheet will have to be sawn and then the two parts re-glued.
First you need to remove the top cover from the unit. This is easy to do by unscrewing two screws from the back of the washing machine and carefully sliding the lid back a little. Then it needs to be lifted and removed from the support. In some Indesit models, the lid is additionally held in place by plastic latches at the front. If there are any, use a hammer and lightly tap away from you to remove the cover from the latches.
Before removing the top cover, you need to unscrew the screws
Next, dismantle the back wall . To do this, unscrew the 6 screws on it, after which the panel should come off without any extra effort. You will see a motor behind it, but it will need to be disconnected at the end of disassembly. If the machine is equipped with a drive belt, it must be removed at this stage so that it does not interfere with further actions.
Then proceed to disconnect the dashboard . First, remove the powder receptacle by pressing the lock inside the element. In the compartment free from the hopper, unscrew the bolts that secure the instrument panel and remove it from the holders. The connecting wires must be removed and the completely separated part placed aside so as not to damage it during operation.
Experienced craftsmen advise beginners to photograph each step of disassembling the unit in order to facilitate the assembly process after completion of the repair.
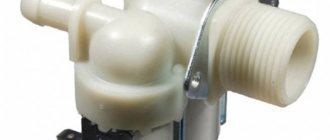
After removing the dashboard, it is necessary to remove all parts located in the upper part . These include a concrete counterweight, a pipe located between the tank and the powder compartment, a pressure switch and a water inlet valve, as well as their contacts.
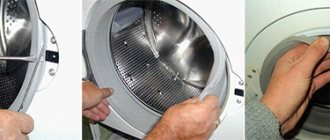
Before removing the front wall, unscrew the hatch door and remove the rubber cuff. First, use a screwdriver to bend the seal and carefully wrap it into the tank so as not to damage it. Unscrew the bolts that hold the hinge in place and remove the door.
From the rear side below, you need to disconnect the electric motor and heating element, shock absorbers, drain pipe and counterweight from the housing. To remove the motor from the machine, disconnect the power supply and ground wire, then unscrew the bolts that secure the element. Using the same principle, disconnect the heating element wiring.
After removing the back cover, disconnect the heating element and the motor
Using pliers, remove the clamp and disconnect the drain pipe from the pump . It is recommended to unscrew the filter before doing this. To release the shock absorbers from the fastenings, you need to unscrew the nuts on the left and right sides. When all elements are removed, make sure that nothing is holding the tank and dismantle it. Then unscrew the pulley using a T40 hex key. Loosen its fastening by gradually loosening the bolt. If this is not easy to do, use WD-40 to soften it.
To get to the bottom to disconnect the pipe and shock absorbers, you need to place the machine on the front or side panel.
Next, you need to disassemble the dismantled tank to get to the drum and bearings. In a collapsible tank, it is enough to unscrew all the bolts around the circumference and carefully separate the two parts. The solid part must be cut in half at the joint using a hacksaw or grinder. First, you need to drill holes around the perimeter of the tank, the distance between which should be no more than 4-5 cm. This manipulation is necessary in order to assemble the tank after completion of the work and secure it with bolts.
This is what the tank looks like after being removed from the machine body
After this, remains is to unscrew the bolts holding the tank to the drum , unfasten the retaining latches and remove the plastic walls of the tank. Then you can proceed directly to replacing the bearing on the drum of the Indesit washing machine. The procedure is carried out in the following order:
- Remove the worn oil seal from the socket and carefully knock out the metal washers.
- Place the drum on the side of the hatch.
- Place a chisel on the rim of the outer bearing and knock out the part with a hammer.
- Repeat the manipulation of the inner bearing, making sure that the chisel does not hit the drum body and damage it.
- Clean the sockets and treat them with lubricant and WD-40.
- Drive the new elements into the vacated spaces until they stop, hitting the outer edges of the parts with a hammer.
- Treat the oil seal with lubricant and install it on the inside of the tank.
- Reassemble the washing machine in reverse order.
Do not forget to treat the bearing installation area with protective lubricant.
Replacing bearings is a labor-intensive and time-consuming process, but by doing it yourself, you can save on the services of a service center. We hope that our article will be useful to you.
Replacement features for top-loading models
Replacing a bearing in an Indesit top-loading washing machine is even more labor-intensive. To begin with, you will have to disassemble almost the entire washing machine. Unlike front-loading, on a “vertical” drum the drum is attached on both sides. The doors and blocking are at the top, and the side walls are at the sides. Washing machines Electrolux, Bosch, Whirlpool are disassembled in approximately the same way. But Bosch will have to be promoted almost completely.
The peculiarity of a vertically located drum is that two bearing assemblies need to be replaced - top and bottom. Otherwise, an imbalance may occur and all the work will have to be done again.
Changing the bearing on an Indesit washing machine with your own hands is not so difficult. The main thing is not to be afraid, to prepare properly and to have the right tool.
Removing the pulley and motor
Before solving the problem with the wear of the seals, we need to remove the pulley and remove the motor of the Indesit washing machine. As you can see from any diagram or photo, to do this you will first need to remove the drive belt. To do this, rotate the pulley and pull the belt towards you.
Now we fix the pulley by inserting any strong pin into the wheel. Unscrew the pulley by unscrewing the bolt holding it. Rocking it slightly, remove the pulley from the shaft. We disconnect the heating element and the washing machine motor from the wires.
It is not necessary to remove the heating element, but take a moment and look at its condition to see if there is a little scale on it.
Unscrew the mounting bolts and remove the engine, rocking it slightly. Now it is possible and necessary to separate the pipe. They do this through the bottom, for which we place the machine on its side, loosen its clamp with pliers and separate the indesite from the tank of the washing machine.
We disassemble the washing machine
First we need to remove the upper part of the case (cover).
It is secured with two screws from the back. After you have unscrewed them, you need to slide the cover towards the back of the case. And we take it off. Then remove the machine dispenser completely. In some models, to remove the dispenser we need to press the latch. Next we need to remove the control panel. To do this, unscrew the fixing screws. The panel can be carefully placed on the side of the case. Next, open the hatch and remove the outer collar of the cuff. Clamps are different. Some can be removed with pliers. Others can be removed using a slotted screwdriver. When the clamp is removed, we need to separate the cuff from the front of the body and tuck it inside the machine. This way she won't bother us.
Then unscrew the lock. It is secured with two screws. We twist them and stick our hand inside between the cuff and the wall and separate the locking device from the inside of the machine wall. We remove all the remaining fastening elements and remove the front part of the case. We’ll also remove the back part of the case in advance, so that we don’t have to mess around with it later.
Then we disconnect the dispenser hopper with the pipe from the machine tank. To do this, we need to remove everything that is in the way and loosen the clamp. We put everything away where it won’t get in the way. Next we need to remove the counterweight (if it's on the front). If it’s behind us, then we’ll get to it too and definitely take it off. Typically the counterweight is bolted in place. We will unscrew these bolts using a screwdriver.
Next, we approach the heating element (heating element). For most models it is located at the back. Some have it in the front. Before removing it, we’ll take a photo of the wires so that we can connect everything in the right order later. Then remove the heating element mounts. More often it is attached to one nut. We loosen it and press in the screw. Then use a flat object (for example, a screwdriver) to pry it up and take out the heating element.
After this, remove the pipe that is attached to the tank. We have already learned how to disconnect the clamps, so we can do it without any problems. Then we remove any wires that may be attached to the tank.
We approach the machine from behind and remove the drive belt. Next, disconnect the connector of the wires leading to the machine motor. Then we twist the screws that secure the engine. Then we take out the engine by pulling it in our direction.
Then we tighten the screws that secure the shock absorbers. And we separate their lower parts from the wall of the car. All that remains is to remove the springs. And the tank can be taken out. All this should be done carefully so as not to drop the tank.
Preparing for replacement
In order to replace the bearing, the washing machine will have to be disassembled. You need to be prepared for the fact that the repair may take several days, therefore, if possible, it is better to carry out the work not in the bathroom, but in the garage, shed or other utility room.
It is necessary to prepare new bearings and oil seal. You can find spare parts in specialized stores if you name the model of your unit. It is better to purchase parts manufactured by the washing machine manufacturer.
Also required for repairs:
- a set of flat and Phillips screwdrivers;
- socket and open-end wrenches;
- hammer;
- bit;
- hacksaw for metal;
- pliers;
- glue;
- sealant;
- WD-40 product.
In the photo you see the tools and means necessary to replace the bearing.
The washing machine is disconnected from the network, the water supply tap on it is turned off, and the water supply and drainage hoses are disconnected. If there is water left in the tank, it is drained through the emergency pipe.