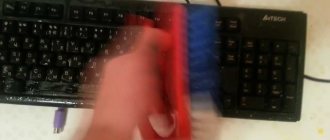
Good afternoon friends. There are different situations in the lives of people who often work with a computer. One of the most common is when a user accidentally spills a cup of coffee or a glass of beer onto the keyboard. In fact, the difference is not big. So, a person accidentally flooded the keyboard; the keys don’t work, what should I do?
The very first action that a person should perform in this situation is to unplug the keyboard plug from the connector. Otherwise, water can harm not only the keyboard itself, but also the connector in the system disk. And this is already worse. If the keyboard connector fails, you will have to take the computer to a repairman. But, let's take a closer look.
I flooded the keyboard with water, what could be the consequences?
A data input device, like other elements of a computer, when liquid penetrates inside its case, ceases to function completely, or it begins to malfunction. But, despite this, a modern keyboard (even a simple one), when exposed to water, passes this test without any special consequences (in most cases).
In general, there are membrane and mechanical keyboards. Now we will look at membrane devices, and mechanical ones at the end of the article.
Most modern (membrane) keyboards do not have any special waterproofing features. They are simply not provided. The point here is different. At the moment, such devices use materials and electronic parts that will not fail even if a decent amount of liquid gets on them.
Therefore, if you flooded the keyboard with liquid (water-based) and it stopped functioning, this incident does not mean that the gadget is faulty. This problem can be solved in two ways:
- You just need to dry the information input device using a hairdryer, or place it in the sun (under a hot lamp) to dry it on its own;
- You need to start disassembling the device and try to remove all the water from the keyboard using manual methods. This method also helps out if the hairdryer does not dry the keyboard.
Preventive measures
If liquid containing honey, sugar or similar substances is spilled on the keyboard, then additional actions are necessary. Water evaporates completely and without a trace, but, for example, coffee and tea in any case leave a sticky substance. And here ordinary drying will not help. If you don't clean your keyboard, the keys may become stuck or break completely. Therefore, cleaning in this case is mandatory.
To remove the sticky substance, you can use an alcohol solution after disassembling the device and disconnecting all its elements.
The keyboard can only be connected after drying. It should be noted that the external input device dries faster. If we talk about a laptop, then you need to dry not only the keys, but also all the existing boards.
Attention, TODAY only!
A budget solution if liquid gets on your laptop keyboard.
How often do you flood your keyboard with beer and other various drinks? Statistics from service centers show that every fifth user of computer equipment accidentally spills liquid.
If this happens, there is no need to immediately run to the service center; there are simple tips that can help you quickly fix everything yourself. What needs to be done in this case will be discussed in the article.
Six steps to salvation.
Spilled coffee, tea, beer? First of all, don’t panic and rush into all seriousness. To correct the situation you will need:
- Set of small screwdrivers;
- Cotton wool;
- Brush (perfect for women’s makeup);
- Alcohol (vodka will also work).
Step one - you must immediately disconnect the laptop from the network. Otherwise, this will lead to the keyboard coming out and causing a short circuit. And then you can say goodbye to your favorite computer. How to clean a flooded laptop keyboard
? Much easier than it seems.
Step two is to promptly remove the battery. In some models, you will have to remove the back cover to do this.
Step three - no need to blow dry immediately. You need to remove the keyboard. On the back side under the battery or on the case you need to unscrew the bolts (you will need a thin screwdriver), carefully prying and lifting the keyboard and move it towards the screen.
How to dry your keyboard with a hair dryer?
Almost all hair dryers are useful for this purpose. The process of drying the clave itself is not complicated. You only need to remember one thing - try not to overheat the part of the keyboard that is under the hot wind of the hair dryer. Modern keyboards have a board that is responsible for key clicks. Its base is thin plastic. There is a possibility that this plastic will simply begin to melt from the hot flow of air masses. Therefore, you need to not overdo it when you start drying the keyboard.
Take a hairdryer and gently pass it in an even layer across the plane of this device five times (on average). At the same time, it is advisable to stay in one place for no more than 5 seconds. Next, after you have dried this device, you need to connect it to the PC and check whether it has started to function or not. Does not work? In this case, we perform the operation again.
To dry keyboards, there are special devices whose task is specifically to dry keyboards. They are called “Vacuum Cleaners”. I offer a snapshot of one such device:
It is advisable to purchase this gadget for people who like to enjoy drinking coffee or beer while working at a PC.
Safe liquid spilled
Follow the instructions below to promptly resuscitate your PC after being flooded with water:
- If the user spills water on the laptop, turn off the laptop first. Hold the power button for five seconds, the device will turn off completely. Take out the battery. The sooner you turn off the power to your PC, the more effective the repair will be;
First of all, disconnect the laptop battery
- Turn the laptop upside down so that all the water drains out. Leave the laptop in this position for a day. 24-48 hours is enough for the computer to dry completely;
Never turn on a computer that has not been dried and do not dry anything with a hairdryer!
- By quickly following the first steps of the instructions, you will save time on further repairs. After complete drying, the device will turn on. Are the buttons not working after switching on? You can replace the keyboard on your PC at home. Buy buttons for your PC model and install them following the instructions for your PC model.
- completely turn off the power and dry the PC. The steps are described in more detail in the previous instructions;
- in eighty percent of cases, the liquid first gets on the buttons, and then penetrates the case and floods the hardware components: the processor and the main board. Manufacturers add a special film under the buttons that prevents moisture penetration. If a user spills tea on a laptop, you first need to wash the laptop keyboard after spilling it, and then remove it
Sticky keys
on a laptop. Clean the stuck surface with an alcohol solution;
Cleaning the keyboard from aggressive liquid
- If your PC is flooded, first of all you need to turn it over and unclip the keys. Humidity under the keyboard is a direct indicator that the hardware components are flooded and, conversely, the computer is not damaged from the inside if the key tray is dry. Wash the removed keyboard with warm water and detergent.
How to disassemble the keyboard to dry it by hand?
Most of these devices have a housing, on the front of which buttons are installed. Secure the top and bottom of the keyboard with bolts. From here, if you need to completely disassemble this device, carefully look through its entire lower part to look for bolts. They need to be unscrewed every single one.
Be sure to look at what is under the stickers, since manufacturers often hide some of the bolts under them. If the halves of the keyboard still do not want to separate, you need to peel off the sticker and unscrew another bolt (or several).
In the top screenshot we see a keyboard that has a complex design. This design includes a folding element. When your keyboard looks like the one above, it is advisable to start disassembling it with this particular part.
Recommendation - after unscrewing all the bolts from the body, do not rush to turn it over. In this case, all of the keys with rubber pads under them may fall off the keyboard (not on all models). Inserting such elements one at a time is a very painstaking task. Therefore, to ensure that small parts remain in place, you need to carefully lift the bottom cover of the keyboard.
Next, let’s see if the gadget’s mechanism has another plastic or metal backing under the buttons. It's there in the screenshot.
In other words, in this situation you will have to unscrew some more bolts. The substrate is also sometimes a board that is responsible for information about button presses. But, in most keyboards there is a special board. But, regardless of this, next we extract this important fee.
For example, this is what a regular plastic board looks like on modern keyboards:
At the top right of the photo there is another small board with the main controller. In most cases, there are still a few bolts in this part. They need to be unscrewed. Then, we take the board and carefully pull it out.
There may be an additional rubber button under the keys (nowadays this option is rarely used). But most often a silicone panel is used for these purposes, as in the screenshot:
Such a board most often consists of a three-layer mechanism. At the same time, its 3 layers are attached to each other in different places. It’s not worth separating these layers because with your actions you can simply break it. To remove water, you need to carefully wipe the surfaces of each of the three board elements on each side with a soft cloth.
It is quite possible that water will be on rubber buttons, keys and other elements of the front surface of the device. In this case, the gadget must be completely disassembled. It is advisable to place the disassembled keyboard in a warm place for about 12 hours. The water should evaporate on its own.
What was spilled is an important point
It is important to consider what was spilled on the keyboard.
It is important to consider that not all liquids that end up on the surface of a laptop lead to damage. According to the parameters of potential danger, they are divided into the following groups:
- Aggressive.
- Weakly aggressive.
There is a simple principle: the more salts and sugar are present in the composition, the more aggressive it is. Therefore, the first category includes running water, tea without sugar and other similar drinks.
Slightly aggressive substances in small volumes and with short-term exposure do not pose a particular danger. If resuscitation is carried out in time, the motherboard and other important components of the device will remain in good working order. As for drinks containing sugar (coffee, tea, Coca-Cola, etc.), they often cause laptop failure. And kvass, salty mineral water or wine can “kill” a laptop computer in a few minutes.
The effectiveness of future repairs will depend on the amount of liquid that gets onto the working surfaces, its composition and the duration of contact.
The first actions of a laptop user when a non-aggressive liquid is spilled in an amount of up to 20-30 ml
What the user needs to do first
The algorithm for the first steps to care for a laptop comes down to the following actions:
- You need to immediately, without any pause or hesitation, disconnect the laptop from the power supply by removing the charging unit from the device connector. When such a problem occurs, you don’t need to think about how to properly disable the operating system or check unsaved files, much less turn to thematic forums for help. The first task is to save the equipment. Text documents and other files can be recovered in most cases, but repairing a laptop that has been exposed to water for a long time is much more difficult.
- Next, you should turn off the laptop if it did not turn off on its own after contact with water or the previous step. To do this, you need to remove the battery and connected peripheral devices (drives, mouse, keyboard). You should also remove the hard drive from the drive.
- After removing the back cover, you need to turn the laptop over with the keyboard down so that the water droplets drain off. The main thing is to avoid getting moisture on the display matrix. The remaining particles should be wiped off with a napkin or soft cloth. You should let the device stand in this state with the lid open for several hours. It is better to place it on a heated windowsill and wait for the case and keyboard to dry completely. The process may take 1-2 days.
Do not try to turn on a flooded device even if proper drying has been carried out
You cannot turn on the laptop.
It is strictly forbidden to start the laptop after the initial drying. According to statistics, 80% of users who encounter such a problem make a fatal mistake by connecting an “under-dried” or insufficiently tested electronic device to the power supply. This approach is extremely dangerous, since the remaining spilled liquid can cause a short circuit and damage the system. The main task is to eliminate unpleasant consequences and minimize risks.
If the laptop is not filled with a large amount of non-aggressive liquid, and all stages of resuscitation measures are completed successfully, most likely after drying it will continue to work as before. But even at this point there are pitfalls.
A common misconception: if the device starts up after drying and works correctly, then problems will no longer arise.
However, in practice, unpleasant incidents often occur. Upon visual inspection, there may be no traces of moisture on the keyboard and case, but this does not guarantee that liquid has not managed to penetrate inside. Prolonged contact with internal components will result in serious failure. The poured composition goes the following way: keys, joints between the case and the keyboard - the motherboard. When interacting with conductive parts, the destruction process starts within a few seconds.
Some laptop manufacturers provide a special protective film under the device case. If it is absent, corrosion processes will gradually affect metal elements.
The situation is aggravated by the following factors:
- Motherboard components quickly become saturated with liquid.
- The rate of corrosion progression increases as the board heats up.
- Corrosion processes occur faster when there is a potential difference between tracks located nearby.
To avoid disastrous consequences, you need to perform a series of diagnostic actions before drying, without turning on the laptop.
How to check if there is moisture under the keyboard
How to check for moisture under the keyboard
To determine if there is moisture under the keyboard, you will need to disassemble the device. The algorithm for dismantling the case differs for different laptop models. It is important to remove the keyboard slowly and carefully after removing the small latches using a straight screwdriver.
If there is no moisture under the housing, this is good news.
To clean sticky buttons of a dismantled part, you need to use regular hot water and a detergent without abrasive particles. It takes up to 24 hours for the keyboard to dry before reinstalling it on the laptop.
If no mistakes were made at this stage, the keys will work properly for several years.
If you find traces of moisture under the keyboard case and on the motherboard, you can proceed according to the following scenarios:
- Contact professionals from the service center for help.
- Try to eliminate the unpleasant situation with your own hands.
We invite you to familiarize yourself with the algorithm of actions for self-reanimation of computer equipment.
After dismantling the case, diagnostics of the motherboard should be performed under a magnifying glass. Particular attention should be paid to blackening at solder points and plaque. If there are blackened areas, and you know how to work with a soldering station, you need to re-solder them.
For local lesions, you need to clean them with a soft toothbrush, alcohol and distilled liquid. Next, you should thoroughly dry the board. A soft eraser can be used to remove traces of oxidation on the contact elements.
Deformed and blackened areas need to be resoldered. If there is plaque on the entire surface, and local cleaning is impossible, you should try the option of global washing of the board. To do this, you need to remove all unaffected parts (coin-cell battery, chipset, Wi-Fi module, etc.), remove the remaining thermal paste and clean the interior from dust and other contaminants.
At the next stage, you need to briefly “soak” the board in a weak soap solution and carefully brush it with a toothbrush. Next, you need to rinse the part with clean hot water, heated to a temperature of 50 degrees Celsius.
When washing, it is worth considering that the internal chips and textolite love to absorb liquid. They need to be washed for 4-5 minutes, applying a detergent without abrasive particles. It is allowed to use neutral baby soap. Soap and remove the board carefully, avoiding contact with the connectors.
After washing off the soap solution, you need to inspect the board for damage. Remaining stains should be washed again. Having completed a kind of “water bath”, you need to shake the treated board, wipe it with a lint-free cloth and dry it for 24 hours.
After the specified time has passed, it remains to make sure that there are no traces of spilled liquid and install the part in its original place. The contact pads are additionally cleaned with an eraser and treated with an alcohol-containing solution.
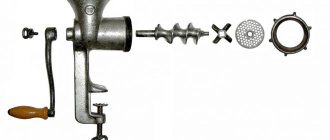
How to disassemble a mechanical keyboard?
If your keyboard is mechanical, and all its keys are attached to springs, it is no less easy to disassemble. First you need to unscrew all the bolts, then remove the bottom cover, then the front cover and carefully disconnect all the keys. Then we dry the keys, covers and board and put them in place. After that, we check whether it worked or not. In general, I wrote in detail how to disassemble and clean a mechanical keyboard in the article: - How to clean a keyboard?
If you have dripped a little, in this case you should not loosen the bolts on the keyboard. Simply pry the button with a flat screwdriver and remove the key. You can remove it from everything by first photographing the device. Then, carefully dry the gadget and put the buttons in place.
Important: - I think many of you will think that this disassembly process is difficult and you can easily get confused. After this, you are unlikely to be able to assemble the keyboard. This is true. But there is a simple way out for this. First, take a photo of the keyboard. This will help reassemble its keys in the right places if they fall apart.
Then, as you disassemble this device, continue to take photographs of all important steps. After this, using the photos taken, you can easily restore everything. This applies not only to disassembling the keyboard, but also to all electrical devices. Also, you can film the entire process, this will also help restore everything to its place. You can rewind the video to the beginning at any time and watch the process again!
Actions to take if liquid gets on a laptop keyboard
The laptop buttons are built into the case, and if water gets on them, the following measures are taken to maintain functionality:
- disconnect office equipment from the power supply and remove the battery as soon as possible;
- turn the laptop over to allow any liquid that gets inside to flow out of the case;
- keep the equipment upside down for 2–3 hours in a dry place;
- using a hair dryer, they direct streams of warm air under the buttons without changing the position of the laptop.
It is advisable to increase the natural drying period to 1–2 days. After this, the equipment is turned on and checked. If the laptop does not turn on, you will have to use an office equipment maintenance service, where specialists can put it in order.
When working with computer equipment, it is advisable not to drink tea or have light snacks. This will eliminate the possibility of liquid getting on the keyboard and extend its service life.
How to rinse?
Flushing the device is necessary if aggressive liquid is spilled. It will help minimize the damage caused. They contain sugar and are more likely to cause the keys to stick. This will significantly affect the operation of the device.
In addition to performing the basic steps, or rather turning off, disassembling and drying the laptop, the keyboard must be unscrewed and the buttons washed under water using detergent . Then leave them to dry for 24 hours in a sunny place.
A vacuum cleaner and napkins will help speed up the process. As soon as the buttons are completely dry, the device is assembled and the quality of work is checked.