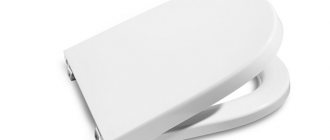
Preparing for installation
- The toilet is installed in the intended location, and its outline is drawn on the tile with a marker.
- There is a sewerage system and a pipe for cold water supply. There must be at least 15 cm of pipe above the floor in order to properly connect it to the toilet.
- The tiled surface is sanded, since parts stick better to a rough surface. The part of the toilet that will be glued to the floor is also sanded.
- Dust is wiped off the areas to be glued on the floor and toilet, then they are degreased with white spirit or any similar solvent.
- In order not to contaminate the surface that is not to be glued, the outer side behind the marker mark is sealed with masking tape or simple tape.
Which glue to choose
The cheapest way to glue a toilet to ceramic tiles is with a cement-based solution, but its seam will not always look aesthetically pleasing. It will also be difficult to dismantle in the future, especially if the toilet is connected to a cast iron sewer. Liquid nails also work well, but it will be difficult to replace the plumbing fixtures with new ones.
When using silicone, there is a high probability of the toilet moving or being damaged. Epoxy will quickly help to glue, but during dismantling there is a high risk that the tiles and plumbing will be damaged.
Cement mortar
Can be used if the toilet is installed for a long time. For installation you need a hammer, cement, and a chisel. The earthenware is installed in place, its outlet is connected to the sewer pipe, and the contours are outlined with a marker.
The toilet bowl is removed, and a notch is made on the tile along the drawn contour and a light chip of the top glaze is made with a hammer and chisel. This way improves the adhesion of cement to tiles. Actions are carried out wearing safety glasses.
A solution is prepared with or without sand. The consistency should be thick. The installation site is wetted, and a solution is generously applied to it along the marked contour. The toilet is placed on the solution and pressed slightly to the floor. Excess cement is removed with a rubber spatula.
You can use the bathroom only after the solution has completely dried.
Sealants
When choosing silicone sealant, you need to pay attention to its composition.
- Acetic. It has a pungent odor and is inexpensive.
- Neutral. Dear, can be used with any material.
Sealants are resistant to UV rays, adhere well to plumbing parts, are resistant to elevated temperatures, and form a flexible, beautiful seam.
- Ceresit Sanitary. A special sealant for plumbing, it can be used in areas of increased dampness. Provides good adhesion and prevents the spread of mold. Resistant to sunlight, has a long service life. Before applying the sealant, the surface must be cleaned to improve the adhesive characteristics of the material.
- Baumit Silicone. Does not allow the spread of fungus, is resistant to ultraviolet radiation, can be used at t=+5…+35 °C. Used for fixing interior plumbing fixtures and for tiling work. Resistant to high temperatures. Release form: 310 ml tubes.
Liquid Nails
- Acrylic. It is based on a water emulsion.
- Neoprene. Based on organic dye.
Neoprene composition is more suitable for the bathroom. Its disadvantage is toxicity, and its advantage is a more reliable coupling.
The mixtures are not susceptible to moisture and are resistant to mechanical damage. They set quickly, so installation is carried out very quickly. The following brands of compounds are suitable for installation.
- Belife is a one-component polyurethane composition. Has high initial adhesion force. Eco-friendly, safe for humans.
- LIQUID NAILS LN-901 – the product is suitable for damp areas. You can adjust the position of the glued parts for another 10 minutes. from the moment of application. Withstands t=-29…+60 °C, can be used indoors and outdoors. Dries completely within a day. This is a universal, durable composition that is resistant to mechanical stress.
- Titebond Multi Purpose is a universal product in a light beige shade. Has a viscous consistency. It hardens for half an hour, the parts adhere tightly. The adhesive is toxic and has a pungent odor, so all work with it is carried out in protective equipment. Resistant to dampness and low temperatures.
Use of adhesives
One of the most versatile methods of attaching a toilet to a tile floor is gluing. Modern industry offers a whole line of products designed for reliable fixation of plumbing fixtures. Often these are simple products that are applied immediately (liquid nails, sealants); there are also two-component compositions, the most famous of which is epoxy resin.
For those who want to achieve excellent results and are not afraid of work, we can recommend an adhesive composition based on epoxy resin, which has been used for decades. Its composition:
- 100 parts epoxy;
- 20 parts solvent;
- 35 parts hardener;
- 200 parts of cement.
First, take the resin and bring its temperature to 50 degrees in a water bath. The solvent is introduced, followed by the hardener. The mixture is stirred all the time. Cement is added last. The resulting mass has sufficient fluidity; when it hardens, it firmly fixes the mating parts.
While the glue is being prepared, you need to prepare the surfaces. To do this, simply sand the base of the toilet and the tiles with coarse sandpaper. An adhesive mass is applied to the base. The layer must be at least 4 mm, otherwise it will not be possible to completely fill possible irregularities in the tiles and the base of the bowl. Place the toilet in place, press down firmly and leave until completely hardened.
Even a novice repairman can install a toilet on tiles with his own hands.
The main thing is not to rush and not to forget that you are doing this for yourself. Just try, spend a little time, and everything will work out, and another useful skill will appear in the home master’s collection of skills. Related article: The insides of a toilet cistern
Installation instructions for silicone
The surface of the floor and the bottom of the toilet are prepared for gluing. The silicone compound is evenly applied to the tile along the inside of the contour drawn with a marker, with a distance of no more than 4 cm from it. The glue is also applied to the underside of the toilet. Both surfaces are connected, slightly compressed and held with force for 15 minutes.
Excess silicone that has gone beyond the plumbing must be quickly removed. You can use the toilet after the glue has completely hardened. Usually this takes no more than a day.
You cannot do anything near the toilet so as not to damage the integrity of the seam if it is accidentally moved.
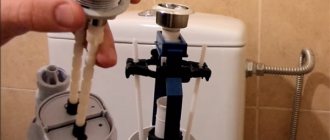
A day later, a sewerage system and water supply are connected, and a tank is installed.
Source
Tools and materials
To perform installation work on installing plumbing, it is necessary to prepare all the tools and equipment:
- hammer drill with drills;
- a hose for supplying water;
- corrugated pipe for connecting the drain to the sewer;
- a set of keys, including a wrench;
- rubber spatula;
- Screwdriver Set;
- sealant or silicone;
- glue;
- cement mortar;
- substrates;
- core;
- hammer;
- ball valve;
- winding for sealing connections;
- marker or simple pencil.
Mounting bolts
To securely fasten the device, it is necessary to use mounting bolts and gaskets for them. When installing, it is necessary to use dowels.
Liquid Nails
Liquid nails are used when installing plumbing fixtures without fastening bolts and act as glue, firmly gluing plumbing fixtures in the bathroom.
Sealant
The sealant is responsible for the tightness of all joints and joints and prevents the leakage of moisture.
Before using sealant, silicone and liquid nails to increase the adhesive properties of the surfaces to be joined during fastening, it is necessary to clean the surfaces from dirt and grease with acetone, turpentine or industrial alcohol.
Silicone
When installing plumbing fixtures, silicone is used to create waterproofing under the frame of the device.
Methods for attaching a toilet
When installed in a bathroom, the device is mounted using two methods: closed and open.
The closed type of fastening is carried out using bolts located inside the plumbing structure. The open method involves bolting the base.
Open
Experts consider open mounting to be the most reliable and simplest, since installation is quick and easy. But in terms of aesthetics, this type of fastening the toilet to the tile is inferior to the closed fastening method. In addition, when cleaning, it is necessary to thoroughly wash the frame of the device in the open mounting area to maintain the cleanliness and sanitary condition of the room.
Closed
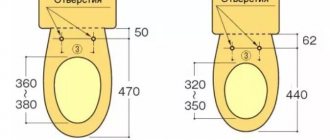
Having purchased a toilet that is installed in a closed manner, it is necessary to mark the installation site, outlining the outline with a pencil and marking the location for the mounting holes.
Attaching a toilet to a tile floor
Toilets on tile floors
fastened using screws (dowels) with a turnkey head. This method of installing toilets is often used:
A. Attaching a toilet with an oblique outlet to the floor -
- turn off the water supply to the tank
and drain the water from the tank to make
it easier to move the toilet - disconnect the flexible corrugated pipe (5) from the toilet flush
(8); - through the mounting holes
(18) in the base of the
toilet
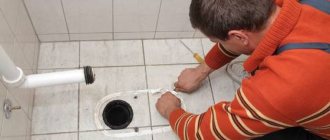
, mark the holes for the screws and move the toilet; - at the marked points, drill holes with a hammer drill with a diameter 1 mm smaller than the dowel screws that will fasten the toilet;
- 2...3 drops of silicone glue are poured into the drilled holes and plastic cases are inserted under screws with a length of at least 60 mm;
- the lower edge of the bottom of the toilet
(pedestal) is also coated with silicone (white) glue and installed so that the holes in the toilet pedestal coincide with the drilled holes; - To prevent the silicone adhesive from being squeezed out from under the smeared edges of the bottom during installation under the weight of the toilet, place 3...4 plates of thick plywood or plastic underneath it. 2-3 mm;
- then insert screws with a key head
and screw them in, not reaching 1...2 turns; - after the glue dries, after 1-2 days, pull out the plates from under the bottom and tighten the screws until the toilet is tightly connected to the floor.
ATTENTION! Driving screws
Great care must be taken as the edge of the toilet can easily be chipped off.
B. Attaching a toilet with direct release to the floor -
- turn off the water supply to the tank
and drain the water from the tank to make
it easier to move the toilet - through the mounting holes
(18) in the base of the toilet pedestal, mark the holes for the screws and move the toilet; - at the marked points, drill holes with a hammer drill with a diameter 1 mm smaller than the dowel screws that will fasten the toilet;
- 2...3 drops of silicone glue are poured into the drilled holes and plastic cases are inserted under screws with a length of at least 60 mm;
- between the floor and the toilet, sheet rubber is laid with holes for releasing the toilet bowl
(2) and holes for screws; - the outlet branch from the outside of the groove must be lubricated with red lead and a linen strand of flax, previously tarred, must be wound around it (ready-made tarred rope strands are sold);
- do not bring the strand to the end of the process (2) so that its ends do not fall into the drain hole and clog it;
- the strand should also be coated with red lead;
- then install the toilet
with the outlet hole in
the socket of the sewer pipe
; - If the toilet
becomes normal, you can screw in the screws.
READ ALSO: How and what to cut threads on a metal pipe
B. Fastening a toilet with direct release by cementing
toilet flushes into the floor
(release).
But then the toilet cannot be dismantled if clogged. You will have to break the cement along with the outlet
, lift the remaining part
of the toilet
and, after cleaning
the sewer pipe
, install
a new toilet
.
In this case, even a nearby inspection
(cleaning) will not save the toilet.
Yes, and cement the toilet
not so easy.
Cement does not adhere well to the shiny, smooth, glazed surface outlet
.
Therefore, when pouring the tide with cement, it must be below the floor level. around the outlet
, which is filled with cement.
READ ALSO: How to disassemble a ball mixer and repair the mixer yourself
Any change in the type of toilet
to the floor may require a number of alterations to the floor, hard lines, etc.
Installation methods
Before proceeding with installation, be sure to mark the installation location. When marking the holes for attaching the toilet, hold the pencil strictly vertically so that the holes coincide with the mounting holes.
It is better to use a core to mark the holes, which will leave a scratch in the right place. The mounting bolts must be tightened thoroughly, but carefully so as not to split the device and avoid possible tilting.
Vertical mount
Vertical fastening is performed when installing a toilet in a closed or open type.
Side installation
Lateral fastening is carried out in the same way as fastening using dowels, only the connecting parts are located inside the toilet frame. Having made preliminary markings, use connecting parts for side fastening: long screws and corners. The device is fixed through the side holes. Plumbing installed using this method has an aesthetic and attractive appearance.
No bolts or drilling required
Installation of a toilet without bolts is carried out using special glue or liquid nails. Clean the pre-prepared installation site and degrease it with industrial alcohol. Then the joints between the tiles and the toilet frame are treated with sandpaper to provide roughness, which ensures reliable adhesion between the frame of the device and the tiles.
Attaching the toilet to a wooden floor
Toilet bowls of any type
are attached to the floor through holes
in its base - tide or pedestal
.
Screws
are passed through them , screwed into the floor or into a wooden board that is embedded
in concrete
.
The board is also called taffeta
.
The wood around the hole where the screws go, like the taffeta
, often overheat due to leaks, and the toilet begins to wobble.
A. If the toilet is loose - minor repairs
To start, try carefully so as not to chip off the boss or pedestal
, tighten the screws.
If the screws do not screw in, remove them. Through the holes in the pedestals
we will place small wood chips into the holes of the taffeta.
Place pieces of leather or rubber under the heads of the screws
, grease them generously and screw them in again.
To make pieces of leather or rubber less visible, we place brass and plastic washers
.
If the screws do not yield when you try to tighten them, we will try to place something in the gap between the taffeta
and the end
of the pedestal
to reduce the rocking of the toilet (a wedge-shaped sliver or a piece of sheet plastic).
B. If the toilet is loose, it’s a big repair.
A more thorough repair will require quite labor-intensive work:
- Pass a hacksaw blade (for metal) without a frame between the end of the pedestal
and the floor. - Cut the a cloth
. - Disconnect the flexible or rigid line
from
the flush tank
, while closing the valve. - Together, remove, or rather, remove, the toilet outlet
from the sewer socket.
When working alone, this is easier to do by first disconnecting the cistern
.
Lean the entire structure against the wall, placing a rag under the outlet
.
Remove the remaining screws from the taffeta using pliers. If the taffeta
is rotten, change it. To replace it, it is best to take an oak board.
After removing the remaining screws from the taffeta, it is necessary to work with the toilet release
:
- it should be cleaned of remnants of the previous seal;
- wipe dry and coat the grooves with thickened oil paint or red lead putty;
- Wrap strands of seal tightly over the paint.
To prevent the seal from unraveling, make several turns of any twine over it.
It should be remembered that the seal
should not reach the edge
of the outlet
by a few millimeters.
Coat the outlet
with the seal again with paint or red lead putty.
READ ALSO: The toilet flush cistern is leaking, what to do
if new screws
, with which you will mount
the toilet
, the cross-section is smaller than those previously used, insert pieces of telephone or electrical wire in plastic insulation into the holes of the taffeta.
Vinyl chloride tube is also suitable. If it is large enough (more than 5 mm), cut it lengthwise and, having rolled it up, insert it into the hole so that a screw
.
Also fill the holes drilled in the floor if the toilet
is attached without
taffeta
.
Finally carry out the last operation - lower the toilet flush
into
socket
and tighten the screws.
Q. Some recommendations for replacing taffeta.
Taffeta
may be flush with the floor or protruding from it.
To make a new taffeta
, measure the dimensions of the old one or determine these dimensions from the notch.
The largest hole in the taffeta, which serves for direct release
, should be processed with a drill.
The bridges between the holes are partially removed with the same drill, placing it at an angle. The remaining jumpers can be cut with a chisel. It will be better if the taffeta
is oiled.
After fitting, drive nails into the back of the taffeta
, and from the front, drill holes for screws.
the taffeta
in it .
Install a toilet with a cistern
.
the toilet
for a day or two .
How to install it yourself
Installing a toilet with your own hands is done in this way. First you need to prepare a place for installing the device, having previously made markings for sewer and water pipes. Then bring the communications to the installation site and install the toilet according to the chosen mounting method. Be sure to use silicone sealant to prevent the connections from leaking.
How to secure the base
To prevent the plumbing fixture from wobbling, it must be well secured and, if necessary, a substrate must be placed to level the floor level. When installing using mounting bolts, they should be tightened well.
Installation details depending on size
According to their purpose and parameters, devices are divided into universal, children's and devices with a special design for people with disabilities. Installation of the toilet, depending on the size, is simple. It is important to observe the technological parameters of the product when connecting it to sewerage and water supply. Modifications of the latter version are equipped with a wide bowl, height-adjustable and special armrests and handrails.
How to install on uneven tiles
If the floor in the bathroom is uneven, the toilet is installed as follows: it is necessary to level the floor using plastic or rubber gaskets. When installing the gasket, the gap between the floor and the toilet is removed. You can also use cement mortar on which the toilet is installed. Excess mortar extending beyond the frame is removed with a spatula.
How to install a toilet on tiles.
We are often asked: “Can a toilet be installed on tiles?” Yes, you can. But this task is not an easy one and, depending on the chosen technique, requires proper professionalism or time.
We will describe several ways in which a toilet is traditionally installed on a tile floor. And you yourself choose the most suitable one for yourself.
To get started, you should stock up on the following materials and tools (some of them may not be needed, depending on the chosen method of installing the toilet on tiles):
- corrugated pipe; - flexible hose for supplying cold water to the toilet; — ball valve to control water access to the toilet; — drills for concrete and ceramic tiles; - drill or hammer drill; - adjustable wrench; - screwdrivers; - hammer; - pencil; — core.