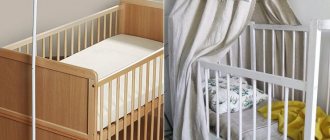
The kitchen room is usually furnished with a variety of furniture. This includes wall cabinets. They can be used to store dishes, a variety of appliances (food processors, mixers), as well as other kitchen utensils. But when purchasing such structures, the question of their installation immediately arises.
How to hang cabinets in the kitchen? It must be said that hanging kitchen furniture on the wall is a very difficult task. But still, any person who is at least a little familiar with the tool can perform the installation manually.
How to Hang Kitchen Cabinets on the Wall
The kitchen room is usually furnished with a variety of furniture. This includes wall cabinets. They can be used to store dishes, a variety of appliances (food processors, mixers), as well as other kitchen utensils. But when purchasing such structures, the question of their installation immediately arises.
How to hang cabinets in the kitchen? It must be said that hanging kitchen furniture on the wall is a very difficult task. But still, any person who is at least a little familiar with the tool can perform the installation manually.
How to properly hang kitchen cabinets on the wall
How to hang kitchen cabinets on the wall?
Before starting work, special attention must be paid to preparing the walls. This is necessary for reliable fixation of the purchased model. If the surface is uneven, you will need to ensure evenness using putty. Also, for these purposes, chipboard slabs can be attached to the surface. Otherwise, a lot of difficulties will arise during the installation process, and it is unlikely that you will be able to complete the job successfully.
Also, if you plan to install lighting or a socket, you will need to run the wires and complete the installation work before starting the installation of the main product. In addition to the above, the walls should already have paint, wallpaper or tiles on them.
Attention! If you moved into a new building, the house may shrink. Therefore, in such cases it is recommended to give preference to a kitchen apron. It will easily hide all the irregularities, and fastening will be extremely simple (using liquid nails or self-tapping screws).
How to hang a corner cabinet in the kitchen? It is necessary to determine the optimal placement height. After all, all household members are of different heights, and they should use the furniture without inconvenience. To do this, apply markings using a regular pencil.
How to Hang Kitchen Cabinets on Furniture Hinges
How to hang kitchen upper cabinets?
In this situation, we will need regular hinges and other fasteners. Having determined the upper limit, you should draw a horizontal line along the length of the entire cabinet. Then, using a water level, check the accuracy of its application. The line marks the location for the hole for installing the fastener. In the fourth step we install the fasteners. We equip furniture with regular hinges. A slight horizontal shift can be allowed to ensure optimal adjustment. The cabinet is suspended, leveled, after which a second point for the hole is marked, and it is removed. Next we perform the same actions. Afterwards we install the furniture and decorative elements, check it for functionality and begin to use it successfully.
How to hang kitchen cabinets on a strip
How to hang cabinets in the kitchen on a strip?
You can use a mounting rail for installation. It includes a hook that attaches to the side of the cabinet, with a small protrusion. To install using this method, you will need to attach the rail to the wall at the optimal height, and then install the cabinet using a hook. The presented method allows us to obtain a more reliable design and significantly speed up the installation process.
Now you know how to hang a wall cabinet in the kitchen. But this method also has certain disadvantages, which include the high cost compared to buying hinges, as well as the presence of a small gap between the wall and the main structure.
How to hang cabinets on a hanging corner
This hanging system has come to us since the times of the USSR.
Initially, the user needs to level the walls, and then follow the following algorithm of actions. At the start, the front doors are dismantled, the back wall is cut in the right places and the hooks are installed. Then the set is leaned against the wall at the required height and the upper border is marked, and then it is moved, outlining a line along the perimeter of the wall at the place where the cabinet is attached. Next, using the mounting rail, measure the distance from the top of the furniture to the top of the rail. This difference is displayed on the wall, followed by drawing the upper boundaries of the batten and the parallel first line. Using a mounting rail, holes are made. Next, dowels and screws are screwed in, the rail is attached, corners are installed and the cabinet is mounted.
Which dowels to choose
What kind of dowels should I use to hang kitchen cabinets?
Inexperienced users sometimes make mistakes during their selection process. The diameter should be larger than that of a self-tapping screw. This way you can securely fix it in the hole and ensure the highest quality fastening. If the diameter is smaller, the cabinet will not fit tightly to the wall, which may cause difficulties during its operation.
How to hang kitchen cabinets on the wall? It’s easier to purchase a ready-made kit, which includes both self-tapping screws and dowels. For drywall, an option equipped with a drill is suitable, as well as an option known as a “butterfly”.
Selection of fasteners and installation of corner cabinets
How to hang kitchen cabinets on a mounting rail?
There are several nuances on which the mounting option will depend. If the cabinet is hung on a wooden wall, then the ideal option would be hardened screws with a hidden semicircular head. And when the cabinet is mounted on a brick or concrete wall, dowels with plugs or regular bolts should be used. We recommend: Making a dressing room from plasterboard with your own hands
But installing the corner option will differ little from the installation methods described above. During the process you will need the same tool. As for fasteners, any of the options presented above are suitable for these models of kitchen furniture.
But it is still recommended not to experiment and discard the installation of the mounting rail, giving preference to ordinary hinges or corners already known to us. Well, in situations where installation causes difficulties, it is best to contact a specialist!
Source: setafi.com
1
The position of the suspended modules of the kitchen unit - we determine the height
Before installing the kitchen unit on the wall, markings should be made, taking into account all the features of the upper base. The fact is that all models differ slightly in size, and in some cases the difference in size can be quite significant. This refers to both the total height of the cabinets, which is usually observed for all wall sections of the block, and the spans between the shelves, as well as their depth. Moreover, the last 2 values have the greatest impact on the usability of the upper base. Let's look at a few examples.
The most effective solution for kitchen furniture is sections of 3 shelves no more than 30 centimeters deep. Moreover, the height of each span should be such that the middle level can be reached without resorting to aids in the form of a chair or, especially, a stepladder. As for the upper shelves, they can also be made in a direct access area or left at a height exceeding the height of a person with an outstretched arm, reserved for rarely used utensils. In this case, the lower plane of the cabinet should not interfere with tilting over the work surface intended for cooking, at a standard tabletop height.
Before you begin installing kitchen cabinets, you need to mark
Of course, in order to increase the capacity of the hanging sections, you can make them as deep as possible, up to half a meter, by providing each with 4 shelves, divided into compartments. However, an increase in internal space will be achieved by limiting access to it. The fact is that hanging kitchen cabinets below eye level is not the best option, as this will reduce the usability of the work area. Especially if the “apron” of the kitchen wall is used for hanging utensils and dishes. And to hang it high means to make the top 2 shelves out of reach at once.
Thus, based on GOST, the minimum height of the lower plane of the cabinet above the countertop is considered to be 45 centimeters, while the depth should be less than 30 centimeters. This will allow you to conveniently use the cutting area and at the same time leave room for a microwave oven and electric kettle. But the most comfortable height for a person of average height is considered to be 60 centimeters with the same tabletop width. The recommended height of the middle or second shelf from the bottom for a user height of 155 to 160 centimeters should not exceed 175 centimeters, so that a raised hand reaches the entire depth of the compartment. With a height of 160–170 centimeters, the average shelf should be at a height of 190 centimeters, and with a height of 175–190 centimeters – no more than 2 meters.
We recommend
Types of lamp bases Corners for walls Fastening for drywall to the wall
We hang on drywall and other complex materials
Complex materials include cellular concrete (foam and aerated concrete), cinder block and drywall, and drywall is the hardest to work with, so we’ll start with that.
The ideal option is when a small plasterboard box is installed on top of the load-bearing wall. Here you simply take long steel studs with a diameter of 12 - 16 mm and fasten the mounting strip through the box with these studs. In this case, the drywall is not particularly involved, the entire load falls on the load-bearing wall.
It’s more difficult if you have a hollow plasterboard partition in front of you, which has already been puttied and even painted. In this case, you arm yourself with a magnet on a string and determine where the supporting metal frame is located. Having found the metal structures, screw the mounting rail to them using special fasteners (moles) through the gypsum plasterboard.
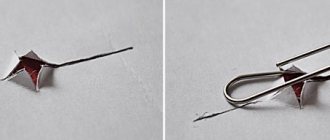
Model of metal fastening for gypsum boards.
The gypsum board sheet itself, no matter how often you attach a rail to it, is unable to withstand any serious weight. Therefore, do not even try to screw fasteners onto drywall alone.
With cellular concrete everything is much simpler. The load-bearing capacity of such blocks is sufficient to support a kitchen set. True, for this you will have to buy special anchors. The technology is standard - you drill a hole, insert an anchor into it and when clamped, the anchor expands.
Special anchors for cellular concrete.
The cinder block has the highest load-bearing capacity of the three, but the problem is that it is hollow. If the blocks are multilayer, then a long metal anchor is used for fastening and it is driven in such a way as to pass at least 1 chamber.
For multi-chamber blocks, long anchors are used.
But hollow blocks with 1 chamber will have to be drilled through and secured with a pin on the back side of the wall. As an option, metal fasteners for thick drywall are used, but it is not advisable to hang heavy cabinets on them.
Hollow single-chamber blocks are drilled through and the rail is secured with studs.
Installation instructions
After completing the preparatory work, you can begin assembly. After screwing the screws, you need to align the hooks in one position and make sure that they are at the middle level. Canopies must be secured in one position. The protrusion of the fastening part (has a hook configuration) should be 2 mm in relation to the rear of the wall. If you planned to cut the tire, then it’s worth taking care of the preparations. Holes are made on the pre-marked wall for fixing the tire. When finished, you need to attach the strip using dowels or self-tapping screws. The body of the hanging furniture must be mounted on a tire. The reference point is the plane of the wall. The next fastening of wall kitchen cabinets is carried out based on the previous one. The next step is the sequential fixation of installation objects using fasteners. A clamp is used for this. To prevent the surface from being damaged, a thin layer of insulating material must be laid. Fixing cabinets on fastenings. Next, you need to drill holes in the housings. To avoid cracks or splinters, use plywood or wood overlay. After preparing the apertures, the elements are connected with ties. After hanging and fixing the drawers, the doors should be screwed on. To do this, they must be laid out on the floor in such a way as to attach the loops to special niches. After this procedure, installation to the housing occurs. Test doors must be closed and opened several times to determine whether adjustment is needed or whether they are attached smoothly.
Step by step installation process
As already mentioned, there are 2 ways to mount the top block on the walls. The first is designed for the use of furniture hinges, corners and Ikea fittings, and the second is used only for an installation canopy with a wall plate.
Whatever method you choose, remember - first the corresponding fittings are screwed to the cabinet, and then markings are applied to the wall underneath them.
Method 1: ordinary
Hanging furniture hinges and corners are screwed to the cabinet in the same way:
- You need to lay the hardware against the edge of the cabinet and mark the screw entry points;
- If the loop is screwed with self-tapping screws, then holes with a diameter of up to 2 mm are drilled under them. If a furniture confirmant is used, then there are special drills for it, they are called “confirmant”;
- Next, screw the hinges to the cabinet;
Self-tapping screws for attaching hinges to the side wall have a length of 50 mm.
- When the hinges are screwed in, you can clearly measure the level of installation of the wall mounts. At the same time, immediately measure the distance between the loops, this is important here;
- Heavy modules are hung on anchors with a cross-section of 6–10 mm; for light ones, metal hooks such as self-tapping screws are used;
- In the case of powerful anchors, a hole is simply drilled and the anchor is inserted, and the anchor is finally tightened after hanging the cabinet. Under the light hooks, a plastic dowel is driven into the hole and the hooks are screwed in. Everything is ready, you can hang the closet.
For lightweight hanging blocks, hooks with a cross-section of up to 5 mm are used.
Method 2: Using a mounting rail
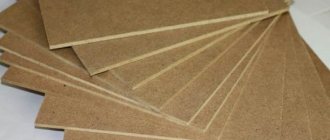
This method is good for its versatility, it’s hard to make a mistake here, so it is used by both amateurs and professionals. First, you will need to remove the back wall of the cabinet. This is not difficult to do, there is a thin fiberboard nailed with small nails, you can pry it with a screwdriver and it will come off easily.
| Illustrations | Recommendations |
| We attach the canopy. The canopies are rotated into the far corners of the structure, but not flush to the edge, but with a tolerance of 5 mm. If you fix the bracket flush with the wall, then the adjuster travel will not be enough and when hanging, there will be a gap between the mounting plate and the furniture. On heavy cabinets, the brackets are screwed with through studs onto the bolts. For small boxes, self-tapping screws are used. | |
| Cutout in fiberboard. After fixing both brackets, cut holes in the back panel for these brackets. Window size 32x55 mm. Then nail the back panel in its place. Many people believe that fiberboard is thick cardboard and try to cut it with a knife. You shouldn’t do this; it’s easier and faster to use a hacksaw. | |
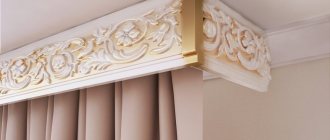
| Marking for the rail. The upper edge of the mounting rail is installed 30 - 35 mm below the top plane of the cabinet. Next, beat off the horizontal line on the wall and draw a line using the same strip. | |
| Cutting the slats. The standard length of the slats in the store is 2 m. To separate the desired piece, it is not at all necessary to cut it; these slats have notches for breaking. Simply place the rail on the edge of the stool and break it off with oscillating movements, as in the photo on the left. | |
| Let's drill a hole. The slats have mounting holes. On a solid base, such as brick or concrete, the fastening pitch is 30 - 40 cm. In foam and aerated blocks, the pitch is no more than 150 mm. For plasterboard boxes, the fixation step is 100 mm. The hole itself is drilled with a hammer drill to the required depth. | |
| Fastening the bar. The plank is screwed with anchors or powerful self-tapping screws under a plastic dowel. | |
| We hang the closet. You have everything screwed down, now all you have to do is take the cabinet and hook the hooks of the brackets to the edge of the mounting rail. |
Another important point is the adjustment of the hanging bracket. Such canopies are good because they are easily adjustable in 2 planes; you just need to take a Phillips screwdriver and adjust the box in the desired direction.
Diagram for adjusting the hanging brackets for the rail.
Which dowels to choose
What kind of dowels should I use to hang kitchen cabinets?
Inexperienced users sometimes make mistakes during their selection process. The diameter should be larger than that of a self-tapping screw. This way you can securely fix it in the hole and ensure the highest quality fastening. If the diameter is smaller, the cabinet will not fit tightly to the wall, which may cause difficulties during its operation. How to hang kitchen cabinets on the wall? It’s easier to purchase a ready-made kit, which includes both self-tapping screws and dowels. For drywall, an option equipped with a drill is suitable, as well as an option known as a “butterfly”.
Key requirements for kitchen furniture
When choosing a kitchen set, you need to take into account a number of basic requirements. The following criteria are of great importance:
- Appearance. Taking into account your own preferences and the general style of the room, you should choose the appropriate set that will harmoniously complement the existing design.
- Number and purpose of cabinets. Depending on your individual needs, you should decide in advance on the type of lockers. When calculating the quantity, you need to be guided by the free space in the room.
- Fastening mechanisms. The best option is a hidden ball mechanism that can withstand high loads. The use of high-quality fasteners has a positive effect on the service life of the entire structure.
How to Attach Kitchen Cabinets to a Bar
Wall cabinets are an important element of kitchen sets. Thanks to such furniture you will save space, at the same time it is spacious.
It is worth remembering that such furniture is often filled as much as possible with items that are different in weight, but so necessary for preparing food.
Therefore, the locking mechanisms of kitchen cabinets have to endure heavy loads. It is for this reason that the reliability and quality of fastening of each part of the headset to the wall is considered an important factor.
Hanging height
Before you start assembling the set into a single “wall”, you need to decide on the height at which the furniture will be hung. To correctly carry out these manipulations, preliminary calculations must be made.
We recommend: How to install a shower tray - options from different materials
In addition, it is worth deciding on the mechanism that will hold the row of kitchen cabinets.
It is necessary to correctly determine the gap from the tabletop to the bottom of the set. This primarily provides convenience to the owners of an apartment or house in using furniture.
Often, GOST is used to determine this factor and the main value is taken to be a distance of 45 cm, but this is not entirely correct.
The boxes should be located at eye level of the owner to create the most comfortable conditions for their use.
The main measure for determining height is often the height of the household.
For people with average height, this value varies from 55 to 65 cm. The optimal height is considered to be the one when a person, without third-party devices, reaches the highest shelf and takes the desired item without risking letting it go from his hands.
The most important thing is comfortable use of kitchen cabinets.
If you do not plan to install the lower part of the set or tabletop, then you should take into account the calculations presented in the table:
Human height/mount height (in centimeters)
155-165 / 175-180 165-175 / 185 175-190 /200
You need to remember: attaching wall cabinets is a serious procedure; due to incorrect calculations, all mistakes will be noticeable.
Let's take a closer look at some of the issues that we will have to face during the installation of wall-mounted furniture.
Mounting options
There are 2 methods by which fastenings for kitchen cabinets are made. Installation is carried out:
One line, that is, the location of the fastener is equidistant from the ceiling;
It is considered the most common type of accommodation. This way you can easily secure the cabinets yourself. Different levels are used for hanging, that is, objects are at different heights.
This method is used much less frequently, since its implementation is much more complicated than a linear fastening scheme.
The first method is popular because you can use only your own strength to attach kitchen cabinets, without turning to outside help.
The choice of option is determined by the number, size and depth of wall cabinets.
The second option for attaching fixation items is less common among ordinary people. This is because the roof of this furniture is used as an additional surface.
Any of the proposed variations is perfect for both a room with a small area and a large one.
And all because they do not have any effect on the fullness or compactness of the room.
When choosing a method, only the interior and design change.
Installation methods
By using new fittings used to attach modern kitchen cabinets to the wall, a person has greatly simplified his life, because the installation of wall cabinets has now become much easier. The new support system helps eliminate small errors associated with marking. In addition, it adds stability to the entire structure.
In addition, you don’t need to use a lot of force, and the owner can handle this task himself.
To make the fastening necessary for installing kitchen cabinets, you should use a special rail and hanger.
The hinge has a hook, thanks to which it is attached to the side wall of the box. At the same time, it is completely invisible.
There are 2 installation methods:
Mounting on a mounting plate;
To attach the cabinet to the wall, a specially prepared rail and a device called a hinge are used. Hanging on furniture hinges.
This fastening method will use hinges and fasteners.
The advantages of the first option are:
no need for outside help (due to which there is no need to support objects when marking), in addition, this will allow you to hang them as accurately as possible; special adjustment screws make it possible to change the position of kitchen cabinets, which helps to align objects; thanks to special notches located on the width of the hitch, the length is adjusted; such installation is possible even with an apron; there is no need to use a curb for leveling; ease of installation and dismantling.
You can do all the work yourself, without any help.
The second option is more accessible (it uses hinges as well as fasteners), but takes more time and requires additional help.
You will need help with this installation method.
Regardless of the option, the following materials are needed for work:
Basis for fixing objects; Hinges for facade doors; Elements needed for the construction of boxes; Nails, screws; Intersectional couplers; Tires; Hitches; Screws to install the hangers.
Materials and tools you will need.
Required tools:
Screwdriver; Drill; Long level; Roulette; Plumb; Pencil; Clamp; Wrench; Hand screwdriver; Hammer; Punch.
Preparatory actions
To begin the process of installing kitchen cabinets, you need to follow these steps:
Alignment of vertical walls, please note that for a corner kitchen the angle of the walls at 90 degrees is provided (most often this process is carried out using drywall, and thanks to this alignment occurs); Applying markings (this stage must be performed using a plumb line, pencil and level);
The points at which the kitchen cabinets will be fastened must indicate the required height. Electrical installation (installation and connection of all sockets and lamps); Wallpapering or painting walls.
These points will be the basis for the work ahead.
The next step is to prepare tools and consumables.
Installation instructions
After completing the preparatory work, you can begin assembly. After screwing the screws, you need to align the hooks in one position and make sure that they are at the middle level. Canopies must be secured in one position. The protrusion of the fastening part (has a hook configuration) should be 2 mm in relation to the rear of the wall. If you planned to cut the tire, then it’s worth taking care of the preparations. Holes are made on the pre-marked wall for fixing the tire.
When finished, you need to attach the strip using dowels or self-tapping screws. The body of the hanging furniture must be mounted on a tire. The reference point is the plane of the wall. The next fastening of wall kitchen cabinets is carried out based on the previous one. The next step is the sequential fixation of installation objects using fasteners. A clamp is used for this. To prevent the surface from being damaged, a thin layer of insulating material must be laid.
Fixing cabinets on fastenings. Next, you need to drill holes in the housings. To avoid cracks or splinters, use plywood or wood overlay. After preparing the apertures, the elements are connected with ties. After hanging and fixing the drawers, the doors should be screwed on. To do this, they must be laid out on the floor in such a way as to attach the loops to special niches. After this procedure, installation to the housing occurs.
We recommend: Placing an outlet in the kitchen - how to position it, at what height should it be placed above the countertop?
Test doors must be closed and opened several times to determine whether adjustment is needed or whether they are attached smoothly.
Installing the top of the furniture
The first priority is to fix the hooks in the middle position. For this, adjusting screws are used. After this, you need to fix them from the inside on the side walls so that the hook is on the outside by 2-3 mm and it is possible to fix them on the fastening bar.
The design of the hinge allows you to adjust the mount in height and depth.
The next stage is applying markings to the wall. But for this you must follow a number of rules.
It is necessary to determine in advance how the drawers will be installed - tightly to the apron or overlapping. The location of the fastening strip is 3-4 cm below the upper edge of the section. To correctly calculate this distance, you need to attach the plank to the rear wall of the object in the same way as it will subsequently be attached to the wall.
This is done for clarity, so that you can see the number of centimeters that need to be taken into account when making the final marks.
The next step is to make holes in order to install the rail. Here are some useful tips that will come in handy:
If the drill "jumps", make small notches using a nail or punch and hammer; If the wall crumbles during work, then first you should make a small hole, and then drill it out to an acceptable size; If you need to change the drilling depth, you need to use a prepared dowel; If you need to make a hole in a concrete wall, but there is no hammer drill, you can do it with a hammer and a punch.
Wiring locations require special attention.
Upon completion of all actions, the dowels are placed in the holes. Next, the mounting strip is installed on the fasteners. The cabinets are fixed to the mounting plate. To adjust their position, screws of mounted mechanisms are used.
To make the set look like a single “wall”, they need to be connected closely to each other.
The elements are fixed with clamps, starting from the corner, avoiding chipping (in accordance with the above instructions).
Thus, alignment of the overall ensemble of cabinets in one plane is achieved.
The next step is to drill holes between the tightly fitting parts of the headset to then fasten them with intersectional ties.
At the final stage, shelves are installed and doors are secured.
Features of hanging on drywall
The main difficulty when fixing a headset to drywall is its inability to maintain strength under heavy loads. For this reason, the use of standard fasteners is not recommended. Even the small weight of a cabinet installed using a mounting anchor will easily damage the plasterboard lining.
Therefore, only decorative shelves and paintings are allowed to be hung on plasterboard walls.
If the set needs to be fixed on a plasterboard surface, then a wooden beam or a thick board, which is fixed to the wall thanks to anchor bolts, will come in handy.
VIDEO: Attaching wall cabinets in the kitchen
50 kitchen set ideas:
Source: berkem.ru
2
Methods of fastening a wall base - choosing according to strength
The main thing you should pay attention to before installing kitchen cabinets is whether the walls in the room are level enough. The fact is that there may be some deviation from the plane, and a bend, imperceptible at first glance, can be quite easily identified using a laser level and a plumb line. Based on how smooth the wall is, you should choose the method of attaching the cabinets. There are 2 installation methods - rigid, using steel corners or plates, and with movable hangers for kitchen cabinets. The first option is possible when the wall is bent only if you screw in the screws to different depths so that the heads are on the same line, while the best solution is to attach them to hanging loops. In general, it is preferable that the surface be leveled, especially if corners are considered as fastenings.
The mounting strip for wall kitchen cabinets can be used when the wall has a relatively slight bend. The fact is that the special groove into which the adjustable hangers cling can be easily deformed if the plank is strongly curved along the base topography. In this case, the cabinet is suspended on adjustable systems with small protrusions facing down and exactly fitting into the longitudinal groove of the strip. Thus, the upper base simply clings and is held by its own weight. But if you lift the cabinet a little, it will fall off along with its contents. In this regard, corners and plates with lugs for screws are still quite popular: the former firmly fix the kitchen base, the grooves of the latter also prevent the box from falling off.
Selection of fittings for fastening and preparation of walls
Before you hang cabinets on the walls, you need to decide what fixtures you are going to mount them on, because they are not mounted on the furniture itself or the holes. By default, it is believed that furniture is hung by professionals, and they already know everything.
Types of fasteners
| Illustrations | Recommendations |
| Plank. At the moment, one of the most progressive and widespread types of fittings. The idea is that a mounting plate is attached to the wall, and canopies are screwed into the far corners of the cabinet. These canopies are adjustable in 2 directions, which makes it possible to attach furniture to load-bearing walls without gaps. | |
| Furniture hinge. Traditional steel fittings that have come to us since Soviet times. You drive an anchor into the wall, screw the hinge to the cabinet, and then hang the furniture on the wall. The option is good, but the markings for the anchors must be absolutely accurate, and the hinges are not adjustable. | |
| ikea mount. Such fittings have appeared recently and are mainly used in furniture of the same name.
| |
| Hanging corner. Another representative of the Soviet school of cabinet installation. By and large, hanging corners are the same loops, only bent at 90º. And if the hinges were screwed only onto the vertical wall of the cabinet, then the corner can be screwed anywhere on the top horizontal panel. |
Preparing the walls
Careful preparation of walls is considered a desirable rather than a mandatory procedure. After all, wall-mounted furniture covers all noticeable defects on the surface, the only exception being those cases when the defects are so large that high-quality installation of the fittings and the fit of the upper block to the wall is impossible.
Crooked walls
In this case, everything depends on the magnitude of the curvature and the material from which the wall is made. Preparation is necessary if the wall is completely bare, that is, there is no starting plaster coating on it. But such cases are extremely rare, since according to the rules, furniture is delivered last, when the finishing work is completed.
Cinder block, brick, concrete walls, as well as foam block or aerated concrete, are easiest to plaster over beacons. The technology looks something like this:
- Initially, the wall, as far as possible, is cleaned of residual mortar and dust;
- Then, with a drying break, a couple of layers of deep penetration soil are applied;
- The most important stage is the installation of beacons. Beacons are called metal or carbon fiber slats. Beacons are installed on gypsum cakes. First, 2 vertical slats are attached at the edges, after which 2 - 3 cords are stretched between them and the remaining beacons are placed along these cords;
To install the slats vertically, a plumb line is used, and the horizontal is checked with a level.
- Now on the wall, in a layer just above the beacons, spread the starting solution and, before it hardens, level it with a plaster rule, supported by the beacons. The solution will have to be added, since there will be sinks here and there;
- If the beacons are steel, then after 3 - 4 hours (when the solution has set a little), take them out and rub the grooves that appear with the same solution. Carbon fiber slats, if you don’t mind, can be left in the wall.
Full cycle of plastering on beacons.
If you get a poorly plastered wall with differences in the plane, then using beacons is not cost-effective. Such defects are removed using finishing putty or tiles are laid.
The technology for finishing walls with putty, as well as laying tiles, is not technically complicated, but if you have never encountered this, it is better to hire a professional. The work is painstaking and requires skill.
Final leveling of walls with putty requires certain skills.
But for the hobbyist who doesn't want to putty or lay tiles, there is another fail-safe way to prepare walls for hanging kitchen cabinets. It consists in the fact that you strictly horizontally screw 2 - 3 wooden beams to the wall with anchors.
Thus, the bars act as a kind of tire. Furniture and hanging elements do not touch the walls; wooden blocks create a flat surface for them. True, in this case you will have to separately mount an overhead apron between the table and cabinets on the same bars, which will cover the gap between the cabinets and the wall.
A pair of even horizontally fixed bars will hide minor curvatures of the walls.
Initial stage of work: how to determine the height of the suspension?
Before you start attaching cabinets to the wall, you need to correctly determine the height of their hanging. Approximately, the gap between the countertop and the bottom of the cabinets is 50-60 cm, and according to GOST - 45 cm. If you mount cabinets above a refrigerator or high oven, then their height will indicate the required hanging point.
Size is influenced by several factors, but the primary one is human height.
You should also take into account the quality of the wall partition. In modern houses it is most often made of plasterboard. In this case, do not hang the cabinet too high - the wall may become deformed. In older houses, the floors may also be dilapidated. The walls will not bear such weight and will crumble. In this case, the furniture may fall, and you will be forced to repair it or purchase a new one.
To prevent heavy loads on the floors, you must install auxiliary supports and metal frames.
In most cases, the height of the suspension can be influenced by design innovations. We are talking about facade kits, where everything you need is included in the kit, and this is very economical.
The instructions indicate what height the suspension should be.