At what distance from the wall to mount
The first question that arises when you start installing a cornice above a window is at what distance from the corner it should be attached. Close? Stepping back 10 cm? 20 cm?
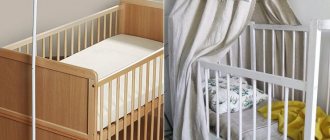
The curtain rod should be placed so that it hangs freely without touching the window sill or heating radiators.
In fact, the distance can be from 8 to 15-20 cm. It is determined depending on the location of the heating radiators and/or window sill. The cornice must be placed so that the tulle and curtains hang freely, without touching either one or the other. Firstly, this way the drapery lies perfectly, secondly, it is better for the fabrics, and thirdly, there is better air circulation, which is important during the heating season.
Installation of a ceiling cornice to a concrete floor
The procedure for attaching a ceiling cornice is not too complicated, but if the length of the product is more than two meters, an assistant will be required. In addition to the fasteners, you only need a drill and a screwdriver with a suitable slot.
Preparation
Before attaching the ceiling cornice, it is necessary to carry out some preparatory work. The first thing we do is adjust the length. If everything suits you, great. If you need to cut off excess, you will need a hacksaw. It is advisable to use a cloth for plastic, but it is also suitable for metal. If the cornice is assembled, remove the plugs and turns (if any), cut off the excess, then return everything to its place - the turn, the plug.
Adjusting the length
If the holes for the fasteners are not drilled at the factory, you will have to make them yourself. Let's start with the markings. Mark so that the distance between adjacent screws is no more than 50-60 cm. If there are joints, then retreat 5-10 cm from the joint on both sides. For better load distribution, it is better to stagger the mounting holes.
After the marks are set, we drill mounting holes in the plastic. Use a drill that is equal in diameter to the size of the fastener. More is undesirable, but less is also not good - when twisted, the plastic may crack.
Even for a single-row cornice, it is better to place the holes in a checkerboard pattern
After all the holes are ready, if the cornice is prefabricated, assemble all the parts. You don't have to install the decorative trim (if any). For now she will only get in the way.
How to attach
In most apartments and many private houses the ceiling is a concrete slab. Accordingly, we take a drill for concrete. The diameter of the drill should be taken according to the size of the dowel. Then we proceed according to plan:
- We apply the assembled cornice to the ceiling and level it.
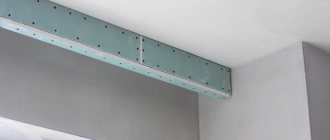
- Use a simple pencil or marker to mark the attachment points.
- We drill holes, trying to hit exactly the marks. The depth is equal to the length of the plastic insert. To make control easier, you can stick a strip of electrical tape on the drill. Already fixed, but without curtains
- We insert the plastic part of the dowel into the hole. It should be flush with the ceiling. The protruding parts will interfere with installation, so we either deepen the hole or cut off the excess plastic.
- After all the plastic parts of the dowels are installed, if the decorative strip is attached to the grooves (not with Velcro), install it. It is not always possible to “latch”, so you should not hope that you will install it “later”. Most often you have to put on this bar gradually, moving along the grooves as if on rails. This cannot be done on the ceiling; you have to remove the already mounted cornice. As you understand, this does not improve the mood.
- We attach the assembled cornice to the marks. First we install the fasteners along the edges and in the center. If the cornice is long, we fasten the two halves with an additional one or two dowels. So that the plastic does not sag. The following installation order is arbitrary.
That's all, actually. You know how to attach a ceiling cornice to a concrete floor. If the floor is wooden, everything is even simpler: there is no need to pre-install dowels. After all, wood screws are usually used. In this case, the cornice is leveled and screws are immediately placed in the mounting holes. It’s more convenient to follow the same order: along the edges and in the center, and then - as it turns out.
If the ceiling is plasterboard
If it was decided to install a ceiling cornice at the renovation stage, most likely there is a special niche in which it is installed. In this case, it is attached to the ceiling, and how to attach the ceiling cornice to concrete and wooden floors is described above. It will be a little more difficult, since freedom of action is limited, but not critical.
Attaching the cornice in a niche is a little more inconvenient
There may be a second option - without a niche. A wooden beam is fixed at the place where the cornice is installed. It is located between the drywall and the main floor. In this case, the ceiling cornice is attached to the beam through plasterboard. You need to use wood screws of sufficient length so that the body of the beam contains at least 2/3 of the length (preferably more).
But if you decide to replace the cornice with a ceiling one after the repair, you will have to look for special fasteners. These are the so-called butterfly and snail dowels. Both are characterized by an increased contact area with the material, due to which the load is distributed over a larger surface. But it’s still better not to use heavy fabrics.
Both types of drywall fasteners - butterfly dowel and snail dowel - come in plastic and metal. Stronger, obviously metal. But the trick is that most likely it is not the dowel that will withstand the high load, but the drywall. To prevent this from happening, reduce the fastener installation step. For example, you can make it 40-45 cm. This will increase labor intensity, but will give at least some hope that the structure will not collapse.
Installation on a suspended ceiling
In the case of a suspended ceiling, the ceiling cornice can only be secured to a pre-installed embedded beam. It is secured before the fabric is stretched. When fastening, use wood screws and attach them directly to the beam through the ceiling sheet.
How to attach a ceiling cornice to a suspended ceiling
The second option is a niche for installing a cornice, but this is also made during the installation of the ceiling and not later. In this case, there is also a wooden beam, but a guide for the stretch ceiling is attached to it.
Attaching a ceiling cornice in a stretch ceiling niche
There are no options for installation on a ready-made stretch ceiling. There is, however, a compromise - mounting to the wall with brackets right under the ceiling. There is a gap to the ceiling, but it is small and not too noticeable.
Which is better: cornices on the ceiling or on the walls?
When choosing a design, you need to consider not only the type of curtains, but also your personal taste. It is important to consider the place where it will be installed. The installation height of the cornice above the window should be taken into account taking into account the aesthetic component. In this case, ceiling products look nicer in appearance than wall products, and all because when mounted to the ceiling, the curtains completely cover the window opening and all the way to the floor. The good thing is that the ceiling cornice well hides the entire curtain fastening system, which cannot be said about the wall-mounted version.
Attaching the ceiling cornice to the wall
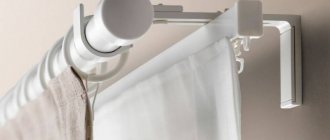
For cases with suspended or plasterboard ceilings, there is another installation option - on special brackets that are attached to the wall. In this case, the distance from the corner is determined by the parameters of the bracket. They have longitudinal slits that allow you to adjust the length at your discretion. There are several holes at a distance of 5-6 cm from each other. Wall mounting brackets usually come with mounting plates that are attached to the plastic case with four small self-tapping screws. The installation step of the fasteners for wall mounting is the same - 50-60 cm; two stops are placed at the joints, 10-15 cm away from the joint.
Types of brackets for wall mounting of ceiling curtain rods
How to attach a ceiling cornice to a wall? The installation procedure is the same as in the case of installation on a concrete ceiling: marking the mounting holes, installing dowels, then attaching the cornice itself to the wall with brackets. But with different brackets the procedure is different.
This is what comes together
Option with long cuts in the bracket body:
- The plates are fixed, the brackets are inserted into the grooves.
- We apply the cornice to the installation site, mark the holes on the wall (circle it). We outline all the holes, how many there are in the cornice.
- We make holes in the wall and insert dowels.
- We remove the brackets and fix them on the wall.
- We put plates attached to the cornice onto the brackets.
- We set it exactly, at the same distance from the wall.
- Tighten the fixing bolts.
Mounting on brackets
This option is good because, if desired, you can move the cornice closer or further within the length of the cut. You can also level out imperfect wall geometry. When using the option with several holes, it is easier to first attach the brackets to the cornice, then lift the entire structure and make markings. After installing the plastic part of the dowels, attach the cornice assembly to the wall again. As you can see, it is very difficult to do without an assistant: you need someone to hold the cornice.
Attaching a profile cornice to the ceiling
Now we will tell you how to attach profile-type ceiling curtains.
Before installing them, determine the exact length because you will most likely have to shorten them. This is done using a hacksaw. After this, we drill holes for fastening. In order for the screws to sink into the structure, you need to make holes with different drills. First with a larger diameter, and then with a smaller one. With a large drill we make a hole to the depth of the cap, and with a thin drill we make the final through hole. The order should be as follows: the central one first, and then all the rest.
This is interesting! How to choose a ceiling cornice: variety of types and materials
How to hang curtains on a ceiling cornice
The ceiling cornice has hooks or runners for hanging curtains. Each type of profile has its own, but they come in different heights.
It is necessary to select hooks/runners according to the type of profile
Now about the difference between hooks and runners. The runners have small wheels. They are more expensive, but the curtains move much easier. To save money, you can take hooks for tulle (we move it very rarely) and runners for drapes (curtains).
Types of hooks for ceiling cornices
To hang curtains on a ceiling cornice, a special ribbon is sewn to the top of the curtain. It helps to form folds of the required size. This ribbon has a strip that can be used as loops. This is where the hooks are attached.
Curtain tape and hooks on it
There is another option - to make the loops by hand, but then the folds will have to be laid and sewn up by hand. This option will have to be used if you need to lay not standard folds, but with some special pattern.
There are two ways to hang curtains on a ceiling cornice:
- Secure the hooks to the tape, and then tuck them one by one into the desired groove on the profile. Then install the stopper, then the plug.
- The second method is to first insert the required number of hooks/runners into the groove, install a stopper and a plug. Then put loops on the hooks.
Installing the locking screw. Then you need to put a plug
The first option is physically simpler, but the second option is more often done. When you remove the hooks for washing, they may get lost, or you may make a mistake in the order in which they are installed. In general, it is not so important how exactly you hang the curtains on the ceiling cornice. The choice is yours. And finally, a small life hack on how to make it easier to put loops on hooks. This is a tedious and difficult task that irritates many.
At what height from the ceiling is it correct to hang a curtain rod?
When all the walls are painted and the furniture is in place, the only thing left to do in the apartment is to hang the curtains and enjoy the warm stay inside. But in order for expensive tulle with curtains to show off in the right place, you need to know how to properly hang curtain rods in relation to the window. There is nothing difficult here, but some nuances are still present. Read our review and learn all the features of installing curtains.
The cornice is an indispensable element of the interior, without which it is impossible to hang curtains
Types of cornices
For each special room design, construction stores always have several different types of cornices in stock. They differ in:
- type of material of manufacture;
- method of fastening and type of fastener;
- the shape of the supporting beam.
When choosing a cornice, it is important to take into account the style and weight of the curtains, the shape of the window and the style of the room.
Wood, metal and plastic are used as materials for making fastenings for window textiles. Each material is successfully used for various interior styles. Plastic products are especially popular due to their low cost, availability, but most importantly, a huge selection of different colors, shapes and designs.
Metal and wood are expensive curtains. They are purchased for luxurious interiors, decorated with elements of wood or chrome. These products can withstand heavy loads, so curtains made from thick fabrics, richly decorated with glass beads, decorative clamps and all sorts of ruffles are suitable here.
Different types of fasteners are used for different repairs. Typically this is mounted on:
Wall-mounted models are equipped with brackets, most often these are L-shaped hangers, the design of which is made in the style of a cornice
To secure curtains with lambrequins, there are special curtain rods with adhesive tape.
Ceiling systems are usually profile products that have several grooves for attaching hooks. But it happens that telescopic or tubular curtains are attached to the ceiling. Oh yes, there are also different types of cornices. This:
Crossbars and cables are usually mounted on the wall, and profile ones on the ceiling. But there are exceptions: some are installed on the ceiling, and others on the wall.
The aluminum rail of such a cornice can be mounted both on the wall and on the ceiling
Even before purchasing...
Previously, when the curtains, walls, and ceilings in all the houses were approximately the same, there was simply no point in thinking about such a trifle as installing a curtain even before the renovation began: hanging it after the fact was not a problem. Now it’s better to think through some points in advance so that you don’t have to change the already purchased curtain.
- Mounting type
Decide which mount is better in your case: ceiling or wall? And when making a decision, it is better to be guided not only by aesthetic considerations. The fact is that in some cases wall mounting is not preferable or even impossible. As is the case with thin or loose walls, for example. In such a wall, it will be extremely difficult for the brackets to hold on under the weight of the curtains, and there is a high risk that at one moment the entire structure will collapse, leaving a couple of noticeable holes in the wall.
If you decide that you want a ceiling rail or hanging curtain, think about its compatibility with the suspended ceiling: cutouts for fastening the curtain should be discussed with the workers in advance, just like the space for the rail.
- Material
Related article: How to cut blinds to size
It would seem that the material of the curtain matters only for interior design, but this is not so: the lighter the design, the less impact on the wall, and this is very important if the wall is thin, for example a plasterboard partition, or, again, loose. Perhaps, in this case, it is better to abandon the beautiful, but heavy metal and wooden curtains and hang string, plastic or profile ones.
- Dimensions
The width of windows in most houses is standard, but increasingly the width of the curtains can be changed to order. So, don’t try to save money by choosing a width equal to or slightly wider than the window opening: when open, the curtains will cover most of the window, preventing sunlight from entering the room, especially if you are a fan of voluminous curtains with a lot of folds.
Also look at the windowsill. Are the brackets long enough to cover it without it sticking out when the curtains are drawn? Or maybe it’s better to choose ceiling or telescopic curtains that will be attached to two walls perpendicular to the window opening at any distance from the window instead of the wall with the window itself?
- Wiring
And don't forget to find out how the wiring works: the wires may not allow you to hang the curtains the way you originally intended, and minor changes will have to be made to the design plan.
By the way
Telescopic curtains are convenient, since this is the only possible option for wall mounting without brackets; only, taking into account the laws of physics, they can be used without additional hangers or brackets exclusively in narrow rooms and for light curtains.
How to properly hang a cornice on a wall: step-by-step instructions
To learn how to properly hang a curtain on a wall, read the following tips:
- The first step is to mark the wall. This is an important stage, since the final result depends on its correct implementation. What could go wrong? Are you sure that the wall and ceiling meet at a perfect 90 degrees? This is usually not the case, so be sure to measure the mounting points from the ceiling.
When marking, you should not focus on the ceiling; to accurately determine the horizontal line of the cornice suspension, it is better to use a level
A wall cornice is usually hung at 1/3 of the distance from the ceiling to the window opening
To drill a concrete wall you need a hammer drill or hammer drill
Scheme for fixing a wall cornice
As the reader has already understood, an example of installing a cornice with one round crossbar was discussed above. To carry out the entire list of work, you will need marking and power tools, as well as fasteners.
- Pencil, chalk or marker.
- Meter construction ruler.
- Impact drill (hammer).
- Dowel-nails with plastic or metal sleeves (depending on the wall material).
When you order a curtain, do not forget to measure the distance at what height you hung the curtain rod from the ceiling. It is important to measure and write down this parameter, since when purchasing custom-made curtains, you must indicate the length to the floor.
Curtain measurement chart
Important! Measurements should be taken from the edge of the hooks (rings) to the floor. This way you will get reliable data.
Experts advise taking the length of the crossbar longer than the window opening by 30-50 cm on each side. If there is only one window and it is located in a short wall, you can install the crossbar almost along the length of the wall, leaving a gap of 5-10 centimeters.
A full-wall cornice will help visually adjust the proportions of the room.
Remember three main points:
- The curtain should not touch the open window.
- The tulle with the bottom edge from the battery should be at a distance of 5-8 cm.
- The length of the crossbar should ensure full opening of the window opening.
Usually, when purchasing curtains, the basic package includes brackets. Their length ensures the correct placement of the crossbar and tulle in the future. But it would be a good idea to first measure the width of the open window and the protruding heating radiator, and compare these data with the length of the bracket. If the length is insufficient, the fasteners must be replaced.
The length of the cornice determines whether the curtains will completely clear the window opening
How to hang a Roman blind
Roman blinds, which when closed are a sheet of fabric divided into sections, have become very popular. The curtain rises from the bottom up, and the fabric is gathered into horizontal folds. To ensure that the folds are neat and even, special plastic slats are inserted into the canvas. Nowadays there are a lot of colors of Roman curtains, which makes them universal for any interior (one of the samples of these functional curtains is shown in the photo). You can replace your old curtains with Roman curtains. If you bought such curtains, you need to find out how Roman blinds are attached and how to do it correctly.
Roman blinds look very original and beautiful in the kitchen
You can install Roman blinds in the following ways:
- on the ceiling;
- on the wall;
- on the window;
- into the window opening.
The installation location is selected based on what goal needs to be achieved. If you need the window sill to be free, then you need to fix the structure on the surface of the window. In other cases, it is better to fasten a curtain that will completely cover the window opening. For example, if you need to hide visible defects. Also, the installation location depends on the design and decoration of the window. A particularly good way to attach the canvas in a window opening for compositions when combining classic curtains and Roman blinds.
How to hang a ceiling curtain correctly
The procedure for installing a curtain hanger on a ceiling space is no different from mounting it on a wall. But there are still some nuances here. And the main one is the material from which the ceiling is made. Drywall and tension structures are very common in residential apartments. And such materials are not capable of holding a large load.
You can attach a light curtain to a plasterboard ceiling
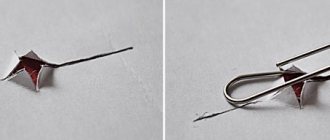
There are special fasteners for drywall. These are the same dowels with screws, but only of a special design. Each of them is designed for a certain load, above which the element cannot be loaded.
Butterfly dowel for fastening in drywall
How to use a butterfly dowel when attaching a cornice to a plasterboard ceiling
This cannot be done without preliminary analysis. A significant role is played by the type of cornice, the material of its manufacture, the number of crossbars or grooves for curtains, as well as the type and density of the fabric. These parameters determine the mass of the entire product. After all, it is known that drywall is a fragile composition. Its edges can easily crack, and the cornice will simply jump out onto the floor.
Curtains of any type can be attached to a suspended ceiling.
There are no special fasteners for suspended ceilings. If it was planned to attach the curtains to the ceiling system, then it is necessary to provide wooden (metal) bars under the base. In this case, installing window textiles on ceiling fasteners will not be difficult.
Scheme of fastening a wooden block to a stretch ceiling
And this is what it looks like in reality
It is important to know at what distance to hang the curtain from the ceiling. The determining parameter is the gap between the curtains, the window and the heating radiator (battery). It is best to visually try on where the curtain goes by attaching a curtain. This way you will achieve an accurate result.
When determining the location for attaching the ceiling cornice, the width of the protruding part of the window sill and the presence of folds on the curtain are taken into account
The order of work is as follows:
- Marking the ceiling space.
- Drilling holes for dowels with screws.
- Fastening brackets and crossbars.
If you are installing a plastic (aluminum) profile-type cornice, then there is no need to attach brackets. The product is attached directly to the ceiling surface using dowels. Additionally, this solution is decorated with a decorative baguette.
When installing a stretch ceiling, curtains can be fixed in a niche, then the design of the cornice will not matter at all
Requirements for installing curtains
When installing curtains, you must adhere to the following rules:
- Dowels (screws) are selected taking into account the wall material.
The distance of the cornice from the wall is determined taking into account the protruding part of the window sill (or radiator) and the depth of the curtain folds
The reliability of curtain installation depends on:
- cornice material;
- design configurations;
- installation locations;
- finishing the surface where the curtains are attached.
Before you begin installation of the structure, you need to pay attention to the following factors:
- Strength of the material (wood, string, plastic, metal). The curtain rods must support the weight of the curtains; accordingly, they are matched to the weight of the textiles.
For example, string curtain rods are designed for attaching only light curtains
How to attach a curtain to a loose wall
People often face the problem of installing curtain rods in loose walls. A thick layer of old plaster tends to crumble when installed in the drilled holes of plastic dowels. Naturally, nothing serious will be held in such a wall. You'd better forget about beautiful Italian curtains.
Loose material will not be able to hold a heavy curtain
To get rid of this problem it is not at all necessary to do a major overhaul. It is enough to drill holes of a larger diameter than the dowels purchased. The holes are sealed with tile adhesive or wooden “chops” with liquid nails. After complete hardening and drying, all you have to do is screw the screws into the wood.
Well-dried birch is best suited for making wooden cork.
The best solution would be to install a long anchor bolt, which will be fixed deep into the wall
Thanks to various types of fasteners and cornices, you can hang beautiful curtains in any room, with any of its shortcomings.
Hanging curtains to the wall
For those who have never drilled anything, this task will not be easy, but this is where you can start getting acquainted with basic tools. Before starting work, make sure that there are no wiring in the fastening areas, stock up on a hammer drill and a screwdriver, and also call someone to help to make hanging more convenient.
Related article: Electric heated floor installation: technology
Measurements and determination of places for fastenings
First, you need to decide on the mounting locations, and, as you can guess, the calculations must be as accurate as possible, otherwise the curtains will hang crookedly.
- Find the middle of the window opening.
- Step back at least 10 centimeters from it and place a dot.
- Now you can go in two ways: transfer the measurements of the curtain to the wall or try on the curtain to the wall. For the first method, find the center of the curtain using a tape measure, measure the exact distance from the center to the holes for the screws and transfer the measurement to the wall in both directions from the center point that we determined above. For the second option, having found the middle of the curtain, align it with the exact center on the wall, align it and use a pencil to make marks at the locations of the holes for the screws. Here you will need the help of a friend to hold the curtain level while you make marks.
Advice
Ideally, the curtain should be hung parallel to the ceiling, the upper edge of the window opening and the floor, but in reality all these 3 lines are rarely strictly parallel to each other. Then what should you focus on? Definitely on the ceiling line, because otherwise the curtains will look crooked both open and closed.
Providing fastening
Now you need to make the holes. You can drill with a drill, but for concrete the best choice is a hammer drill. Select the diameter and depth to match the fastenings that come with the curtain. If the wall is problematic, then the fastenings will have to be improved in one of the following ways.
- Select screws of the same diameter, but longer. Suitable for walls lined with plasterboard where it is necessary to reach the concrete to hang the curtain securely.
- Dowels are not needed only for high-quality concrete, and it is better not to spare plastic ones even in this case.
- For problematic loose walls, wooden plugs of larger diameter, in which a hole for a screw is already made, may be useful.
Advice
In loose or thin walls, screws can be held in place by pouring a little epoxy resin into the drilled hole.
What is important to consider when buying a baguette
Before you figure out how to install a curtain rod on a wall, we’ll tell you what to look for when purchasing a product. There are different designs on the market:
Each of them has its own advantages and disadvantages. They definitely need to be taken into account. But the installation is greatly influenced only by the type of brackets that come with the products. Depending on the material, there are several options:
- Plastic. The cheapest, but the most fragile. They are great for tulles and light curtains. When hanging a heavy canvas, the fastening sags and eventually breaks.
- Wooden. They help bring vivid design solutions to life. Their strength directly depends on the quality of workmanship. Therefore, components must be carefully inspected to ensure there are no knots, chips or cracks.
- Metal. The most reliable and durable curtain rods. If your budget allows, preference should be given to them.
Each option has its own design features. Many of them only affect appearance. But the type of mounting plate determines the reliability of fastening to the wall:
- Three-point. Makes it possible to firmly secure the structure and avoid turning the rod holder. This is ideal for installation in concrete and wood. If the holes are located close to each other, installation in porous materials becomes more difficult: aerated concrete, hollow brick and others. A fragment of the weakened surface may crumble or break off.
- Single point. The only hole for the dowel is in the middle of the installation “cup”. In this case, under the weight of heavy curtains, the bracket may tilt down slightly. But this makes it possible to firmly screw it to a surface made of hollow materials. It is enough to choose a dowel of the desired type and length.
If you have to attach a three-point “cup” to a hollow base, drive the load-bearing dowel only into the upper hole. We screw small self-tapping screws into the other two to avoid turning the bracket.