Equipment and tools for sink installation
To cut a hole in the countertop for a sink, no special skills or experience are required. But tools and equipment must be available.
First of all, you need to acquire:
- ruler;
- pencil;
- corner;
- level;
- tape measure;
- screwdrivers;
- rasp;
- screwdriver;
- adjustable wrenches;
- a set of wrenches;
- brush;
- drill for woodworking with a diameter of 10mm;
- electric jigsaw;
- electric drill;
- PVA glue;
- appropriate sealant.
The tools must be of high quality so as not to spoil the whole process.
Installing a sink in a structure made of other materials
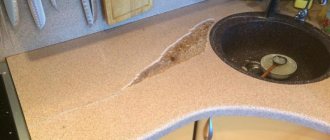
It’s easy to install a sink in a countertop made of wood or chipboard if you have the required tools and simple handling skills. A countertop made of artificial or natural stone installed in the food preparation area will be more durable It will look more solid, but it will be more difficult to install a sink in it without the help of others.
The introduction of sealant not only prevents unnecessary water penetration
When purchasing kitchen furniture with such a surface, it is better to have a ready-made product that will only require connections to the water supply and sewerage system.
Sealants containing alcohol are often used on wood and plastic.
If the sink is purchased separately and will need to be installed, it is better to entrust this work to experts. In a stone processing workshop, craftsmen will perform the required work without damaging the surface. To do this, they have the appropriate abilities and have the entire range of necessary tools.
Each surface has its own sealant.
If you decide to cut a hole in the countertop for the sink yourself, you will need a special tool - a grinder with a diamond wheel. When working with this equipment, extreme vigilance is required. You will need to wear protective gloves on your hands, and protect your face with a special transparent mask.
The sealant is used to prevent water from entering the contact points between the sink and the countertop.
It is better to do this outdoors, because there will be a lot of dust during the sawing process. The sequence and manipulations performed are similar to cutting a hole in chipboard.
The location for the cutout is selected taking into account the short distance for draining water into the drainage ditch and connecting the water supply.
How to cut a countertop for a sink
Preparing a countertop for installing a sink is not a very difficult task, but it is quite painstaking and requires diligence, free time and personal labor. A correctly cut hole is the key to basic installation of the sink, and as a result, enjoyment of washing dishes.
To make the hole neat and correct, you need to follow these rules:
- We take a blank cardboard sheet of the required parameters, which will be used to make the template. There are conscious manufacturers who make such a template themselves and put it in the product packaging. All that remains is to take the scissors and walk them along the contour. If such a template is not available, then take the sink, turn it upside down, place it on cardboard laid on a flat horizontal surface, use a pencil to trace the outline of the sink and cut out the template. If you don’t have a ready-made template and you didn’t buy a cardboard sheet, you can lay the inverted sink on the countertop and trace it.
Outline the sink with a pencil
The place circled with a pencil where the sink will cut into
Cut a hole for the sink using masking tape
Processing the edges of the hole with silicone
Helpful information! The distance from the wall to the sink should exceed 10 cm, which will make it possible later when installing it to prevent vulnerable areas from breaking or being damaged!
For more information on how to cut a hole for a sink, watch these videos:
How to cut a countertop for different types of mortise sinks
The space for the sink in the countertop can be cut out in several ways. But the main principle that unites them is the mandatory observance of the geometry of the recess in the countertop when carrying out work. At the very beginning, you should understand for yourself which method you are going to use. The main point that should not be forgotten is the presence of individual washing features. Let's look at the rules of installation and its types.
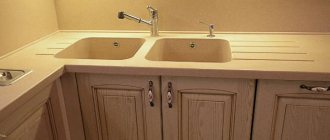
On the left - installing the sink flush with the countertop, in the center - on top of the countertop, on the right - below the countertop
Installing a sink under the countertop
With this installation, the countertop will rise above the edges of the sink. This type is used for furniture made from expensive materials, which has sophistication, attractiveness, and rigor.
Sinks installed below the countertop level. For this purpose, special sinks for under-table installation are purchased. The sink is fixed using brackets or screws (for expensive materials - special self-tapping screws).
The holes for the sink in this version are cut out using special professional equipment (you can use a jigsaw with diamond-coated blades). The edges of the hole are very carefully sanded and covered with a moisture-resistant film or special means.
It is quite difficult to install this type of sink yourself. It is recommended to contact professionals.
For this type of installation, the following points should be taken into account:
- you need to get an undermount sink of the shape you choose and the tools to install it;
- After trimming is completed, the edges must be treated with special means that will subsequently prevent moisture from being absorbed and will repel it.
With the simplest option for installing an undermount sink, the countertop is cut out in the standard way, but from the inside of the countertop. The main thing is to measure everything in such a way that the sides of the sink are exactly along the cut hole - they do not protrude or fall beyond it. The point of installation is that the sink will be screwed onto the inside of the countertop, and then it will simply be turned over and installed on the kitchen unit. You can, of course, not turn the countertop over, but work initially from below, but in this case the whole process will be less comfortable.. For more details about this method of installing a sink under the countertop, see the short video:
Installing the sink flush with the countertop
In this case, as in the first, it is important to cut the hole in the tabletop as accurately as possible. In this case, the main difficulty is to cut out small sides along its perimeter in addition to the main hole to match the size of the sides of the sink. The sink is inserted on top of the countertop and its sides fit into the recesses in the countertop, thereby becoming flush with it.
Sink installed flush with the countertop You can learn more about installing the sink flush with the countertop from this excellent video: Before you begin, you must first properly prepare the surface. This means the following:
- a special tool is taken and used to work out the areas of contact with the washing surface. In this case, indentations appear corresponding to the thickness of the sides of the sink being installed;
- you need to go deep ideally along the entire perimeter of the built-in sink;
- It is worth noting that there are certain difficulties in such work, so all actions must be careful, coordinated, and unhurried.
Installing a sink on top of a countertop
This procedure is the simplest, and even a non-professional can handle it. The hole in the tabletop is cut in the manner described in the corresponding section above. Moreover, slight flaws of a couple of millimeters will not be very critical. Silicone sealant is applied along the edge of the hole or on the sides of the sink. The sink is installed from above into the opening and pressed well against the countertop. Excess sealant is removed with a rubber spatula.
Drop-in sink on top of the countertop If there are additional clamps (for example, claws) for the sink, these are also screwed under the countertop.
Installing a mortise sink For master classes on this simple method of installing a sink, watch the following videos:
How to cut a circle from chipboard or a review of a circular saw with variable diameter Buttress (Ballerinka)
The stated diameter of the holes or round timbers that can be cut out using this ballerina ranges from 30 mm to 120 mm. The kit includes a key for assembling and disassembling the ballerina, as well as for adjusting the position of the cutters on the hexagon. Cone for soft materials. On the transverse hexagon there is a marking in mm, on the reverse side there is a similar marking, but there, in my opinion, it is in bourgeois units.
By the way, by default, the cutters are chamfered to meet (photo below). Naturally, I don’t understand enough about the processing of wood, but judging by an ordinary hand hacksaw, the chamfers of a ballerina’s incisors should look in one direction, and not at each other. I tried to cut out a pancake with default settings, wasn’t it enough, suddenly they invented a big one that I don’t know about yet, but somehow it didn’t work out for me. The chipboard begins to burn, the cutters warm up, but they are reluctant to climb into the chipboard. Either I pressed weakly, or it was necessary to give more revolutions. But without a machine or stand, it’s a little awkward to drill with a Chinese drill at high speeds, while supporting the boards with your feet. Therefore, I still turned one cutter on one of the holders, after that, things went much faster and easier.
In fact, the results of testing the Chinese ballerina on pieces of chipboard. Because in this ballerina everything is actually curved and is clamped like hell, I tried to set the incisors not according to the existing ruler on the hexagon, but using a caliper, measuring the distance from the drill. So that the round timber comes out without torn edges, I drill to about half the thickness of the chipboard and then unroll the sheet and cut it to meet.
READ Cordless Jigsaw Makita Bjv180rf
In the photo below, for clarity, you can see the uncut penny, so the width of this groove should correspond to the width of the incisors. I don’t know about science, but I tried to do it exactly this way, maybe a little more extensively, so that the cutters specifically cut out the chipboard with the edges of cone-shaped chamfers. Since the cutters touched the planes of the chipboard and outlined two stripes on it, it is worth stopping the work and measuring the distance between these marks and, if necessary, adjusting the position of the cutters on the hexagon.
In general, if you need to cut out several holes or pancakes, then you can completely use this Chinese ballerina. But for a huge number of holes, it is still better to purchase a normal wood crown. By the way, if you have never worked with a ballerina, then I advise you to start training with ordinary crowns (a piece of pipe or tape with teeth on the edges). Because the ballerina’s instrument is somewhat specific and requires some skill and adjustment before implementation. And in uncomfortable hands, this drill turns into a rather terrible mixer for limbs, or into a centrifuge for throwing incisors at the forehead.
Write a message to the creator Creator: Nikolay Golovin – – – – – – – – 10/26/2015
How to embed and install a sink into a countertop - step-by-step instructions
One of the most common and inexpensive materials from which countertops are currently made for the mass consumer. It is not necessary to resort to the help of strangers when installing the sink.
Before starting work, you should purchase a drill, a screwdriver, a construction pencil, a tape measure, an angle, a level, an electric jigsaw, self-tapping screws, and silicone. If everything is in stock, we begin to act. We free the area from everything unnecessary and disturbing. If possible, it is best to carry out work in an open space to avoid unnecessary noise and debris. It is good to fix the tabletop with the cabinet frame so that it does not move. We mark the recess for a rectangular sink as follows:
| Forms | Characteristics | Dimensions (mm) |
| With right angles | Perfectly combined with a narrow tabletop or cabinet, excellent performance qualities | |
| 450 x 510 |
| Marking the future hole |
| Installing a sink |
| Posted in Home TipsTagged cut, sink, finishing, renovation, countertop, construction |
Kitchen countertop materials
To make the right choice, you need to have information about what countertops are created for the kitchen. There are plenty of options to suit every taste and budget. There are simply multifunctional ones, and there are also those that become a decoration for the kitchen. The main aspects of choice are:
- aesthetic and appearance;
- waterproof and moisture resistant;
- resistance to mechanical damage;
- compliance with hygiene requirements;
- environmental friendliness;
- coating durability;
- resistance to external causes.
The main and most common materials for the production of countertops are:
Published by admin
View all posts by admin
Add a comment Cancel reply
You must be logged in to post a comment.
The advantage of an acrylic bathtub
09/08/2020 No comments on the post The advantage of an acrylic bathtub
DIY box for storing vegetables on the balcony in winter
08/28/2020 There are no comments on the post Do-it-yourself box for storing vegetables on the balcony in winter
Do-it-yourself potato storage box on the balcony in winter
08/28/2020 There are no comments on the post Do-it-yourself box for storing potatoes on the balcony in winter
Do-it-yourself Japanese furako bath
08/28/2020 There are no comments on the post Japanese furaco bath with your own hands
Welsey apple tree, description, photo, reviews, planting
08/28/2020 There are no comments on the entry Welsey apple tree, description, photos, reviews, planting
Apple tree lungwort, description, photo, reviews, planting
08.28.2020 No comments to the post Lungwort apple tree, description, photos, reviews, planting
Tags
eggplant disease spring video grow growing soil dacha doors tree home home honeysuckle winter instructions cabbage potatoes brick strawberries kitchen furniture carrots pruning cucumber description open ground pepper preparation tomato planting sowing seedlings plant recipe plant currant seed with your own hands variety greenhouse tomato pipe care photo flower
Welded, seamless, rectangular pipes - characteristics and applications
08/23/2020 No comments on Welded, seamless, rectangular pipes - characteristics and application
Paving slabs: advantages and production
05/14/2019 No comments on the entry Paving slabs: advantages and production