When we open a fashion magazine to select curtains, our eyes are lost in the endless variety of modern styles, the variety of fabrics and window finishing methods. However, there is a classic method, fashionable at all times and suitable for almost any type of window. True, it requires time, patience and perseverance. This is window decoration using buffs.
What do curtains with puffs look like?
The essence of the concept is contained in the French word bouffer, which means “to swell”, “to swell”. The technique was invented by French needlewomen.
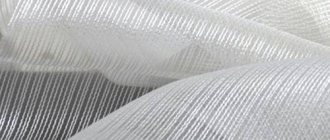
Puffs are tucks and clips made from the wrong side, and rarely from the right side, of the fabric in a certain order according to the pattern, so as to create a rich and intricate pattern.
This is a non-standard way of draping material, which allows you to assemble the head of a curtain or lambrequin in an artistic way. You can learn more about curtain models with lambrequins here.
Curtains gathered into folds create a festive and theatrical atmosphere in the room, since excess fabric looks lush and pompous. A lambrequin made using this technique harmonizes perfectly with high windows and long curtains. Small puffs also look good on small windows.
There are factory methods and models of curtains with folds. However, the result is not as interesting as what you get if you do it manually.
Usually, puffs on curtains are made to order in workshops.
But don't rush to shell out money. I am quite capable of handling this work myself if I have the desire and free time.
Rules for designing buffs
You can decide how to make the puffs on the fabric neat and correct in a matter of seconds. You need to know a few secrets of creating folds and the rules of working with a needle. The basic rules are a few nuances:
- The distance between the elements of the pattern should be determined by the size of the base fabric. Usually only 1.5-2.5 cm between the needle penetration points is sufficient.
- When transferring the diagram to the fabric, you need to set not only points for the needle, but also indicate the direction of work.
- It is advisable to tighten the thread so that a “stable” but soft fold is obtained.
- When the thread passes through the point, you need to fix it by making several knots at the base.
- The pattern is located in the center of the product; it can become a frame or a side strip for decoration.
- You can hide uneven stitches and divert attention from the supporting work by using decorative elements: beads, seed beads, sequins.
To make puffs, it is enough to know just a few nuances regarding the design of folds. It is advisable to have a fine feel for the needle and choose the appropriate thread for sewing. To hide not very good work, you should use little tricks.
DIY curtain-buffs
First you need to decide on the general concept. Will folds adorn the top of the fabric or pelmet?
Lush draperies look better on a plain base, but a jacquard pattern, reminiscent of frost on glass or satin stitch embroidery, can give unexpected and interesting effects. You can learn more about curtains and jacquard fabrics in this article.
Buff manufacturing process
When choosing a pattern, you can collect folds along the top and edges of the curtains or along the edges and in the middle. When making decorative folds using a sewing machine, a narrow ribbon is sewn from the wrong side of the fabric, which is then pulled together. The disadvantage of machine sewing is the limited choice of patterns.
Video of sewing a “flower of Thailand” puffer:
It is important to know that the puffs can be pulled together both from the wrong side and from the front side. To hide the seam connection points, these places can be decorated with various accessories (decorative buttons, beads, pearls, etc.)
Curtains with puffs in the bedroom interior
Beautiful and pompous curtains with lush folds in the bedroom interior look especially appropriate if the furniture is made in a classic style.
Here you can use dense, opaque fabrics. Tucks on curtains with a metallic sheen look good. It would be interesting to use a lambrequin, gathered in puffs, from a fabric contrasting to the main one.
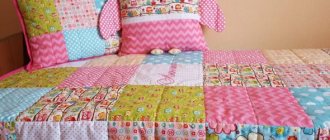
Curtains can be complemented with a bedspread or pillows decorated with the same pattern.
Curtains with voluminous folds are also a good choice for a modern style bedroom. In this case, the technique is performed on colored tulle or silk and adds a touch of lightness, airiness and romance.
The first steps of a novice master
An example of calculating fabric for sewing a lambrequin.
The first step for a novice craftswoman who has decided to make an exquisite lambrequin with her own hands is to calculate the fabric. To calculate the amount of material needed for a curtain, take into account the length of the curtain rod. This rule also applies to buffs. The length of the cornice is multiplied by 2 or 2.5 to obtain the length of fabric required for the lambrequin. The simplest lambrequin, the puffs of which are made of nylon or nylon, consists of two identical strips of fabric sewn together, with a rope or ribbon pulled inside them. Lambrequin, according to this method, can be made in an even simpler way. If there is a little fabric left after the curtain is sewn, a single piece is sewn along the length, collected on the curtain tape, and the puffs are ready.
The simplest version of lambrequins using the puff technique takes about two hours to make; a complex one, of course, will take longer. If the curtains are made from a denser fabric than nylon or nylon, and the lambrequin is planned to be made from the same, puffs made using filler look very interesting. To solve the problem, in addition to the main fabric, you will need: sewing tape, filler and thread. Pieces of organza, tissue paper or synthetic down are perfect fillers for lambrequins.
Related article: Butterfly stencils for decoration
Scheme of a lambrequin with puffs.
The lower part of the lambrequin is equal to the length of the cornice, multiplied by 2.5 or 3. The length of the upper and lower parts will be the same, the width will be different. The width of the top part of the lambrequin should be 20 cm less than the bottom. It is important not to forget to leave approximately 4 cm for the folding of the side sections. Choosing the length of the sewing tape for such a lambrequin is an important issue. The greater the coefficient of its assembly, the more magnificent the puffs will be. The side sections of the lambrequin, which are folded 2 cm on each side, are processed with an overlocker, manually or using a sewing machine.
The next stage is connecting the two parts. The fabric fragments are folded together with the front part facing inward. To avoid mistakes, it is better for novice craftswomen to follow all the outlines. One side of the fabric is sewn lengthwise. Then the other one is bent about 40 cm, the fold is ironed. According to some techniques, it is sewn together immediately, according to others - last. The sewing tape is attached from the wrong side. Particular care must be taken when forming the scallops; each of them is stitched. All pockets must be sewn so that each of them has a small hole left. After placing the fillers in the pockets, all holes in the lambrequin are sewn up using hidden stitches.
Curtains with puffs for the kitchen
For the kitchen, it is better to choose curtains made from light, transparent cotton or synthetic fabrics.
If the window is small, you can completely fold the curtain, up to the middle of the window.
Sewing puffs with your own hands is a long and painstaking, although not difficult, work. Repeating the same actions over and over again is quite tedious, but the results are worth it. In the final version, the curtains will look luxurious and delight the craftswoman for many years.
Let's understand the terminology
Lambrequin location diagram.
The French word “lambrequin” is usually used to describe a decorative fabric cornice. Why is it needed for curtains? It perfectly camouflages the top of the window. It is located on top of the curtain. It is usually made from fabric of the same color or texture or contrasting fabric. Lambrequins are usually divided into soft and hard. This depends on the presence of a lining that provides the appropriate property. Lambrequins play a special role in the functional and aesthetic space of a house or apartment. They change the visual perception of the size of the window opening. With their help, the window frame appears larger than it actually is. Lambrequins visually increase the space of rooms, which is especially important when it comes to small housing.
Lambrequins are divided into simple and complex; the criterion by which gradation occurs is swags - hanging folds of fabric. The width, height, and number of swags determine the fabric consumption and the complexity of making the curtains yourself. Curtains that combine soft and hard lambrequins are very fashionable in interior design. However, it is quite difficult for beginning craftswomen to complete them. Experienced seamstresses usually recommend sewing a curtain that will be decorated with a simple soft lambrequin, and only then moving on to more complex designs. Sewing lambrequins using the puff technique is popular among those who are taking their first steps in the art of sewing. Puffs is also a French word that denotes the condition of the fabric if it puffs up, inflates, that is, takes on a different three-dimensional shape.
Puffs are a classic of interior design; they can be used to decorate not only curtains, but also other items.
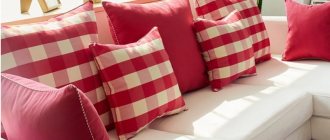
A very stylish solution is considered to be the option when curtains and sofa cushions are decorated with puffs made of a single-color, single-texture fabric.
Related article: How to properly paint a ceiling with water-based paint over whitewash
Lambrequins with puffs are sewn quite simply.
There are different types of making puffs. But if you choose the simplest one and make lambrequins using this technique, then the most discreet curtain will look elegant. If you decide to make such a lambrequin, the puffs will change the space of the usual room, and the curtain in it will look new. Sewing puffs with your own hands is not as difficult as it seems at first glance. It is important to remember about the specifics of caring for puffs. They cannot be ironed. If the lambrequin gets dirty, the puffs need to be washed; only a very careful, gentle wash is required. Lambrequins made from puffs retain their original appearance for a long time if a fabric is selected for them that does not quickly lose its aesthetic properties under the influence of sunlight penetrating through the window.
how to sew a crossover
4. We hang the crossover on a special block for assembling lambrequins, covered with insulation, and on top with fabric (you can adapt the back of the chair) in accordance with its length (the length of this crossover along the bar is 115 cm). This block does not have to be firmly attached to the wall. You can nail fasteners to it (as on wall cabinets) and hang it only when you are sewing the lambrequin , just as when assembling they should hang exactly like on a cornice. And you can easily assemble any parts of the lambrequin on this block, adjusting the length of the lambrequin itself and the position of any of its parts, right up to sewing a strip to it, which will fix exactly the model that you laid out on the block.
And so, this is what happened:
Now let's start sewing the strip using the first method. To do this, we cut (you can tear off) a strip of fabric 120 cm long (the length of our crossover is 115 cm) and 17 cm wide.
5. Iron the bar in half along its entire length and let the fabric cool.
6. Sew a narrow curtain tape at a distance of 7 cm from the ironed edge of the strip.
I advise you to iron it with steam before sewing on the curtain tape. The tape may shrink.
7. Cut off the excess fabric under the braid on the untreated side of the plank.
This is what came out of the face of the plank:
And this is the view from the inside:
You don’t have to cut the fabric, but simply tuck this protruding piece under the curtain tape when processing the strip in the future.
Who likes it more?
8. We pin the prepared plank directly to the crossover hanging on the bar like this:
9. Remove the lambrequin from the bar and sew a line. Sew the strap to the crossover.
Here's what happened:
10. Fold the plank in half with right sides facing inward and trim the edges of the plank.
11. We lay a line in a line along the bar, trying to grab the lower part of the bar along with the braid.
12. Turn the lambrequin inside out and add another line to the line along the braid.
13. Iron the bar, slightly catching the folds of the crossover. And let the fabric cool.