March 30, 2011
Seal
- #Italian Cuisine
- #cooking tricks
- #pasta
- #paste
- #do it yourself
This is a bit of a time-consuming process and a little more complicated than it looks, but with practice it gets easier.
The photo shows the preparation of pasta from durum wheat, which is a little more difficult. You can take any flour from those suggested below. If you are a beginner, I advise you to start with Italian 00 flour. It is the easiest to work with.
The process itself is the same for dough made from any type of flour. Below I provide standard proportions of liquid ingredients to flour, but you may need a little more or less of this or that. Since the moisture content of flour changes depending on the humidity in the house, the season and even the shelf life... The ability to determine the desired moisture content of the dough by eye comes with time. Don't be afraid to try. I tried to describe the process as much as possible, but if you have any questions, don’t be afraid to ask!
1 egg + 2 yolks + 1 tbsp. water and ¼ tsp. salt for every 160 grams of flour
For Italian wheat flour 00:
3 eggs + 2 yolks and ½ tsp. salt for every 500 grams of flour
For regular wheat flour:
2 yolks+1 tbsp. water and ¼ tsp. salt per 160 grams of flour
There are 2 ways to start the dough: by hand or in a food processor. It's easier in a food processor because it's easier to control and adjust the moisture content of the dough.
So, let's start with the manual one:
1) Place flour on your work surface. Make a hole in the middle and knock the eggs into it. Add water and salt.
2) Gently break the yolks with a fork and stir actively, grabbing a little flour at a time, and so on until you have used all the flour.
3) You should have a stiff dough. Even if at first it seems awkward and too elastic, this will improve after kneading and “resting” the dough.
In a food processor:
1) In a separate bowl, beat the yolks with the egg and water until smooth.
2) Pour flour and salt into a food processor, turn on the processor and add 1 tbsp. egg mixture, turning off the processor from time to time to scrape down the sides of the dough.
3) The dough ready for further processing should have the consistency of couscous.
If the dough forms a ball or the dough is too wet, add more flour. If too finely grained, add 1 more tablespoon. water, and so on until it reaches the consistency of couscous.
Once you take the crumbs in your hands and squeeze them and the dough easily comes together and holds together, you can start kneading.
4) Knock the crumbs into a ball with your hands, knead them and place them on the work surface.
Kneading:
1) Start kneading the dough, first simply kneading it on all sides. The dough is steep, so you need to make an effort.
2) When the dough has become more elastic, knead as if folding the dough in half and pressing.
You need to knead the dough for 6-8 minutes. If you press the dough with your finger and it returns to its previous shape, the dough is ready.
NB : If the dough literally crumbles under your hands, it is too dry. Cover the dough with a damp kitchen towel and let rest for 30 minutes. The dough will absorb moisture. And start kneading this dough again with wet hands. Wet your hands until the dough becomes smooth. (If you try to add water to the dough, it will be a mess).
If the dough is very sticky to your hands, it is too wet. Sprinkle generously with flour and knead.
3) Wrap the dough in cling film and refrigerate for at least an hour. (Up to 24 hours)
Rolling out the dough:
Place the pasta machine in a place convenient for you.
1) Remove the dough from the refrigerator. Divide the dough into 2 or 3 parts, depending on the quantity. Place one portion on a floured work surface and wrap the rest in cling film.
2) Punch down a piece of dough a little and roll it out with a rolling pin as thinly as possible so that the dough is the width of a pasta machine.
3) Set the machine to the first position (thickest thickness) and pass the dough through.
Then fold the dough in half and pass it through again, fold down. And so 10 times.
If the sheet is too wide, fold it in half widthwise.
4) Set the machine to the next position and, without folding, pass the dough once. And so move from position to position, passing the dough only ONCE without folding. And so on until the desired thickness.
5) Immediately cover the rolled sheet with cling film, as the dough dries quickly.
To get tagliatelle (0.5-0.6 cm wide), pass through a wide pasta cutter.
For fettuccine (width up to 1 cm), you will need to cut it with a knife.
Same thing with pappardelle (2-3 cm), this is already a wide pasta, it is also tedious to cut with a knife. Sprinkle the dough sheet generously with flour, roll it into a tube and cut it to the desired width.
The dough must be unrolled immediately to prevent sticking and deformation.
With lasagne sheets it's even easier, just trim off the uneven edges of the rolled out sheet, thus forming lasagna sheets of the size you need.
You only need to cook fresh pasta for a little while, in plenty of boiling salted water. The term blanch is even more appropriate.
NB: Blanching is a short-term heat treatment of the product with boiling water or steam, 1-2 minutes, and for some vegetables 3-4 minutes.
Place fresh lasagne sheets with the filling without boiling them first. They will “get ready” during the baking process.
Ready pasta can be kept in the refrigerator for 3 days. After this, fermentation will begin.
Can also be frozen. Finished products are stored in the freezer for 1 month. In this case, you need to start preparing the dish WITHOUT DEFROSTING the pasta. To prevent them from getting wet when thawing. It is better to freeze pasta in an airtight container so that the shape of the pasta does not deteriorate.
That's probably all I know about fresh pasta! Enjoy your meal!
See: Fresh tagliatelle with wild garlic cream sauce.
See also
How to cook delicious pasta: secrets of chefs
During the cooking process, the pasta becomes soft. Therefore, you need to cook it in a large saucepan with enough water. Place pasta only in boiling salted water. It is important to limit the cooking time so that the products do not become overcooked!
How to cook delicious pasta: secrets of chefs
The main secrets of cooking pasta from chefs:
- Do not cover the pan with a lid during cooking. Otherwise, the products may stick together;
- Pasta goes perfectly with olive oil. It must be added not only to the finished pasta, but also a little during cooking. Important! Only refined oil should be added to boiling water, but after cooking, you can combine pasta with unrefined oil;
- Contrary to general Russian traditions, there is no need to rinse pasta after cooking!
- Do not drain all the water that remains after cooking the pasta. You can save some to add to the sauce if it is too thick;
- If you plan to cook pasta with sauce, the cooking time should be reduced by a couple of minutes. During the mixing process, the paste will reach the desired consistency and become perfect!
Experienced chefs recommend boiling only the required amount of pasta. Pasta is not eaten warmed up or “yesterday’s”. They cook quickly. Therefore, you can boil the side dish at the right time. If you still have pasta left, it is better to use it for preparing various casseroles.
Pasta goes perfectly with seafood, meat, poultry, vegetables and, of course, cheese. Italians prefer to complement pasta with olive oil, aromatic herbs, tomato and cheese. The last product complements any recipe!
Baking temperature and time
Every oven is different, so everyone sets their own. I collected a lot of statistics from students (who learned how to make macarons) about what temperatures and baking times worked for them. This data will help you set up your oven.
The ideal baking temperature is 145-155 C. Start baking at a temperature of 150 C. It is good if the lids are baked in 10-15 minutes. The exact time depends on the size of the lids and oven temperature.
The setup strategy looks like this:
- We bake on top-bottom mode. No fan. On the Middle level.
- If you bake for 20 minutes, then the temperature needs to be increased.
- If the lids darken, then we lower the temperature.
These are the most important points in the technology of making cakes. Check if you comply with everything. I hope these observations will help you avoid mistakes or correct them.
I invite you to watch a webinar where we will look together at specific mistakes in preparing pasta. You will have a guide to errors, causes and fixes.
What can you make from pasta?
Pasta is suitable for preparing side dishes, both simple and complex. They can be boiled and served, complemented with meat, fish, and sausages. Homemade noodles are ideal for making lagman, various soups and casseroles. Pasta can be included in an omelet, roast, or baked with hard cheese.
Pasta recipes are found in various countries around the world. Italians pay special attention to them. After all, pasta is a national product. Noodles are also popular in Asian cooking. The famous woks and udon are an excellent choice when you want a quick and tasty snack.
Homemade spaghetti
In Italy they love to cook spaghetti. This one is especially popular in this sunny country. They are eaten almost every day, seasoned with various sauces. To prepare such homemade pasta, an unusual recipe is often used. To work, you need to take 400 grams of wheat flour, 10 grams of salt, 4 raw eggs and 17-34 grams of olive oil.
- Sift the flour and carefully pour it in a heap directly onto the table.
- Beat the eggs well. To make the process more efficient, you can add salt to them.
- Make a small hole in the flour with your hand and pour in the prepared eggs along with the butter.
- Knead the dough thoroughly.
- Place it in a cool place for half an hour for better ripening. The semi-finished product must first be wrapped in film or covered with a towel.
- Divide the dough into pieces, and then roll each of them out thinly.
- Prepare spaghetti using a special cutting machine.
Finished products can be cooked immediately. For long-term storage, they must be well dried. To do this, the workpieces must be hung on special devices. If you don’t have them, you can use regular clothes hangers. The result is simply amazing homemade pasta. The recipe is interesting because oil is used instead of water. This gives the products better plasticity and prevents them from sticking together during cooking.
Nourishing naval pasta
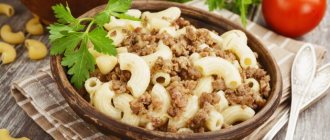
Very nourishing and incredibly tasty, the most important thing is simple, there can be pasta dishes, naval recipes are just like that. They are ideal for dinner, and will also help out when guests are already on the doorstep. Despite the fact that the dish is quite everyday, if prepared correctly, it is not a shame to serve it on a festive table.
As a rule, the dish is prepared from horns or shells. Bows, spaghetti, and curls are also suitable. As for minced meat, you can use any kind. The classic option is mixed minced meat. But if you want to reduce the calorie content of the finished dish, you can use minced chicken and add a little zucchini.
Ingredients:
- Pasta – 400 grams;
- Mixed minced meat (pork/beef) – 500 grams;
- Onion – 1 head;
- Salt, black pepper and spices - to taste;
- Olive oil – 2 tablespoons.
Nourishing naval pasta
Cooking method:
- Boil the pasta until tender in salted water, adding a couple of teaspoons of olive oil;
- Fry the onion in vegetable oil until soft, then add minced meat, salt and black pepper to it and cook for about 20 minutes. To prevent the minced meat from burning, you can add a small amount of liquid;
- Drain the pasta and drizzle with olive oil;
- Mix the pasta with the minced meat, cover the pan with a lid and let the dish stand for 5-7 minutes;
- Place the dish on plates, sprinkle with fresh herbs and serve.
If you want to serve naval-style pasta for the holiday table, you can use nests or tubes that are filled with ready-made minced meat. Raw minced pasta is cooked in a frying pan with enough sauce to cook through. As a rule, the preparation time for nests is 20-25 minutes. The tubes cook faster, they only need 7-10 minutes.
Baking pasta in a gas oven
A separate question relates to how to bake pasta in a gas oven. I tell my students that it is easier to set up a gas oven than a convection oven (which is used in workshops). The fan in combi ovens cannot be turned off. And the air currents blow the cake away, they rise unevenly and become lopsided.
Everything is easier in a gas oven. The difficulties arise from the fact that the heating is uneven: there is intense heat from below, and different parts of the oven may have different temperatures. The second feature of baking in a gas oven is maintaining the temperature. It is important that it does not jump; the oven must be preheated when we place the baking sheet. Therefore, a thermometer is a must for those who plan to bake pasta in a gas oven. And here are the tips from students who baked the lids in a gas oven:
- Place the baking tray on the very top
- Place a brick or another baking tray down
- It is important that the temperature does not fluctuate. Make sure after 10-15 minutes that the temperature remains stable. Only then put the lids in the oven.
- If the temperature drops when opening the oven, there is no need to increase the temperature. Let the lids bake longer.
PS: Macarons are the most capricious cakes and at the same time the most delicious. Don't give up if you don't get the caps the first time. By learning to make these French pastries, you will also become more attentive to detail and more patient. Study the technology, set up the oven and you will definitely get cakes. The whole secret is in strict adherence to technology. And if you want to learn how to cook macaron cakes under my guidance, I will be glad to see you “on the Encyclopedia of Macarons course.”
PSS: You know that the taste of pasta is created not by the lids, but by the fillings. The blog has an article on 5 colorful fillings for pasta. Be sure to read and save the recipes. They are designed for approximately 30 cakes with a diameter of 4 cm. The recipes have been tested, the fillings are very tasty, and they hold their shape well. My favorite flavor among them is spicy caramel.
Unusual recipe for pasta with cottage cheese
Casseroles are incredibly easy to prepare. They are prepared quickly and do not require any culinary skills. This cottage cheese casserole recipe is perfect for breakfast. It has a sweetish taste. Therefore it resembles a dessert. Children will definitely appreciate this delicacy!
Cottage cheese goes well with pasta. At the same time, it is rich in easily digestible protein, which pasta lacks. The dish is ideal not only for breakfast, it is also good for dinner.
Ingredients:
- Pasta – 100 grams;
- Cottage cheese 5% fat - 100 grams. You can use a low-fat product;
- Chicken egg – 1 piece;
- Cream – 30 ml;
- Sugar – 3 teaspoons;
- Salt – ¼ teaspoon.
Unusual recipe for pasta with cottage cheese
Cooking method:
- Boil the pasta in lightly salted water until tender. Place them in a baking dish greased with vegetable oil;
- Mix cottage cheese with sugar and cream, grind until smooth using a blender;
- Cover the pasta with the resulting mixture;
- In a separate container, beat the egg with a pinch of salt. Cover the workpiece with the resulting mass. Using a fork, make punctures so that the egg can reach the very bottom;
- The mass is baked in an oven preheated to 180 degrees for about 20 minutes;
- The dish can be served with various berry sauces and jam.
If you are looking for unusual recipes, then pay attention to the combination of pasta and cereals. Cypriot cuisine has an interesting dish that resembles pilaf. It is made from couscous and vermicelli. In India they like to cook chickpeas in tomato sauce with curry paste. In Egypt, pasta is often prepared with spicy lentils. Legumes are rich in plant protein, which is extremely filling. Therefore, they are often added to pasta. In Italy, pasta is considered a self-sufficient dish, which is supplemented only with various vegetables, herbs and animal protein.
Meringue
I remember my first experience making pasta. Recipe from the Internet, vague knowledge of what French meringue is and how to make it. The dough turned out to be liquid, the lids spread, and the pasta did not turn out. This situation often arises when making macarons with French meringue. (We are talking about beginners who do not follow the technology. Experienced confectioners successfully make it in French).
French meringue is prepared simply: the whites are whipped into a foam, sugar and/or powdered sugar are gradually added to them. This meringue is unstable and cannot be prepared in advance. It quickly falls, loses volume, and spreads. It is better to leave it for making biscuits and desserts, where the stability of the cream is not so important. Therefore, if you are preparing macaron with French meringue, change the recipe.
Set up an experiment. Find out from the pastry chefs what meringue they use to prepare the macaron. In 95% of cases it is Italian meringue. It is stable, holds its shape, you can prepare large quantities at once and make several batches of pasta of different colors. Although it is more difficult to prepare Italian meringue than French, macarons are always obtained (if you follow the technology).
Tips for making meringue:
- beat macaron on medium speed. Take your time to cook it in 5 minutes. It's better to beat longer. So it will consist of small air bubbles.
- the ideal state of meringue is a bird's beak. The meringue does not fall out of the bowl when you turn it over. The beak bends over the corolla, but the cream does not drain. The whisk leaves a clear mark on the cream.
You may also like:
Marshmallows at home: recipe with photos
What can you cook dinner quickly and tasty?
Simple recipes for delicious cakes
Do you like our articles? Subscribe and look for delicious and healthy ideas on chefmarket.ru
