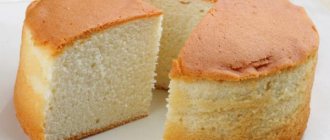
Classic quick biscuit recipe
This sponge cake is suitable for shaping any cake. Its recipe is interesting because it does not contain soda or baking powder. The dough rises very well thanks to the whipped egg whites. There are small subtleties in preparation that need to be taken into account.
Ingredients:
- Eggs - 6 pcs
- Sugar - 200 g
- Flour - 160 g
- Vanilla sugar - 1 sachet (10 - 12 g)
- Butter (for greasing the mold) - 5 - 10 g
Preparation:
Take the eggs. Separate the whites from the yolks. Pour the whites into a previously prepared, clean, dry bowl. Beat the contents until light foam forms using a mixer.
To achieve the desired result, not even a drop of yolk should get into the whites.
Gradually add sugar without stopping the mixer. The foam should be more stable. That is, when the container is tilted, it is in a stationary state.
If the beating process is completed before a stable protein foam is obtained, the sponge cake will not turn out fluffy.
In a separate bowl, combine egg yolks with sugar and vanilla. Beat the mixture until a light fluffy foam forms. You can use a metal whisk here.
Gradually fold 1/3 of the whipped whites into the yolk mixture. Mix from top to bottom
Sift the flour several times. Pour it into the egg mixture and mix again. Be careful not to create flour lumps
Gradually stir in the remaining egg white foam. At the same time, continue stirring from top to bottom. You should have a smooth, fluffy consistency.
Stirring in a circular motion is strictly prohibited, as the contents will completely lose airiness and quickly settle
Line a mold (no more than 22 cm in diameter) with parchment and grease everything with butter. Pour the dough, and the mold should be filled only 2-3 cm. Since the sponge cake rises well, free space is required
Preheat the oven to 180 degrees. Place the pan with the dough in it and bake for about 30 - 40 minutes. Determine readiness with a toothpick. If it is dry and without grains, then the biscuit is ready.
To prevent the dough from settling while rising, do not open the oven for the first 20 minutes. During this time it will rise well and brown. After this, the heat in the oven can be reduced to 120 - 150 degrees (depending on the characteristics of your equipment) so that the baked goods do not burn, but are definitely baked.
Cool the finished treat directly in the oven. At the same time, open the door slightly. This method will not allow it to fall in volume.
Serve the cooled delicacy in portions with pleasant, aromatic and fresh tea.
Enjoy your tea!
Lush sponge cake prepared according to the classic recipe at home in the oven
A very tender, soft and tasty cake is almost always obtained according to a proven classic recipe. To ensure a fluffy texture, it does not use any baking powder or soda. The required volume is created by thoroughly whipped protein mass.
Very often in this kind of baked goods you can detect a subtle vanilla note. This is achieved by adding vanillin or flavored sugar.
We will need:
- Fresh chicken egg – 6 pcs.
- Granulated sugar – 200 gr.
- Flour – 160 gr.
- Vanilla sugar – 10 gr.
- Butter – 5 gr.
Preparation:
1. Rinse fresh chicken eggs, warmed to room temperature, in running water and dry with a kitchen towel. Carefully separate the whites from the yolks, and set the latter aside in the bowl for now. Place the squirrels in a dry, clean, deep bowl and start beating them with a mixer, turning it on at the lowest speed.
To be safe, you should first wipe the bowl for whipping egg whites with a piece of paper kitchen towel. If you have a couple of drops of lemon juice, lightly moisten the paper with it to better “degrease” the surface of the dishes.
2. Without stopping the mixer, pour half of the granulated sugar into the protein mass in several additions. Increase the whipping speed to medium and achieve the appearance of white peaks that will be stable even when the bowl is tilted.
If the protein mass moves or spreads, it means that it was not whipped enough, and therefore we will not be able to achieve the required volume of cake.
3. Now you can start working with the yolks set aside. Pour the remaining half of the sugar and vanilla flavored sand into them. Grind the ingredients until smooth and beat the mass until it thickens and lightens using a whisk, blender or mixer.
4. Now you should combine the separately beaten egg parts. First, add a third of the airy protein mixture to the yolk mixture and combine them very carefully, stirring from the bottom of the sides to the center of the container.
5. Sift the flour and add it to the combined egg base. Continue mixing carefully until you get a homogeneous mixture without any lumps.
6. Transfer the remaining 2/3 of the whipped egg whites into the dough and fold them in carefully to form a fairly smooth, fluffy mixture. All! Our biscuit dough is ready!
You should mix at all stages from the bottom up, and not with the usual circular movements, so that the dough does not fall off.
7. Now we quickly need to prepare the form in which our handsome man will be baked. It is best if it is detachable and has a diameter of about 20-22 centimeters. Grease the parchment with a piece of butter and place it on top of the bottom. Secure it with the side walls, closing the latch on the detachable part.
The inside sides also need to be oiled. Pour the tender dough into the prepared baking container - it should fill about half, maximum two-thirds of the volume of the mold, because during baking it will increase and the delicacy may “run away” and you will get a clumsy top of the cake.
8. All that remains is to place the pan with the contents in an oven preheated to 180 degrees and bake for about 35-40 minutes without opening the door. This is important to do so that due to the difference in air inside and outside, the rising sponge cake does not fall off.
It is advisable to turn off the heat after the time has passed and open the oven slightly only after 5 minutes so that it, along with the culinary masterpiece, gradually cools down.
9. Using a sharp knife, carefully run between the finished edge of the cake and the sides of the pan, then open the latch and carefully remove the springform pan. Allow the airy tall cake to cool completely, covering with a clean waffle towel. And then wrap it in cling film and leave it to rest for at least half a day on the table or in the refrigerator before using it further to prepare some delicious cake.
Thanks to the film, the remaining moisture will remain inside the cake and the biscuit will not dry out on top.
In the future, use it for its intended purpose.
Lazy biscuit
This biscuit is very quick to prepare. And it tastes quite delicious. Suitable for using as a base for a birthday cake. All that remains is to arrange it beautifully and serve it on the table.
Ingredients:
- Eggs - 5 pcs
- Sugar - 1 glass
- Flour - 1 cup
- Vanilla sugar - 0.5 teaspoon
Preparation:
Before starting work, turn on the oven and set the temperature indicator to 200 degrees. Leave to warm up
Break chicken eggs into a cup, add sugar and vanillin. Using a mixer, beat everything until smooth.
Add flour in portions without turning off the mixer. The mass should be lump-free, completely smooth and homogeneous. Its thickness resembles liquid sour cream.
Grease the mold with oil and fill it with dough. Bake in an evenly preheated oven for 30-35 minutes.
Since the biscuit requires gradual cooling, you should not take it out right away. All you have to do is open the door a crack and leave him inside.
Place the finished biscuit on a flat dish. You can serve it as a cupcake or cake. You can lubricate it with any cream or jam. I hope that this quick method will suit you, especially if you don’t have a lot of time.
Bon appetit, have a nice day!
Sponge cake with sour cream
As it turns out, such a dessert can even be baked with sour cream. It is very tasty, soft, airy. Suitable for the role of a cake, soaked in cream.
Ingredients:
- Flour - 2 cups
- Eggs - 6 pcs
- Sugar - 1 glass
- Sour cream - 1 glass
- Soda - 0.5 tsp. Spoons
- Butter (for greasing the mold) - 20 g
Preparation:
Turn on the oven for good, even heating
Separate the yolks from the whites and pour them into a bowl. Add sugar to them. Beat until a good white foam is achieved.
After this, add sour cream, mix from bottom to top. Add well sifted flour and soda. Mix everything carefully so that the mass does not fall in volume.
Soda can be pre-quenched with sour cream.
In a separate bowl, beat the egg whites until stiff. After this, transfer 1/3 of it into the dough. Mix gently using a spoon. Add the remaining protein foam. Connect it to the dough using up and down movements.
Grease the mold with vegetable oil and fill it with dough. Send to bake for about 40 - 45 minutes, at a temperature of 170 - 180 degrees. Do not open the door. Otherwise the biscuit will fall off.
Determine readiness with a wooden stick by sticking it into the very center. Remove the crust to a plate. Cut it into 2 - 3 pieces. Spread with cream and the dessert is ready.
Enjoy your tea and sunny day!
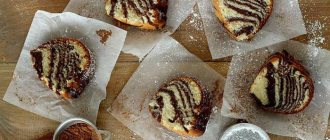
Chocolate sponge cake in boiling water
Chocolate sponge cake
Cakes baked according to this recipe will be an excellent basis for a homemade cake. They turn out fluffy, slightly moist, rich in taste, and go well with butter or custard.
Ingredients:
- 2.5 cups premium wheat flour;
- 2.5 cups sugar;
- 1 glass of milk;
- 2 eggs;
- 0.5 cups odorless vegetable oil;
- 6 tbsp. l. cocoa powder;
- 1 glass of boiling water;
- 1 tsp. baking powder.
In a deep bowl, mix the dry ingredients: sifted flour, sugar, baking powder, cocoa powder. In a separate container, beat the eggs, pour them into the dry mixture, add milk and vegetable oil. Mix everything until smooth with a spoon, wooden spatula or whisk. The mass should be smooth, homogeneous, with a consistency reminiscent of thick chocolate.
Bring water to a boil and immediately pour it into the dough. Grease the mold with butter, place the chocolate mixture in it, and place in the oven, preheated to 180 degrees. You can bake 1 sponge cake from the resulting mixture or divide it into 3 parts to make cake layers for a future cake.
The cakes are baked for 40-50 minutes; readiness can be checked with a wooden toothpick. If it remains dry, the biscuit is ready. All that remains is to carefully remove it from the mold and cool on a wire rack. If you plan to soak the cake in syrup or layer it with cream, put the finished cakes in the refrigerator, wrapped in film. You need to keep the workpieces in the cold for at least 3 hours, and preferably all night.
Biscuit with starch
A very tasty, tender and aromatic dessert is obtained using this cooking method. The lemon flavor gives it extra charm. The pastries are perfect for serving without using cream. Because it has a beautiful yellow tint from citrus. However, the main feature is that no flour is added. Replaces it with starch.
Ingredients:
- Eggs – 5 pcs
- Sugar – 1 tbsp
- Starch – 10 tbsp. l
- Baking powder – 1 – 1.5 tsp
- Lemon (zest) – 1 pc.
Preparation:
Rinse the lemon thoroughly and wipe with a towel. Grate the zest from it on a fine grater
Separate the yolks from the whites and pour them into a cup. Add sugar to them (setting aside 3 tablespoons from the norm for proteins) and zest. Beat everything well with a blender until foam forms.
Add starch while keeping the blender running.
In another bowl, beat the egg whites with the reserved sugar until stiff peaks form.
Gradually transfer the whipped foam into the dough, mixing from top to bottom.
Grease the mold with a small amount of oil. Pour the raw mass into it. Bake for about 40 - 45 minutes at 180 degrees. The dough should increase noticeably in volume, achieving a beautiful blush.
Remove the mold from the finished sponge cake. If desired, it can be decorated as a cake or simply served with a piece of cupcake. In addition, you can add condensed milk.
The taste of the dessert is more intense if washed down with aromatic freshly brewed tea.
Enjoy your tea and good mood!
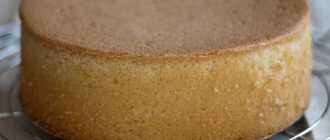
Classic sponge cake
Classic sponge cake - a recipe that guarantees 100% excellent results! The sponge cake is tall, fluffy and always turns out great! A detailed description of the process and subtleties! Lots of photos!
The recipe for this sponge cake is already on the blog, you can find it in the article about the ombre cake, only there it is with the addition of dye, which, however, in no way affects the technology of its production. However, since this is a classic in its purest form, it would be unfair to ignore this wonderful biscuit and not dedicate a separate post to it. I'm getting better, overall!
So, classic sponge cake! Properly cooked, it is fluffy, airy, light and very beautiful! Working with him is a pleasure, I adore him and am very happy when I get the opportunity to bake another cake with him. This biscuit has only one... feature, I wouldn’t call it a minus, because everything can be turned to your advantage. He's a bit dry. But this can be corrected by impregnation, the amount of which can be adjusted at your discretion. But the taste of this impregnation will be transferred to the cakes, which is very good: you can play with flavor shades this way and that, depending on what filling you make the cake with.
There are a few secrets you need to know and a few rules that you need to strictly follow to ensure that your sponge cake turns out just the way it should. I will tell you everything I know) All my tricks, life hacks, observations that I have at the moment. Let's say our firm “No!” biscuits that look like soles! From now on - only pomp, airiness and lightness - “perfection itself”!
I will make a sponge cake for 4 eggs in a 16 cm mold. Using the same amount of ingredients, you can prepare it in a mold 18 cm or wider, but then it will turn out lower. The larger the diameter, the lower the biscuit. Or increase the amount of ingredients proportionally) Remember, we have a calculator on our website for this purpose, where the “Ingredients” button is) Everything is for you!
And you can order all the necessary ingredients at Instamart, they deliver the freshest products from supermarket shelves, the first delivery is free!
Go!
First you need to separate the yolks from the whites. I have often heard, they say, take eggs at room temperature. Supposedly they whip up better this way. Someone, on the contrary, writes: take cold ones! But, to be honest, I never bother with this myself. I don’t take eggs out of the refrigerator in advance and don’t intentionally chill them if I just brought them from the store. Whatever is available, that’s what I take. I have never noticed that this somehow affected the quality of the biscuit. Although I won’t argue, if, for example, in a course you were told to cool or heat, cool and heat)
But what you definitely need to do is separate the yolks from the whites carefully so that not a drop of yolk gets into the whites! And also use a clean, dry bowl for proteins, without any residual fat or droplets of water. Now, if water or fat gets into the whites, then they may easily not be whipped properly.
So, we separated everything and put it in different bowls, quite large so that it would be convenient for us to whisk.
Add 50 g of sugar and 10 g of vanilla sugar to 4 yolks.
Beat with a mixer at high speed until fluffy. You will get a light creamy mass.
Don't be lazy, beat well. The quality of our biscuit depends on this. If you have a powerful mixer, such as a planetary one, you will, of course, need less time, and the sponge cake will turn out fluffier and taller. But I don’t have a planetary set, I have a regular manual Bosch 450W, and the biscuit still turns out great, although it could probably be better)
We set the bowl aside.
The mixer whisks need to be washed and wiped dry. Remember: no fat and water!
Take a bowl of squirrels. Lightly beat them until foamy. Attention: life hack! To make the whites whip better, you can add a pinch of salt or citric acid to them. Or even wipe down a dry mixing bowl with a slice of fresh lemon.
Add 60 g of sugar.
And beat until the mass becomes thick and glossy.
But here it is very important not to interrupt! If this happens, the mass will become very dense and the dough will not rise in the oven. How do you know when it's time to stop whipping? Tilt the bowl strongly or even turn it over: if the protein mass “sits” firmly in it and doesn’t slide anywhere, then it’s ready! Don’t miss this moment; check periodically while whipping, tilting the bowl every now and then.
Now carefully add the protein mixture to the yolks. We only work with a silicone spatula, it’s very convenient!
In a couple of batches, add all the whites and combine with the yolks. We make so-called folding movements. That is, we pick up the mass with a spatula from below and transfer it to the top. We act carefully so as not to destroy the air structure of our future dough, but quite confidently so as not to delay the entire process.
Separately sift 120 g of flour. And add it to the dough in several batches.
In the same way, using folding movements, combine the flour with the egg-sugar mass. We try to work quickly, but mix thoroughly so that there are no dry “islands” of flour left in the dough.
The dough is ready!
We put it in the form. Well, as a form... Not the one that most people imagine.
I recommend everyone to bake any biscuits in a ring! There are special steel rings for baking and assembling cakes, look for them in hardware or confectionery stores, fortunately there are a lot of them now. They have no bottom, come with a fixed diameter, or are sliding. They also differ in height, in general, to suit every taste and budget. Buy one for yourself, you won’t regret it, I’m telling you for sure! In rings, biscuits always turn out smoother and higher than in conventional split or monolithic forms. For the rings, you don’t need to make a French shirt, greasing the walls with butter and sprinkling with flour, or line the sides with parchment. To be honest, I don’t grease it even in regular molds: the dough clings to the untreated walls and rises better, and taking out the biscuit is always easy: run a knife between the walls of the mold and the sides of the biscuit, and voila!
Don't be afraid that the rings have no bottom. For a classic sponge cake (like many others, most in my practice) this is not a hindrance at all: the dough is quite thick. And if you need to bake something liquid, just wrap the outside of the pan with foil, press it tightly, and everything will be fine. It will set in the oven faster than it can leak out. I’m also telling you this from experience. If you want clarity, look at my articles in the “Cakes” or “Master Classes” sections.
So, put it in a ring, which we first place on a flat, heat-resistant surface (baking tray) covered with baking parchment, and level it as thoroughly as possible. This dough will not spread or even out in the oven; as you do now, it will be baked that way.
Place the dough in an oven preheated to 180-200 degrees for 40 to 60 minutes (the exact temperature and time depend on the characteristics of your oven!). Do not open the oven, otherwise the biscuit will fall off! If you really can’t stand it, you can open it slightly after about 20 minutes. I bake at 180 degrees for about an hour on a medium level, without convection, and I always put a heat-resistant container with water down, otherwise the bottom will burn. You need to make friends with your oven, find an approach to it. If the biscuit rises in a mound and cracks, it means the temperature is too high, next time make it lower. If the bottom is on fire, a container with water at the bottom will help you; if the top is on fire, place foil on top of the ring. But if the temperature is too low, the sponge cake may not rise at all, be dense, sticky, etc. If the sides of the sponge cake go in waves, most likely you greased the walls of the mold with oil: the dough was uncomfortable, there was nothing to grab onto, it was climbing, as best I could, but here... (If the biscuit falls off, either you disobeyed me and opened the oven earlier than expected, or you didn’t bake it enough.
Check the readiness of the biscuit with a skewer. Inserted into the middle, it should come out dry.
Or with your hands. Lightly press into the middle. If it springs back, returning to its previous shape, it means it’s baked!
And also - the smell!))) You will learn to understand that the biscuit is ready by its divine aroma! But this will come with experience.
In general, here it is!)
You can see the top is a little cracked. But these are minor things: having taken it out of the ring (by the way, look, who was afraid, how clean the bottom is, nothing leaked out), I turn the biscuit over onto a wire rack, it will rest overnight (as it should be), and the top will become smoother. In general, you can cut it thinly, this is not a problem at all.
Let it cool a little.
Next, carefully pass the knife between the walls of the ring and the sides of the biscuit.
Remove the ring and turn the cake over onto a wire rack. Carefully! Just baked, it is very tender.
Do you see how smooth and beautiful it is?
Now he needs to give it a rest. This will take 8-12 hours. To prevent it from drying out, wrap it in cling film and leave it on the table or put it in the refrigerator (optional). After this time, working with the biscuit will be much easier, it will be more docile, springy, not so brittle and will not turn into porridge when soaked. It will be more convenient to cut it into cakes. I always try to let the biscuit rest. However, I know that in emergency situations this rule is not followed, and the cakes still turn out)
Here. It seems like she told me everything. I’ll show you the cut in the cake assembly workshop. Coming soon)
Another myth: sometimes they say that while the biscuit is in the oven, you shouldn’t stomp, create a draft, drop something on the floor, talk loudly, scream... Well, I don’t know who it is) I didn’t notice such a connection. However, you still shouldn’t slam the oven door into which you just placed a ring of biscuit dough! Just in case)
If you have questions, ask!
Happy adventures in the kitchen!
P.S. Excuse me, what kind of radish gives bad grades?) Come on, show your face, Gyulchatay! Let me know in the comments) What's wrong with this MK? What do not you like? Was I in vain trying all day today? Let's make up for the omission through joint efforts if you know more and better.
By the way. I wanted to say that by replacing part of the flour with unsweetened cocoa powder (20-30 g, to your taste), you will get a classic chocolate sponge cake. So that!
Curd biscuit
This recipe includes cottage cheese. It gives the delicacy tenderness and improves taste.
Ingredients:
- Chicken egg - 3 pcs
- Sugar - 200 g
- Margarine - 100 g
- Slaked soda with vinegar - 1/3 tsp
- Cottage cheese – 175 g
- Flour - look at the thickness of the dough
Preparation:
Rinse the eggs with water and wipe. Separate into whites and yolks
Pour sugar into the container with the yolks, beat until foam forms.
Melt margarine in a saucepan over heat. Then cool slightly, then pour into the main mass in a thin stream. Stir it constantly
Mash the cottage cheese with a fork or immersion blender. Then he will be more gentle. Transfer it to the egg mixture.
Quench the soda with sour cream or vinegar and place in a bowl. Gradually add sifted flour and mix everything until smooth.
In a separate clean bowl, beat the egg whites well, then carefully fold them into the dough.
Grease the mold with vegetable oil. Pour the entire mixture into it. Preheat the oven to 180 degrees. Send to bake for 40 minutes.
The sponge cake according to this recipe can be baked in a slow cooker. “Baking” mode, time 50 minutes.
When it is covered with a beautiful blush, check it for readiness. Transfer the finished dessert from the mold to a beautiful tray. If desired, you can decorate it and soak it in cream.
Bon appetit and good mood!
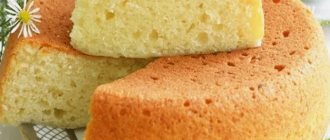
Vanilla sponge cake with starch
Vanilla sponge cake
Those who love light, low-fat desserts will surely love the airy and crumbly sponge cake. It gets its original consistency from potato starch, which replaces half the flour. The finished dessert can be sprinkled with powdered sugar, decorated with fresh berries or lightly fried nuts.
Ingredients:
- 100 g of premium wheat flour;
- 140 g sugar;
- 4 large eggs;
- 100 potato starch;
- 80 g butter;
- 2 tsp. baking powder;
- 1 tsp. vanilla sugar.
Beat eggs with regular and vanilla sugar into a fluffy, homogeneous mass. Melt the butter and cool slightly. Pour sifted flour mixed with starch into a container with eggs. Gently mix with a silicone or wooden spatula, moving it from bottom to top so that the mass does not fall off. Pour in the melted butter, stir again.
Grease the mold with butter and dust with flour. Pour the dough, place the container on the middle level of the oven, heated to 180 degrees. Cook for 35-40 minutes, check readiness with a wooden skewer. If the top of the sponge cake is browned but the bottom seems raw, move the pan to the lower level and bake for another 5 minutes.
Take out the finished biscuit and let it cool right in the mold. After 10 minutes, carefully remove the product, after running a wide knife along the walls of the mold. When the pastry has cooled completely, transfer it to a beautiful dish, sprinkle with powdered sugar and serve with tea.
Custard sponge cake with butter
This time I will describe to you a recipe for sponge cake made from choux pastry with the addition of butter. The recipe is quite simple, not complicated. Doesn't require a lot of time.
Ingredients:
- Chicken egg - 4 pcs
- Sugar - 230 g
- Flour - 230 g
- Butter – 80g
- Milk – 160 g
- Soda - 1/4 tsp.
Preparation:
In a bowl, combine eggs with sugar. Beat them into a good foam
Bring milk with layers of butter to a boil. It should completely dissolve
Add the flour one by one and add the milk and butter mixture. Stir constantly and add baking soda.
For baking, use a mold with a diameter of 22 - 24 cm. Grease the inside of it. Fill with dough. Preheat the oven to 180 degrees. The required baking time is about 50 – 60 minutes.
Cool the finished biscuit thoroughly, cut it crosswise into 2–3 pieces, and brush with cream. Let it brew and you can treat your guests.
Enjoy your tea!
Lemon sponge cake in a frying pan
Lemon sponge cake
Lack of an oven is not a reason to give up homemade baking. The tender biscuits can be prepared on the stove using a suitable sized frying pan. This makes it convenient to prepare thin cake layers for multi-layer cakes or the base for homemade rolls. Lemon puree can be replaced with orange puree, and baked goods will acquire new flavor nuances.
Ingredients:
- 4 eggs;
- 1 cup wheat flour;
- 8 tbsp. l. Sahara;
- 0.5 medium sized lemon.
Wash the lemon with a brush and pass through a food processor, turning it into a puree. Separate the whites from the yolks and beat with a whisk into a fluffy foam. Grind the yolks with sugar in a separate bowl. When the mass becomes homogeneous and the sugar crystals are completely dissolved, alternately add sifted flour and whites to the yolk mass.
Mix the mixture carefully, from bottom to top. Finally, add lemon puree and mix everything again. Grease a frying pan with high sides with oil and line it with baking paper. Pour the dough, cover the frying pan with a lid, and place on the stove preheated to 170 degrees. Bake for about half an hour, open the lid no earlier than after 20 minutes.
Place the finished biscuit on a wire rack and cool. If you need to make a multi-layer cake, you need to bake several cake layers. After 7 hours, the completely cooled sponge cake can be soaked in syrup and greased with butter or custard.
Kefir biscuit
The biscuit turns out incredibly tasty, rich, airy and light. This option is often used for sales. Because its taste never gets boring. On the contrary, it becomes more popular every year. Below is a description of the preparation for two standards, so the amount of ingredients indicated in the list does not correspond to the amount in the photo.
Ingredients:
- Egg - 1 - 2 pcs
- Kefir - 1 faceted glass (volume 250 g)
- Granulated sugar - 1 cup
- Flour - 1.5 cups
- Baking powder - 0.5 tsp.
- Baking soda (no need to extinguish) - 0.5 tsp.
- A pinch of salt, vanillin
Preparation:
In order for your sponge cake to be a success, all the necessary ingredients must be warm.
Break the eggs into a bowl and start beating them using a mixer. You should get a light, airy consistency, as in the photo. The mass should increase in volume.
Add sugar 1 tablespoon at a time, without stopping whisking. Add vanilla and salt here.
Sift the flour several times. Slowly pour it into the mixture, continuing to beat. Add baking powder and baking soda.
Do not continue to beat the dough at maximum speed and power of the mixer, as all the flour will scatter to the sides.
Pour warm kefir into the main mass, mix with a whisk.
If you heated kefir on the stove, be sure to pay attention to its temperature. If it is hot, the eggs may curdle.
The dough should be completely homogeneous, without a single lump. The consistency is not particularly liquid, but it tends to flow in a thick stream.
The main feature of this test is that when kefir interacts with soda and baking powder, many bubbles are formed that are filled with air. They provide airiness to the dessert.
To ensure a good rise, the walls of the mold must not only be greased with butter, but also sprinkled with flour. This will prevent the dough from slipping.
Fill the mold with the required amount of biscuit mixture. Place in a preheated oven at 180 degrees for about 30 - 40 minutes.
After 25 minutes, you can start checking the cake for doneness. Using your fingertips, press lightly into the very center. If it is ready, a spring effect will occur. If it's damp, dents will remain.
If the cake itself begins to move away from the walls of the mold, then this is another sign of its readiness.
Remove the finished dessert from the oven and remove from the mold. Sprinkle it with powdered sugar immediately while it is hot. It is better to cool it on a wire rack, as it may become damp.
The resulting height allows you to cut the cake into two parts and grease them with your favorite cream. Thus form the cake.
I hope you will be delighted. You will be able to proudly surprise and delight your loved ones. Especially serving the delicacy on the table with delicious, aromatic tea.
Enjoy your tea and enjoy your meal!
How to make chocolate sponge cake at home
Have you noticed that many chocolate cakes are based on fluffy layers? In fact, cocoa powder is simply added to the usual three-ingredient dough and the light, airy sponge cake turns into a soft brown dessert with a subtle aromatic note of chocolate.
Children simply adore this delicacy, especially if instead of cream you add Nutella or a thick layer of chocolate glaze.
We will need:
- Fresh chicken egg – 4 pcs.
- Granulated sugar – 180 gr.
- Flour – 100 gr.
- Cocoa – 30 gr.
- Butter - for greasing the pan.
Preparation:
1. Sift the flour thoroughly so that there are no lumps. Then combine it with cocoa powder. Mix well to form a smooth, pourable mixture with a hint of dark chocolate.
2. Wash and dry fresh chicken eggs. They must be warm, like the air temperature in the kitchen, so it is advisable that after being in the refrigerator they remain on the table for about an hour and a half and warm up well.
Break them into a bowl and remove the shells. Start whisking the liquid contents using a mixer, first at low speed, and then gradually increasing at high speed.
3. After a thick foam appears, add 1/3 of the granulated sugar and stir with a kitchen appliance for about two more minutes. Then repeat this procedure with another two-thirds of the remaining sugar.
The result should be a homogeneous, fairly stable mass, which will increase exactly three times relative to the original volume. When falling from a spoon, a mass of this consistency should perfectly retain its shape.
4. In order not to lose the airy state of the dough, add flour and cocoa one tablespoon at a time and immediately carefully turn it over with a spatula, lifting the mixture from the bottom to the center of the cup. As soon as you get a homogeneous beautiful mixture without lumps, the dough is ready.
5. You can take a silicone baking dish. If one is not present in the kitchen, then any heat-resistant cookware will easily do. Be sure to grease the inside with butter and lightly dust it with flour. Transfer the chocolate tender dough into the prepared container and place it on the middle shelf of the oven, which has already been preheated to 180 degrees.
After 35 minutes you can check the readiness of the product. Then let it cool slightly right in the container in which it was baked. Run a knife near the sides so that if the baked goods are stuck somewhere, loosen them.
6. Carefully remove the baking dish to release the finished treat. Leave it to cool completely on a wire rack so that the bottom does not sweat and the tall cake retains its correct shape.
Then you can let it rest and use it for its intended purpose for your culinary purposes.
Biscuit with hot milk
This sponge cake is attractive because it tastes very good, much juicier than the classic one. Perfect for shaping into a cake. However, it is wonderful as an independent treat for tea; you just need to sprinkle it with powdered sugar. In addition, you can use jam, jam, condensed milk.
Ingredients:
- Milk (any fat content) - 120 g
- Butter - 60 g
- Flour - 160 g
- Baking powder - 5 g
- Granulated sugar - 160 g
- Eggs (s1) - 3 pcs
- Vanilla extract - 1 tsp. (can be replaced with vanilla sugar 10 g)
- Salt - a pinch
Preparation:
The products included in the biscuit must be at room temperature. The only exception is milk, since it will need to be heated during cooking.
Break the eggs into a cup. Start whisking until foam forms. Increase the mixer speed gradually. First, a light foam appears, then the egg mass becomes significantly lighter.
Add sugar in a thin stream while continuing to beat.
The peculiarity of this recipe is that it does not require separation and separate beating of whites and yolks.
After 8-10 minutes of beating, the egg-sugar mixture becomes a stable foam. It retains clear traces of the mixer. We continue to beat further.
To increase the aroma, add vanilla extract. Or you can replace it with one packet of powdered vanillin.
In order for the cake to rise evenly, without puffy hills, the powdered ingredients must be mixed in a separate, dry bowl. Due to the uniform distribution of soda and baking powder throughout the entire mass, the biscuit turns out smooth
Gradually add the dry powder mixture, gently mixing it with the egg mixture, from bottom to top. It is very important to preserve the air bubbles. Therefore, you need to stir very carefully with a spoon, spatula or whisk.
The kneaded dough should retain its airy volume. If this factor disappears, the mass will be dense and the biscuit will be tough.
Pour milk into a saucepan and put on fire. Place the butter into the liquid and wait for it to completely dissolve. In this case, the milk should heat up well, but not boil
Pour the hot liquid into the dough in a thin stream. At the same time, be sure to mix the entire consistency. The dough should spread slightly and become a little thinner than it was.
You can use a mixer on low speed. At the moment, the mass may seem quite liquid to you, but this is the necessary consistency for this cake
Prepare the form. There is no need to lubricate it. Cover the bottom with parchment. Pour out all the dough.
If you process the walls of the mold with butter, do not forget to sprinkle them with a small amount of flour.
Preheat the oven to 170 degrees. Place the cake in it to bake for 30 - 35 minutes, without opening the door for the first 20 minutes.
When the pleasant smell intensifies, you can check the readiness with a wooden stick.
This dessert turns out moderately moist and crumbly. But it can be perfectly used for the base of a cake, cut into at least 3 layers.
If you decide to form a cake, it is advisable to wrap the uncut base with cling film and put it in the refrigerator. Leave there exactly overnight. During this time, it will infuse perfectly, will not crumble so much and will be easy to cut.
This delicacy can be used as an independent dish. Just sprinkle it with powdered sugar and cut it into pieces.
Enjoy your meal and enjoy your tea!
How many minutes to bake a biscuit in the oven at 180
You most likely make biscuit dough according to the recipe of one of the common types.
- Classic - with an established food set, eggs, sugar, flour. Often include starch.
- Buttered - with the addition of butter or vegetable oil.
- Nut (dacquoise) - consists of crushed nuts fifty-fifty with flour.
- Chocolate - cocoa is added to any variety indicated above, and we get chocolate baked goods.
They can be prepared in two ways: by heating the egg mass and cold beating, which will directly indicate the baking time of the sponge cake. Let's sort it out in order.
Cooking time for the first method - with heating
This option, for some reason, is not very popular among housewives; it is rarely used in homemade biscuits, but in industrial production it is considered the main one.
The process of creating it in this way consists of combining granulated sugar with eggs, heating it in a steam bath to forty to forty-five degrees, which melts the fat in the yolks and beats faster. Then add flour and knead the dough.
The baking mode depends on the volume of the biscuit mass and the size of the molds; the smaller its diameter, the lower the temperature, and the longer the cooking time.
From here, in a cake pan, the sponge cake will be baked in 30-40 minutes at 160-180°, on a baking sheet in 10-15 minutes at 180-190°.
You cannot open the oven for the first fifteen minutes, much less shake the pan, this will cause the cake to fall, since the air bubbles in the poorly baked dough will burst, and they are the basis of the airy cake.
Heating technology makes the structure of the products more stable, the cakes remain fluffy for a long time.
How long does it take to bake using the second method - cold (bush)
Here the eggs are separated into white and yolk, and then each is separately beaten with sugar and combined with flour.
Bake immediately, in tall confectionery molds with a diameter of 18-25 centimeters, temperature 160°-180°, time 45-60 minutes.
On a cake sheet, temperature 180°-190°, time 10 minutes.
The conclusion to all that has been said is this:
The baking time for biscuits depends entirely on the size of the molds and the amount of dough poured into them. You should not rely on the cooking time indicated in the recipe; it is better to resort to proven methods of determination that will not deceive, they are described below.
If you have any difficulties in this area of cooking, be sure to watch the video where all the nuances are explained.
Sponge cake without eggs and milk
This option is very convenient because it is often classified as lean. Because it does not contain milk or eggs. In addition, this biscuit is very easy to soak. You can always put it on the table and treat your guests.
Ingredients:
- Sugar - 14 tbsp.
- Baking powder - 250 ml
- Mineral water – 1 glass
- Vegetable oil - 14 tbsp
- Flour (approximately) - 205 cups
Preparation:
Pour sugar, vanillin, baking powder into a bowl. Pour in mineral water (you can use regular water). Stir with a whisk until the powdered ingredients are completely dissolved.
Add vegetable oil by spoonfuls.
Be sure to ensure that the amount of butter and sugar is the same. If you increase one of them in quantity, then you need to add the second product
Add well sifted flour. This will add additional volume to the dough. Mix thoroughly until all clots and lumps disappear
The dough should be thin and thick. Reminds me of waffle batter.
Line the pan with baking paper or simply grease it with a small amount of vegetable oil.
Pour out all the prepared dough. Preheat the oven to 180 degrees. Place the biscuit in it to bake until beautifully golden brown, about 20-30 minutes.
The cake should rise well and brown nicely. After making sure it is ready, pour jelly cream on top. Serve each person in portions with a cup of fresh, delicious tea.
Enjoy your meal!
Meet the chiffon sponge cake
The recipe is considered non-classical due to the set of ingredients. Since the dough contains vegetable oil, you won’t be able to beat a lot of air into it. The problem is solved by doubling the number of whites in relation to the yolks. Soda is not used for chiffon sponge cake, since there is no acid in the dough, and there is nothing to quench the alkali.
Cooking method:
- Beat 5 egg whites with 100 g sugar until soft peaks form.
- Separately, beat 2 yolks with the same amount of sugar and add 1 packet of vanillin. Add ½ cup of vegetable oil and 120 ml of cold water to this mixture.
- In another container, mix 200 g of flour, 8 g of baking powder, and a pinch of salt.
- Combine all three mixtures with slow, measured movements.
- Place in two forms and bake for 30 minutes at 170°C.
The finished cake is tall, dense and elastic, but soft and slightly porous.
Video - recipe for chocolate sponge cake in a slow cooker
Multicookers are now widespread. This recipe is for those who love baking using this technique. It turns out lush, tasty, loose.
Ingredients:
- Chicken eggs – 8 pcs
- Cocoa powder – 45 g
- Flour – 200 g
- Granulated sugar – 320 g
Preparation:
All detailed descriptions are presented below.
Have a great mood and bon appetit!
These are the simple and inexpensive recipes described. Therefore, I am absolutely sure that you will definitely find the one that you will use constantly in the future. Therefore, try and experiment with pleasure. Please yourself and those close to you with such delicious biscuits. After all, if everyone liked the dish or dessert, then the desire to cook again something unusual and new only increases.
I wish you success and easy conquest of all peaks, as well as many pleasant and joyful moments!
Author of the publication
offline 1 year