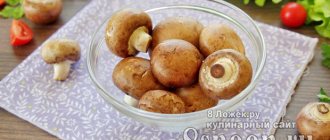
Buy
Buying mushrooms at the market is not a good idea.
The point is that you don't know where they are collected. During the mushroom season, everyone has seen mushroom picking cars parked along suburban highways. They pick mushrooms right in the forest along the road. Can you guarantee that they themselves then eat everything they picked up? Of course not - these mushrooms end up in markets or on portable street trays with grandmothers. But mushrooms accumulate all the dirt that flies from the highways. At the markets, mushrooms are at least checked, albeit selectively. But the laboratory does not test them for where they were collected. So the danger of accumulation of toxic substances remains.
Questions and Answers How to dry chanterelles?
Chanterelles. These are the safest mushrooms to buy second hand. They also retain freshness longer, they are not eaten by worms, and besides, chanterelles have a rather dense structure, not porous, so they absorb less toxic substances from the air.
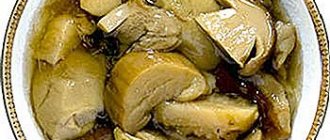
Shop. Many stores check their products. Therefore, buying mushrooms at the store is probably the safest option. But fresh forest mushrooms are not sold there. But you can buy salted and pickled ones. Just follow the storage conditions, especially for salted mushrooms, since bacteria that cause botulism can multiply under the lids of jars with salted honey mushrooms. But in an acidic environment, in pickled mushrooms, they cannot reproduce, so it’s safer to buy pickled ones.
Along the road. On the way to the dacha or to work, we often see grandmothers, and not only them, selling mushrooms they have collected with their own hands. Perhaps these mushrooms were collected in an ecologically clean place. They just sell them next to car exhaust fumes, and the mushrooms continue to absorb carcinogens and absorb heavy metals even after being picked.
With or without crust. How to properly cook mushrooms
More details
How to make kombucha at home from scratch
The most important thing is to choose the right container where the mushroom will begin to grow. It is better to take a three-liter glass jar; in plastic or cellophane, the drink can quickly oxidize. The jar must be washed thoroughly and can be sterilized. Then the fermentation medium is prepared.
- 100 gr. black or 70 gr. green tea pour a liter of boiling water.
- After 5 minutes, strain.
- Pour the tea into a three-liter glass jar.
- Add 50 gr. sugar, stir thoroughly.
Add a tablespoon of apple cider vinegar to the drink. Vinegar is needed to prevent the kombucha from becoming infected with mold fungi, which love a sweet environment for life and growth.
The jar is covered with gauze or cotton cloth, the mushroom needs oxygen, it is not placed in a dark place, but so as not to be exposed to sunlight, the ideal place is an open floor in the kitchen. Open the jar for 6-7 days. By this time the mushroom should have budded.
After 5-7 days, open the gauze; there should be a thin film on the surface of the drink, which indicates that the fungus has successfully emerged. Then a strong smell of vinegar will appear, but there is no need to worry - it once again confirms the successful development of the mushroom body. Moreover, the smell will quickly disappear.
If this didn't happen...
If after 7-10 days, instead of a thin film in the jar and the smell of vinegar, you see pockets of familiar mold and a characteristic smell... the kombucha has died, and a bouquet of pathogenic fungi is developing with might and main in the jar... It didn’t work out to grow kombucha, start again.
If the first two weeks went well, the kombucha has arisen and is developing well, the jar needs to be closed again with gauze and the mushroom left for 1-2 weeks, you can add 200 grams of cold sweet tea to the jar and leave for 1.5-2 months, for this Over time, the mushroom will noticeably increase in size. Then you need to carefully remove it, rinse it with warm water and put it in freshly brewed sweet tea, cover it with gauze and place it in a warm, bright place. After 3-4 days, the medicinal drink will be ready.
An indicator of proper preparation of the drink is that the mushroom is on the surface. If it sank to the bottom of the jar, it means that at some stage an error was made and the mushroom dies. It is unlikely to be revived.
Assemble it yourself
The best option to get mushrooms is to pick them yourself. If you have no experience, you need to approach such an enterprise with careful preparation. Be sure to take a compass, dress smartly, and don’t forget a bottle of water and a box of matches. Read more about mushroom picker equipment here >>>
Before going into the forest, print out color pictures and descriptions of the most common mushrooms. It's hard to confuse:
- white (but there is a false version; when cut, its stem turns pinkish)
- boletus (correct boletus turns blue when cut)
- chanterelles (there is a false version, the cap has a smooth edge, there are nodules on the plates under the cap)
- boletus (there is a false, dark version)
You can collect other mushrooms, of course, if you are confident in their reliability. But keep in mind that if there is the slightest doubt, it is better to leave the mushroom in the forest.
How to find mushroom spots?
More details
If you see that:
- the mushroom has plates under the cap, and you are sure that it is not a chanterelle (a noticeable part of toadstools have just a plate-like structure).
- the mushroom is at least slightly different from what you see in the picture. Yes, it’s better to take pictures of edible mushrooms with you into the forest.
- do not take overgrown mushrooms. Not only are they probably wormy, but they have also managed to absorb a lot of unpleasant things, even if you collect in a relatively clean place.
- Do not take mushrooms that have insects hovering around them. It is better to leave such mushrooms in the forest to feed wild boars and other forest animals. In the end, snails and worms need something to eat.
Article on the topic
If a mushroom suddenly appears... What to do if you are poisoned by forest products? Important! It is best to take an experienced mushroom picker with you into the forest. But if one is not available, at least take printouts of photographs and descriptions of edible mushrooms. And when you return home, look among your neighbors for a person who knows about mushrooms and show him your “catch.” Let him look, and if even the slightest doubt arises about the reliability of the mushroom, throw it away without regret. And an experienced mushroom picker can make a mistake, but here it is better to throw out the good than to leave the bad.
By the way! If you do find a toadstool in the basket, you will have to throw out all the mushrooms; toadstools are so poisonous that they can infect all the mushrooms next to them with poison.
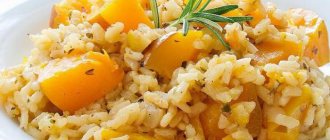
Methods for preparing mushrooms: there is no dispute about tastes
There are a large number of mushroom dishes. Mushrooms are fried, boiled, stewed, baked, salted, pickled, dried, frozen. Caviar is made from mushrooms, they are added to soups, solyanka, porridge and salads. Mushrooms are used to prepare juliennes, sauces, goulash, casseroles and pie fillings. Grilled mushrooms, sandwiches with mushrooms, mushroom cutlets, meatballs, rolls, stuffed mushrooms and mushrooms in batter, mushroom pizza and puree are very tasty.
Mushrooms go well with meat, fish, eggs, vegetables, cheese, sour cream, herbs and spices, emphasizing and complementing the taste of products, making dishes brighter, richer and more aromatic.
What can you cook from fresh mushrooms?
We know that many of you are well versed in preparing fresh mushrooms. Those of you in this category may want to stop reading now if you don't feel like a refresher course on the "fundamentals" is in order.
There are certain rules when it comes to picking mushrooms, but there are only a few additional (but absolute) rules regarding their preparation and consumption. (The emphasis here is on eating them.)
Rule #1: Before you decide to eat a wild mushroom that you have chosen yourself, you must be 100% sure of your identification. 99.9% is not good enough. If you're not entirely sure, you can pick them out, examine them, caress them, or take a bath with them... but don't even think about putting them on your plate - no matter what cooking method you intend to use - unless you're 100% sure. in your identification. A saying we like to use in the mycological community is, “There are old mushroom hunters, and there are brave mushroom hunters, but NO old, bold mushroom hunters!”
Rule #2: If you are really sure or almost sure of your identification, re-read Rule #1.
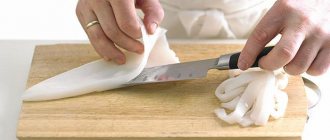
Now that we have a little information, we must conclude that if one or more reliable methods are used, identification is not a problem. Before you begin, you will need a source of clean water, some towels (or paper towels), a knife or maybe two (preferably not serrated), a heat source such as a stove, and suitable kitchen utensils, which will depend on what you cook. Olive oil is generally an excellent choice, although oil works better for some mushrooms. Yes, we hear some of you asking, “Can I use margarine instead?” Well, you can even use mustard if you feel like it, but we can tell you that the taste will most certainly be compromised by margarine. "Alternative" spreads such as Earth Balance work fine, but (for certain applications) nothing beats oil. By the way, unsalted butter is better. (Salt should be added separately). A mushroom brush (widely available at stores that sell cooking supplies) always comes in handy.
Insects
Some people don't care as long as there are no large bugs, spiders or slugs. (They assume they will be cooked anyway.) We can't say because we agree with it. We apologize to those of you who may feel differently, but we don't "make" mistakes. Any errors. Sometimes an insect infestation is very obvious. Sometimes you will have to cut (or break) the lid to see if there are any signs of tunnels or small worms. (This is sometimes visible as small "pinholes" in the flesh.) Some mushrooms (such as morels) can become infected with insects, which will only become apparent after soaking in lightly salted water and observing the insects float to the surface. The stems often show signs of insects while the cap does not show the same fungus, so careful inspection is very important. Where we find signs of insect penetration, we cut and discard that part of the mushroom. You can do as you wish.
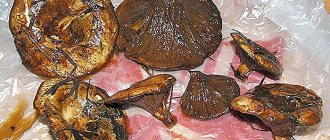
Cleaning mushrooms
We prefer our mushrooms to be very clean before cooking. If cooked well, a little dirt probably won't hurt you, but sand will completely ruin the dish, no matter how tasty it is. Because of their structure and the locations where they are found, some mushrooms are easier to clean than others. Some mushrooms can be cleaned effectively no matter how dirty they are (like lobster mushrooms), while others (like small, delicate chanterelles) are almost impossible to clean (especially if there's a lot of dirt on the gills) without using an absurd amount of time and effort. While it's generally best not to pat mushrooms dry before cooking, sometimes this is the only way to clean them.
If you have a small amount of mushrooms to clean, you can do it standing on your head, but if you have a large amount, you will want to be as comfortable as possible. (Your back will thank you for this!) A high chair or bar stool raised toward the sink will help, as will something to cushion your hands from the edge of the sink. You'll probably find that running water is useful because you'll need it so often that turning it on and off again and again becomes a hassle. In most cases, a mushroom brush will work well, although if dirt gets in, you may have to resort to the tip of a knife. Note that any mushrooms that have been cleaned with water (rather than just wiping them with a damp cloth, if you're lucky enough to find really clean ones) should be well dried before cooking.
Although some people do it differently, we recommend removing the pores on mushrooms (we usually do this in the field) because they may harbor insects. Our experience is that sometimes, if mushrooms have been stored whole in the refrigerator for a day or so, insects will tunnel into the flesh of the mushrooms (even where there was previously no evidence) from the pores when the pores are left intact. The exception is very young, dense pores, which are in (apparently) perfect condition. Old deep pores are spongy and tasteless anyway. They add nothing to the flavor except that they absorb vegetable oil at a rate far greater than that of the densest flesh.
A few mushrooms can be cooked whole with satisfactory results. Generally, the exception to this are smaller, more fragile varieties such as the great cinnabar chanterelle (cantharellus cinnabarinus). Most mushrooms should be sliced evenly (especially when pan-searing or sautéing) or divided into bite-sized pieces, such as wood hen (grifola frondosa).
Once your mushrooms are washed and trimmed to the right size for eating, the easiest way to prepare them is to sauté them.
Saute
Most mushrooms are amazing when you use them in a simple sauté. The time required depends on the consistency of the mushrooms. However, the basic process is the same for everyone. Heat oil over medium heat. You'll know the oil is at the right temperature when a drop of water placed in the pan instantly sizzles. The next step sometimes depends on what kind of mushroom you are cooking. If you plan to use garlic in your sauce, add it with or after other ingredients (like onions or mushrooms) because it burns and burns quickly, which will cause an unpleasant bitter taste.
For young, tender chicken mushrooms, cut into 1/8- to 1/4-inch-thick slices and fry in olive oil for two to three minutes on each side. Remove to paper towel. Sprinkle with salt and lemon juice and just eat them right away! Also good: served with mayonnaise or mayonnaise-mustard mixture. They make a wonderful and totally simple appetizer. If you have too many, they are easy to freeze once cooked and can be used in many different recipes later. (For example, try them instead of chicken in a chicken salad!)
Oyster mushrooms are also great sautéed. Half and half olive oil works great with oysters, but we don't recommend straight oil because the oysters take a long time to cook and the oil can burn. For each pan full of oysters, chop two or three cloves of garlic and a small onion. Heat the oil (3 to 4 tablespoons) until it shimmers, then add the onion, cook until translucent and add about 1/2 tsp. ground cumin and stir. Now you can add the oysters and garlic (and salt to taste, we like about 1/2 teaspoon). Cook, stirring occasionally, until the oysters release their liquid. At this point we like to drain the liquid into a container and then use it for the sauce. (this takes 15-20 minutes). Continue cooking the drained oysters until they are lightly browned, then move the cooked oysters to one side in the pan and add a little more oil (a tablespoon at a time). Reduce heat and add 1 – 2 tablespoons of flour and quickly mix into butter. When the flour is evenly mixed, it will slowly thicken and you will need to return the drained mushroom liquid, stirring constantly. Additional fluid is then required. You can use milk, but it's not necessary, any good vegetable broth will work just fine. Adjust the seasoning and you will have a wonderful oyster mushroom sauce. Adjust the seasoning and you will have a wonderful oyster mushroom sauce.
Morel is also ideal for roasts. We always love morel butter, but vegans can use Earth Balance as a substitute. For the simplest morel dish, halve your clean morels and dust them with a little flour. Although we've often heard people claim that washing morels takes away the flavor, we find them pleasant to the taste, and the slight moisture that remains on them helps the flour cling. The easiest way to clean them is to place flour on a plate and dip each piece of morel into the flour, turn over and shake. You just want to dust it with flour, not a thick layer. (Morels also taste great with a variety of thick coatings - but that's another lesson!) Half olive oil and half butter works very well, use about 4 tablespoons per pan of morels. When the oil is hot and water starts dripping, add the morels. Watch them carefully and flip them once the first side is browned (less than five minutes). Fry the other side and remove them to a paper towel. Sprinkle with salt to taste and a squeeze of fresh lemon juice, and eat! They can also be served on toast or added to an omelette. The dusting of flour seems to capture the flavor of the morel.
Chanterelles are equally good. Whether black trumpet, vermilion or golden, chanterelles taste great when quickly fried in butter (or butter substitute) with a clove of minced garlic. Finally, sprinkle with salt and lemon juice. The chanterelles will be done in about five minutes. You don't have to fry them, just cook them until they release their liquid. Stir often and you'll know they're done when they start to smell good and you can't resist anymore!
Shaggy manes are prepared just as quickly and made in a similar manner. We like to cut them crosswise, but they can also be cut lengthwise or crosswise. They're great no matter how you cut them, and if you like eggs, cooked shaggy manes with eggs (and maybe a little cheese, salt and pepper) are a surefire hit any time you have the resources. Please note: shaggy manes do not hold up! They should be prepared the day they are picked and once cooked they can be stored (tightly covered) in the refrigerator for a day or so until needed, but it is best to use them ASAP.
Boletes will take a little longer to fry. The strong flavor holds up well to garlic, garlic and onions or garlic, onions and tomatoes. We found some good bogs one day while out walking with members of our local mushroom club, cleaned and chopped them in the woods, and cooked them with just olive oil on the Coleman stove we brought "just in case." Sprinkled with salt, they were truly excellent. If you want to use onions, first add them to the oil and fry until translucent, then add the garlic and boulettes. Once they are cooked they should be lightly browned around the edges and take 15-20 minutes to fully preheat the pan.