Cleaning the fuel pump is a fairly urgent procedure that must be carried out when the following symptoms appear:
- Difficulty starting the engine with the starter;
- reduction in vehicle acceleration dynamics;
- jerking when pressing the gas pedal sharply;
- floating speed and sluggish engine response;
- the engine stalls in transition modes after pressing the accelerator, etc.
In some cases, when you press the gas, the car practically does not accelerate, overcomes inclines with great difficulty, and does not overtake. There may be several reasons for such a malfunction, but often the problem is localized in the fuel pump area. Next, we will consider issues related to the electric fuel pump, which is installed in the gas tank of injection cars.
When and why you need to change/clean the fuel pump screen
Let's start with the fact that general problems with the fuel system (fuel pump in particular) should be divided into the most common groups:
- the fuel pump mesh and fuel filter are clogged;
- the fuel pump itself has failed;
- injector problems;
Let us add that we should also not exclude the possibility of air leaks, that is, airing of the power system. Another culprit of problems may be the pressure regulator in the fuel rail. In this case, engine malfunctions may be partially similar to some of the symptoms mentioned above. For example, a slight ingress of air into the fuel system results in the engine not starting for a long time after parking.
Let's go back to the fuel pump. Its malfunction means that the performance of the fuel supply system is reduced. If the fuel pump breaks down, then the car becomes unsuitable for normal use. Signs of a fuel pump malfunction are as follows:
- It is impossible to start the engine, the fuel pump does not pump;
- the engine starts, but runs with serious interruptions;
In this case, the service often recommends diagnosing, repairing or replacing the fuel pump. It should also be taken into account that the fuel pump mesh filter may become clogged inside the device. Let us immediately note that it is impossible to accurately answer the question of when to clean the fuel pump stack. Some car enthusiasts clean/replace the fuel pump mesh as needed or as a preventative measure every 50-70 thousand km. mileage, while others are faced with the need to clean the fuel pump grid for the first time at mileages of 150 thousand km or more. and more. Let us add that the operating manual for some models specifically states that it is recommended to replace the fuel pump stack once every 120 thousand km.
It should be added that the loss of dynamics and the appearance of symptoms of a clogged mesh occurs gradually. For this reason, each driver decides to clean the fuel pump himself. On powerful naturally aspirated engines, the gradual deterioration in acceleration is not felt as strongly as compared to highly accelerated engines with a small displacement. For this reason, many owners of large-volume trucks begin to solve the problem after noticeable complications appear. Also, the condition of the pump grid is greatly influenced by the quality of the fuel being filled and a number of other factors and individual operating conditions, which we will talk about a little later.
How to clean the fuel pump yourself
Let's start with the fact that the mesh filter for the fuel pump is a coarse filter and is designed to capture large particles and deposits that are in the fuel and inevitably accumulate in the fuel tank. It turns out that the fuel pump has its own additional fuel filter mesh, which prevents debris from entering the fuel system from the tank parallel to the usual fuel filter. The process of cleaning or replacing the fuel pump mesh is almost similar to the general scheme for replacing the pump itself:
- The fuel pump is installed directly into the gas tank. You can get to the pump from the passenger compartment, as it is located under the rear seat. To gain access to the fuel pump, you need to remove the rear seat cushion or fold down half of the sofa (if possible).
- The fuel pump is usually located on the right and covered with a special plastic cover. The specified cover must be removed.
- Before removing the fuel pump itself, it is necessary to relieve the fuel pressure in the system. To do this, you will need to disconnect the power connector from the fuel pump, and then turn the engine with the starter.
- The next step is to remove the negative terminal from the battery, after which the tubes from the fuel pump are disconnected. These tubes are “supply” and “return”, they are secured with clamps that need to be pressed out.
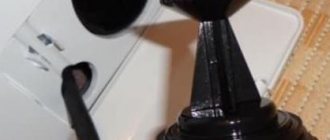
- Next, you need to unscrew the special pressure ring-cover of the fuel pump. It is very difficult to unscrew this cover manually. There is a special fuel pump cover puller for removal. If there is no such puller, then you can try to carefully unscrew the ring using improvised means. We strongly recommend that you first study on specialized auto forums how to remove the fuel pump cap on a specific car model.
- After unscrewing the cap, you can remove the fuel pump. Before complete removal, the remaining gasoline should be drained from its body, and the sealing ring should be removed.
- Now you can begin disassembling the fuel pump housing. To clean, you will need to remove the bottom part. There is often dirt in the indicated lower part of the housing.
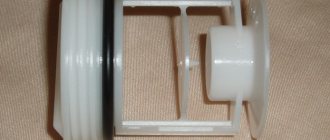
- After this, remove the fuel pump screen. To remove the mesh, just pry out the filter at the place of attachment to the pump body using a regular screwdriver. The fuel pump strainer usually becomes completely clogged, especially on cars with high mileage.
- Then the fuel pump mesh can be replaced with a new one or cleaned. It is better to wash the fuel pump mesh first with carburetor cleaner. Mechanical cleaning is done with a soft brush. Then the mesh should be dried and blown. The bottom of the pump housing and the cleaned mesh are finally washed again with gasoline.
- The final step is to reassemble the fuel pump and install the device in the gas tank. To facilitate installation, it is better to invite an assistant, as it may be necessary to ensure high-quality pressure of the pump to the tank. The fact is that many gasoline pumps have a special spring, the force of which must be overcome. At the same time, you need to make sure that the rubber seal is in place and at the same time screw in the pressure ring-cover of the fuel pump. When tightening the clamping ring with a puller or improvised means, do not exceed the tightening torque. If you tighten it too tightly, the fuel pump cap may burst; if you tighten it too weakly, the fuel pump will wobble due to poor fixation.
In order to determine the correct position of the fuel pump, there are special indicators. Such indicators are made in the form of arrows and are located on the fuel pump, the gas tank body and the pressure ring. The correct installation of the fuel pump can be considered when all the arrows are in the same line. We would like to add that if the gasket is installed incorrectly, gasoline may leak out if you fill the tank full.
Now all that remains is to connect the fuel supply and return pipes to the fuel pump, while simultaneously checking that the clamps are securely fastened. The completion is to connect the electrical power connector to the fuel pump, after which you can start the car for testing.
Cleaning the fuel pump
Material from Nissanoteka.ru.
The fuel pump is located in the fuel tank. The control unit causes the fuel pump to operate for a while after the ignition is turned off, in order to then facilitate starting the engine.
As soon as the control unit receives the corresponding signal from the crankshaft position sensor, the engine rotates and the pump starts working. If this signal does not arrive, the engine stops and the pump stops working, saving battery power and ensuring reliability. The control unit activates the pump via a separate relay. On vehicles with a catalytic converter, a lambda probe is installed in the exhaust tract. It is sensitive to the presence of oxygen in the exhaust gas and changes the composition of the fuel-air mixture accordingly.
On Nissan Almera, the fine fuel filter is combined with the fuel pump and can only be replaced as an assembly (and this is not cheap). Therefore, in order to clean it, you need to:
1. Remove the rear seat cushion.
2. Relieve fuel pressure in the fuel line.
- In order not to look for a fuse, you can simply remove the connectors from the gas tank flange under the seat and, without removing the hoses, start the engine several times.
Tips and tricks
In the case when the gas tank is heavily contaminated, cleaning or replacing the fuel pump mesh will only be a temporary measure, and the rate of subsequent contamination of the mesh will not greatly depend on the quality of the fuel being filled. In such a situation, it is necessary to remove and wash not only the mesh, but also the gas tank.
To keep the fuel pump screen clean, try not to lower the fuel level in the gas tank below ½ unless necessary. Dirt and deposits that clog the mesh are usually located at the very bottom and are the last to be drawn in by the gas pump.
The causes of whistling and increased noise during operation of the fuel pump are overheating of the pump. How to diagnose and fix the problem yourself. Tips and tricks.
Why does the fuel pump grid need to be changed? How to remove the fuel pump yourself to replace the filter. Features of reassembly after replacing the fuel pump mesh.
How to determine why the fuel pump does not pump or works poorly. Fuel rail pressure, pump diagnostics. Wiring, relays, fuel pump fuses.
Why and when you need to flush the engine power system. How to flush the engine fuel system yourself: gasoline and diesel engines.
Mechanical and electric fuel pump, design and principle of operation of the device, types of pumps and main malfunctions, operating features
How to change a fuel pump. Location of the fuel pump, releasing pressure in the system, unscrewing the fuel lines, removing the pump, reassembling.
Qashqai fuel filter for diesel engines
Nissan Qashqai diesel engines – 1.5 K9K, 1.6 R9M, 2.0 M9R. The Qashqai fuel filter for diesel power plants differs in design from the same part of a gasoline engine. External features: a cylindrical metal body with tubes in the upper part. The filter element is located inside the housing. The part is not located in the fuel tank, but under the hood of the crossover on the left side.
In fact, a mesh filter is not installed on the diesel Qashqai. The mesh can be found in the fuel tank. It is located in front of the pump and is designed to combat large particles of debris in the fuel. During assembly, the original filter is installed on the vehicle, which has catalog number 16400JD50A. Among analogues, filters from the German company Knecht/Mahle have proven themselves. The old catalog number is KL 440/18, the new one should now be looked for under the number KL 440/41.
The question of whether to replace with more expensive but original spare parts, or use analogues, is decided by each owner of the Qashqai crossover independently. The manufacturer, of course, recommends installing only original spare parts.
Signs of a clogged filter
By indirect signs you can determine whether it is dirty, but it is not always possible to reliably find out about its condition without visually assessing the mesh.
Signs of a dirty filter:
Based on the signs already stated above, you should begin inspecting the fuel system and be sure to start with coarse and fine filters. You can read how to replace the fine filter here.
Also, if the mesh is very dirty, the fuel pump itself may fail. Therefore, it is not recommended to neglect its replacement.
Replacement process
Before proceeding with the replacement, it is necessary to prepare the tool and the place for disassembling the glass itself. To do this, you need a clean cloth to spread it on a workbench or table and work on it. This is necessary to prevent excess debris from getting into the fuel pump.
Required tool:
- Ratchet or crank;
- Head on “10” or “8”;
- Key to "17";
- Pliers;
- Screwdriver;
Step by step process
- The first step is to relieve the residual pressure in the fuel line. To do this, remove the fuel pump fuse (F3-15A). The fuel pump fuse is located under the center console on the passenger side behind the plastic footwell vent cover.
- We start the car and let it idle until the car stalls.
- Next we proceed to removing the rear seat. On sedan cars, you must press the seat latches on both sides.
- On station wagon and hatchback cars, you need to pull the tongue and lift the seat up.
- Unscrew the two self-tapping screws of the fuel pump glass cover.
- We clean out all the debris and dirt under the lid of the glass. You can use a brush, vacuum cleaner or compressor. This is necessary so that after the fuel pump glass is removed, excess dirt does not get into the tank.
- Remove the fuel pump connector.
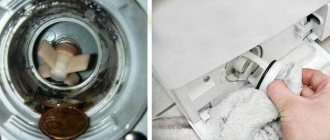
- We unscrew the fuel pipe fittings on cars older than 2003. On cars manufactured after 2003. plastic fitting clamps were installed. In order to remove the plastic clamp, you need to press the buttons as shown in the picture and pull the fitting towards you.
- Next, using a “10” or “8” head (also depends on the year of manufacture of the car), carefully unscrew the 8 nuts securing the fuel pump cup ring.
- We remove the glass, without carefully bending the fuel level sensor, from the tank.
- Next, we proceed directly to disassembling the fuel pump glass on a clean rag.
- We pull out the glass stopper and remove the sump.
- We remove the old fuel pump mesh by prying it up with a screwdriver.
- We install a new mesh and reassemble in the reverse order.
When tightening the fuel pump cup ring, do not apply excessive force, otherwise the pins on the gas tank may come off.
We hope the article was useful to you, then you can watch a video on replacing the fuel pump mesh on a Priora.
Nissan Almera Spitfire › Logbook › Cleaning the fuel pump
So I finally got to the fuel pump...
For cleaning you will need a rag, an empty bag, a can of carburetor cleaner (preferably a large one)
Before cleaning, relieve pressure in the fuel system, in order: - remove the fuel pump fuse (described here) and start the engine; we wait until it stalls; — unscrew the filler cap, hear “pshshh” (or don’t hear