The value of rye bread is many times higher than wheat bread, while its calorie content is much lower. It contains much more vitamins, minerals and amino acids. Rye bread based on sourdough is especially useful. It contains substances that promote weight loss, remove excess cholesterol from blood vessels, strengthen the body and increase immunity. The value of sourdough lies in the fact that every day it gains more strength and only gets better, and baked goods turn out healthier and tastier. In our article we offer a recipe for rye bread in a sourdough bread machine. But first, let's talk about how traditional bread with yeast is prepared.
Rye bread without sourdough: recipe in a bread machine
Traditionally, yeast is used to make bread from wheat or any other flour. Despite the fact that today there is more and more controversy about the dangers of this ingredient for the body, most housewives prefer to stick to just this recipe, mistakenly believing that making sourdough on their own will be quite difficult.
You can make rye bread based on yeast dough (without sourdough) in the following sequence:
- 200 ml of water is poured into the bread machine bowl.
- Next, 260 g of wheat and the same amount of rye flour are sifted. There is no need to mix the ingredients. The bread maker will perform all the steps independently during the dough kneading process.
- Kvass wort (1 ½ tbsp.) is added to the bowl. If you skip this ingredient, the bread will not have the characteristic rye taste.
- Next, sugar, milk powder and refined oil are added to the bread machine (2 tablespoons of each ingredient).
- All that remains is to add salt and yeast (1 ½ tsp), as well as vinegar (1 tsp).
- After this, the bowl with the ingredients is placed in the bread maker and the main program for making bread is selected, lasting 3 hours. It is recommended to use a dark crust color.
Step-by-step preparation of sourdough for rye bread
Among all cereals, rye contains the most complete set of amino acids. Sourdough based on rye flour significantly increases the absorption of vitamins and microelements from this crop. If you make rye bread in a bread machine according to a sourdough recipe, it will turn out much tastier and healthier than traditional bread.
Baking is not difficult at all. But first you need to learn how to make rye sourdough. To do this, you will need only 2 ingredients: rye flour (400 g) and purified water (450 ml). It is also necessary to prepare a clean glass jar in which the fermentation process will take place.
The starter is prepared over five days. At this time, the following steps are performed step by step:
- On day 1, mix 100 g of rye flour and 150 ml of slightly warm water (not higher than 40 ° C) in a glass jar. The jar is covered with gauze or a piece of cotton fabric, after which it is sent to a warm place for a day.
- On day 2 the starter is fed. To do this, after 24 hours, add a little more flour (100 g) and the same amount of water. The jar is covered with a cloth and placed in a warm place.
- On day 3, namely after 24 hours, repeat the steps described in the previous paragraph.
- Similar actions are performed on day 4.
- On day 5, the starter can be considered ready. Now it should be used for baking rye bread.
Sourdough rye bread for beginners. Part 2.
So, if the starter is ready, it smells like alcohol, and the inside is full of holes like a sponge, then this means that you can proceed to the next stage, baking bread! Agree that making sourdough turned out to be not at all difficult, much easier than each of us imagined, so baking bread will not be much more difficult, so let’s move forward. For the first bread, I recommend Darnitsky, it is quite easy to bake, it is tasty, it can easily become a base for further recipes. As a rule, sourdough bread consists of three parts:
- Leaven.
- Opara.
- Dough.
We have dealt with the first point.
The second point, dough, is essentially the same leaven, only in a larger volume. It may vary in moisture content for different recipes and always pay attention to this. There is a term called “baking humidity”, it determines the ratio of water and flour in a recipe; if the ratio of these two ingredients is the same, the humidity is considered 100%. Therefore, if the recipe states, for example, to take a leaven with 100% humidity, this will mean that the leaven should consist of 25 grams of flour and 25 grams of water. This is exactly the kind of starter we made in the first part. Here is the recipe for our dough: Sourdough 100% humidity - 20 grams Peeled rye flour - 180 grams Water at a temperature of about 25 degrees - 180 grams First, I mix the starter with water, shake it well with a spoon to saturate it with oxygen until bubbles appear on the surface, then add flour and knead. You should not put much more starter than in the recipe, more does not mean better, the dough can turn out very sour, so we strictly observe all grams and temperatures.
I knead the dough in the evening, just like the starter, I cover it with a lid and put it in the cabinet. It will stand for about 10-12 hours.
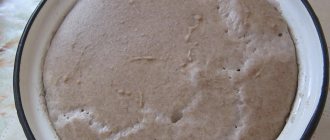
Here is the mixed dough:
And here's what it looks like after 12 hours:
In the morning I make the dough: Dough – 300 grams Water – 250 grams Vegetable oil – 2 tablespoons Wheat flour – 200 grams Rye flour – 130 grams Salt – 7 grams Sugar – 7 grams
To begin with, do everything exactly according to the recipe, later you can experiment with the ingredients, try different wheat flour, whole grain or premium, use molasses or honey instead of sugar, etc., but let the first recipe be basic. Then there are two ways to proof the dough (time for the bread to rise). We'll take a simpler approach. We put all the dough in a greased form, it is better to moisten your hands with plenty of water, since the dough will be very sticky, level it, cover it with film so that the dough does not dry out and send it to a warm place for 4 hours. Let me explain this paragraph in a little more detail. I use an L-7 aluminum rye bread baking pan, before I bought it, I baked in a silicone muffin pan, this is also not a bad option, but such molds are usually small in size, and they are very flexible and in the process the yeast works and the dough increases in volume, the shape creeps to the sides, this will not affect the taste, at least I didn’t notice anything, but the shape of the bread will not be clear. I also baked this bread and simply loafed it, put it in a tray, rounded it, covered it with a plastic container, the bread also spread to the sides, it was not tall, but it turned out well. The only thing I didn’t like was baking on parchment, as I didn’t grease it with oil, the bread always stuck to it due to the high humidity.
The optimal temperature for rising the dough is 30 degrees, I put the form with the dough in the oven, turn on the light in it, and the incandescent light bulb keeps the temperature I need stable, but first, be sure to control your environment with a thermometer so that the temperature does not go higher. Then I wait until the dough rises and there is 3-4 cm left to the top edge of the mold, this takes me 3.5 hours. I take out the mold and turn on the oven at 230 degrees. After 30 minutes, the oven has warmed up well and you can place the mold, but before doing this, you must moisten the dough on top, I do this with a spray bottle. After placing the dough, I reduce the temperature in the oven to 180-200 degrees and leave for 45 minutes. Then everything depends on your oven; the readiness of the bread is determined by the temperature inside the loaf of 98 degrees. Once the bread is baked, the internal temperature has reached 98 degrees, you need to remove the bread from the pan, usually just turn it over and shake it a little, and place the bread on a clean towel. The top of the bread should be moistened with water from a spray bottle and wrapped, this is done so that the crust of the bread does not become wooden after cooling and remains soft. To prevent the bread from getting damp underneath, you need to put it on a wire rack; if there is none, add a couple more towels.
Then the bread needs time to ripen and cool, this takes about 8 hours, but personally, it’s impossible for me to resist, warm fresh crispy crust with butter, what could be tastier….
I once thought that it was impossible to bake Darnitsky bread at home, then when I saw that people were calmly baking it at home, I admired and envied them, now it seems to me that it is no more difficult than making soup, so don’t be afraid, bake delicious bread!!!
I would like to express my deep gratitude to the responsive people of this forum who helped me with advice and their experience, in this article there are many words that I heard from them, thanks to the forum members!
How to store sourdough
Part of the starter, the preparation process of which is described in the previous paragraph, can be used as a starter. It is enough to add the same amount of rye flour and water (150 g each) to create a new starter. Next time, some of it can be set aside, then fed and used to make bread again and again. Thus, rye sourdough can be grown forever. But first you need to find out how to store it properly.
A refrigerator is ideal for this. The finished starter in a glass jar can be stored for up to two weeks. Do not seal the container hermetically. The consistency of the starter should resemble liquid sour cream. Before using it for making bread or feeding, you should remove the jar from the refrigerator at least 1 hour before you start working with it.
How to make “Homemade sourdough bread in the oven”
1. About an hour before the start of the cooking process, you need to remove the starter from the refrigerator and let it stand for about an hour in a warm place.
2. Next, you need to put the starter in a deep bowl, add a little rye flour and pour in water to get the consistency of liquid sour cream. Cover with a clean towel and leave overnight in a warm, draft-free place.
3. In the morning, the recipe for making homemade sourdough bread in the oven moves to the next stage - kneading the dough. Add salt, sugar, vegetable oil to a bowl and gradually add sifted flour.
4. Transfer the dough to the work table, continuing to add flour and knead the dough. Knead it thoroughly for at least 10 minutes. Grease the mold with a little oil, lay out the dough and remove it for about an hour until it rises.
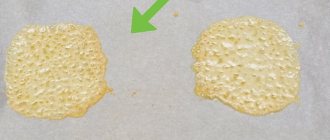
5. Next, you can sprinkle sesame seeds or sunflower seeds on top and place the mold in an oven preheated to 200 degrees for half an hour.
6. Remove the pan and brush the top with melted butter to create a more appetizing crust. Send back and bake until done. That's the whole secret of how to make homemade sourdough bread in the oven.
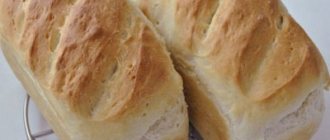
Rye bread in a bread machine
Using pre-prepared sourdough at room temperature, you can make very tasty bread:
- To give the product a characteristic malt taste, kvass (2 tbsp) is used as one of the ingredients. It needs to be poured into hot water, stirred and cooled.
- Pour rye flour (375 g) into the bread machine bowl, add sourdough (375 ml), salt (2 tsp), caraway seeds (1 tsp), sugar (1 tbsp), olive or any other vegetable oil (2 tbsp.).
- Lastly, the soaked kvass is added.
- The dough is kneaded in the “Dough” mode for 1.5 hours. After this, it should be left in the bread maker for the same amount of time.
- When the dough is well prepared, select the bread baking program for 1.5 hours.
- Sourdough rye bread according to the recipe in a bread machine, while hot, is removed from the bowl and wrapped in a towel. You can cut and taste it after it has cooled.
Rice starter
Day 1: 100 g of rice, pour 150 ml of warm water, add 1 tsp. sugar and leave in a cool place for three days.
Day 3: add 3 tbsp. l. with a heap of wheat flour and 1 tsp. Sahara.
Day 4: mix the starter and add 100 ml of warm water and 1 tbsp. l with a heap of flour.
Day 5: strain the starter, add 1 tsp. sugar and 4 tbsp. l. with a heap of flour.
After a few hours you can prepare the dough. Set aside part of the starter for preparing the dough, put the rest of the starter in the refrigerator. This starter is ideal for pies, buns and pancakes.
Step-by-step recipe for sourdough rye bread in a bread machine with malt
Preparing such a homemade product is not difficult. In a bread machine, sourdough rye bread with malt turns out aromatic and tastes like everyone’s favorite Borodinsky. The step-by-step recipe is as follows:
- First, prepare the dough for the dough. To do this, in a deep bowl, rye flour (2 tbsp) is mixed with sourdough (300 ml) and the same amount of water. The dough should stand in a warm place for 3-4 hours for the fermentation process to start.
- At this time, malt (2 tablespoons) is poured with boiling water (50 ml).
- Add honey (1 tbsp), salt (2 tsp), sunflower oil (1 tbsp) and rye flour (1 tbsp) to the suitable dough. The cooled wort is poured out.
- The dough is kneaded by hand, transferred to the bowl of the bread machine and placed in a warm place for 1.5 hours.
- After the specified time, the bowl is installed in the bread maker. The bread cooking mode is selected for 1.5 hours without kneading the dough. The finished product should be cooled thoroughly before cutting into portions.
Sourdough bread in a bread machine
I've been baking in a bread machine all week: I put it on a small table for filming in the kitchen, now it's in the way for everyone, but I don't clean it, let them walk around)) I was interested in the bread machine about six years ago, when I just started baking, then I started using it only for kneading sourdough dough, and then a dough mixer appeared and I put it in the box. I tried to bake sourdough bread in it only occasionally, condescendingly believing that you couldn’t bake good sourdough bread in a bread machine. Considering that 99% of bread machines are designed specifically for quick yeast bread, this is true. The longest cycle, including baking, takes “as much as” 3 hours 40 minutes, and if you consider that baking lasts an hour and kneading takes 18 minutes, then only 2:22 remains for fermentation and proofing. In a good way, this time should be spent simply on fermentation without proofing, but the baking modes for quick yeast bread are not designed for this. Therefore, I tried baking in a bread machine only with sekowa or rye bread, which ferments faster than wheat. But then I got a new bread machine - a German Unold with cool buckets and programming capabilities, and the prospect of baking normal sourdough bread became a reality.
I’ll show you my Unold 68511 BACKMEISTER EXTRA . I got it back in January, but I only decided to try it now.
The case is metal, durable, the lid is made of white plastic, there is a convenient window on the lid to see how the test is going, but there is no backlight. On the right are buttons and a display, as usual with all bread makers.
But the most interesting thing is inside! Buckets! This bread machine comes with very cool buckets with ceramic non-stick coating: one large with two kneading blades (for a large bucket there are two sets of blades), and one double with a kneading blade in each. In a double bucket you can bake two breads with different additives, this is great!
And all sorts of nice little things: a hook to remove stuck blades from the finished bread, a measuring cup and a measuring spoon.
In this bread maker you can bake regular white yeast bread, bread made from whole grain flour, there is a quick baking function for white and wheat-rye bread, cooking jams and baking muffins and pies with soda and baking powder, and there is also the most important and important mode - individual. In general, it contains only 10 programs, including individual ones. With the regimes for yeast bread, everything is clear: specialist technologists have developed a recipe, calculated how much yeast is needed for a certain amount of flour so that the dough has time to rise on time, calculated what the weight and humidity of the dough should be so that the bread is completely baked at a certain temperature and duration baking. And with a programmable mode, you are your own technologist and can only rely on your own experience and knowledge. How much dough should I take? How long should I leave for fermentation? What about proofing? Will he have time to come? Moreover, I want to try different recipes and using different flours. I have determined for myself several important rules regarding baking wheat bread:
Rye bread with sunflower seeds in a Moulinex bread machine
This product will be especially useful for people with disorders of the digestive tract. It is prepared on the basis of rye sourdough, but with the addition of sunflower seeds. As a result, the finished product gets an interesting taste and higher nutritional value.
We suggest baking rye sourdough bread in a Moulinex bread machine. The recipe is:
- First of all, 400 g of starter is added to the bowl.
- As the next ingredient, add sunflower seeds (70 g) and pour in 200 ml of water at a temperature of 40 °C.
- Next, 200 g of rye flour and 250 g of wheat are sifted into the bowl.
- Add salt (2 tsp).
- The bowl is placed in the bread machine and the lid is closed.
- On the control panel, program No. 9 “French bread” is selected. In addition, you need to set the weight of the loaf to -1000 g, and the color of the crust to medium (you can also choose light or dark). Cooking time: 3 hours 24 minutes.
- After the signal, you can learn about the end of the program.
Bread “Darnitsky” in a Redmond bread machine
Using the following recipe you can prepare very tasty and aromatic bread. It is baked in a Redmond bread machine.
Rye bread with Darnitsky sourdough is prepared in the following sequence:
- You need to place the dough immediately. To do this, mix rye flour (240 g), water (150 ml) and sourdough (60 ml) in a deep bowl or saucepan. In a warm place, the dough matures for 14 hours.
- After the specified time, another 180 g of peeled flour and 270 g of grade 1 wheat are added to the dough, 300 ml of water is poured in and 12 g of salt are added.
- The sticky dough is kneaded for 4 minutes. After this, it is transferred to the bowl of the device.
- In the bread machine, the bread rises for 2 hours until it doubles in volume.
- Next, select a bread cooking program for 1 hour and 30 minutes. The color of the crust is chosen at your discretion. The weight of the finished product is 1200 g.
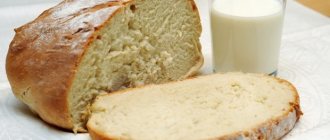
Homemade sourdough bread in the oven
Good day, my dear readers. I just took homemade bread out of the oven. The fragrant smell not only floats around the house, but also floated out the open windows and called my family into the room. Who came running with questions about when you can eat bread and milk.
I have been baking bread myself for more than ten years, and for the last seven years I have been making it with live sourdough from rye flour. My great-grandmother baked it using almost the same recipe. The best baker in our area. Back in the thirties, when harvest festivals were held every autumn, she took part in a competition for the best baker. So her bread turned out so big that she had to dismantle the oven to get it out. And its taste was simply excellent.
Inspired by my great-grandmother’s exploits and adding to this concern for the health of the family (much has already been said about the dangers of industrial yeast), I began to bake bread at home. The most difficult part of this process will be growing the starter. However, having created it once, then you must not forget to feed it. But more about that another time, but now let’s start baking the bread. And we will do it without dough. The weight of the finished product is 1 kg.
To bake sourdough bread without dough, we need the following products:
- sourdough - 10 tbsp;
- flour - 4 tbsp. (230 gr.);
- water - 1.5 tbsp;
- salt - to taste;
- flax seeds - 1 -2 tbsp;
- bran - 2-3 tbsp.
How to bake yeast-free sourdough bread in the oven at home:
1. First of all, let's feed our starter. To do this, pour 100-150 grams of sourdough into the remaining bread from the previous preparation. water and add 1 tbsp. Sahara. Then pour in 3 tbsp. sifted rye flour and mix everything well. Now let’s cover the dish with the starter loosely with a lid with holes or a piece of cotton cloth and leave it to rise in a warm place. Usually, if the starter is good and you haven’t steamed it and the room temperature is about 20 degrees, then it takes 2 hours to rise.
2. Our starter is ready. Let's start preparing the dough. There shouldn't be any difficulties here either. Sift 4 tbsp into a suitable sized container (at least 3 liters). flour. Why sift flour I already wrote here. For the dough I use first or second grade flour. In my opinion, it is more “alive” and the bread turns out much tastier than from premium flour.
3. This item can be excluded if you do not want to supplement the dough with anything else. But my family loves bread with various additives. For all the time that I have been baking bread, I have tried many additives. I made it with sunflower seeds, and with bran, and with onions, and with dill, and with flax seeds, and with cereal flakes. I also added various types of flour - flaxseed, corn, barley and others. Last time I baked with amaranth.
Additives, regardless of type, should not be added too much, because The taste of the bread may turn out to be very strong and you won’t like it. And all these additions are very heavy and the leaven may not rise after kneading.
Our family really likes bread with flax seeds and bran. So we add them to the flour.
4. Now let's deal with the liquid part. To do this, pour the amount of liquid specified in the recipe into a large bowl and add salt. Then measure out 10 tablespoons of starter. Now carefully mix everything until smooth.
5. Pour the liquid into the flour and begin to knead the dough. First knead with a spoon and then with your hands.
As my grandmother said: “Bread loves the warmth of human hands. The more heat you give it, the tastier and better the result.”
Another little secret - when kneading, dip your hand in water, then the dough will be easier to knead and will not stick to your hands as much.
As a result, we should end up with a loose, wet dough. It will take us no more than 5 minutes to knead.
6. Grease a baking dish with vegetable oil and place our future bread there. Cover the top with a cotton towel and place in a warm place to rise. This will also take an hour or two in warm air in the room.
7. When the bread is ready, put it in the oven. I turn on the oven, set the regulator to 170 degrees and put in the bread. The oven heats up along with the bread. I bake it for about an hour and a half. It all depends on the features of your oven and the final result. The longer the bread sits at the temperature indicated above, the denser the crust will be, but it will be light, without a tanned crust.
If you want a tanned bread, then the dough should be baked at a temperature of 200-230 degrees and 40 minutes. The crust will also differ in density.
Affects baking and the addition of oilseeds. Baking with them also turns out golden brown.
8. Take our bun out of the oven, remove it from the mold onto a wooden board and cover with a towel to cool.
If the bread is very toasted, then to soften the crust, you can grease it with water.
Under no circumstances should you eat hot bread. This may have a negative effect on your stomach. Therefore, we pull ourselves together and while the bread is cooling, we simply enjoy its amazing aroma.
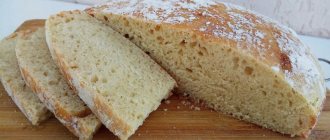
I apologize for the photo. But while the mother was running for the camera, the children had already broken off a piece of bread. In the photo below you can see how it turned out inside.
That’s actually the whole recipe for sourdough bread without industrial yeast, which any housewife can bake at home in the oven. The taste of such baked goods is amazing. Anyone who has ever tried homemade bread, baked according to our grandmothers’ recipes, will no longer eat store-bought bread.
I will be glad to see your comments and questions.
Tatiana